class="eliadunit">
How to copy Windows and in what reliable, proven program. Next, where to store the copy and on what media, so that nothing happens to it. The thing is, our family actively uses the computer, creating accounts with limited rights does not help. From time to time, Windows with all programs has to be reinstalled and configured again, this takes the whole day. I read your article Transferring Windows 7, but, as I understand it, it does not suit me, since I have only one hard drive. I also read your article Acronis True Image Home 2011, but it’s too complicated for me, you have several hard drives and many partitions. Could you give simple instructions, I have only one hard drive and two volumes (C:) and (D:). Dmitriy.
How to copy Windows
In order to create an archive copy of the system, it doesn’t matter whether it’s Windows XP or Windows 7, first of all we need to think about the program we need, I work with all such utilities and I can say that, for example, Acronis is quite suitable. Secondly, we need to think about where we will go copy Windows, there are many options, best of all on a portable USB hard drive, although many create a copy or correctly call a Windows backup on an additional hard drive partition. If the Windows system partition is not large, you can even use DVDs.
There is also another partition (E) with a volume of almost 300 GB and you and I can copy Windows and place our copy of the system on it, it will occupy about 3 GB; in my case, I can even use a DVD or flash drive to store the archive.
You can work in Acronis True Image Home from the operating system or from the boot disk. It’s better to immediately learn how to copy Windows, or in other words, create a backup of the system, as well as deploy a copy of the system in place of the damaged Windows, working from a boot disk or Acronis flash drive. Why? Firstly, it’s not difficult, secondly, you will most likely use a copy of the system when Windows crashes so much that it won’t boot at all, and it’s better to always be prepared for this. In this case, you can immediately boot from the Acronis disk and restore your Windows with all programs in a few minutes, isn’t that great.
So let's create copy of Windows in the Acronis program and place it on disk (F). Creating a system archive in the Windows graphical shell and from a boot disk looks the same. Likewise, unrolling a copy of Windows to replace the damaged one also looks the same, now you’ll see everything for yourself. You can create Acronis bootable media (disk or flash drive) in the program itself, you can read it here. How to boot your computer from a disk or flash drive, also read from us.
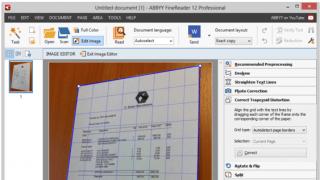
Boot from Acronis media.

Select backup disks.

We see that our disk (C:) has a capacity of 165 GB, designated as (E), put a checkmark on it and click Next.

In this window you need to click Review

and select the hard drive partition where we will create a Windows backup; in our case, we don’t have to make much choice, since the letters are mixed up, so we select (C:), which is actually (E) 300 GB.
For example, we call the archived copy of Windows No. 1


Get started.

An archive copy of Windows is being created.

In a running Windows 7 operating system, it will look like this; the format of a copy of Windows made in Acronis always has an extension. tib.

Make sure that no one accidentally deletes this copy.
Now let's imagine that Windows does not boot for you and none of our articles from the System Restore section helped, then we have only one hope left for an archived copy of Windows 7. The restoration will be carried out in full, that is, everything that is on your disk (C :) will be replaced by the contents of the archive. So if you have important data on disk (C:), you should use any Live CD and copy it to a safe place, otherwise it will be lost.
Boot from Acronis media and select Recovery.

Review

We go for a copy to disk (C:), which is actually (E) and see our archive there. Select it and click OK.
There are times when it is necessary to transfer the operating system to another hard drive. For example, imagine that you have a small hard drive installed on your computer, and you do not have enough memory. And now you have finally bought a new hard drive with more memory and want to install it on your PC. The question arises - how to transfer the operating system to another screw. By following my instructions, you can do this absolutely without problems. So, if you're ready, let's begin!
My computer has two hard drives. One of them is old with 80 GB (disk A), the second is new with 500 GB (disk B). So it turns out that I need to transfer the Windows operating system from hard drive A to drive B. For the transfer, we will use a very convenient and multifunctional program called Acronis Disk Director 11 Home. Finding it will not be difficult on various trackers, as it is very popular.
Well, we installed the program, now turn off the PC. Open the side cover and insert a new hard drive (also called a hard drive or screw). Turn on the computer. You don't have to prepare a new hard drive to copy the operating system. So, let's launch the Acronis program.
IMPORTANT! Before you begin transferring the OS, you need to turn off sleep mode on your computer.
Having launched the program, we observe that another disk has appeared. Now you need move the system from one hard drive to another. Right-click on the disk on which the system is installed to bring up the context menu, where we select Clone basic disk.


In this window, do not forget to check the One to One box. In this mode, the disk will be copied one to one. Click Finish

All we have to do is apply the actions by clicking the checkbox button.

Acronis will ask in a new window, where we click Continue

At this stage, the program will inform you that you need to restart the computer, since all operations to copy the system will be carried out in DOS mode. Before you click OK, check out the pictures below to understand what will happen to your PC after it restarts.

When the computer restarts, do not press anything, because important operations are now being carried out. After the second reboot, look carefully - the following message will appear in the lower left corner

After which the process of copying the Windows operating system will begin.

Here we click OK.
When all the operations are done, we can see that all the information from the old hard drive (including Windows itself) has been transferred to the new one. However, the new hard drive has more memory than the old one, so we will be left with an unallocated empty area. We can correct this.
First, right-click on the disk and in the menu that appears, click Resize Volume

Here we change the size of our disk. To do this, drag the slider to the very end.

Next, we will set the size of the unallocated space in front of the disk itself, since to increase drive C, free space is needed. My C drive was 50 GB, but I decided to increase the system disk to 100 GB. To do this, I need to leave about 50 GB in order to add it to drive C after all operations. Now click OK.

We perform the same operations with system drive C. By the way, I wrote recently.


After the disk sizes have been adjusted to the required volumes, click on the button with the checkbox for our changes to take effect.
No matter what anyone says, carefully setting up a new OS takes an order of magnitude longer than it takes to understand the process of creating its image and then transferring it to another PC.
Windows 7: backup and recovery. Built-in tool in OS (Windows migration)
The easiest way. Windows 7 Transfer. Location of the backup tool in the operating system: “Start | All programs | Service | Archiving and restoration." The menu in the left column is “Create a system repair disk” and “Create a system image”
Creating a system image
You must specify the location where the data will be archived: select another disk partition, external HDD or optical disk (DVD, Blue Ray). There is also the ability to save a backup copy to a network drive. It is not practical to use optical media, so use a logical drive with sufficient storage space or an external HDD to store the backup. Select a location and click the “Archive” button. After completing the archiving procedure, boot onto another computer from the Windows 7 installation disk (or from the ERD Commander 6.5 boot disk, I described how to create such a disk or how to make a bootable USB flash drive with ERD Commander), having previously disconnected it from the old one and connected a USB HDD or any other the media you selected containing the system image. Select system recovery and specify the disk with the Windows 7 image. Now wait for the recovery process to complete and reboot, remembering to set the BIOS to boot from the hard drive.
This tool built into Windows is not without its drawbacks, such as long archive creation times and the lack of a compression function. However, there are other, more functional products.
Cloning an operating system
A bootable copy of your old hard drive can be transferred to a new computer using a backup utility or through virtualization. In this case, Windows and applications will be available immediately, without reinstallation.
You bought a new computer with the Windows 7 operating system, but you don't want to part with the customized Windows XP from your old PC, along with all the applications. Then you need a copy of the system partition, which includes the boot sector, which is necessary to start the OS.

To physically clone the hard drive of an old computer, install Paragon Drive Copy 11 on it - this is a solution for backup, recovery and migration of systems in physical and virtual Windows environments, that is transfer Windows from one computer to another won't be difficult.
Paragon Drive Copy 11 supports all existing technologies Reserve copy. As a result, the user has more than seven ways to create backup copies and a whole range of archive storage options: from CD / DVD / Blu-ray media to FTP servers.
The 11th line has expanded functionality system recovery, which now allows you to return your PC to functionality not only using boot disks based on Linux / DOS and WinPE 2.1, but also by migrating and deploying the system to another hardware platform (P2P) or to any virtual environment (P2V). Paragon Drive Copy 11 works correctly in all popular types of virtual machines, including MS Virtual PC, VMware Workstation and VMware Fusion. There is support for USB 3.0 devices.
Transferring Windows with Paragon Drive Copy
Open the program and call “Backup disk or partition”. Select the partition you want to clone and check the "Change archiving settings" checkbox. In the next dialog box, under “Archive Settings | Compression level”, you must select the “No compression” entry and check that the “Direct access to partition sectors” option is activated in the “Copy Settings” section.
It is more convenient to transfer data using an external HDD, but if you don’t have one, you can use network drives or burn data to Blu-ray discs.
Data archiving. Selecting a location for data recovery: creating a partition
Created in Paragon Drive Copy operating system clone(or system partition) is best saved on an external drive (USB, E-SATA)
Once the copy is created, transfer it to your new computer. If you want to keep the modern OS installed there, create a new partition for Windows XP and integrate it into the Windows boot loader selection menu. To do this, first install the Paragon program on your new computer. Launch and select "Additional archiving operations". Paragon Drive Copy will show the existing partitions on the disk in a new window. If there is an area of sufficient size and not divided into disks, right-click on it and select “Create Partition”. Its volume should not be less than the copied archive from Windows XP. If your new computer only has one large Windows partition, you'll need to shrink it down first. Unfortunately, you won't be able to do this in Paragon. Therefore, use an additional utility for working with partitions, for example Partition Wizard Professional Edition 5.0
When the partition for the copy of Windows XP is ready, click on it in the “Backup & Recovery” program and select “Recover a logical drive from an archive.” Click on “Switch to file view” and select the desired archive. Follow further instructions. Finally, copy the clone to the new system using the Run button.
Now you can start your old computer through the Windows boot loader - Paragon's utility lists it there under the name "Microsoft Windows". It is better to rename it using the EasyBCD program. Click on “Edit Boot Menu” in its interface and select the above entry. The “Rename” function allows you to set a more informative name.
Data archiving. Alternative solution: virtual cloning
Using the Virtualization Operations section of the program, turn your old computer into a virtual machine and run it on your new PC. Select "P2V copy" to create a virtual copy of your computer. In the wizard, be sure to select the "Microsoft Virtual PC" option, even if you are using VirtualBox. Run "P2V OS setup". On a new PC, install the VirtualBox utility and launch the copy by double-clicking the VMC file.
Online storage for PC. Image of your system on the network
If you have a fast Internet connection, it is possible to place a copy of your old computer on online drives. Not only will you transfer your data to a new system, but you will also be able to restore it after a failure.
Laptop users who are concerned about the safety of their data should save it online: if the device and external hard drive are stolen, this will help you restore the system on another computer, but before you put your data in web storage, you need to take care of security.
The most important factor in the successful implementation of the plan is a sufficient amount of free space for a system clone. For small partitions, free online storage of 25 GB is quite suitable .
Learn more about Windows Live Skydrive storage from Microsoft
Using SkyDrive, you can create three different types of folders that are accessible over the Internet (these folders are stored on a server managed by Microsoft):
- personal folders that only their creator has access to;
- shared folders with limited access assigned by their creator to the specific people to whom the files are shared;
- shared folders with unlimited access that anyone can open via the Internet.
After registration, the following options are available:
- Access 25GB of free storage from any internet-connected computer or web-enabled mobile device. You can even drag and drop files directly from your computer to SkyDrive using an additional program. The presence of this application provides convenient uploading and synchronization of files to the server. Some people do not accept the ubiquitous web interface and prefer to use the usual win-shells.
- Free. Today, almost all services of this type are free to one degree or another, only some resort to micropayment services to expand functionality. Nevertheless, in the age of capitalism and the global financial crisis, the absence of any fee for such a service can easily be considered an advantage.
- Own folder structure. Storing any types of files. Ability to link accounts. Direct links to folders.
To create a copy, you can use the Paragon Drive Copy program presented in the previous section. You can repeat the process described above, and also use the proposed compression function for backup archives - this will significantly reduce the upload and download time. You can also clone your old computer using Paragon's Virtualization Operation, creating a virtual copy of the system and then storing it online. The generated image can be downloaded at any time and run in VirtualBox. But before that, it won’t hurt to encrypt the copy using TrueCrypt.
Secure data encryption
Some online storage services offer their own encryption function. I recommend performing this operation on your computer in order to initially exclude the possibility of access to an unprotected clone during the download or immediately after it for particularly cautious users.
After successfully creating a copy of your old computer, install TrueCrypt and the corresponding localization file. Create an encrypted image of the folder or
disk by placing it on a local or external HDD. To do this, launch TrueCrypt and use the “Create Volume” menu item to place the encrypted file container on the selected disk. Choose a medium-strength algorithm, such as Serpent, as too strong encryption will negatively impact upload and download speeds. To place files in a ready-made container, you need to connect the latter as a disk. In the main window of the TrueCrypt interface, select any letter and use the “File” button to navigate to your container. Click "Mount" and enter the password. In Windows Explorer, you will see a new local drive where you can place a clone of your PC. Disconnect from the TrueCrypt program and go to the new computer on which you want to install the system clone. Install TrueCrypt on this PC and connect an external drive with an encrypted container to it. Then connect the file container as above as a new local drive and open it in Windows Explorer. Now you can import the clone.
If you use online storage to host an encrypted container, then in order to prevent it from being constantly loaded by the TrueCrypt program, in the “Settings - Options” section you must check the box “Save modification date in container files”.
Situation No. 1: new computer, identical operating systems
If you replaced your old (previous) PC with a device with a similar OS, data transfer carried out very quickly using the backup protocol created by the Ocster Backup program.
Since standard folders such as “My Documents” are the same in old and new versions of Windows, you only need to select the desired copy in the Ocster utility and use the wizard to restore it. If the computer failure occurred before you created a current backup copy, use the program calendar to access an earlier version of the backup. Be sure to activate the “Use default access permissions” option. Otherwise, the new OS will not have access to the data due to the lack of the necessary rights. In addition, in the wizard you can click on the backup folder and selectively restore files.
Situation #2: new computer, different version of Windows OS
If you change your client PC to a more modern device with the latest version of the OS, you will have to take into account its features. For example, in XP, your profile files are saved in the folder C:\Documents and Settings\username, and in Vista and Windows 7 they are stored in C:\User\username.
For such cases, Ocster Backup offers few settings, so you will have to download the Windows Easy Transfer program (link above). However, it is worth mentioning some limitations. You will not be able to transfer personal data using this utility if the versions of Windows on the old and new computers have different localizations, and there may be problems with transferring data from a 64-bit system to a 32-bit one.
In Windows 7 this program is already built-in. This way, you can seamlessly import all settings to your new computer using the same wizard.
How to transfer Windows to an SSD drive
Special situation: transferring Windows from IDE or SATA to an SSD drive
Conventional hard drives store data on tracks divided into sectors. There is no such breakdown in SSDs. When you install Windows 7 on a solid-state drive, the operating system takes into account the features of flash memory, but when you import a clone of an old computer, the drive will be about half as slow because most backup utilities save the clone according to the old sector logic.
Program for transferring Windows to SSD
Paragon offers the Drive Copy 11 Professional utility, which allows you to correctly transfer a system clone (system image) to a solid-state drive. It's tempting to take advantage of the latest, fastest, and quietest solid-state drives. But the capacities of affordable SSDs are limited, and in most cases, the size of your system partition will be larger than you would like. The option of this program, Migrate OS to SSD, is a unique way to transfer only the files necessary for Windows operation, eliminating everything unnecessary, in order to migrate the system to an SSD or any other smaller drive.
Using a 3TB disk (the system does not see the entire volume of the 3TB HDD)
Having become the owner of a high-capacity hard drive - more than 2.2 TB, you may be faced with the inability of your system to use all the free space (full volume). Reason: The traditional MBR partitioning method does not provide this feature. But Drive Copy 11 Professional will come to the rescue again, which will allow you to transfer the system and use a new 3TB hard drive for the entire volume.
How to copy Windows and in what reliable, proven program. Next, where to store the copy and on what media so that nothing happens to it. The thing is, our family actively uses the computer, creating accounts with limited rights does not help. From time to time, Windows with all programs has to be reinstalled and configured again, this takes the whole day. I read your article, but it is too complicated for me, you have several hard drives and many partitions. Could you give simple instructions, I have only one hard drive and two volumes (C:) and (D:). Dmitriy.
How to copy Windows
Note: Hello friends, after reading this article, I recommend our newest article on the topic of working with the new version of Acronis True Image 13. . And further restoration of Windows 8 from a backup.
Many users are also interested in how they can transfer Windows to another computer using the tools built into the operating system, that is, without resorting to any programs, and in fact there is such a method, it is described in our article "".
In order to create an archive copy of the system, it doesn’t matter: Windows 7 or Windows 8.1, 10, first of all, you need to think about the program we need, I work with all such utilities and I can say that, for example, Acronis is quite suitable. Secondly, we need to think about where we will go copy Windows, there are many options, best of all on a portable USB hard drive, although many create a copy or correctly call a Windows backup on an additional hard drive partition. If the Windows system partition is not large, you can even use DVDs.
There is also another partition (E) with a volume of almost 300 GB and you and I can copy Windows and place our copy of the system on it, it will take up about 3 GB, in my case I can even use a DVD to store the archive or flash drive.
You can work in Acronis True Image Home from the operating system or from the boot disk. It’s better to immediately learn how to copy Windows, or in other words, create a backup of the system, as well as deploy a copy of the system in place of the damaged Windows, working from a boot disk or Acronis flash drive. Why? Firstly, it’s not difficult, secondly, you will most likely use a copy of the system when Windows crashes so much that it won’t boot at all, and it’s better to always be prepared for this. In this case, you can immediately boot from the Acronis disk and restore your Windows with all programs in a few minutes, isn’t that great.
So, create a copy of Windows in Acronis and place it on drive (E). Creating a system archive in the Windows graphical shell and from a boot disk looks the same. Likewise, unrolling a copy of Windows to replace the damaged one also looks the same, now you’ll see everything for yourself. You can create Acronis bootable media (disk or flash drive) in the program itself, you can read it here. How to boot your computer from or, also read from us.
Boot from Acronis media.

Select backup disks.
We see that our disk (C:) has a capacity of 165 GB, designated as (E), put a checkmark on it and click Next.
In this window you need to click Review

and select the hard drive partition where we will create a Windows backup; in our case, we don’t have to make much choice, since the letters are mixed up, so we select (C:), which is actually (E) 300 GB.
For example, we call the archived copy of Windows No. 1

Get started.

An archive copy of Windows is being created.

In a running Windows 7 operating system, it will look like this; the format of a copy of Windows made in Acronis always has the extension .tib.

Make sure that no one accidentally deletes this copy.
Now let's imagine that Windows won't boot for you and none of our articles in this section helped, then we have only one hope: an archived copy of Windows 7. The restoration will be done in full, that is, everything that is on your disk (C:) will be replaced by the contents of the archive. So if you have important data on the drive (C:), you should use any Live CD and copy it to a safe place, otherwise it will be lost.
Boot from Acronis media and select Recovery.
Few Windows 7 users know about such a very useful function as creating a backup copy of the installed operating system. Let's look at what it is and how to make a backup copy of Windows 7 here and now.
What is this function?
This is which, using archiving tools, can create a backup copy of user information and the OS as a whole. There are a lot of benefits from it, since with its help you can make an OS image, thanks to which you can then restore a damaged operating system. This will become a real lifeline in the event that it is not created, and a rollback is impossible. Of course, it is also advisable to make a restore point in case the operating system is damaged, but there are different situations in which a good old rollback will not help. For example, when the system does not start, and the disk on which Windows 7 is recorded is not at hand.
Why not a rollback?
Unlike a rollback (restore function in a different way), which simply returns the system to a previously saved state, a backup saves user settings and the image of Windows 7 as a whole. The benefits of this are enormous. For example, you get the opportunity to restore all user data that was erased during the reinstallation process.
And if the operating system fails, it can always be returned to normal using a backup copy; in addition, drivers, programs and personal data (saves and profiles in games, etc.) will also be restored.
How to backup Windows 7?
Creating a copy of the OS is carried out by a fairly large number of utilities. In addition, Windows 7 has sufficient functionality for this. Before you create a backup of Windows 7, you need to do the following steps.
We go to the “Start” menu, where in “All Programs” we look for the “Maintenance” folder. In it we find and click on the item “Backup and Restore”. There are also a couple of alternative ways to open this function:
- open “Start”, enter “Backup and Restore” in the search line and go when it appears;
- We go to the control panel, where the “Backup and Restore” section immediately catches your eye.

It doesn’t matter which opening method is chosen, the main thing is that the window with this service is open. There you can use three functions:
- configure backup;
- create an OS image;
- create a disk designed to return the system to normal.
Let's start with how to create a backup copy of Windows 7, then we'll look at the other two functions.
Backup
To do this, in the “Backup and Restore” window, click on the “Set up backup” hyperlink highlighted in blue. The archiving settings window appears. At this stage you will have to wait a little. Patience will be rewarded by the appearance of a window called “Archiving Settings”, where you will be offered a choice of where to save the copy. Of course, a reserve can be created on drive D, for example. But if all the data on the hard drive is deleted or damaged, then the backup copy will be of no use. Therefore, it is best to store the backup on an external hard drive. In addition, if you connect an external hard drive, the system will offer nothing more than to backup the Windows 7 system to it. When the choice is made, move on using the "Next" button.

In the next window you need to choose whether to leave the selection of files for Windows archiving or choose what data will be archived (individual files, folders, disks). By the way, this feature can help you on how to backup Windows 7 drivers.
If there is no trust in the operating system, and the decision was made to distribute the data manually, in the window that appears, you must click “Include disk system image: (C)” so that you can restore the faulty system using a backup, and also check the boxes for the necessary data. As usual, click on “Next”. Before making a backup copy of Windows 7, we check that all settings are correct. After that - “Save and run”.
Creating an OS image

This time we click on “Create an image” instead of such a fad as making a backup copy of the Windows 7 disk. In this case, an image is created that includes the disks necessary for normal operation of the OS. We are in the window for choosing where to save the future image. It is best to prefer a portable (that is, external) hard drive, since the image can weigh several tens or even hundreds of gigabytes. Next, you select the disks from which the image will be created. In the next window, we check again the disks that will be in the image, and then click “Archive”.
Creating a recovery disk
This is done in the same place, instead of such an item as making a backup copy of Windows 7, only it is located next to the image creation button. True, this step is not necessary for those who have Windows 7 on disk and who can use it to return the system to normal. For those who do not have such a disk, it is useful to go through this procedure, since in case of serious damage to the OS there will be something to restore it from.
To do this, you will need a blank DVD or CD, since the recovery files will weigh approximately 150 MB. In the “Backup and Restore” window, click the “Create system disk” option. Insert the disc into the drive, select it from the list and click on the “Create disc” button. We wait until the disk creation process comes to an end, after which we remove the disk.

Now this disk can be used if the operating system dies for a long time, and it will be impossible to enter it even from safe mode.