Do you need the largest collection of frames in RuNet? Then you have come to the right place!
There are frames for text design. They are also used for framing paintings, photos and, what is especially interesting for us, electronic Word documents. Agree, dry text done in black and white is not very pleasing to the eye. Of course, if we are talking about business documentation, then you need to adhere to the appropriate style. There's not much to experiment with here. But even here you can create a stylish page frame.
note . At the end of the article, sets of frames available for download are presented to you -.
It's another matter if we create a letter, a children's book, or any other document of an entertaining nature. Here we can safely use our imagination and create a beautiful and vibrant document design, thanks to the use of all kinds of frame variations available in Word.
. Do not forget that the finished document must be designed with the highest possible quality. Don't forget to put numbers for each page (see).If you need to frame a piece of text in any document that is published on your site, you can use HTML tools for this (see).
Adding frames in different versions of the editor
This section is suitable for those who want to understand how to make a frame in Word. The process is quite similar in all editor variants, but there are still slight differences. Let's start with the oldest version.
Frames in Word 2003
Open the document into which you want to insert a border. Next you need to do the following:
Frames in word 2007

Frames in Word 2010
Here the process is similar to that discussed above. Therefore, let's try to expand the editor's standard set a little. There is a large set of frames for Word: pictures, all kinds of lines, and even frames in the form of GOST frames. We invite you to download three sets (see):
- Several interesting pictures for frames
The archives contain a pretty good set of frames. Launch, see which ones suit you, and use them.note. If you need additional information to be provided below the frame in your document, you can add it using footnotes (see)
A short instructional video:
Update. Added a set of patterned frames. Jun 5, 2015
Conclusion
Using frames will allow you to design your document, add the necessary technical fields, and make it more original and readable.
Can be used in any Word document. Thus, you can make the desired orientation for the entire document, or a separate sheet.
Allows you to create convenient navigation within the document. Use them to add a table of contents.
Why look for information on other sites if everything is collected here?
MS Office Word has rich functionality. Not every user knows about the full list of text editor features. Moreover, we often forget about the simplest options, for example, how to insert a frame in Word. This is especially true when editing creative works. This is exactly what we will talk about now.
Making a design in Word 2003 is quite simple:
- select a page by simply clicking on it;
- select a section Format on the top of the toolbar;
- select a sub-item from the list that appears Borders and Shading. A window of the same name will open;
- go to the second tab Page, selecting the necessary parameters for the frame.

You can change the color and line thickness. On the right side, the buttons mark the sides on which the frame will be. In point "Type" You can select line shapes - dotted, double, solid. Paragraph "Drawing" will help you choose a framing option. If you need to move the frame along the edges of the sheet, you should tap on the key "Options" on the lower right side.

How to insert a frame in Word 2007, 2010, 2013
In the 2007 release, the software interface was transformed. Here the algorithm of actions will be like this:
- first, look for the section at the top "Page layout";
- secondly, press "Page Borders".

Starting from version 2013, you will find this button in the section "Design".
The window that opens is similar to previous versions. There are all the necessary parameters: color, type, line width, the ability to choose a design with a duplicate of the picture, as well as the sides on which the frames will be.

We use the picture
You can design a document not only with special templates, but also with images. This will make the design more expressive and interesting. To do this, simply upload the element you like in the desired format.
The larger the size of the object, the better it will appear on print. Then insert the downloaded image onto the sheet. To do this, use the "Insert" menu, the "Picture" item, or you can simply drag the file into the program window.

In the window that opens, go to the "Text wrapping" subsection and select the "behind the text" item. This way, the image will not cover the typed text, but will appear in the background. In addition, it is not tied to the edges of the page; you can move it to the very edge. If it does not fit in size, you can stretch it by the “corners”, they will be active. The dots in the corners change sizes, maintaining proportions, and on the sides they stretch horizontally and vertically.
Frame in Word around individual text
Inserting a design near a specific area is quite simple. The steps are almost the same as those described above:
- go to section "Design";
- tap "Page Borders";
- in the menu that opens, go to the section "Border";

- press the button "Frame", "OK".
If you want to frame another paragraph, simply select it before following the instructions above.
Do not forget that you can change the type, size, appearance, design, location of the frame, it all depends on your wishes. The principle of installing this element is the same for all editions of Word, the only difference is in the arrangement of the elements. If you wish, you can easily cope with this; to do this, you just need to follow the instructions described above.
Now you know how to insert a frame in Word. In the article you will find options for all versions of the editor. Good luck!
Formatting text in a Microsoft Word document may require setting borders. This element is used to frame both paragraphs and pages. At the same time, the capabilities of Microsoft Word version 2016 allow you to set borders on all paragraphs and sheets of the document or only on specified objects. Let's find out which menu blocks need to be used to insert a frame in Word, remove it, or install it only on certain text elements.
Setting a frame on a paragraph in the text
To set a frame on a specific part of the text, you must first select it with the cursor. Then:
Confirm changes. To remove the outline of a paragraph, you need to do the same steps, only in the “Type” block select the icon with the word “No”.

If in the same menu with a selected text area in the item " Apply to» to set the text, then the border will be placed on all lines of the paragraph.

After completing the operation, the set parameters will be duplicated on each new paragraph.
Setting a frame on one or more sheets in a document
To set a frame for an entire page, you do not need to select an object with the cursor. You should enter the same section of the menu, but only select the “Page” tab. Do the same steps as described above. After clicking “Ok”, a contour will appear along the border of the sheet fields.
The procedures described above are easy to perform. Difficulties may arise when it will be necessary to set a border, for example, only on the title page or an area in the middle of the document. Here's what you need to do to insert a frame in Word only on the first sheet:
 The Apply To menu contains other functions. A frame can be used on the entire document, only on the first page, or except for the first page, or on one of the sections of the document.
Applying the border "to this section" is possible only when arranging sections. They are used when it is necessary to create different formatting for different pieces of text in one document. Installing partitions is easy. You need to enter the block " Page layout", in the parameters select " Breaks"and, following the arrow, install the desired one. At the time of setting the break, the cursor is placed directly at the text formatting transition.

To cancel the set frames in the document, use all the same menus, only in the block " Type"You need to make the icon active" No" It is convenient to use frames when placing emphasis in the text. The main thing to remember here is that the edging can have its own color, thickness and design.
All these parameters are selected individually in the central menu block " Type" And in order not to make a mistake and not perform the procedure several times, you should pay attention to the sample on the right. If the appearance of the frame is suitable, click " OK" Otherwise, they continue to make changes.
Gone are the days when people only read textual information. Today, every computer user can independently type texts, edit them and print them. There are auxiliary programs for this, for example Microsoft Word 2010. But working with this program requires special skills. Our article will tell you how to make a frame in Worde.
So, to work you will need a simple program included in the Microsoft Office suite. The text editing utility is called Microsoft Word 2010.
What is a frame and what is it for? A frame is a beautiful frame around text or a blank page that creates some volume on the page. Most often, frames are used by designers. Thanks to the instructions in our article, you will also learn how to make frames of various shapes and colors. So, let's begin.
Create a beautiful frame in Word
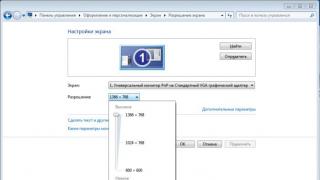
To begin, open a Word 2013 document. It is advisable to have a ready-made text fragment of the page in which you want to make the appropriate changes. Next, go to the “ Page layout».

In the center, in the upper corner, click on the icon " Page Borders" A window will open in front of you “ Borders and Shading" There are many different settings here. In this case, we need only those of them that are associated with the framework. Therefore, we will talk about how to make a frame for the entire text of the page.
Select the type "Frame" and then set " Apply to entire document" To confirm the actions performed, click " OK"at the bottom of the window.

Thus, we received the simplest stroke for the entire page of the document. By the same analogy, instead of a regular frame, you can make a frame in the form of drawings.

The following operations will complicate the shape of the frames. To do this, let's try to create a colored paragraph outline. The initial steps are the same: open the document, go to the “ Page layout" Place the cursor on the paragraph you want to format. In the window that opens, go to the “ Border».

Pay attention to the lower right corner, which shows that all changes will be applied to the paragraph. On this tab you can select.
- No – means that there will be no frame;
- frame;
- shadow;
- volumetric;
- another.
Note that Word has a very convenient preview window. All changes you make to the document are immediately visible in the small diagram on the right.
Select " Frame"(to do this, left-click on the corresponding icon).
Choose a color. To do this, in the section " Color", click on the small triangle. In the menu that opens, select the color you need (for example blue), and click on it with the mouse.

In chapter " Width» select size in points. To do this, in the section " Width» Click on the appropriate item (for example, 3 pt). Notice the changes on the right. If the thickness and color of the frame suits you, then click the " OK", located at the bottom of the window.

All! The paragraph that you selected with the cursor will be transformed into a beautiful stroke of the color and thickness you need.

If you want to frame a large piece of text in the same way, then simply select the text you need with the mouse.
Then, on the tab " Page layout", click the icon " Page Borders" Go to the " Border", and then specify the type - " Frame».
Select any color and width, then click the " OK».
Thus, there will be another option. Experiment with colors and frame thickness. As a result, any of your pages or individual paragraphs will have a beautiful design in the form of a frame.
Headers and footers in Word are text and images placed on the pages of a document that are not related to the main text, but are of an informational and design nature. If used correctly, you will be able to draw up a document that only needs to be sent for printing.
Frames for text in Word and footers
Headers and footers in word placed on each page of the document in the top, bottom and side margins. In these areas you can place page numbers, text frames, time and date, company logo, document title, file name. In my opinion, headers and footers in word useful for an engineer in that they can be used to draw up a document in accordance with the requirements for design and working documentation, insert a frame and stamps of the appropriate forms. To get acquainted with headers and footers in Word, I suggest doing a little practical work on creating a template for the first sheet with a frame for all types of documents in accordance with GOST 21.1101-2013.
How to make a frame in Word using headers and footers
I think, having understood this with a specific example, further work with headers and footers to insert a word frame will not terrify you. We will not consider various ways of performing certain actions (to bloat the article), I think you will familiarize yourself with them. Let's look at the sequence of actions on how to make a frame in the header and footer in Word 2010 (other versions are similar):
1. First of all, download the file with the prepared source materials by clicking.
2. Open the file and copy the inner frame for the text of the document on the second page by right-clicking at the moment when the cursor appears with a crosshair when hovering over the frame.
4. Important. To create a special header and footer for the first page, check the box on the "Header and Footer" tab in the "Options" section
5. Press the keyboard shortcut Ctrl+V, or insert a word document frame by right-clicking.
6. In the top menu Format → Position → More layout options...
7. In the window that opens, set the frame parameters for the text as in the figure below.

8. Go to the "Design" tab and click "Close Header and Footer Window"

9. Copy the table of additional columns of the sheet on the third page. The table is selected by clicking on the crosshair that appears when hovering the cursor over the table area.
10. Similar to inserting a frame for word text on a sheet, follow the steps and .
11. Place the cursor in the table area by right-clicking to open the "Table Properties" window.

12. Click in the sequence shown in the figure below and set similar parameters. Close the header and footer window (same as)

13. Copy the title block template plate according to Form 5 on the fourth page. The table is selected by clicking on the crosshair that appears when hovering the cursor over the table area.
14. Place the cursor on the first page with a text frame. In the top menu ribbon Insert → Footer → Edit Footer.
15. Repeat steps sequentially and set the parameters as in the figure below.

16. Ehh... well, it seems like that’s it, you’ve made a frame for the text in Word, close the window for editing headers and footers ().
Different headers and footers in one document
The method of creating headers and footers with frames for text in Word on subsequent pages of the document is similar to that described, with the only difference that in the footer you need to insert a table in the form of 6. Now you can create a free document with two different headers (frames), for the first and subsequent pages. But what if you need to create different headers and footers (more than two) in one document? A separate article is dedicated to this. By the way, in it you can download free frames for a word document with ready-made headers and footers.
How to remove a frame from headers and footers in Word
In order to delete or change a text frame or the entire footer, go to edit mode and delete all existing elements. The quickest and easiest way is to get into the editing mode by double-clicking the mouse, placing the cursor on the header element (frame, stamp), or use the top menu ribbon Insert → Header/Footer → Remove Header/Footer.
Healthy. In order for the document to be completed and ready to be sent for printing, there are not enough page numbers, but read how to do this.