Technology in our time gives a lot of opportunities to a person. Not so long ago, the presence of a TV in our house, which showed several channels, was considered an achievement. Today, the TV is capable of showing hundreds of channels, but this is not enough. Many users show a desire to install two TVs at once that receive satellite signals and get a high-quality image.
When buying and installing a satellite TV kit at home, few people know that this kit is designed for one TV. And since the tastes of residents do not match while watching programs, films, many have two or even three TVs. And in this case, the owners of several TVs have a question about the problem of connecting this technique to one antenna and separating the signal between them.

There are two options with which you can watch TV at the same time as another:
- Connection using 2 receivers;
- And with the help of the RF module.
There is a very simple way to connect one satellite dish to two TVs, but few people like this method. This method is to use one receiver. In this method, the first device is connected to the first TV through tulips, and the second device, that is, the RF module, is connected to the second output to the tuner, which allows you to connect other monitors.
But, unfortunately, such a connection has a huge number of disadvantages. Channel management can only be in the room where the tuner is located. And at the same time, 2 TVs show the same channels. The image quality is also reduced.
Scheme for connecting a satellite dish to 2 TVs
There is an option to connect 2 TVs using a splitter or a splitter that splits the antenna signal into 2 TVs. For such work, modern equipment is used and for this reason we will not need a soldering iron, tin and rosin.
These branching patterns use screw sockets. The stripped end is inserted into the nut, and the second one with the same plug is connected to the TV. We insert the central antenna cable into a special hole in the screw socket of the splinter, and wrap the nut and tightly press the copper sheath of the cable to the device body.
Before carrying out work, disconnect the device from the network until the final connection.

Connection instructions, step by step:
- We buy a special cable, as much as necessary, at least 12 meters long, the image quality depends on the correct choice of cable, and a splinter with two outputs;
- If the satellite dish is already connected to one of the TVs, then insert this end into the output port on the separator and tighten the nut;
- Next, cut off a small piece of cable from the coil and put on it the ends of a standard plug (the so-called head) and crimp them;
- We perform the same crimping on the remaining cable segment, it will make it possible to connect the signal splitter and the TV in another room;
- We insert the plug into the corresponding connectors on the body of the splinter and connect it to the TV;
- We hide the segment that goes to another room under the plinth so as not to step on it;
- In order to shorten the length of this cable, you can drill a hole in the wall between rooms.
After connecting the antenna to 2 TVs, we check the image quality and if it is distorted or intermittent, then we check the connection or redo the crimp.
How to connect 2 TVs to one tuner
To successfully connect 2 TVs to one satellite, you must have the right tool.
Namely:
- The easiest cable stripping tool;
- Satellite dish or standard dish;
- Tuner;
- Splitter or splitter for 2 outputs;
- 2 TVs;
- A set of necessary cables.
If one TV is located, for example, in the living room, and the second in another room, then we connect the nearby TV with a receiver and a purchased cable. We turn on the TV in the hall and start tuning.

We perform the following actions:
- Press the menu button;
- Determine and mark the desired source for the signal;
- In the found source, mark the connector to which the TV is connected;
- We search for programs;
- After the search is over, we remove channels with low-quality images from the list.
Now we will tell you how to connect the 2nd TV to the tuner. We measure the minimum distance from the TV to the TV. We run the cable along the baseboard so as not to touch it when walking around the rooms.
Next, we take a high-frequency or ordinary television-type cable, which is connected to the output on the back of the tuner, the other end to the antenna input, which is located on the TV. After connecting, it remains only to set up the TV.
Optimal connection of two TVs to one satellite dish
In order to correctly connect 2 TVs to one satellite and allow you to watch different channels on these TVs, you need to connect each of them to its own tuner. After the signal hits the tuner, the signal can be divided as you like and view your favorite channels without disturbing another occupant of the house.
All channels are switched exactly on the tuner - this makes it possible to watch different channels on two TVs at the same time.
It is not cheap to make such a connection, but there is no such way.
A separate device is installed in each of the rooms. The connection is made in a chain. When connecting in a chain, all devices are connected to the loop through output.
How to install a satellite dish on 2 TVs (video)
After you read our article, you realized that there are many options for connecting. Each of them has not only its own characteristics, but also certain difficulties. Based on this, we can say that it will be easier for someone to take their free time and cope with the task on their own, and someone decides to spend money and turn to the masters. In any case, both options have the right to exist.
Now you won’t surprise anyone with a second, third, or even fourth TV in the house. It happens that they buy a new TV, LCD or plasma, to replace the old one, and put the old one in the bedroom. Many people prefer to have a small TV in the kitchen. Built-in waterproof TV can even be in the bath. In all these cases, the problem of branching the television signal arises - after all, the cable entering the apartment, whether it is from a cable television network or from a collective antenna, is only one. And in your own house, putting separate antennas on the roof for each TV is clearly unreasonable.
One solution may be to use indoor antennas. In addition, each antenna serves its own TV. Unfortunately, in most cases this will not work. achieve high quality images especially when the TV signal is weak. Not to mention the fact that a fairly large design obviously does not improve the interior of the room, and the selection of on-air channels is clearly inferior to cable television.
It remains only to invite the master and instruct him to lay the cable and connect the second TV? Stop, this job is not so difficult! let's try do it yourself. But first, look into the contract with the TV provider - it is quite possible that you need to pay a separate fee for the second TV. If everything is in order, then we get to work.
First you need to decide on the installation location of the second TV. Now figure out how you can bring the cable from the first TV to it. The cable is usually laid over a wooden or inside a plastic plinth. Think about it, maybe it makes sense to break the main cable somewhere and connect to the gap? Having chosen the best option, measure the required length of the new cable and go to the store.
To connect television receivers, a coaxial cable with wave impedance 75 Ohm. If you say so in the store, then they will understand you and give you what you need. But still, it’s worth checking if the seller mixed up and didn’t give you a cable with a resistance of 50 ohms? At one time, such cables were very common and were used for laying local computer networks. Now they are much rarer, but it does not hurt to check. Use a cable with the wrong impedance unacceptable, the image will be severely distorted. Wave impedance, together with the cable brand and other information, is applied directly to the cable sheath every 30 - 50 centimeters. The cost of the cable can be from 5 to 50 rubles per meter. The more expensive the cable (unless, of course, it's just about the greed of the seller), the less signal attenuation. But at the distances of the apartment, a cheap cable is quite enough.
Coaxial connectors are used to connect the cable. We will use modern screw-in connectors, this is what makes installation quite accessible even to a non-specialist. Crimp connectors, as well as connectors attached to the cable by soldering, are more reliable, but their installation requires a specific tool and sufficient experience. Don't worry, a screw-on connector can work quite well indoors for decades. To connect a second TV you will need five connectors. If a modern twist-on connector is used at the end of the supply cable, then it can be reused and limited to buying four. Be sure to check with the store whether the purchased connectors will fit your cable.
In addition, you will need two antenna inserts. They are screwed on one side into the coaxial connector on the cable, and the other side is inserted into the antenna jack of the TV. It is quite possible that such an insert is already at the end of the existing cable, it can also be reused. The cost of connectors and inserts is from 10 to 25 rubles, everything here depends only on the "coolness" of the store, the differences in quality are not fundamental.
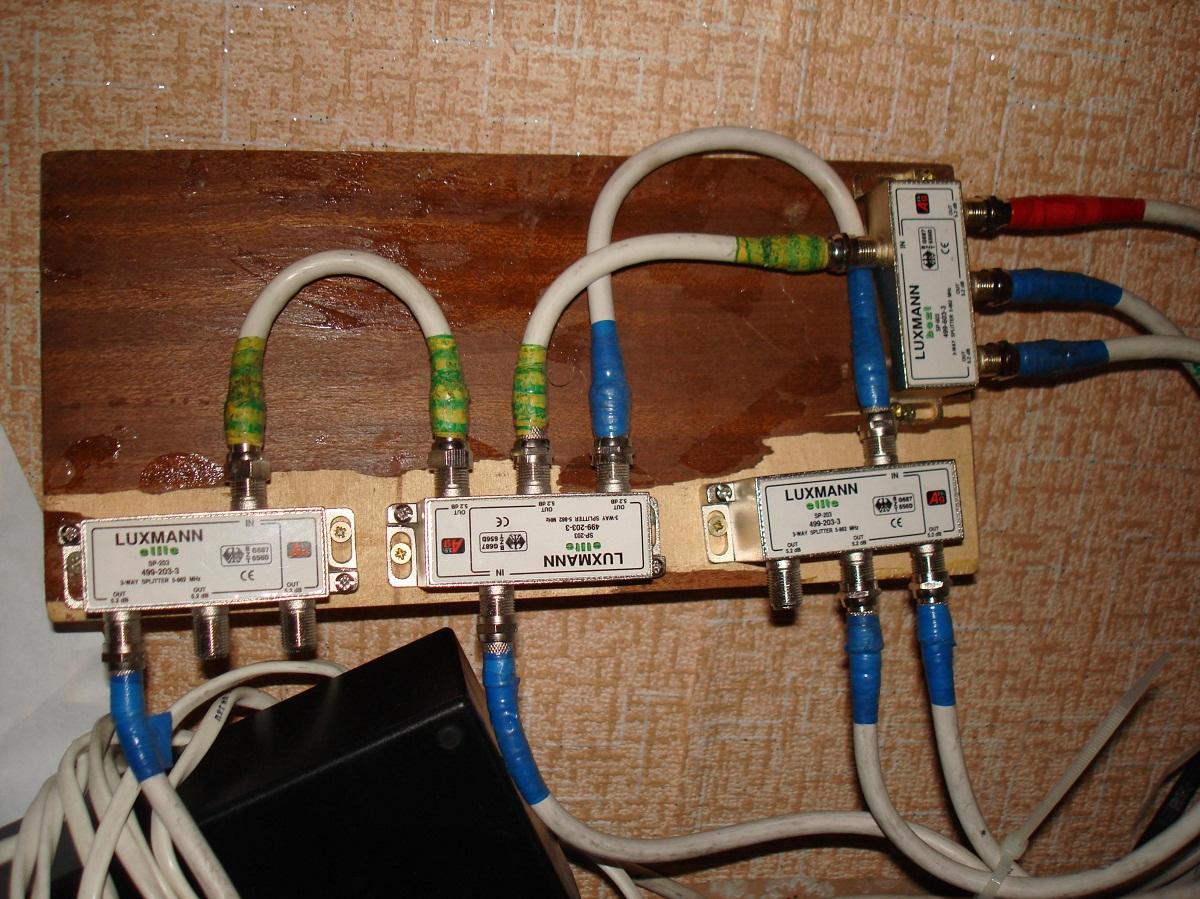
The next necessary component is splitter or splitter. It is this device that most often baffles electricians who are accustomed to dealing with low-frequency alternating current. Coaxial cables cannot be twisted or twisted like ordinary wires. The fact is that the behavior of high-frequency alternating current is significantly different from the behavior of direct current or power frequency current of 50 Hz. Coaxial cable is not just a wire, it's more of a waveguide. Simply put, it is a pipe along which an electromagnetic wave moves in the space between the central core and the screen. Therefore, any violation of the integrity of this pipe leads to a significant decrease in the signal level and, accordingly, to a loss in image quality.
Splitters come in a different number of outputs, mainly from two to five. Buying a splitter with a margin is not worth it. Firstly, the splitter attenuates the signal and the more outputs, the weaker the signal on each of them. Secondly, unused outputs should be closed with a special matching plug. And thirdly, a splitter for a larger number of outputs is more expensive.
And now let's start cutting the cable (photo 1). To do this, you need a sharp knife, you can use a stationery. At a distance of 20-25 mm from the end of the cable, the outer sheath is carefully cut in a circle and removed from the cable (photo 2). When doing this, try not to cut the screen wires or foil. By the way, there are cables in which there is only a braid of copper wires, only a sheath of copper or aluminum foil, or both. The wire braid and foil should be folded down (photo 3).
Sometimes, to increase the strength, the foil is coated from the inside with polyethylene. When unscrewed, such a coating is outside and can be fairly prevent electrical contact. It is impossible to remove the coating, in this case it is necessary to increase the length of the cable section to be cleaned and wrap half of the shielding sheath back. Then the conductive side will be outside and everything will be in order.
Now we remove the insulation of the central core so that it spoke from the screen by 1-2 mm (photo 4). After that, you can wind the connector (photo 5). In a properly screwed connector, the insulation of the central core should fit snugly into the central hole (photo 6, bottom inset). If the connector winds too easily, then it is best to wrap several layers of electrical tape under the bent part of the screen. If, on the contrary, things are going too tight, then you can reduce the thickness of the outer shell by gently cutting it with a knife. We cut off the protruding central core at a distance of 5 mm from the plane of the connector (photo 6). That's all!
Now repeat this process on all cables. At the ends of the cables that will be connected to the TVs, we install antenna inserts(photo 6, top inset). It remains only to connect everything correctly. On splitters, they usually indicate the input ( in) - the cable entering the apartment is connected to it, and the outputs ( out) - from them the cables will go to the TVs. The connectors must be tightly screwed onto the splitter pins. Enjoy watching!
In one of the previous articles, we talked about how to install and configure a digital terrestrial television antenna. But it should be taken into account that in many homes today there are already several televisions, for example, in the living room and in the bedroom or in the kitchen. In the case of using cable TV or pay satellite TV, providers will require an additional fee for a second TV. When using a T2 digital antenna, this feature is available completely free of charge. You only need to correctly split the signal to several devices.
What is the best way to do this? What do you need to purchase additionally? We will provide answers to these questions and even a little more in today's material.
First of all, let's see what you will additionally need to prepare for signal separation and cabling around the apartment.

Connecting to an antenna without an amplifier
The easiest way to use two TVs with one TV antennacausing a minimum of headache when setting up is when using an antenna without an amplifier. We recommend using it if you live in a good reception area, as it will protect you from possible signal over-amplification.

One of the main conditions when using an antenna with a built-in amplifier is that the amplifier must be powered continuously. If you use the scheme described above, there will definitely be problems, since the power supply will be constantly interrupted. Fortunately, the problem is very easy to solve, just change the wiring diagram a little. How will she change?
- Purchase a splitter, install it in a convenient location.
- Cut and crimp the cables as described above. There is absolutely no difference.
- At one end of the cable, right next to the TV input, you will need to connect an antenna power supply. Given the use of a splitter with a power pass (denoted as Power Pass), the voltage will be supplied to the amplifier on the antenna, ensuring its uninterrupted operation.
- If a divider with a power supply passage cannot be purchased anywhere, you can also use a regular one, only power must be supplied before entering the splitter. To do this, you need to use a special adapter, one end of which will be inserted into the input of the divider, and the other, which has an antenna-type connector, into the power supply.

A high-quality picture on a TV screen depends on the level of the received signal, so the installation of an antenna on four TVs is carried out taking into account the input power and installation location. The main conditions for choosing a set of on-air equipment include:
- removal to repeater
- terrain
- presence of obstacles
In different parts of the Moscow region, reception may differ, the closer the house is to tall trees in the direction of the transmitter, the lower the level. The main TV tower for the Moscow region has always been the Ostankino tower. In 2015, the DVB-T2 standard was launched in addition to the analog system, which gave more channels and a good picture.
- The first multiplex Ostankino TVK 30, frequency 546 MHz
- The second multiplex Ostankino TVK 24, frequency 498 MHz
- Third multiplex Ostankino TVK 34, frequency 578 MHz
In the future, local, low-power transmitters will be launched throughout the Moscow region for a 100% coverage area, and the analog band will be turned off. The main difference between DVB-T2 is the high resolution digital image. It's not HD yet, but when all the major channels are filmed and edited with good equipment, even Ultra HD will be possible. It is possible to receive a signal on 4 TVs using a conventional, external, all-wave antenna, analog broadcasting works in parallel with digital broadcasting, but DVB-T2 is only in the decimeter range, and the meter one simply will not be involved.
Advantages of terrestrial digital antennas
Maintenance Free
The antenna, installed in compliance with all the rules, serves for a long time without service maintenance.
A large number of TVs can be connected to one antenna with a serial cabling.
digital quality
Interference-free and distortion-free image with DVB-T2 digital transmission system and high definition support.
No monthly fee
Free TV shows all federal channels, 20 programs have been officially launched and 10 are in test mode.


The initial installation of the antenna on 4 TVs is calculated for DVB-T2 digital reception, equipment with wall or roof mounting is usually offered. Where and how to put the bracket, what configuration to choose, the master decides together with the client. The cost of work varies depending on the complexity of the task and the price of components. Fasteners require a sufficiently strong surface to be able to withstand wind loads. Antenna tuning is carried out according to the readings of the device to the maximum quality. If the cable was not brought out in advance, then the master will drill through the wall and bring it inside. Laying wires inside the house is best done together with the electrician at the construction or repair stage. The wiring diagram is of two types: serial - from one TV to the second, parallel - from each TV point to a specific place. The second option is more preferable and reliable. Before switching to the wiring, an amplifier is needed, otherwise the signal may fade. Connecting to four TVs will require a divider with multiple outputs. On the road, the installer always has with him amplifiers, all-wave splitters, repair consumables and various sets of equipment.
The fourth step is to connect the TV, if the antenna is tuned to the Ostankino tower, 29 free DVB-T2 channels will be received. All three multiplexes go only from Ostankino, but its coverage map is limited, local repeaters are still broadcasting the first multiplex on 10 federal channels and some on the second. In accordance with the official government decree, all public channels are free of subscription fees, it is enough to install an on-air antenna. The figure is accepted by TVs starting from the release of 2014 and newer, you can determine the presence of a built-in tuner by searching the Internet for specifications or branded instructions on the official website of the manufacturer. Adjustment of TV programs is carried out by automatic search, sorting in the right order is done manually. For older models, you will need an external DVB-T2 set-top box of a good company, which is connected with standard RCA, Scart, or better HDMI connectors. The price of the receiver fluctuates around a couple of thousand rubles, but it will be cheaper to buy it than to change 4 TVs for new ones.
DVB-T2 television equipment sets

Price 5 500 rubles.
Antenna without amplifier with one receiver, distance to Ostankino 20-30km.
- Antenna digital DVB-T2 10dB
- Wall bracket 35cm.
- Cable 10m., connectors 2pcs.
- DVB-T2 digital receiver
Popular Kit

Price 11,500 rubles.
Antenna with amplifier without receivers, distance to Ostankino 60km.
- Antenna digital DVB-T2 15dB
- Brackets 0.5m. 2 pcs., mast 4m.
- Cable 10m, connectors 10pcs.
- Signal booster 20dB
- Mounting on the wall from a 4m ladder.