If Microsoft abandons the OS, owners of OEM and Recovery versions face a serious problem: these stripped-down options, as a rule, are not equipped with the recovery tools that the full-fledged Windows 7 offers in the System Recovery Options section. Instead, computer vendors create a hidden Recovery partition from which you can restore factory settings. In doing so, however, you will not only lose all your data, but you will also have to clean your PC again from the pre-installed trial versions of the software. It would be much more convenient to have a full-fledged Windows at hand along with an emergency system that allows, for example, to restore the boot sector on the HDD without external utilities.
Using Microsoft's prepared ISO file and CHIP-selected programs, you can completely free and legally construct a Windows 7 boot disk that is guaranteed to provide all the features. Please note that you will need a valid license key to create such a DVD. After starting, this disk will prompt you to select any of the known editions of Windows 7 for installation. If your computer came with an OEM version of Home Extended, you can only install it. But you have the right to install any other version without a key and use it for 30 days. The Windows PE environment, ready for use even before the actual installation of the system, is not so picky: using your disk, you can restore the Windows 7 partition on your friend's computer.
What to do if Windows won't boot
To start a stopped working operating system, boot the appropriate computer using the installation disk you created and select System Recovery Options. Here you will be offered a choice of various tools for resuscitation of data, such as, for example, "Startup Repair" or rollback to a previous state ("System Restore"). All options from this menu are completely missing in most OEM and Recovery versions.
If you want to reinstall Windows, take this opportunity to say goodbye to the now-unnecessary Recovery partition and win 10 GB of disk space by doing so.
Of course, you should have a pre-prepared Windows installation disk at hand. Creating it is not so difficult - in this guide we will describe the whole process step by step.
Web Boot and Prepare: Windows Image File
The installation disk will be based on the ISO file downloaded from the Microsoft website. All versions of the "seven" will be available to you.
1 DOWNLOAD WINDOWS FOR FREE In order to familiarize yourself with Microsoft products, on answers.microsoft.com/ru-ru you can find links to free downloads of images of various versions of Windows 7. Enter the keywords "Windows 7 image" in the search box of the service. In the results obtained, you will find information about where you can download different versions of the OS. In addition, official images of the system, and in different editions - from "Home Extended" to "Maximum", can be obtained by clicking on the short link b23[.]ru/p9kf. The only drawback is that only English versions are presented here. You can download the localization file separately. You can download any version of the OS, because the install.wim file we need for our installation disk will allow you to install any version if you make small changes (see step 4). When choosing a file to download, pay attention to the language and bit depth (32 or 64 bits). For security reasons, we strongly recommend downloading the version with the built-in service pack (Service Pack 1).

2 CREATE A WORKING FOLDER Now we need to create two directories. The first one (just call it "Win7") will then save the Windows installation files, the second one is needed for the command line utility - dism.exe. Name the second folder "mount". To make the next steps of the process quick and easy, you must have at least 10 GB of free hard disk space. We recommend that you perform the following steps as an administrator so that you will not be annoyed by the UAC service messages.

3 UNPACK WINDOWS Install the 7-Zip program and use it to unzip the downloaded file with the Windows 7 image to the Win7 folder. To do this, simply select "7-Zip | Zip" from the context menu. Extract files", and then in the "Extract to ..." field specify this folder.

Note. When checking, we first tried to unpack the 64-bit version of Home Premium without the service pack (X15-65741.iso). 7-Zip didn't like the presence of the UDF file and refused to run. The second attempt with the X17-58997.iso file (Home Premium with Service Pack 1) was successful. Therefore, we can safely recommend that you use this particular version.
4 DELETE THE CONFIGURATION FILE Owners of Windows 7 Ultimate now need to open the Win7\sources folder in Explorer and delete the ei.cfg file from it. Thanks to this, this system will also become available for selection in the installation wizard. If you have a different version, you can skip this step. You should also get rid of this file if you plan to later upgrade to another version of Windows. Then you do not need to follow step 7 (“Entering the key and activation”) in order to be able to enter the newly acquired key. Also, the configuration file should be deleted for those who are going to help those who are familiar with debugging Windows.

Creating a multi-installation file
The command line utility will read the Windows setup file and you can create a disk that suits your needs.
5 READ INDEX Microsoft has placed all the data necessary for installing Windows in the install.wim file. You can open and modify it using the dism.exe command line utility, but you must know the index of your version of Windows to do so. In order to find out, run the command prompt as an administrator and enter the command:
dism /get-wiminfo /wimfile:X:\win7\sources\install.wim
Here, instead of the “X:\” parameter, specify the drive letter on which the Win7 folder is located. Mark for yourself the version number of Windows that you want to use - for example, for the "Home Premium" option, this is "2".

6 MOUNTING THE INSTALLATION FILE To modify the install.wim file, it must be connected (mounted) to the system. Enter the command:
dism /mount-wim /wimfile:X:\win7\sources\install.wim /index:2 /mountdir:X:\mount
If you want to select a different version of the system, after the "index:" parameter, specify the appropriate value. The dism.exe utility included with Windows will then unpack the install.wim file, which may take some time. On our test machine, the process took about ten minutes to complete.

7 ENTER THE PRODUCT KEY In order for the disk to automatically indicate the license key during installation, run the Magical Jelly Bean Keyfinder program and use it to read the key of the version of Windows you have installed.
Attention! This program refers to the license key as "CD Key". At the command line, enter the line:
dism /image:X:\mount /set-productkey:license key
Replace the "license key" parameter with the product key read by Keyfinder. Note that in the case of the corporate version, obtaining it may fail - then the program will display the characters "B".

Note. If you're planning to upgrade to a different version of Windows 7 later, or if you're planning to help a friend fix the operating system, skip this step.
8 SAVE THE CHANGES Finally, write the modified install.wim file to the \mount folder. And for this you will again have to use the command line window. Run it as administrator and type:
dism /unmount-wim /mountdir:X:\mount /commit
In addition, the "unmount" command will disconnect (unmount) the setup file from the system. After that, you can safely start burning the image to DVD media.

DVD Burning: Correct Format
It would seem that the image of the installation disk with Windows is ready, and you just have to insert the DVD-blank, run the burning utility, select the desired image and start the burning procedure. Unfortunately, not everything is so simple - you first have to do the configuration.
9 ACTIVATE THE UDF FILE SYSTEM To burn a disc, we recommend using the free ImgBurn utility. It can be downloaded from the official website imgburn.com. Do not forget to unpack the localization file into the appropriate program folder. Insert an empty DVD into the drive, run ImgBurn and select the Russian language in the settings. Then click on the big "Burn Files/Folders to Disc" button. On the "Options" tab in the "File system" line, set "UDF" or "ISO 9660 + UDF". The second option is suitable for those who want to create an installation disk in an outdated Windows, such as XP. During our test, both options worked without any problems. Also, check the boxes for "Include hidden files" and "Include system files".

10 KEEP THE STRUCTURE To ensure that all folder levels are taken into account when burning the installation disk, you need to make sure that on the "Advanced - Restrictions" tab in the "Folder / file name length" section, the option "X level: 219 characters" is selected. Specify "DOS" as the "Character Set" parameter. In addition, check the boxes next to "More than 8 levels of folder nesting", "Do not limit file size" and "Do not append version number ";1" to files".

11 WE PROVIDE DVD WITH SELF-LOADING CAPABILITY F On the "Boot Disk" tab, check the "Make image bootable" checkbox. Click on the icon next to the "Boot Image" line, navigate to the Win7\boot folder and select the etfsboot.com file in it. It contains a boot sector for DVD media, and when you start the Windows installation disk, it will automatically search for it.

Note. Typically, on new EFI motherboards and Apple computers, the etfsboot.com file cannot be found by the Boot Manager (setupldr.bin). This error is corrected by the option "Do not add version number ";1" to files" selected at step 10. It is because of this feature that we chose ImgBurn to burn our disc.
12 BURN THE INSTALLATION DISC Make sure that in the line "Load. segment" is the hexadecimal value "07C0". If not, enter this option. Increase the number of sectors to be loaded to eight, and then open the Win7 directory in Windows Explorer. Select all the files and folders in it, and use the mouse to drag them to the "Source" field of the ImgBurn program. To write data to disk, it remains only to click on the corresponding icon. Before you delete the \mount and Win7 folders you created, make sure that our brand new installation disk is working. To do this, in the BIOS, select the DVD drive as the "First Boot Device" and restart the computer. If everything was successful, you will see the Windows Setup dialog box on your monitor. Now, if the system crashes, you can restore it by selecting "System Recovery Options".

Nevertheless, XP remains a popular and recognized system. In fact, this OS became a milestone in the development of the Microsoft OS. With each release of SP, up to the latest SP3 package, the system became more and more reliable and stable.
Unfortunately, there will be no new updates.
Despite user dissatisfaction with the rather inadequate Vista system, Microsoft stopped selling Windows XP to retailers and computer manufacturers four years ago. Then the company cynically stated that such a decision was due to the need to support the sale of Vista and all partners can sell already existing copies of XP only until the end of 2008.
All this despite the fact that Windows XP is a completely self-sufficient and stable operating system that can work reliably and for a long time without reinstalling.
And, nevertheless, a boot disk with a Windows distribution kit will be needed for preventive reinstallation of the OS, or if there are problems during boot or system operation. It is clear that the longer the OS works, the more garbage accumulates on the disk, in the registry, in the system files folder and in the temporary files folder from which it is not always possible to delete everything.
Of course, you can use the standard Windows utilities: Disk Cleanup, System Restore, and Registry Edit. Or rescue disks with a program like Paragon - Data Rescue.
But, the most radical way to fix problems is to clean (!) install the system with disk formatting.
There are many reasons for reinstalling the OS:
- the computer began to slow down and attempts to optimize the OS are not successful;
— in work there are failures with error messages;
- Windows did not leave free space on the system disk and the regular disk cleaning utility does not cope with its task;
- there is, even if subjectively, a decrease in system performance;
- peripheral devices refuse to work for no apparent reason;
- unskilled registry editing;
- the defeat of system files and the registry by viruses in such a way that they block the task manager and access to the registry;
- the operating system does not boot;
— drweb, kis and/or their colleagues at this time only "wink" warning windows, or icons in the tray and do nothing else;
- replacement of the hard drive.
So, it is better to store the system disk of the motherboard, or all the drivers in a safe place, periodically archive and store on external media all the data that you value and take care of creating a bootable disk for a clean installation of the OS in advance.
Boot disk on CD, DVD or flash drive?
Recently, USB drives are increasingly replacing CDs and DVDs. And, it is true that laptops, due to their compactness, are becoming more popular, and they do not need a relatively bulky and electronic-mechanical drive. And, therefore, let's consider the procedure for creating a bootable external media using a CD disk and a USB Flash Drive - a “flash drive”.
To create a bootable CD you will need:
- a disk with the distribution kit of Windows XP SP3;
- scribbler Nero Burning ROM;
- file loader xpboot.bin;
- a computer with Windows XP.
The xpboot.bin bootloader can be downloaded from the Internet, or extracted (picked out) with Bart's Boot Image Extractor (BBIE).
The use of Nero Burning ROM and BBIE is not critical, they can be replaced by their counterparts: Ultra ISO, PowerISO, Bart Pe Builder, Creator Classic and their counterparts.
Training:
First turn off the protection of system files: "Tools - Folder Options - View". Turn on the option "Show hidden files in the folder" and turn off "Hide protected system files".
Copy the entire contents of the Windows XP bootable installation disk to a folder. Install BBIE to extract xpboot.bin, or download it from the Internet and write it, for example, to the root directory.
Start Nero Burning ROM and change to CD-ROM (Boot). Open the "Download" tab, in the "Image file" window, specify the path to the xpboot.bin bootloader. Put "v" on "Additional settings". Do not change anything in the ISO tab.
In the "Sticker" tab, check the "Manual" option and enable "More stickers"
and write the name of the disk in accordance with the figure.
Here it should be noted that in the system identifier, for the Russian version, WXPVOL_RU should be noted, and for the English version - WXPVOL_EN. Click "OK", click the "New" button and go to the window for selecting files for recording.
Add files from the distribution disk or local copy. Left-click to enable "Record".
Nero Burning ROM allows you to select the burn speed and you do not need to use the maximum speed settings. High speed can cause disk errors.
It remains to check the newly created disk:
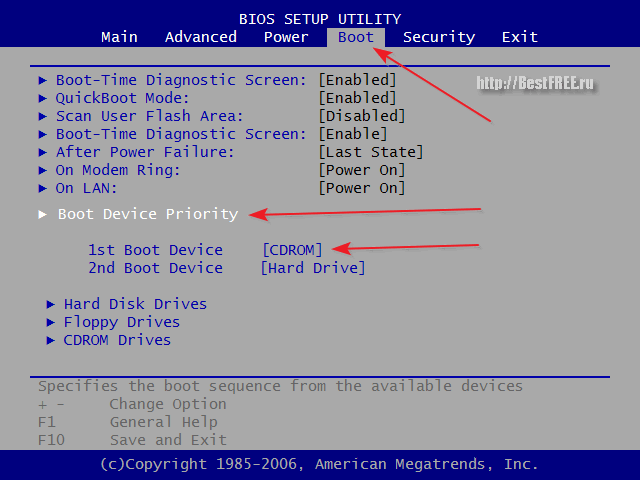
- restart the computer, enter the BIOS and on the BOOT tab, give priority to booting from the CD and exit the BIOS with the settings saved;
- when loading, after the message “Press any key”, press any key, but you don’t have to look for it for a long time ... otherwise the download will start from the hard disk.
The procedure for creating a bootable DVD is the same as burning it to a CD, but in the left window for creating a new project, select DVD-Rom(boot). At the same time, you can add folders with drivers, distributions of user programs and antiviruses, your own folders, files, etc.
Make a bootable disk with windows 7 to reinstall it
People often ask how to make a good boot disk for Windows 7. Why do we need a boot disk? We need it if we are planning to reinstall windows on the computer.
ATTENTION! We highly recommend the article why the laptop heats up. Users often underestimate this situation. The result is the combustion of one or more expensive parts. Although, the issue of heating is not difficult to solve.
Introduction
But it's one thing to reinstall or install windows, and another thing to prepare for it. That is, make a good boot disk. There are enough ways to make such a disk. This article will cover the method using the Windows 7 USB DVD tool.
Making a bootable disk using Windows 7 USB DVD tool
This is a free program from Microsoft. Why will we use this particular program, because you can also make a bootable USB flash drive in it, which is also very popular and often needed.
In general, the program is sensible, nothing superfluous, everything is simple and literally in 2-3 mouse clicks a boot disk is already being made.
You can use another program, most importantly, using the Windows7 USB DVD tool as an example, we will analyze the very essence of creating a boot disk, and there you can already experiment with any other programs.

And so, for starters, you need a windows 7 image. What is this “disk image”?
Well, where can I get this image?
or here: http://www.microsoftstore.com/store/msusa/html/pbPage.Help_Win7_usbdvd_dwnTool (copy this link, paste it into the address bar of the browser and press enter) from the official Microsoft website, the size is only 2.6 mb.
Let's say we downloaded it, now we launch it, this is how it looks at the first start:


In this window, you need to specify what you need to make a bootable disk or USB flash drive? (). Since we need a boot disk, select "DVD":

It remains only in the next window to click:

if everything is done correctly, then the windows 7 image will be written to disk. If an error occurs, then we read the error article: we were unable to copy your files When the burning process is over, you can use this disk as a boot disk to install windows 7 on a computer or laptop.
This is how we considered the question of what steps the creation of an installation disk with the Windows version 7 operating system consists of.
Before you can start using your computer, you need to install an operating system on it. In this case, you can not do without an installation device. It will also help you start your PC in case of a critical error. One of the options for such a device can be a DVD disc. Let's see how to create an installation or boot disk for Windows 7.
Write the distribution of the operating system or its backup to disk can special programs that are designed to create images. It is about them that we will discuss further in the description of specific methods for implementing the task. But before you start working with these programs, you need to create a backup copy of the system or download the Windows 7 distribution kit, depending on what you need a boot disk for: to install the system from scratch or to restore it in the event of a crash. You must also insert a blank DVD into the drive.
Method 1: UltraISO
UltraISO is rightfully considered the most popular program for creating bootable drives. We will talk about it first of all.

Method 2: ImgBurn
The next program that will help in solving the problem is ImgBurn. This product is not as popular as UltraISO, but its undoubted advantage is that it is completely free.
- Start ImgBurn. In the window that opens, click on the block "Write image file to disc".
- The recording settings window will open. First of all, you need to select a pre-prepared image that you want to burn to disk. Opposite point "Please select a file..." click on the directory icon.
- In the opening window that appears, move to the folder where the system image is located, select the corresponding file with the ISO extension, and then click on the element "Open".
- After that, the name of the selected image will be displayed in the block source. From drop down list "Destination" select the drive through which the recording will be performed, if there are several. Track to near the item Verify checkbox has been checked. In the block "Settings" from the drop down list "Write Speed" select the slowest speed. Meaning "copies" don't change. There should be a number "one". After entering all the specified settings, to start recording, click on the disk image at the bottom of the window.
- Then the disc burning will start, after which you will receive a ready-made installation drive.


As you can see, making a Windows 7 installation disk is quite simple if you have a system image and a specialized program for processing it accordingly. As a rule, the difference between these applications is minimal, and therefore the choice of specific software for this purpose does not matter.
Learn how to burn bootable discs and create your own multi-boot builds with the tools you need to reinstall and restore your system.
What's the difference between a shaman and a sysadmin?
- The system administrator has a tambourine with a hole :)
As you may have guessed, today we will talk about "shamanic" "magic" disks, which are found in many holders of various kinds of computer masters. And it's not just disks with programs. Some of them allow you to run almost a full-fledged operating system even on a non-working computer! These disks are called boot disks...
Windows boot
Before starting a conversation directly about boot disks, a few words should be said about how Windows and a computer in general are loaded.
In modern computers, two subsystems may be responsible for booting: BIOS and / or UEFI (in newer PCs). In a simplified form, the process of starting a computer looks like this:
- When you turn on the BIOS, it checks the functionality of all PC components.
- The BIOS determines where to boot from.
- The BIOS transfers boot control to UEFI (if any) or immediately to the Master Boot Record (MBR) on the hard disk, after which the operating system starts up.
By default, booting is performed from the hard drive after the BIOS has tested the functionality of the main components of the computer. To be able to boot a PC from disks or flash drives, you need to slightly reconfigure the BIOS to boot from external media. To do this, set the value of the First Boot Device parameter to CD-ROM (or USB). If you don't know how to do this, you can read about it.
After you make this setting, in the boot cycle after checking the place where you should look for boot files, it will also add a check for the presence of a disk in the drive (or a flash drive in the USB socket) and search for the bootloader on it. For many, by the way, the option to boot from the drive is set by default (PC builders simply did not change anything back), so, perhaps, no manipulations with the BIOS will be required :)
Types of boot disks
All boot disks according to their scope can be roughly divided into 3 categories:

The first category includes all installation discs that are used to install or reinstall a particular operating system. The regular Windows CD that we buy (kh-kg-m :)) from a computer store or a Linux distribution from the Internet is exactly this type.
The second category includes disks that contain tools for restoring the main operating system. These resuscitators are usually prepackaged Windows LiveCDs that can be run directly from the disc. The usefulness of such tools is increased by the inclusion of additional software for fighting viruses, data recovery, etc.
The third category is disks that do not have a full-fledged OS and contain programs designed to perform one or two tasks. Examples are programs for partitioning a hard disk or data backup.
The above classification is not universal, since, for example, a LiveCD disc can also be an installation disc. And there is also the concept of multiboot, when several different systems or programs can be placed on one disk at the same time. To clarify the situation, consider the question of where to get the boot disk...
We write the finished image
When we found out what boot disks are and what they are for, the question arises: where can one get such a miracle tool? As in any business, there are two ways: simple and difficult ...
A simple one is to download a finished disk image from any of the many torrent trackers, or copy a real disk taken from a friend. The complex one involves the creation of a hand-made assembly containing all the tools you need. Let's start simple...
Downloading a ready-made ISO image from a torrent, I think today it will not be a problem for anyone, so let's consider the case of copying a real disk. For this case, almost any CD and DVD burning program is suitable for us. Here we consider the algorithm of actions using the example of the CDBurnerXP program.

If you simply open a bootable disk on your computer, copy its contents to a folder, and then write it to your disc, nothing will work, because the boot area is not written to the disk during normal writing of data. We need to create an exact copy of your friend's boot disk (or in other words, his image) and then burn this copy to ourselves.
To do this, insert the disc into the drive and press the "Copy disc" button on the main screen of CDBurnerXP. In the window that opens, you can select the drive into which you inserted the disc, the speed (if you are not in a hurry, it is better to set it to about 8-x) and the copy method:

There are two copy methods. By default, direct copy is active. With it, at the first stage, an image of the inserted disk is created in a temporary folder, and then it is proposed to remove the disk and insert an empty one to record the resulting image. After recording, the image from the temporary folder is deleted.
The second option - you can only create an image and save it on your computer in order to burn it to a real disk in the future or, for example, put it on the Internet. Since there should be no questions with direct copying, let's consider the second method in more detail.
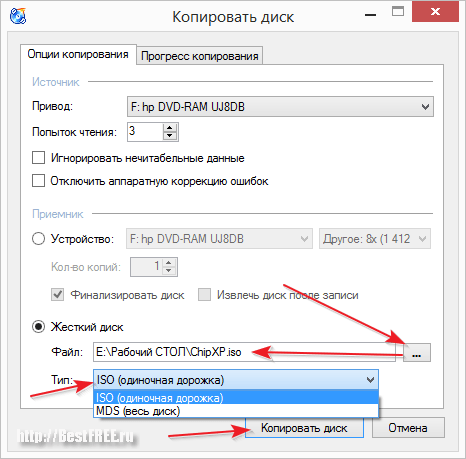
First of all, in the "Receiver" section, we need to switch to the "Hard Disk" mode. Then it remains only to specify the path for the created image and select its format. ISO and MDF/MDS formats are available in CDBurnerXP. I recommend saving to ISO, since this is the most common and supported by most programs option for storing images. Now click the "Copy Disc" button and wait for the creation of our ISO image to finish.
As I said, the image can then be written to a real disk without losing its boot properties (the same applies to images downloaded from the Internet). In CDBurnerXP, in the main window, there is a separate special section for this - "Burn ISO image":

In the window that opens, we need to specify the path to our image in ISO or MDS format. If you downloaded the image from the Internet and it is in BIN or NRG format, then CDBurnerXP has a tool to convert such images to ISO. Click the "Convert to ISO" button and specify the path to the desired image there.
After the image is selected, all that remains is to check the "Finish disc" box (some computers may not want to boot from a disc that has not been finalized) and click the "Burn Disc" button. We are waiting for the end of the recording and become the owners of our own boot disk :)
What is multiboot
Following the classification that we discussed above, a boot disk can be designed to solve one specific task, whether it is installing a system, repairing or maintaining it. It used to be so. For each goal, a separate disk had to be created. However, today there is such a thing as "multi-boot" ...
Its essence is that, using a non-standard bootloader (NTLDR is standard for Windows), we can launch, for example, several operating systems from one disk or make it installation and repair, writing several images to it at the same time!
The most popular bootloaders under Windows that allow SysLinux and GRUB4DOS. Configuring them manually allows you to literally do wonders in terms of booting a PC, but this requires the user to have knowledge and ability to work with code ... However, there are easier ways to build your own multiboot disks yourself using third-party programs.
Create a multiboot disk
On the pages of our site, I already once wrote about a program that allows you to create boot disks and flash drives - xBoot. Here we will look at another way, which may be even better and more convenient for you, using the SARDU program (short for Shardana Antivirus Rescue Disk Utility):

On our site you can download the Russified version of the program 3.2.3, which is newer and more understandable to the Russian-speaking user (thanks for the translation to our regular reader Valery!). IMPORTANT: it is obligatory to unpack the program into a folder, in the path to which there are no Russian letters. Best of all in the root of Disk C or Disk D.
Despite the fact that the original program is in English, it will not be difficult to understand it. Its entire interface can be divided into four parts:
- Top menu bar and buttons. At the top are the usual menu bar and toolbar. You can find almost all the functions of the program in the menu, but almost everything you need is placed on the top and side toolbars, so we don’t have to look there. On the toolbar, there are buttons for opening a folder with images, starting downloading selected images, burning a disk, and testing a finished disk or flash drive.
- Left toolbar. Here we have collected large buttons that allow you to download and add typical disk images with antiviruses, system utilities, Linux distributions, and even Windows. In addition, it is possible to add any images that are not listed in the previous lists using the "Extra" button.
- Right toolbar. This panel contains tools for selecting a flash drive for writing an autoboot image to it, a button for creating an image or a USB drive, a button for going to the developer's website, and a button for exiting the program.
- Central region. This is the main working area, the content of which varies depending on the activated tool.
In order to create your own multiboot assembly, it is advisable to place all the ISO images of boot disks we need in the ISO folder. If you decide to download images directly from the Internet using the links provided, they will automatically be placed in this folder. However, your images will need to be copied manually. There is one more nuance. The path to the program and images should not contain Russian letters. Therefore, it is desirable to unpack SARDU immediately to the root of the disk.
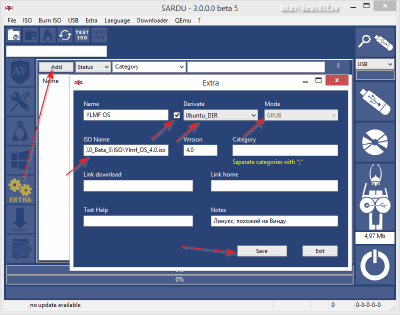
Here we press the "Add" button and fill in the proposed fields. Of the required fields, it is worth noting:
- Name. Here we enter the name of the system, in the form in which we want to see it in the list and in the boot menu.
- Derivate checkbox. If we know on the basis of which system the added image is built, we can activate the checkbox and select the required one in the drop-down list. This will save us from having to choose a bootloader.
- Drop-down list Mode. Here we select the bootloader. I advise you to use the universal GRUB, which is the default.
- ISO name. Here you can enter either the full path to the image (if it is not in the ISO folder, which is undesirable), or simply the name of our image.
The remaining fields are optional and we can fill them in at will. After filling in the fields, click "Save" and our image appears in the list. However, in order for us to add it to the assembly, we need to manually specify the path to it again by clicking on the red button after the image name:

Now it remains only to check the necessary and confirmed by the program (the red button is replaced by a blue one) images and click one of the buttons on the right panel: "Create SARDU USB" (to create a bootable flash drive) or "Create SARDU ISO" (to create a disk image). Upon completion of the work, we can immediately test the performance of the new multiboot disk using the built-in QUEmu emulator by clicking the "Test ISO" (or USB) button on the top toolbar:

If everything went well, you will be able to run your newly created image and find the systems added to it in the Extras section.
findings
Here we figured out what boot disks are and how you can make them yourself. In the article, we did not consider, except perhaps the principles of working with the loaders themselves directly, but, I think, ordinary users, like you and me, do not need it :) The result is important to us, which, I hope, we got.
Creating multiboot builds is not such a difficult task, but it brings tangible benefits in cases where we are faced with the need to reinstall or fix something in the computer's OS. As for me, for quite a long time I created an ideal flash drive for myself, on which there is Linux, and a small Windows that can be run or installed on a PC, as well as a set of the most necessary programs.
I wish you to have such flash drives and disks in your arsenal. And even more I wish you less damage to your computer!
P.S. It is allowed to freely copy and quote this article, provided that an open active link to the source is indicated and the authorship of Ruslan Tertyshny is preserved.


