Read how and why an ISO image is used. How to create an ISO image from an optical disc, mount it to your PC's virtual optical disc, or extract data from it, if necessary. Personal stationary and mobile computing devices are extremely popular and are widely used in all areas of our lives. Every sector of the economy, education, healthcare, social culture, etc., one way or another, uses computer technology for its needs. All accounting, control, processing and storage of various information is carried out using such devices.
Content:
Naturally, computer devices are used quite widely by users for personal use. Performing various tasks, communicating using electronic applications, creating any information files, editing and exchanging audio, video files and images, sending and receiving emails, organizing leisure and entertainment and much more.
It is not surprising that for the correct operation of computer devices, it is necessary to have modern, high-performance software that will make full use of their capabilities.
Most modern computer programs, which have a wide range of capabilities, are delivered to the user on optical media or otherwise in a specific digital format. And quite often a situation arises when it is necessary to save a copy of a particular disk. In this case it may help "ISO image". "ISO file"(often called image "ISO") is an archive file that contains an identical copy (or image) of data found on an optical disk, such as a CD or "DVD". This type of file format is often used for backing up optical discs or for distributing large sets of files to be written to an optical disc.
What's happened "ISO image"
Name "ISO" taken from the name of the file system used by optical media, usually "ISO 9660". Can you imagine the image "ISO" as a complete copy of everything stored on a physical optical disk such as "CD", "DVD" or "Blu-ray" disk, including its own file system. It is a sectoral copy of the disk, and no additional compression is used. Idea of images "ISO" is that you can archive an exact digital copy of a disc, and then use that image to burn a new disc, which in turn is an exact copy of the original. Most operating systems (and many "utilities"– auxiliary computer programs that perform specialized standard tasks for the correct operation of the equipment or operating system) also allow you to mount an image "ISO" like a virtual disk. In this case, all your applications treat it in the same way as if it were an actual optical disc inserted into your personal computer's drive.
While many users use "ISO" to create backup copies of your optical drive, "ISO image", these days, is mainly used for distributing large programs and operating systems because it allows you to store all the files in one easily downloadable file. People can then decide whether they want to mount the image for later use or use it to burn an optical disc.
Most bootable operating systems, including "Windows" and various distributions "Linux", spread like images "ISO". This will come in handy when downloading the current version "Ubuntu" for subsequent installation on your computer or installation of any old game disc on a laptop in the absence of a real physical disc.
How to connect "ISO image"
Concept "install ISO image" means that you will mount your disk image to a virtual optical disk. All your applications will treat the mounted image as if it were a physical disk in your personal computer's drive.
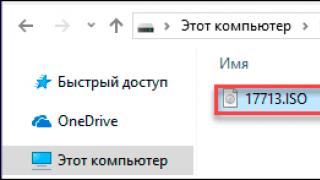
Operating system versions "Windows 8, 8.1 and 10" allow you to mount a disk image "ISO" without the use of additional third-party software. To do this, just open the file explorer "Windows" folder where the image of the required one is stored "ISO disk", and right-click on it to open a pop-up context menu. In the list of available actions that opens, you need to select a section "To plug".

Or in file explorer "Windows" Left-click on the required image "ISO", and then on the Explorer main menu ribbon in the tab in the section "Control" click the button "To plug".

If you are using an operating system on your personal computer "Windows 7"(or a previous, earlier version of the system), you will need to install an additional third-party application, such as the free and easy-to-use application "WinCDEmu".
How to record "ISO image" to disk
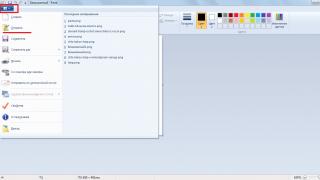
OS "Windows 7, 8 and 10" have an image recording function "ISO" to disk, directly built into the pre-installed services of the system itself. Everything you need to record "ISO image", is to insert an optical disc into the computer drive, prepared for recording, and then use one of two methods to choose from. By analogy with the previously described connection methods "ISO image" you will need to open in file explorer "Windows" folder containing your "ISO image". Now right-click on it and select the command from the pop-up context menu that opens.

Or mark the file with the left mouse button "ISO image" and in the tab in the section "Control" press the button.

Note: If your personal computer does not have a device that allows you to write to an optical disc, you will not see this button. Also, if you have a file compression application installed (such as "7-Zip"), and it is associated with the file extension "ISO", this button will also be unavailable to you. We'll cover this in more detail in the next section.
In the operating system "MacOS" recording function "ISO image" to disk works on the same principle as in the system "Windows", so there is no need to describe it in detail.
How to extract data from an ISO image
If you don't want to mount "ISO image" or burn it to disk, but still need to access the files stored inside, then you can extract its contents to your computer. To do this you will need a third party app like "WinRAR" or "7-Zip". We will show a way to get data from "ISO image" using an example application "WinRAR", but you can use the application you are used to working with.
If when installing the application "WinRAR" you associated it with a file extension ".iso", then to open and view its contents, you only need to double-click the required "ISO image". Depending on the size of the original "ISO file", the opening process may take some time, so be patient.

You can copy any files from "ISO image" into a regular folder by simply dragging and dropping them.
If you want, you can also extract the full contents "ISO image" to a regular folder. In File Explorer, simply right-click on "ISO image" and open the pop-up context menu. Among the available actions, you can use one of three sections to choose from, each containing a specific file extraction command. Team "Extract files" allows you to independently select the location for subsequent extraction of files, the command "Extract to current folder" extracts files to the same location where the file is located "ISO image", and the team "Extract to "folder name"» creates a new folder at the location "ISO image" and gives it a name "ISO file".

Other file compression applications such as "7-Zip", work on the same principle and offer similar features as the application described above.
However, one important detail should be noted. If you install a file compression application such as "7-Zip" or "WinRar", and you allow this application to associate with files "ISO", then you will no longer see the built-in control commands "ISO images" in file explorer "Windows" to fully work with them. So it's better to have a control "ISO images" in the file explorer, because you can still right-click on them and access compression application commands to extract data from "ISO image" whenever you want.
If you have already installed one of these applications and it is associated with image files, then you can easily reassign the file extension "ISO" for file explorer "Windows". To do this you will have to use the application "Options". This application contains all the basic settings of the operating system. And the developers "Windows 10" intend to replace the application with it "Control Panel" to improve the user experience. Therefore, we will dwell in more detail on possible ways to open the application. "Options". We will show you five ways to access the application, and you can choose any method you like for further use.
1 way: Open file explorer "Windows" "This computer". On the Explorer main menu ribbon, select the tab "Computer". On the tab panel that opens, in the section "System" press the blue button with the white gear "Open settings".

Method 2: Click the button in the lower left corner of the desktop "Start", located on "Taskbars", and open the main user menu "Windows". Select the button with the gear shown on it in the left menu panel and open the application. Or, in the list of installed applications, move the scroll bar down and, in the corresponding menu item, select the section "Options".

3 way: Search on "Taskbars" button "Search", presented in the form of a magnifying glass and located next to the button "Start", and open the search bar. Enter your search phrase in the query field "options". The system will analyze in the graph "Best Match" Click on the link of the application you are looking for.

4 way: Click icon "Windows Action Center", which is located in the lower right corner of the desktop on "Taskbars". In the pop-up sidebar menu, find the shortcut buttons at the bottom. To open the desired application, press the button "All parameters".

5 way: The easiest and fastest way to call an application "Options"– press the keyboard shortcut together "Windows + I" and open the app directly directly.

On the main page, go to the section "Applications". Next, in the left panel of the new page, select the section "Default Applications". In the right pane, move the scroll bar to the bottom of the page and click the text link.

The next window displays a very long list of file extensions. Use the scroll bar to find the extension in the list provided. ".iso". Next to the indicated icon in the right half of the window, click any application that is currently associated with the file extension ".iso". From the pop-up menu, select the file explorer option "Windows".

How to create your own file "ISO" from optical disc
Process of creation "ISO file" from Discs allows you to get a digital backup of your physical discs. Then you can use the created "ISO files" to install them on computers that do not have an optical drive. In the future, you can create additional copies of the disk image from your existing "ISO file" without using the original physical disk. And of course you can share it "ISO way" with other people.
While operating systems "MacOS" And "Linux" come with pre-installed software that allows you to create "ISO image" from a physical disk, in the operating system "Windows" there is no such possibility. Instead, you'll have to use a third party app to create "ISO file"
An ISO image is created to compactly combine several files and folders into a single file. This is easy to do with the help of special applications. This manual offers an introduction to only some of them. Their advantage is that they are freely available, have proven themselves and are easy to use. You can create an image while preserving the file system and boot sectors of the disk.
Users create an ISO disk image when they want to increase the life of a CD. It is not large - external drives wear out quickly. To be on the safe side, you can save the necessary data by making a copy of the disk. Service information, such as copy protection, is not included in the image. The image itself can be created, mounted, and protected with a password using applications that have different versions - free and paid. CDBurnerXP is a program with great functionality, access is free on its official website. It will help you create an image of a boot disk and split voluminous information into a number of disks. After burning, it analyzes the result and writes to any CD/DVD disc, including double-layer ones. Works on all versions of Windows and has many awards. The downside is that it doesn’t work with a virtual drive. After installation, run the program to create an image from the selected files. In the window, select the top item “Data disk”, click “Ok”. For the project, select the files, folders that you want to include in the image. Go to the “File” menu, here click on the line “Save project as ISO image...”. Enter the name of the future image in the “File name” field below. Finally, click “Save”. That's it, the image from the selected files is saved under the specified name in the specified location. Similarly, you can create a copy of the entire disk. Select "Copy disc" from the main menu. If there is one drive in the computer, it is used as a “Source” and “Sink”. A temporary image will be created on the hard drive, then copied to the destination disk after it is installed. The “Source” disk is ejected automatically; you should replace it with a clean one. To save the image on the hard drive as a destination, specify “ISO” as the file type, and set the switch to “Hard Disk”.


In the absence of a special utility, you can extract files from the image using the WinRar program, just like from a regular archive. Before creating a disk image, be sure to check its functionality, as well as the state of the destination disk, otherwise the process will fail.
A disk image is an ISO file that stores all the contents of the original media. There are other formats, but this is the most popular.
The computer recognizes the virtual image in the same way as a physical disk. Even if related files were stored on the original media, they will work correctly as an image. Therefore, most often they create disk images with installation files for games, programs and operating systems.
Modern operating systems read ISO files without additional programs. On older operating systems, you can use utilities like Daemon Tools for this. You can also open the image and view its contents using a regular archiver.
Why create disk images?
Let's say you bought a DVD/Blu-ray with a game or movie. Over time, scratches appear on it, which is why you can lose the recorded information. And the disk itself is easy to lose. In addition, it makes noise as it rotates in the drive, and the speed of reading data from it is lower than from computer memory. All these problems can be solved by creating a virtual disk image.
If the disk is copy protected, most likely it will not be possible to create an image of it.
Another example: you have a Windows distribution disk. It can be used for or OS, but a flash drive is much better suited for these purposes. Moreover, many modern computers do not have disk drives at all. But you can create a disk image and make a .
How to create a disk image in Windows
Ashampoo Burning Studio FREE is one of the most convenient utilities for creating disk images. Its interface has been translated into Russian, it takes up little space and is also free. During installation, the program requests a license key, but you can receive it by email after quickly registering an account.
Immediately after launching the utility, select “Disk Image” → “Create Image”. Then insert a physical disk into the drive and wait until the program recognizes it, then click “Next”. Then specify the folder in which the image will be created and select the ISO format. Click “Next” again and wait for the copying to complete.


The disk image will appear in the location you specified in your computer's memory.
If for some reason you are not satisfied with this utility, you can use similar free programs like BurnAware Free or CDBurnerXP.
On a Mac, this can be done in the standard Disk Utility, available in Finder → Programs → Utilities. After launching it, insert the desired disk into the drive and click “File” → “New image” → “Image from [name of your disk]” in the top menu.

In the next window, enter the short name of the future image in Latin. Specify the desktop as the destination and select the “DVD/CD Master” format. After that, click “Save” and wait until the copying is completed.
The created image will appear on the desktop and will have a CDR extension. If you plan to use it only on , then you can leave this format. But for Windows computers to read it, you need to convert the CDR file to ISO.
To change the image format, run the Terminal utility. Type cd desktop and press Enter. Then enter the second command hdiutil makehybrid -iso -joliet -o [name 1].iso [name 2].cdr, after replacing [name 1] and [name 2] with the names of the future ISO file and the already created CDR file, respectively. Then press Enter again - after a while the ISO image will appear on the desktop.
Let's say we first created a CDR file called olddisk. Then we choose, for example, the name newdisk for the future ISO image. As a result, the commands for our case will look like this:

A disk image is a file that contains the most complete information about the file structure and data of any media (hard drives, optical disks, USB drives, etc.). It can be used for completely different purposes (installation or system recovery, data backup). The following will show you how to create an ISO image. Let's take Windows 7 as the platform used. But consideration of this issue is inextricably linked with what kind of result should be obtained.
How to create an ISO disk image in Windows 7: options
Despite the fact that today you can find quite a lot of image formats, we will focus on considering all the procedures based on the most popular ISO format, which is supported by all programs and systems.
So how do you create an ISO image? Windows 7 is a platform that is perfect for such purposes. Based on further use, images can be divided into several categories:
- installation distribution image;
- to boot and restore the system;
- a backup image of Windows, programs and user information.
Most popular programs
Today, you can find quite a lot of applications on the software market that can work with images. The most popular are the following:
- UltraISO.
- Daemon Tools.
- Nero.
- Alcohol 120%.
- ISO Workshop.
- Acronis True Image, etc.

With a wide variety of all kinds of software, you should also take into account that Windows systems themselves have good tools for working with images. This particularly applies to backup and recovery. Like most of the above-mentioned programs, such tools allow you to create images in a matter of minutes. True, if the contents of a hard drive or virtual partition are copied, it may even take several hours. It all depends on the amount of information.
Creating a disk image using Microsoft resources
Few people know that recently developers from Microsoft Corporation have provided users of licensed Windows 7 operating systems with the opportunity to create a system image for recovery in case of unexpected failures directly on the official web resource. How to create an ISO image of Windows 7 in such a situation? As it turns out, it’s as simple as shelling pears. To do this, you need to go to the Microsoft website in the Software section, scroll down the page and see if the product license key is actually listed there (nothing will work without it).

If there is a key, then through the “Control Panel” you need to go to the system and security section, where the “System” subsection is selected and activate the security key check (this can also be done through the RMB menu on the computer icon, where the properties line is selected). If the key is valid, the browser will begin creating an image directly on the site, with which you can subsequently perform a recovery.
How to Create a Bootable Windows 7 ISO Image
If you don't have a key, you can use another tool. The question of how to create an ISO image of Windows 7 using system tools is resolved through the archiving and recovery section. Here, in the menu on the left, you need to use the image creation item, and after scanning, the system will prompt you to select the option for saving data (hard drive, optical media, network location). If we are only talking about creating a disk from which you can then boot and fix some malfunctions or glitches, you can choose DVD-ROM. However, if you are backing up an entire disk partition, it is better to save the copy on a hard drive (you may need too many optical disks).

Additionally, you can use the creation of a recovery disk from which the boot will be made if a backup copy is saved on the hard drive. In principle, you can use third-party utilities, but when creating an image you should pay attention to one point. The image you create must have boot entries. For example, UltraISO offers to create an ISO image of Windows 7 through the boot menu (Make Disk Image). In this case, we mean a copy of the hard drive with a working system. From it in the future it will be possible to restore not only the OS itself, but also all installed programs in a few minutes.
Creating an installation image
Finally, one more aspect. Let's say you want to create an ISO image of Windows 7 as an installation distribution that you can save to your hard drive or burn to optical media. To do this, you will need a real DVD with the distribution and one of the above programs. For convenience, again, let's take UltraISO.

We insert the original DVD into the drive, and in the running program we use the tools menu, where the image creation line is selected (to quickly call the procedure, you can press the F8 key). Next, select the drive with the distribution, indicate the storage location and the name of the image file being saved, and set the output format (in our case, ISO). After that, click the “Make” button and wait for the process to complete. The file will be saved in the selected directory. Then it can be written to an optical disc.
Instead of an afterword
Finally, it remains to add that when creating images, you should initially pay attention to what kind of data such a file should contain. Depending on the purpose and sequence of actions will be different. In terms of the programs used, the user himself decides what to give preference to. In general, all means are good. However, it is believed that backups can be created both using system tools and using third-party programs, but making copies of optical media using Windows tools is a troublesome task. All you have to do is copy files to the hard drive, displaying hidden objects, then write them to disk, etc. Moreover, such a copy will not be an image. To simplify all these procedures, we can speak with 100% confidence about the advantage of third-party utilities.
You may need to create an ISO image when you need to burn a bootable disk or flash drive, for example with Windows, or copy a disk, for example with a game. In order to make an image of the desired disk, a special program is needed.
There are several popular programs for burning ISO image files, both paid and free. One of the most popular paid programs is Alcohol 120%, which allows you to both create ISO files and images, and emulate a virtual disk (disk drive).
Watch the video: how to create a disk image on a flash drive.
And probably the most popular free program for burning images is CDBurner (Office website: http://cdburnerxp.se). This program has more than sufficient functionality and allows you to perform most common operations with disks and flash drives, from creating images and copying disks, to recording audio and video. Also in CDBurner you can make an ISO image from any folders or files; to do this, you need to select them and move them to the project window.
The interface of the CDBurner program is intuitive and understanding it will not be difficult. If you have any questions, you can ask them in the comments to this article.
Another shareware and quite popular program for creating ISO disk images is UltraISO (http://www.ezbsystems.com/ultraiso/index.html). The UltraISO program has a trial period during which you can try out the functionality, after which you will be offered to purchase a paid version. The maximum size of the created image in the free version of UltraISO is 300 MB (This is clearly not enough to burn a boot disk with Windows, but it is quite enough for the test).
How to burn an ISO disk image to a USB flash drive (flash drive).
Sometimes, for example, if your laptop or netbook does not have a disk drive, you need to burn a disk image (usually a boot disk with Windows OS) onto a flash drive. Using flash drives is much more convenient and convenient than slightly outdated CDs and DVDs. And the UltraISO program will help us with this again.
Before you burn an ISO disk image file to a flash drive, you need to format it. To do this, go to “Start” - “Computer”, right-click on the icon with your flash drive and select the appropriate menu item.
After the flash drive is formatted, launch the UltraISO program and in the upper left corner click “File” - “Open” and select the required (pre-created or downloaded) ISO image. After that, go to the item “Boot” - “Burn hard disk image” and select our flash drive, then click “Burn”. Ready!
The advantage of installing Windows from an ISO image recorded on a flash drive is that it is much faster and the likelihood of errors and installation interruptions is minimal, unlike installation from a CD or DVD.
Rate the article!