In this article, you will find all the information you need to know about setting up an access point for Windows 8 and Windows 8.1... We will configure the distribution of the Internet from a laptop that runs on Windows 8 and connect our phone, tablet, another computer, TV, etc. to this laptop via Wi-Fi. Our computer will act as a Wi-Fi router.
I have been going to prepare this article for a very long time, as this is a very popular topic on this moment... The article received a lot of views and comments. And even popular ones too.
Briefly about what we are going to do, and why generally launch an access point on a laptop.
For example, you have a laptop (possibly a personal computer with a Wi-Fi adapter), there is a wired internet (or internet via 3G / 4G modem), and devices that can be connected to the Internet via Wi-Fi. Modern smartphones, tablets, laptops, TVs, almost everyone has this opportunity. And you have the Internet via cable, or from a USB modem.
We connect the Internet to a computer that has Wi-Fi and run an access point on it. In this article we will do this using the example of Windows 8. That's all, our laptop receives the Internet via cable, and distributes it via Wi-Fi to the devices we need. That's the whole scheme 🙂. If you don't want to spend money on buying a Wi-Fi router, or you just don't need it (for example, you rarely need Wi-Fi), then this method is what you need.
Setting up the distribution of the Internet on Windows 8 practically does not differ in any way from setting up on Windows 7 (there is a link to the instruction at the beginning of this article)... But, I understand that it is much easier to do everything according to the instructions, which are written specifically for the operating system that is installed on your laptop. And since Windows 8 (8.1) is actively gaining momentum, this article will be useful.
What do I need to do before setting up an access point?
- You need to connect the internet to your laptop. By cable, or via USB modem. There may be some nuances with a USB modem, see the article if you have the Internet via a modem. There's an article for Windows 7, but that's okay. If the Internet is connected via a network cable, then there should be no problems. The Internet should work, sites in the browser should open.
- Make sure your laptop has Wi-Fi and the driver is installed on it. If you have previously connected to wireless networks from this laptop, then everything is fine, then the driver is installed. If you do not know if the driver is installed on the wireless adapter, then go to Control Panel - Network and Internet - Network Connections and see if there is Wireless network... If there is, then everything is fine. If not, download the driver for your model and operating system from the website of the manufacturer of your laptop (adapter) and install it. Driver for wireless Wireless LAN adapter.
That's all, you can start setting up.
Configuring a Wi-Fi hotspot on Windows 8 using the command line
This is the first way in which we will not use third-party programs, but will do everything as standard features of the operating system. This method is a little more complicated than the second one, which you will find below. But, sometimes it is even easier to configure everything through the command line. And problems may arise through third-party programs.
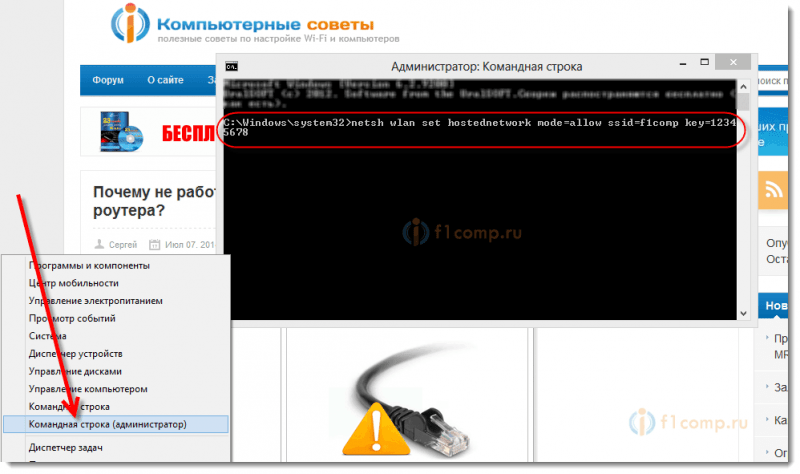
Right click on the lower left corner (or the keyboard shortcut Win + X), and select Command Line (Admin).
In the Command Prompt window, enter the command (you can just copy and paste):
Where “f1comp” is the name of the network, it can be anything. English letters.
And “12345678” is the password for the network. You will need to enter it on the device that you will connect to Wi-Fi. Please enter a password of at least 8 characters. You can use numbers and English letters.
 Click on Enter.
A startup result should appear with information that the network name and password have been successfully changed.
We enter one more command:
This is the command to start the access point. Push Enter, and we see the following result:
 It should be written that the hosted network is up and running. If you have the same result as mine in the screenshot above, then you can continue. You can close the command prompt window.
If you see an error Failed to start hosted network, then run two commands in turn:
netsh wlan set hostednetwork mode = disallow
netsh wlan set hostednetwork mode = allowGo to Device Manager, open in the list Network adapters, right click on Hosted network virtual adapter and choose Turn on.
We execute two commands to start the network, which I wrote about above:
netsh wlan set hostednetwork mode = allow ssid = f1comp key = 12345678
netsh wlan start hostednetwork
Allow Internet Sharing
Right click on the connection icon, in the lower right corner. Select item Network and Sharing Center.
In the new window, on the left, click on the item Change adapter settings... Further attention! Right click on the connection through which you get the internet ( I have it Ethernet, since just the network cable is connected to the laptop), and select Properties.
In the new window go to the tab Access... Check the box next to Allow other network users to use this computer's Internet connection.
Below in the list, select the network that appeared after the launch of the access point. Most likely, it will look something like the screenshot below.
Click on OK.
You can take your device and connect it to the Internet via Wi-Fi, which is already distributed by our laptop.
You can see the instructions for connecting to Wi-Fi:,.
The most popular problem is when the device connects to an access point created on Windows 8, but the Internet does not work. Websites do not open. Or when you have problems getting an IP address.
Solution: completely disable antivirus, antivirus utilities, firewalls. Most likely, they are blocking the connection. If after disabling the antivirus everything works, then you need to add the connection to the antivirus exceptions.
Also, check your Internet sharing settings as in the screenshot above.
How to start the network after restarting the laptop?
You probably have a question, but how to restore the wireless network after restarting the laptop.
You just need to run the command:
netsh wlan start hostednetwork
How we did it above in the article. You do not need to enter the network name and password again. Just start the network.
We distribute the Internet in Windows 8 using the MyPublicWifi program
This is an easier way. We will start the network not through the command line, but using the program MyPublicWifi... This is a free, small program with an intuitive interface, albeit without the Russian language. Instead of MyPublicWifi, you can use Virtual Router Plus, Connectify and the like. The principle of their work is the same.
Download and install MyPublicWifi. Version 5.1 can be downloaded from the link (I took the file from the official site http://www.mypublicwifi.com).
The installation is standard. After installation, restart your laptop and launch MyPublicWifi. If an error appears at startup, then right-click on the MyPublicWifi shortcut and select Run as administrator.
Highlight item Automatic HotSpot configuration.
In field Network Name (SSID) specify the name of the network to be created.
In field Network key specify the password that will need to be specified on the device to connect.
Check the box next to Enable internet sharing and select from the list the connection with which your laptop is connected to the Internet.
Click on the button Set up and Start Hotspot.
You can already connect devices to the created network. If, again, there is a connection to the network, but the Internet does not work, then check the Internet sharing settings (I wrote about this above in the article) and disable antivirus, firewall and other programs that might block the connection.
In the MyPublicWifi program, on the tab Clients you can see the devices that are currently connected to your network.
And on the tab Management you can further customize the program. For example, by checking the box next to the item Enable Firewall ... we will prohibit devices that connect to your network to use to download and share files through clients such as Torrent and the like.
And if you check the box next to MyPublicWifi Will be launched on every system start, then the program will start automatically when the computer is turned on.
Everything is ready! You can use the Internet.
If you encounter any problems, errors and other difficulties during the setup process, then you can ask a question in the comments. Describe the problem in as much detail as possible, and we will try to figure it out together. Best wishes!
More on the site:
We configure the distribution of the Internet via Wi-Fi from a laptop on Windows 8 and Windows 8.1. Access point setting updated: February 6, 2018 by: admin
Home wireless networks are very convenient nowadays, because thanks to internal Wi-Fi, we can connect any devices equipped with a Wi-Fi module to the Internet. And if you don't have a router at hand? How to set up a laptop to share Wi-Fi and use it as an access point?
Preparing the laptop
It is worth immediately answering a fairly common question that worries more and more laptop users: can a laptop distribute Wi-Fi? The answer is simple: yes, any wireless adapter works to receive and transmit data. This means that the same wireless adapter is capable of receiving and distributing the Internet via Wi-Fi.
Updating network drivers, in particular for the Wi-Fi module, is the first place to start.
You can always find and download suitable software on the official website of your laptop manufacturer. In addition, you need to immediately set up sharing. This is done quite simply.
Look for the Wi-Fi icon in the Windows system notification area (the so-called system tray - the area to the right of the clock and date). Click on this icon and go to the network control center.
A window will open. Here you will need to go to the "Change advanced sharing settings" section.
Thus, we have opened a menu in which you can configure sharing for remote devices. Now all that remains is to enable sharing at all points. Here we cancel password-protected sharing. Click "Apply".
That's it, now you can proceed directly to setting up the distribution of the Internet via Wi-Fi from a laptop. There are three ways to do this:
- Through the command line.
- Create a wireless computer-to-computer connection.
- Through the Virtual Router Plus program - you need to download and install it.
Each of the options above has its own advantages and disadvantages. Moreover, depending on what goals you are pursuing, it is worth choosing the method of organizing the distribution.
For example, the second option allows you to create a wireless network only for computers, smartphones and tablets will not be able to connect to it. Such a network is intended only for laptops and netbooks, as well as stationary computers with Wi-Fi modules installed. So let's take a closer look at all of these options.
Configuring distribution on the command line
The distribution of Wi-Fi is configured only in the command line launched as administrator (has full access to the system). In Windows 7, launching it is quite simple: open the Start menu (you can simply press the Windows key or click on the corresponding icon in the lower left of the desktop). Next in the search line write CMD. Above, you will see the search results. Find the CMD line in the list of options provided. This is the command line. Click on it with the mouse and select "Run as administrator".
In Windows 8, running Command Prompt as administrator is even easier. To do this, you can use the key combination + [X]. A pop-up menu will open. Select the "Command line (administrator)" item in it.
Now you need to enter two simple commands:
- The command to organize the distribution is netsh wlan set hostednetwork mode = allow ssid = My_virtual_Wi-Fi key = 12345678 keyUsage = persistent. After writing, press "Enter". Here SSID = My_Virtual_Wi-Fi is the network name. Instead of “My_Virtual_Wi-Fi, you can write any other name. However, only the letters of the English alphabet can be used. KEY-12345678 is the password. Instead of numbers 12345678, you can write any other password. It can consist of letters of the English alphabet (including capital letters) and / or numbers.
- To start virtual distribution, prescribe - netsh wlan start hostednetwork and press "Enter".
The connection has been created. Now you can group any devices - smartphones, tablets, other computers and laptops, TV, printer and so on. But so far, you have no Internet access.
To open access to the global network, you need to make some settings on the distributing computer. This is configured in the Network Control Center. Open the tool and go to the "Change adapter settings" section.
Find your internet connection here. This can be a wireless or cable connection, or a USB modem. Click on the method of connecting to the Internet with the right mouse button and select "Properties".
Go to the "Access" tab. Here you need to set the marker in the line "Allow to use the Internet connection of this computer."
Now we pass to the item "Connecting a homegroup". Here you should select our created network (usually called "Wireless Network Connection 2"). If there is no such line, then just put a tick and click "OK". That's it, the Wi-Fi access point on the laptop has been created, and all connected users will have access to the Internet.
How to create a Wi-Fi hotspot in Windows 8 from the command line: Video
Create a computer-to-computer connection
As mentioned above, this distribution method will only work for laptops and other computers equipped with a Wi-Fi adapter. So, start the Network and Sharing Center. In the "Change network settings" section, select the first item called "Set up a new connection or network."
In the line "Network name" write the name of the virtual connection. You need to come up with it yourself. But it is always worth remembering that a name can only include English letters and some symbols, such as an underscore or a hyphen.
Security type - "WPA2-Personal". This is the most secure type of encryption. Below, in the line "Security Key", enter the password (think of it yourself). After that, set the marker in the line "Save network settings" and click "Next".
After that, we set up general access and allow the Internet connection. How to do this is described above. Remember that the sending computer itself must be connected to the virtual network. Otherwise, other devices simply won't find it.
The disadvantage of this method is that only computers can connect to such a network. Moreover, you will not be able to receive Internet over Wi-Fi. That is, in order for users of such a virtual network to be able to access the Internet, you will need a cable connection or a USB modem.
Distribution of Wi-Fi from a computer without a router: Video
Using Virtual Router Plus
This distribution method is the second way to distribute Wi-Fi from a laptop to a phone. Its advantage is that users do not need to configure anything. However, you will have to find the utility on the Internet and download and then install it on your computer.
After the first launch of the program, you just need to enter the name of the virtual network and the password to it (think of it yourself). After that, specify your Internet connection or just click the "Refresh" button in the form of two oppositely directed arrows.
That's it, after that the network will be created, and you will be able to fully use it. Basically, this program uses built-in tools, just like the command line. But the app is much easier to set up.
Now you know how to make a laptop a Wi-Fi hotspot. Moreover, you know three different ways. Be careful when setting up sharing and distribution, and you will succeed.
Installing and Configuring Virtual Router Plus: Video
I work as a private computer foreman. I have been professionally engaged in computer repair for over 12 years, as an amateur since the 90s.
For two years he worked as the head of a service center specializing in connecting subscribers to the Internet and computer assistance.
If you need to share the Internet with multiple gadgets, but don't have a router at hand, you can do without one. This instruction will help you turn your computer into a router for distributing the Internet through an access point (Wi-Fi network) or an Ethernet wire.
1. How to distribute the Internet from a computer using the "Mobile hotspot" function (Windows 10 only)
1. Find the Mobile Hotspot menu: select Start → Settings (gear) → Network and Internet → Mobile Hotspot.
2. In the "Internet Connection Sharing" field, select the type of connection that connects the current computer to the Internet. It can be a Wi-Fi (or 3G) or Ethernet wireless connection.
3. Click "Change" and in the next window specify the name and password for the new wireless network through which the computer will distribute.

4. At the top of the page, enable the "Allow other devices to use my internet connection" option.
After that, you will be able to distribute the Internet through the created Wi-Fi network. It is enough to connect the necessary devices to it using the password created in the third step. And you can turn off the distribution of the Internet in the same place where the wireless connection is turned off - in the "Network" window on the taskbar.
1. Start the command line. To do this, enter "Command" in the search for the system, right-click on the found element and select "Run as administrator".
2. To create a new distribution network, type netsh wlan set hostednetwork mode = allow ssid = Stacy key = 4419E1z # at the prompt and press Enter. Instead of Stacy, you can enter any other network name, and instead of 4419E1z # - any other password.
3. To activate the created access point, enter the command netsh wlan start hostednetwork and press Enter again. If the commands worked, you will see the following text.

4. Now allow other users to access the Internet through the created network. First, open the Windows Control Panel and select Network and Sharing Center.
5. Then right-click on the icon for connecting your computer to the Internet, select "Properties" → "Access" and check the boxes next to the permission requests. In the "Home network connection" field, select the wireless connection created in the second step of the instructions.

After that, you can connect other devices to the Wi-Fi network configured in this way using the specified password. To disable the hotspot, type netsh wlan stop hostednetwork at a command prompt. To re-enable it, use netsh wlan start hostednetwork.
If the Internet does not work on the connected devices, open the Device Manager menu through the Control Panel, expand the Network Adapters item and check that all devices from this list are turned on. If you find inactive among them, enable them using the context menu.
If you encounter other problems, try reinstalling the network adapter drivers manually by downloading them from the manufacturer's website, or automatically using the Driver Booster program or a service. The latter will do everything for you.
If you don't want to mess with the command line, you can use a special utility to quickly set up a wireless access point. With the free Connectify Hotspot software, you'll be up and running in minutes.
- Download and install Connectify Hotspot.
- Run the program and follow the prompts on the screen. The Russian interface language can be selected in the settings. The utility will ask you to set the type of computer connection to the Internet and the parameters of the new wireless network. After that, it remains to click on the start button to activate the access point.

When you're done, you can share the Internet to other devices over Wi-Fi. You can manage the wireless network right in the program window.
Connectify Hotspot also has a paid version with additional features. For example, it allows you to distribute not only fixed Internet via Wi-Fi, but also 3G and 4G. Hotspot Pro costs $ 35.
- Connect the Ethernet ports of both devices with a cable.
- On the computer from which you want to share the Internet, open the "Control Panel" and go to the "Network and Sharing Center" → "Change adapter settings". The names may vary from version to Windows.
- In the window that opens, select two connections using the Ctrl key. The first one should be responsible for connecting your computer to the Internet. The second is for connecting a second computer to this one. Right-click on any of the two connections and select "Configure Bridge".

In a few seconds, a new connection should appear with the name "Network Bridge", and the status "Connected, Connected" should be displayed next to the used connections. If everything goes well, the Internet will work on the second computer. But this may not happen immediately, but after 10-15 minutes.

In macOS, it's pretty easy to set up Internet sharing both by cable and via. You do not need additional programs for this.
- Expand the Apple menu and go to System Preferences → Sharing.
- Check the "Shared Internet" box on the left pane and specify the type of connection between the current computer and the Internet in the "Shared connection" list on the right side of the window. For example, if it is connected to the Network via a cable, choose Ethernet.
- In the For Computers Using box, select a method for sharing the Internet with other devices. For example, if you want to distribute the Internet without wires, choose Wi-Fi, if by cable, then Ethernet.

If you selected Wi-Fi, uncheck the Internet Sharing box, click Wi-Fi Settings and set the hotspot name and password, then check the Internet Sharing box again.
After making these settings, you can connect other devices to your computer using the selected method.
Today we'll talk about how to distribute the Internet via Wi-Fi from a laptop or from a computer that has an appropriate wireless adapter. What is it for? For example, you bought a tablet or phone and would like to access the Internet from it at home using any browser such as Google Chrome (see the article Google Chrome Secrets) without purchasing a router. In this case, you can distribute Wi-Fi from a laptop that is connected to the network both wired and wirelessly. Let's take a look at how to do this. In this case, we will consider at once two ways of how to make a laptop a router. Ways of distributing Wi-Fi from a laptop are considered for Windows 7, Windows 8, they are also suitable for Windows 10. If you prefer non-standard, or do not like to install additional programs, then especially for you, the way in which the implementation of distribution over Wi-Fi will be organized using the Windows command line.
So let's get started
When the list of network connections opens, right-click on the wireless connection and select "Properties"

Switch to the "Access" tab, check the box next to "Allow other network users to use this computer's Internet connection", then - "Ok".


Run the command netsh wlan show drivers (complete list of CMD commands) and see what it says about hosted network support. If supported, then you can continue. If not, then most likely you have installed a non-original driver for the Wi-Fi adapter (install from the manufacturer's website), or a really very old device.

The first command that we need to enter to make a router out of a laptop looks like this (you can change the SSID to your network name, and also set your password, in the example below, the ParolNaWiFi password):
netsh wlan set hostednetwork mode = allow ssid = "password" key = "Parol"

After entering the command, you should see a confirmation that all operations have been performed: wireless access is allowed, the SSID has been changed, the wireless network key has also been changed. Enter the following command
Netsh wlan start hostednetwork

After this entry, you should see a message that "Hosted network is running." And the last command that you may need and which is useful in order to find out the status of your wireless network, the number of connected clients or the Wi-Fi channel:

Ready. Now you can connect via Wi-Fi to your laptop, enter the specified password and use the Internet. To stop the distribution, use the command
Netsh wlan stop hostednetwork
Unfortunately, when using this method, the distribution of the Internet via Wi-Fi stops after each restart of the laptop. One of the solutions is to create a bat file with all the commands in order - see how to do this in the video under the material (one command per line) and either add it to startup, or run it yourself when necessary.
Using a computer-to-computer network (Ad-hoc) to distribute the Internet via Wi-Fi from a laptop in Windows 7 without programs
In Windows 7, the method described above can be implemented without resorting to the command line, and it is quite simple. To do this, go to the Network and Sharing Center (you can through the control panel or by clicking on the connection icon in the notification area), and then click "Set up a new connection or network".

Select the option "Set up a wireless network computer-to-computer" and click "Next".

In the next step, you will need to set the network SSID, security type and security key (password on Wi-Fi). To avoid having to re-configure the Wi-Fi distribution every time, check the "Save this network settings" item. After clicking the "Next" button, the network will be configured, Wi-Fi will turn off if it was connected, and instead, it will wait for other devices to connect to this laptop (that is, from this moment you can find the created network and connect to it).

In order for the Internet to be available when connected, you will need to share the Internet. To do this, go to the Network and Sharing Center again, and then select "Change adapter settings" in the menu on the left.
Select your Internet connection (important: you must select exactly the connection that directly serves to access the Internet), right-click on it, click "Properties". After that, on the "Access" tab, enable the checkbox "Allow other network users to use the Internet connection of this computer" - that's all, now you can connect to Wi-Fi on your laptop and use the Internet.

Note: in my tests, for some reason, the created access point was seen only by another laptop with Windows 7, although according to reviews, many people work with phones and tablets.
From time to time, users of the worldwide network are faced with situations when there is no router and you need to distribute Wi-Fi from your own laptop. For example, such a problem can arise in a co-working space or even in an office if the router is out of order. And it happens that there is no router at home, and guests need access to the Internet. How to find a way out if there is no special program at hand?
When the router breaks down, and even a friend's phone refuses to connect to it, you can set up an additional signal from the laptop and, one might say, save the situation. So, we need to create an accessible point for wi-fi. This can be done in several ways. The job of creating an accessible point is not difficult and you can handle it even if you own a PC at the level of a beginner user.
Important! Before starting the configuration, check if the Internet is connected, make sure it is working properly.
You are offered a simple but detailed instruction (step by step) on how to configure and start a mobile hotspot using the OS parameters or the command line.
The necessary hotspot can be created without the knowledge of special programs, and there is no need to get the education of a network administrator. Let's use the standard built-in Windows tools. The easiest way is to manipulate the "Parameters".

Step 1. Open "Start", click on the gear sign.

Step 2. We enter the subsection "Network and Internet".

Step 3. And then we select "Mobile Hot Spot".

Step 4. In the subsection "Internet Connection Sharing" we select the method for your PC to enter the Internet. For example, "Ethernet". Under the grid name and password there is a "Change" button. You must click on it.

Step 5. A form for entering information will open. Now come up with a name for your grid and a password. It will be entered by your guests or colleagues. Be sure to save the name of the network and the password from the network.

Step 6. At the very top of the page, activate the option allowing the use of your Internet connection on the devices of your colleagues or guests. Where the switch is set to the off position should be "On".

This concludes our brief tutorial for the built-in system capabilities. The created hot spot can be used in every way. The speed, of course, will depend on the parameters of your mobile hotspot, 3G modem or built-in Wi-Fi adapter.
When it comes time to turn off the distribution of traffic, we do it through the "Network" window on the taskbar.
Configuring the distribution of the Internet in the command line
If our step-by-step instructions outlined above did not work, we suggest the second method. He may be more difficult, but he will be able to help you out.
Step 1. We open the command handler. As a reminder, the console opens in the Start menu. Click on "Start" with the right mouse click, in the window that opens, select the command line with administrator rights. A black window will open. We register special directives in it.

Step 2. First, let's find out if our equipment has the ability to distribute Wi-Fi. This check is performed by entering the "netsh wlan show drivers" directive into the command line, confirming the action with the "Enter" key.
Important! Note that all commands mentioned in this article are entered without quotes.

Step 3. In the black window that opens, we find the line "Hosted network support". In the above line, we need to see the word "Yes". The word "No" signals the need to reinstall the driver.

Step 4. Our next action is to enter the directive: "netsh wlan set hostednetwork mode = allow ssid =" networkname "=" password "", confirm by pressing the "Enter" key.

Step 5. Another command that fits directly in order to start the point, type it "netsh wlan start hostednetwork", press "Enter".

Step 6. Having closed the black window, right-click on the "Start" icon. Now we need "Network Connections".

Step 7. Click on the "Ethernet" icon with the right mouse click, left click on the "Properties" option.

Step 8. To provide others with the opportunity to connect to the Internet, put a tick in the box "Allow others ...". We select below "Local connection ...." (ends with a number).

We put a tick in the boxes "Allow other users to use ...", select from the list "Local Area Connection ..."
Distribution of wi-fi from a computer running Windows 7
In this version of Windows, distribution is configured in the same way. For those who are interested in distributing wi-fi to android, we will answer: in principle, there is no difference what your device is and what OS it works on, the algorithm will remain the same. Windows 7 has a virtual wi-fi function.
Step 1. To call the command line of this version of the system, you need to enter "Start / START", find the search line and type "cmd" there. Right-click to bring up the menu on the console, select the launch line from the administrator's name.


Step 2. The directive that we print at this stage: "netsh wlan set hostednetwork mode = allow ssid =" networkname "key =" password "keyUsage = persistent", press "Enter".
Reference! Of course, we replace "networkname" with the name invented for our hotspot. We replace the expression "password" with your password.

When everything went well, in the black window you will read a report stating that the creation of the grid is possible, and the secret word and networkname have been changed.
Step 3. To start the hot spot, the same command is used as in the tenth version of Windows, namely "netsh wlan start hostednetwork", after entering it, press "Enter".

Step 4. The task is practically completed and now you can use your laptop as a router, the hotspot has already been created. It remains to allow the devices of friends and guests to connect. Right-click on the Internet icon on the taskbar, and then select "Network and Sharing Center".

Right-click on the Internet icon on the taskbar, and then left-click on the line "Network Control Center ..."
Step 5. On the left side, you need to find the "Change adapter settings" option.

Step 6. The newly created wireless network is not yet connected to the Internet. Our next action is to find the adapter through which your PC provides access to the worldwide network. If the PC is connected via a cable, then we are interested in the parameter “Connection by local. network ", expanding it by double-clicking the mouse, we will get to" Properties ".

Step 7. In the new window, we will need a second tab "Access", mark the item allowing access for all network users, click "OK".

Step 8. Now all that remains is to restart the PC. We start the distribution of wi-fi by entering "netsh wlan start hostednetwork" into the command handler, press "Enter".
We remind you that when we initiate the distribution of the wi-fi signal through the command line, we should:
Step 1. Click on the "Start" icon with the right mouse click. In the open window, select a command handler with administrator rights from the list of suggested actions.


Step 2. We use the command already known to us (the one in which we replace the networkname and password with our own, invented by us).
Important! Remember that if an error has crept in in one symbol in the command, you will not be able to create a hot spot. At first, it is good to store such long commands on your PC in separate text files or write them down in
Step 3. After entering this command, we already have an access point, it remains to start it. To start the grid, use the command already mentioned above (with the word "start" inside).

On a note! By the way, if we replace the word "start" with the word "stop" we will stop the network.
Step 4. To set up a hotspot, go to the "Network Control Center":

Step 5. There we change the adapter parameters. To do this, you need to click "Change parameters ..." (on the left side).

Step 6. Then double-click on the main connection icon, in the example it is "Ethernet".

Step 7. In the properties, click on the "Access" tab.

Step 8. We put a mark in front of the line that allows other users to connect to the network. Under the line "Connecting to a home network" we set the name of our created grid.

We put a tick in front of the word "Allow ...", under the line "Connect to home network" you should select the name of your created grid, click "OK"
From now on, the traffic your laptop receives can be distributed to others. Join the network!
We hope that our material answered your questions and helped you figure out how to configure a wireless access point on your device.
Video - How to distribute Wi-Fi from a laptop using Windows


