04.03.2017
Microsoft Office Word is not only a tool for creating and editing text documents, but also a wonderful drawing program. However, it will not work to create a masterpiece in Word. But still, the ordinary man in the street will have enough of a standard set of functions. With the help of templates, it is possible to create a simple drawing.
First steps


You can also create a canvas where you can paint too. Its advantage is that the text will be located only outside its borders.

- Turn
- Moving
- Change the length, width or height of an object. Or just stretching.
As a result of the above manipulations, we get the following result: 
In order for the resulting drawing to become a whole object, it is necessary to combine all those figures from which it was actually assembled.
- First, for this, you need to select each element in turn. left mouse button while holding down the Ctrl.
- Then right click call the context menu, in which in the item "Group" select the option of the same name.

Change the fill of shapes
By default, the drawn shapes have a blue fill color, so you can easily change their color to a suitable one if necessary. First, double-click left mouse button select a picture, and in the tab that opens at the top in paragraph "Fill" choose the color you want. Ready. 
Change the outline color of a picture
This is also a simple procedure, which is carried out similarly to the previous one. After the object is selected, in paragraph "Shape outline" choose the color you want.
Also in the same menu you can choose the thickness of the outline. 
It is also possible to change the lines that will be outlined in the image.
Shape style changes

Adding Effects
Why not add something specific to decorate your design? For example, glow, shadow, reflection and many others. In this case, a special menu will be used, where you can choose special effects to your liking. You can also experiment with the advanced settings. They are found at the bottom of each effect group.

Foreground and background
When you create a drawing, the shapes overlap. For example, as in the picture below: 
That is, in order to move the crescent moon behind the clouds, you need to click on it PKM and select item "To the background." In case you have to move it back, you can use the option "Bring to Front".
What if the shape moves when the text is moved?
This problem is very easy to fix. It is enough to right-click on the created picture. On the menu Text Wrap select an option "Fix position on the page". Voila! 
Advanced image formatting options
Do you want to edit the created image in more detail? Use the menu Shape Format which is called by a click right mouse button.
Shape Format consists of three tabs:
And now about each tab in more detail.
In this tab, you can change the fill of the picture and the lines that make up it.
For example, you can make a pattern, texture or any other fill. You can also change the thickness of the lines and their transparency. Plus, you can experiment with other options here. 
This tab contains advanced tools for adjusting special effects. For example, here you can more accurately adjust the transparency, size, color. It is also possible to add blur and many other embellishments. 
The functions on this tab allow you to adjust the position of the text that wraps around the picture and allow you to set the size of the margins in the document. 
Drawing volumetric figures
In Word, it is also possible to create three-dimensional images. After drawing a regular shape, go to the menu Shape Format where in the tab find the sub-item "Volumetric shape format"... Then fill in your parameters.
Using the above instructions, you can create a rather interesting composition in Word. We hope this material was useful to you.
Few remember how convenient it was to draw directly in the Word. There is no drawing panel in versions of the application starting from 2007. However, the possibility of drawing still remained and even acquired wider functionality.
But the drawing panel itself is absent here and opens only when necessary. And in order to be able to draw, you need to insert the picture into the text, as described in, and click on it with the mouse.
However, the drawing toolbar can be opened in a different way by going to the "insert artwork" tab. Here you need to click on the arrow (in the form of a triangle) located next to the "shapes" button. And at the very bottom of the window that opens, find and click on the "new canvas" button.
 Opening the Drawing Panel
 As a result of such manipulations, a field (canvas) for drawing will appear in the place where the cursor was located, and the drawing panel will be expanded in place of the usual toolbar.
This is what the drawing panel looks like in WordHow to draw lines and shapes
At first it may seem that drawing here is possible only with the help of ready-made shapes and arrows, i.e. drawing up block diagrams. However, you can also find real drawing tools here, such as a drawn curve and polylines.
Using which you can draw not only diagrams, but also real drawings. It is especially convenient to use "polylines", because to draw any contour, you just need to click on the turning points of the drawing contour. And all the lines will be drawn automatically between sequentially located points, and no shaking of the hand or mouse will spoil the picture.  Convenient to draw with polylines
Shape styles and effects
After drawing the outline of the object, you can fill it with different colors or patterns. To do this, use the "Shape Fill" button. The color of the outline of the picture, its thickness is adjusted using the "shape outline" button.
 Shape Styles
 The tools for creating shadow and volume effects are interesting. Using these buttons, you can add a three-dimensional effect to the shape or the shadow it casts. Moreover, you can choose not only the direction of the shadow and its length, but also its color.
3D effectGroup and ungroup objects
After drawing, several pictures on one canvas must be linked to each other, so that during further editing, especially when dragging, individual elements of the picture do not accidentally "crawl" in different directions. To combine various elements into one picture, use the "Group" button. You can then ungroup the object to edit the elements of the picture separately.
Rotate a picture or element
In the new Word, you can also deflect the drawing in the desired direction. And not only by 90 and 180 degrees - here you can set your own any angle of rotation of the picture.
 Rotate the image
 Often it is necessary to hide some elements of the image behind others, for the effect of realism of the whole picture. There is also such a tool here. The selected shape can be brought to the front or moved to the background of the picture with one click of the mouse.
Thus, the drawing panel in modern Word is hidden and only opens when you need it. And you can draw here no worse than in a specialized editor.
MS Word can be used not only for working with text, but also for creating pictures. Of course, its set of tools is much inferior to specialized programs, but if you need to add a simple picture or shape to a document, then the possibilities of "Word" will be enough.
Turn on the Draw panel
There are two ways to draw in Word: manually and using templates.
Many users do not know about the ability to use tools for drawing, such as those in standard Paint. The point is that they are hidden by default and you need to enable them to start working with them. It is also worth noting that the manual drawing function has become available only in the latest versions of Word.
To enable the Draw panel, choose File> Options. Then, in the dialog box that opens, click on the "Customize Ribbon" line. Among the main tabs in the right column, check the box next to the line "Draw" and click OK to apply the changes.
How to draw in Word?
After turning on the "Drawing" panel, a corresponding tab will appear in the document, after clicking on which the following tools will become available:
- "Select" - allows you to select an already drawn element.
- "Draw with your finger" - allows you to draw arbitrary lines in the "Word".
- "Eraser" - removes unnecessary objects or elements.
How to draw in Word using these tools? To do this, select "Draw with your finger" and drag the desired line across the touch screen. If you are using a normal screen, the cursor is used to draw a line.
Apart from these tools, there is a small selection of pens available in Word. They differ from each other in line type and color. If it is necessary to set the color and thickness of the lines already created, this can be done using the appropriate tools on the panel.
The tools of the "Transform" group are used for editing text and creating annotations. For example, using Freehand Editing, you can underline a word, circle a portion of text, add a directional arrow, or highlight errors.
Convert to Shapes allows you to create an object from a sketch you have made. After that, the drawn element can be moved, resized, rotated, or other manipulations available for shapes.
The last tool in the group allows you to enter the desired symbol or mathematical sign.
How to draw shapes in Word?
In addition to drawing by hand, MS Word has a fairly wide selection of shapes that you can use to create a simple illustration for text.

Before creating a drawing from shapes, you need to add a drawing area. To do this, first in the "Insert" tab, click on the "Shapes" item. Then click on the "New Canvas" line in the pop-up menu. This will add a drawing area to the page. It can be resized by pulling one of the corners of the area in the desired direction.
Working with shapes
After creating the canvas, the "Format" item with basic drawing tools will be added to the top panel.
After clicking the "Shapes" button, a window with a large number of objects will open. These include lines, arrows, circles, standard shapes, stars, and flowcharts.
How do I draw lines in Word using these shapes? First you need to select the line you are interested in, then move the cursor to the area to draw and stretch the line to the desired length by holding down the mouse button. In the same way, you can draw arrows in the "Word" and other elements.

There are two additional buttons to the right of the Shapes menu. If you choose the first one, a drop-down menu will appear. The "Change Shape" line from this menu will allow you to completely replace the current object with another. The Start Modifying Nodes line allows you to modify the shape you have selected at specific points.
Another button next to the Shapes menu lets you add text. After clicking on it, a field will appear in the specified place in which you can enter the desired text. It can be moved if necessary.
Adding Styles and Effects
The Shape Styles toolset lets you choose the fill and outline color of the created shape. To do this, use the corresponding button to the right of the standard shape styles.
It is not necessary to use a standard color scheme for the shapes, you can change it by clicking on the "More colors" line. Also, a gradient or texture can be used as a fill for a shape.
Use the Shape Effects key to modify the selected object by adding a shadow, highlight, embossing, anti-aliasing, or rotation to it.
The WordArt Styles tool lets you apply an effect to text that you insert using the Add Text Box function.

The Arrange tool provides a number of options to reposition a shape, rotate it, align it, or add text wrapping. Also, this function allows you to superimpose shapes on top of each other.
The Size tool lets you change the width and height of an object. If desired, you can set the exact value of these parameters or change them manually.
It is not uncommon for text documents to draw a line, for example, in order to separate one part of the text from another. In the text editor Microsoft Word, there are several options for solving this problem.
In this article, we will walk you through the three easiest ways to draw a line in Word. The material will be relevant for all modern versions of Word. Including Word 2007, 2010, 2013 and 2016.
Method number 1. Insert a dash or underscore.
Perhaps the easiest way to draw a line in Word is to use a dash or underscore. By inserting a large number of such characters in a row, you get a horizontal line. For example, to draw a line using the dash character, just hold down the CTRL key and, without releasing it, press the minus key on the additional keyboard block. Then hold this key combination until you get a line of the length you need.
In a similar way, you can draw a line using an underscore. To do this, hold down the SHIFT key and the underscore key. Then you need to hold these keys until a line of the length you need is drawn.

This method of creating lines is convenient because such a line is easy to draw and easy to delete. If the line is not needed, then it can be deleted in the same way as any other text.
Method number 2. Inserting a finished line.
Another way to draw a line in Word is to use the button to create borders. This button is located on the "Home" tab and it allows you to quickly draw a line anywhere in the text. All you need to do is place the cursor where the line should be, click on the button and select "Horizontal Line". As a result, a horizontal line will be drawn in the selected place on the page.
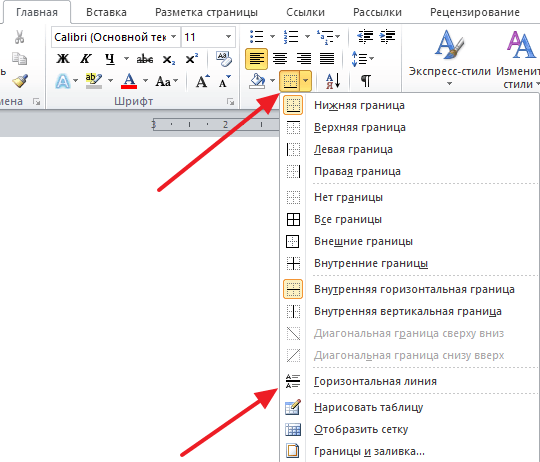
The advantage of this method is that the line drawn in this way can be changed. The line can be made thicker, thinner, longer or shorter. To do this, select the line with the mouse, after which its size can be adjusted by moving its corners. In order to delete such a line, you just need to select it and press the Delete key.
Method number 3. Inserting a shape.
The Insert tab has a Shapes button that you can use to insert various shapes into your document. Among other things, there is a line-shaped figure here. In order to insert it into the document, click on the "Shapes" button, select a line and draw a line of the desired length in the document.
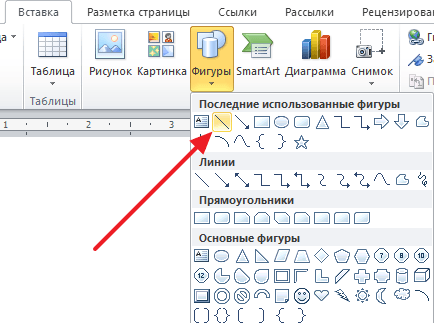
The advantage of this method is that such a line can be placed at any angle. In order to delete such a line, you just need to select it with the mouse and press the Delete key.
MS Office Word 2007 and 2010 are extremely common in the user environment. But not all PC owners know how to draw in Word. As fairly versatile packages, applications are primarily used to create text documents. Sometimes slightly more advanced users insert pictures into them, but few people know that a picture in MS Word can be created without resorting to the help of other editors. How to draw a picture in MS Word 2007 and 2010? After the very first drawing lesson in the popular editor, you can become a good illustrator.
How to open the drawing menu in MS Office Word?
Before drawing a picture in Word, open the "Insert" tab on the ribbon. It is easy to find, since the bookmark is located to the right of the "Home" button. Under the bookmark, the "Illustrations" menu opens, which can be used with, libraries, Microsoft website, etc. However, to draw in Word, you need to open the "Shapes" tab. Under it is a whole set of tools for drawing in the Word, and at the end of the list is the "New Canvas" command. After executing the command, we get a field for work in the document, where we draw a variety of shapes offered in the context menu. There are lines and patterns of various configurations. How to create a canvas for work can be seen from the diagram (Fig. 1). You can adjust the dimensions of the canvas for images as you like.
Draw Diagrams and Pictures Using Shape Templates
If you still do not quite understand how to make a line in Word, use ready-made templates that will help you create a diagram in Word or make a geometric drawing. To make them appear on the canvas, just click on the selected template with the left mouse button. The second time left-clicking is done on the image field. The resulting image can be edited because after inserting, the Modify Shape, Shape Fill, Path, and Shape Effects commands appear. Having opened the first of the listed menus, you can change the configuration of the picture using the second and third tabs. You can image and its borders. In addition, you can edit the thickness of the outline, make it discontinuous, etc. The fourth menu offers to decorate the picture with effects. With its help, we draw a shadow, give the geometric part of the plane translucency and even the visibility of three-dimensionality.
Drawing and editing lines
How to make a line in Word is of interest to everyone who wants to accompany a document not with a template, but with an original illustration. will help to draw even segments, vector lines, which will definitely come in handy when drawing up diagrams.
There are commands in the editor like "Pencil Drawing" or "Lasso" in Photoshop... How to draw with them? Everything is very simple! Choose from the menu the commands "Polyline" and "Drawn curve", click on the selected left mouse button and make a second click on the canvas. Without releasing the button, draw the desired pattern. And with one more mouse click, the picture is fixed on the field. It, like templates, can be edited by filling it with different colors, creating effects, etc. And with the help of "Change Shape" you will correct the image around the perimeter.
Now it became clearer for you how to draw in MS Office Word. It must be said that a text editor cannot be considered a full-fledged drawing program, but with the help of the image creation function you can significantly reduce the time when illustrating documents.


