GIMP app is a photo editor with open source code... The utility allows you to make corrections simple images and digital painting. Unlike photo editor Adobe photoshop, GIMP takes up little space on your hard drive and is completely free. Once the user gets used to the unusual interface of the application, it becomes easy and pleasant to work. This article explains how to use the GIMP.
Installing the app
First you need to download the utility and run the installer. GIMP was designed for operating theaters Windows systems and macOS. The authors offer users to download the installers from the official site. To install the app in Ubuntu system you need to run the following command: $ sudo apt install gimp. The program is launched from the main menu of the operating system.
Setting the window layout
The user may notice that the utility is different from most similar editors. GIMP interface in Russian. The program window consists of several parts. The side columns contain toolbars and layers.
In the center is located working window... The panels can be moved if necessary. To return to the usual view of the screen, select the "One-window mode" item in the menu.
Color correction
After installing and configuring the utility, you should return to the question of how to use the GIMP photo editor. The program is used to create digital pictures from scratch. The application has a large set of tools that allow you to draw original artworks. Ordinary users can edit photos, perform color corrections and optimize other settings.
To get started, open the image. Automated tools cannot be found in the Colors section of the menu. User can manually adjust saturation, contrast, balance and other parameters.

Applying Filters
GIMP allows you to improve appearance images with one click computer mouse... Opening the Filters menu, you can add a lens or flash effect, blur the picture, and make corrections. To return the snapshot to the initial state after an unsuccessful experiment, you need to click on the cancel button.
GIMP 2 supports batch. A selected filter can be applied to multiple photos at once.
Removing red eye
In order to remove a defect, you need to select an object using the "Magic Wand" or "Lasso" tool. Then you should find the item "Improvement" in the "Filter" section. Next, you need to click on the link "Red Eye Removal".
Use the slider to change the color. All corrections are displayed in a special window. You should move the slider until the eyes take on a natural look.

Correction of deficiencies
Editing pictures in free GIMP is one of the key moments in the work of photographers. Use a Healing Brush to remove dark spots, facial highlights, small leaves, and other unwanted objects from images. How to work with this tool?
To eliminate the imperfections, you need to click on the icon in the form of a piece of plaster and indicate the size of the area to be corrected. The area to be painted can be selected using Ctrl buttons... Then left-click optical mouse on unnecessary element... The unwanted object will disappear.
Revert to a previous state
If a computer owner does a lot of experiments with his photographs, he will soon notice that he lacks the number of undo levels in the GIMP. How do I use the option to increase the amount of used memory? First you need to go to the "Edit" menu, select the "Options" section and switch to the "Environment" tab. Next, you need to set the values at your discretion.

Image transformation
This is one of the main functions GIMP programs... How do I use the Transform tool? First you need to go to the "Transformation" section. Find everything here possible options transformation of photography. The application allows you to rotate the picture, distort the picture, change the perspective and perform other actions.
Editing layers
If the reader has previously used others complex programs for creating and processing images, he already faced a similar task.
Working with a picture is performed only on a certain layer. This is one of the most important processes in GIMP 2. Each layer contains its own part of the image. If you combine all the elements, you can get the whole image. To make changes, you need to make the layer active.
If this action is not possible, you will not be able to edit part of the picture. Switching between active layers is performed using the Page UP and Page Down keys. The program allows you to add details. If the user changes his mind about adding new elements, he can make the layers invisible or delete them.

Working with other tools
The developers offered users a set of classic and custom brushes. They also provided the ability to create new brush options. To add a tool, you need to open the Brush section on the left panel. Using a special slider, you can change the geometric shape of the brush. The obtained result is saved in the same section.
Advanced users can with shades gray... Results are saved in GBR format. Users also have the option of creating wireframe brushes and multi-colored pictures with several levels.
Adding a watermark
To complete the task, you need to select any graphic image and activate the "Text" tool. The selected area will be used as the base layer. Next, you need to write the text. It is recommended that you specify the color, size and style of the font beforehand.
After setting all the parameters, you need to click on the text layer on right panel... Using the slider, you can select required level opacity. To install the logo, go to the "File" section, click on the "Open as layers" link and specify the location of the picture. Next, you need to select the value of the "Opacity" parameter.

Adding plugins
Free add-ons allow you to expand the functionality of the program. How to use the GIMP Photoshop filters? To do this, you need to install the PSPI plugin. Via free extension Focus Blur can improve the processing of the background image.
The Save For Web plugin is used when saving small images to good quality... To add additional fonts and text settings, you can install the Free Type Text extension.
Export photos
After finishing work with the image, you need to save the result. The user can choose the XCF format for exporting the picture. All layer information is saved in the file. Photos exported in XCF format cannot be viewed in other applications.
In order to be able to open the saved images in other programs, you need to go to the "File" section. Then you need to select the "Export" item. Next, you should save the edited version of the photo in or PNG.
conclusions
This article covers key points work with the application. The program has everything necessary tools... The level of complexity of the work performed depends only on the user's skills.
An editor's choice for photos and images can become challenging task... Do you want to free program, or do you need something more powerful and functional? Graphics editor GIMP (GNU Image Manipulation Program) combines both. It is powerful enough to match many professional editors, and is completely free because it is open source.
Working with any program of the level of Photoshop will always be potentially challenging. In addition, GIMP has an unusual interface. But once you get used to it, you won't have any problems editing images. In this article we will look at how to use gimp 2. Let's consider the features of the program and the subtleties of working with it.
1. Install GIMP
First, you need to install the program on your computer. The program is cross-platform and can work not only in Linux, but also in Windows and MacOS. you can find installation packages on the official site or install gimp from the repositories in Linux. To install on Ubuntu, just run the command:
sudo apt install gimp
After installing the program, you can launch it from the main menu of your system.
2. Customize the layout of the windows
When you first run the program, you will notice that it is slightly different from most other programs. By default, the interface consists of three windows: the toolbar, the working window and the layers panel. You can move and arrange them as you like. To get a more familiar look, you can open the menu Window and select item Single window mode:


3. Color correction
The GIMP editor can be used to create digital images from scratch, it has a wide range of tools for drawing original artwork. But most likely you will want to use a photo editing program. You can tweak the colors and optimize them.
Open an image and then use the Colors menu. There are no automated tools here, as in less powerful editors... Instead, you have a huge set of options available to you, such as adjusting color, saturation, contrast, balancing, and so on:


4. Correction of deficiencies
The GIMP Healing Brush can be very useful for photographers, as editing in gimp is one of the most important parts of the job. It looks like a piece of adhesive in the toolbox and can be used to remove various unwanted objects from an image, such as blemishes, facial blemishes, leaf scraps, and anything else that needs to be removed.
You can set the scale to select the size of the area to be corrected. Select the tool, then hold down Ctrl and select the area of the image that you are going to paint over. Then left-click on the elements you want to delete, they will disappear.

5. Applying filters
One of the fastest and simple ways to improve the appearance of an image is to use many of the filters that are built into the GIMP. On the menu Filters you will find everything you need, from adding a flash or lens effect to various blurs and fixes.
You can experiment, if something doesn't work, you can always use undo. It should also be noted that effects can be applied to multiple images.

6. Setting undo
If you do a lot of experimenting with your image, you may find that you are running out of undo memory. To solve this problem, you can adjust the amount of memory that will be used for undoing actions.
Open the menu Edit, then Parameters, here in the Environment section, set the necessary values for the items Minimum undo levels and Maximum memory for undo. Here you can change other settings of the program. Configure the program so that editing pictures gimp was the most convenient:

7. Image transformation
Another very powerful opportunity GIMP is about transforming images. You will find all the possible transformations in the menu Tools -> Transform, and some of them will be available in the panel on the left. You can change perspective, rotate images in different sides, rotate it, bend it and more.


8. Layers in GIMP
If you've used other complex editors, you've probably already come across layers. This is one of the most important things about GIMP. This is very important point in the question of how to use Gimp 2. Working with an image is performed only on a specific layer. There can be several such layers and each of them contains its own part of the picture, and when combined together, they create the whole image.
To change a specific layer, you must first make it active, if the layer is not active, you cannot change anything on it. You can switch active layers on the right layer panel or using the buttons PageUP and PageDown... The layer can be made invisible or deleted. For example, you can paint new photo elements on new layers, so that later they can be very easily removed if you change your mind.
9. Export images
When you are done with the image, you need to save the result. GIMP saves data in its xcf format, all information about layers is saved here, but you cannot open them in other programs.
But using the menu File -> Export you can save the image in a more familiar format like JPG and PNG.

We often think in stereotypes, and the market software- not an exception. In addition to Windows, there are many interesting operating systems, documents do not have to be typed in MS Word, and photos can be processed not only in Adobe Photoshop.
Treatment bitmap graphics at the professional level - the lot of expensive, powerful software. but digital processing Today, not only professionals and amateur photographers are engaged in images, but also a wide range of users who are far from this "labor" segment.
What does an ordinary user need? Everyone wants a simple, easy-to-learn program that works stably and allows you to perform all the necessary operations.
The word "GIMP" stands for GNU Image Manipulation Program. Graphic editor distributed by free license, has a funny logo with a devil, which did not appear by chance, because the name of the product contains the anagram "imp". GIMP works in all popular operating systems: Linux, Windows and Mac OS X. GIMP is included in almost all popular Linux distributions, That's why separate installation does not require. If the program does not appear in start menu working environment(KDE, GNOME, etc.), which means that you just need to install it from the distribution disks regular means(for example, at SuSE, YaST2 is responsible for installing the software). Installing the editor on Windows requires the GTK + library. You can download the library (3.7MB) and editor (7.8MB) from the page. The library and editor have international modules and do not require additional loading Russification. GIMP has quite modest system requirements compared to other graphic editors, it successfully runs even on outdated computers with 128MB random access memory. Minimum Requirements to the processor make the older generation fall into distant memories: the Pentium MMX. But even with the fact that the real system requirements The software is always much higher than the officially declared minimum, GIMP will feel confident on all workstations assembled in the current millennium.
The first start of GIMP is quite fast, but the opened working window of the program can plunge a beginner into bewilderment.
The editor interface seems unusual, to put it mildly. Instead of the usual program window with an extensive main menu and toolbar, we have a miniature concentration of buttons. But as soon as you open an image, the situation becomes more or less clear - documents open in independent windows, in which the main menu is already present. Start window serves as a kind of panel quick access, which contains all the most frequently used functions. The rest of the tools can be called in several ways. The first, most guessed, method is to travel through the main menu of the document working window. The second is with the right mouse button. Instead of the usual call of the properties of the current object, you will be prompted full list functions of the editor, duplicated by the main menu. If you click left button mouse near the top edge of the menu that opens, then it will turn into an independent window, which can also be used as a panel for quick call tools. 
And finally, the third way is hotkeys. Call the program settings from the main window and go to the "Interface" tab. Turn on the "Use keyboard shortcuts"and" Save keyboard shortcuts on exit ". This will allow you to assign hotkeys while the editor is running. The most frequently used functions can be called using hotkeys initially. But if your priorities differ from the author's intention of the developers, then why not add to the list In addition, you can reassign existing hotkeys. desired item menu, but do not select it. Stop the mouse cursor on it and press any key combination. An indicator appeared to the right of the item name, stating that this combination is now tied to the current instrument.
The file open and save dialog boxes follow the standard GTK + application tradition, which is familiar to Linux users, but may seem inconvenient for Windows devotees.
GIMP can be used as a drawing editor (thanks to the support graphic tablets) and as a tool for processing photos (including batch).
| Type of operations | Implementation in GIMP |
| Extensibility | Present. The GIMP distribution includes over 200 extensions. In addition, you can connect external modules, of which there are more than 100 on the Web. |
| Painting | Brush, pencil, airbrush, stamp. All drawing tools are flexibly configurable (line thickness, shape, transparency, etc.). |
| Layers | Present. In addition, individual channels can be edited. There is support for the alpha channel. |
| Text | You can work with text with standard tool as well as draw artistic emblems using special scripts. |
| Animation | Present. You can work with animation frames as separate image layers. |
| Highlighting | Rectangle, ellipse, free, diffuse and smart selection, Bezier curves. |
| Transformation | Rotation, scaling, tilting and flipping. |
| Working with exposure | Curves, histogram and traditional sliders. There are automatic modes that allow you to "enhance" images with one click of the mouse button. |
| Rollback | Unlimited number of times. |
| Converting RAW | Implemented with extensions. |
| Working with the scanner and tablet | Through the driver. Standard. |
| Filters | Present. In addition, the GIMP supports the Script-Fu language, which allows you to create new tools based on a group of filters. The distribution kit includes many ready-made scripts. |
| Batch processing | Present. Implemented through custom scripts. |
Of course, a reasonable question arises: why better than adobe Photoshop? Let's consider the main advantages of a paid product.
| Feature present in Adobe Photoshop | Situation in GIMP |
| Support for color profiles | Will appear in the next stable branch 2.4. Unstable versions 2.3.x already have support for color profiles |
| CMYK color space | Implemented with an extension |
| Red-eye removal tool | Missing. It is necessary to correct it manually, highlighting the oval area and lowering the brightness of the red channel in it. However, there is special extension, which works, however, is extremely primitive. |
| Tool "Magnetic Lasso", which allows you to make smart selection WITHOUT pressing the mouse button. | There is no analogue. You can use the Shape Selection tool to place points between which the program finds the best path for selection. |
| Healing Brush tool for removing minor blemishes (such as pimples on the face) | There is no analogue. We have to be content with the Clone Stamp tool. |
| Powerful plugins developed by renowned photography brands (Kodak, Phase One, etc.) | Power is a "subjective" parameter, but it is worth noting that by developing extensions for the GIMP large companies do not. |
A graphics editor is most often a tool for processing images to improve their quality. Consider the GIMP as a tool to perform wide range image processing tasks. Most often, processing starts with converting RAW to JPEG or TIFF. During the conversion process, you can correct images by adjusting exposure, white balance, and other parameters. The GIMP distribution does not have a built-in tool for RAW processing so a special extension should be loaded. For instance, . If you are using Windows, you can download the package to be installed immediately. For Linux users, there is a set of packages compiled for various distributions. If your distribution kit was not found in the list, download the extensions and compile it yourself using the standard commands:
./configure
make
make install
By default, the assembly does not include support for EXIF display, but you can manually connect it by specifying during configuration additional key --with-libexif
After installing the extension when opening files in the list available types a raw image appears. Now we can open RAW of almost any modern camera. 
The extension supports the display of two histograms: RAW (internal) and Live (real). With the Exposure slider, you can change general level image illumination (present auto mode). The image is corrected using the tools located in four tabs.
- WB. White balance adjustment. There is an automatic mode.
- Base. Exposure compensation using curves.
- Color. Adjust brightness and contrast, customize color profiles.
- Corrections. Adjusts color saturation.
After completing all the manipulations, you can open the image in the editor. If the shooting was made in JPEG, then all the operations described above will have to be performed in the editor itself.
Exposure adjustment and color balance and it is carried out with the help of "Curves". 
GIMP. Working with Curves.
By controlling three channels at the same time (Brightness), we adjust the exposure, and by transferring control to individual channels, we can control the white balance. In addition, the color balance can be adjusted using the tool of the same name. 
You can separately adjust the balance in three segments dynamic range: shadows, midtones and highlights.
Reducing the noise level is performed using the "Selective Gaussian Blur" filter. In the filter settings, you should specify the blur radius, as well as maximum difference between adjacent pixels, which the filter will pay attention to. 

Images are sharpened with the Unsharp Mask filter. You specify the radius of the sharpening, the degree of effect of the filter, and also the minimum threshold for its application. 
Removing red eyes in GIMP is a laborious process. Using the Elliptical Selection, select the red pupil. Then open the channels dialog and leave only the red channel visible. Go to "Curves" and lower the channel intensity graph. Turn on the rest of the channels again and observe the result.
You can also download a special extension for red-eye removal -. Windows users just download the ZIP archive, which is a compressed exe file. Linux users should download original text extensions and install with the command:
gimptool-2.0 --install redeye.c
After installing the extension, the filters appear a new group Misc, and in it items Red Eye Remover and Auto Red Eye Remover. Next, you simply select a rectangular area around the pupil and apply a filter. 
When processing images, it is quite common to resort to layers. Let's look at how layers work by emulating the soft focus effect. The layer list window is invoked with the keyboard shortcut Ctrl + L. Let's create new layer as a copy of the current one. On a new layer apply a Gaussian Blur filter with a radius of 15 pixels. After that set the opacity of the layer around 30-50%. The image looks as if a special filter or lens was used when shooting. 
Photographers are not snipers. Very often, the model being shot is not in the center of the frame, and there are extra details in the composition. In addition, non-DSLR cameras have matrices with a 4: 3 aspect ratio, while a 3: 2 aspect ratio is required for printing. In such cases, it is customary to crop the image, that is, to cut off the edges. GIMP allows you to crop with the mouse by moving and scaling the frame borders. In addition, in the working window of the tool, you can manually set the coordinates of the frame boundaries, and also, which is very important, indicate the proportions of the future image. 
After completing all the transformations, you can safely save the file to your hard drive. Free: "cheese" or a real benefit?
Of course, the article covered only a small part of all the possibilities that GIMP conceals in itself. In GIMP, you can draw pretty well, take screenshots, make beautiful emblems, do a variety of photo stylization, and much more. It is not the absolute number of functions that is important, but the quality of their implementation and the convenience of working with the editor. Of course, GIMP is inferior to Adobe Photoshop for professional use. But if we consider exclusively the amateur level, then completely free of charge we get a high-quality, stable product with rich features.
The last stable version GIMP at the time of this writing is 2.2.10. Development is underway in parallel new version editor. Not so long ago, the site was published, telling about what to expect in the new version of the editor 2.4.
On the Russian-language product support site, you can read several training articles designed for both beginners and experienced users.
GIMP is software package, which can do a lot of what Adobe Photoshop does, but at the same time is much cheaper than it - it's free!
Steps
Installing GIMP
Launching GIMP
Cropping an image
- If you are not satisfied with the result of cropping, you can undo it by pressing Ctrl + Z.
Open the image you want to crop (crop). Click right click mouse over the image and select Tools, then Transform Tools and then Crop & Resize. Your mouse pointer icon will take the shape of a clipping cursor, which looks like a knife. You can also select a crop tool from the Toolbox.
Define the rectangular area of the image that you want to keep. The initial definition of this area does not have to be precise, as you will have the opportunity to manually change the boundaries of this area. Click on the squares at the corners or on the sides of this rectangular area to move the corresponding point.
Adjust the bounds of the area pixel by pixel. To use fine adjustment, use Tool Options at the bottom of the Toolbar. You can change the position of the borders of the area on the image by changing the values of the numbers in the Position field. You can precisely set the size of the image area you need by changing the values in the Size field.
Crop the image. Once you have finished all adjustments, crop the image by clicking in the center of the area you selected. All parts of the image outside the boundaries of the selected area will be deleted, only what is inside these boundaries will remain.
Image reflection and rotation
Mastering other fundamentals
-
Resize the image. Right click on the image. From the menu, select Image, then select Image Scale. A zoom window will open where you can resize it. Enter new values for Width and Height and the image will change accordingly.
- The GIMP will automatically preserve the aspect ratio by linking the width and height values. This means that if you change one of these values, the other will also automatically change, preventing the image from stretching or shrinking. You can disable this feature by clicking on the corresponding icon between the two squares.
- Once you're done with the settings, click on Scale to resize the image.
-
Draw a straight line. Select a drawing tool such as Pencil or Airbrush. Click on the image to set the starting point for your line. Hold Shift key and move the mouse cursor where you want to place the end point. You will see a line appear connecting the start and end point... Click to draw a line. Continue holding Shift to add lines, each starting where the last ended.
And so we launched GIMP, and a window opened in front of us in free world graphics and drawing. Or rather, as many as three windows of the program have opened, but do not be surprised, and this happens.
Many are immediately discouraged by this. I'll tell you a secret, even I didn't understand from the first time what to do with this. And three windows are just such a feature gimpa... Many are annoyed at first by these windows, you constantly move them with the mouse here and there, but over time this feature has somehow become boring.
I will say that now there is already a version of gimp 2.7 that supports single-pane mode, but it is trial version before the release of the stable and long-awaited version 2.8.
The developers implemented support for single-window mode at the request of angry users who lacked it so much, as in Photoshop. What are the program windows, if you started the gimp correctly and did not mess up where, then you should have:
1) Gimp toolbar- the heart of the gimp, here are the most necessary basic tools, which we will use in the future, in more detail about each tool is described in the reference article.
2) Main image window is the main working space, where the whole image opens and where we perform basic manipulations on it. Read more in the article Window to gimp
3) And the window Layers, Channels and Outlines ... Let's just call it Layers to shorten. If you write and say the name of this menu everywhere, then it is too cumbersome. This window will contain all the working layers that we will use while editing the image.
Let's now try this program, I set the task as follows: there is a finished image in the format Jpg with the subject in the foreground, you need to select this object, and change the main background, then you need to resize the image and save the finished version in the format PNG image... I think it's enough for the first time.
Important! The lesson is done in gimp 2.6.11
And since this article is mainly aimed at beginners to learn gimp, then I will try to describe all the actions down to the smallest detail. I think this will help you quickly master the basic techniques of working in this graphics program.
In order to open the image, click on the menu File | Open and in the dialog box that appears, select the picture that we are going to edit. In my case, I will choose the image of a flower that I photographed in my infield last summer.
Lesson One - Introducing the GIMP
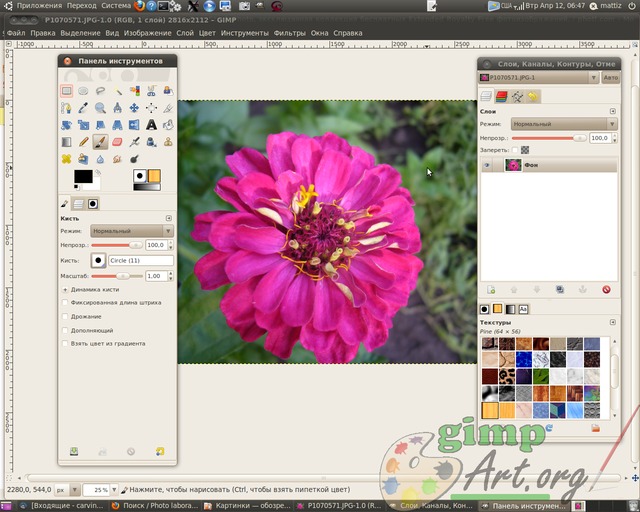
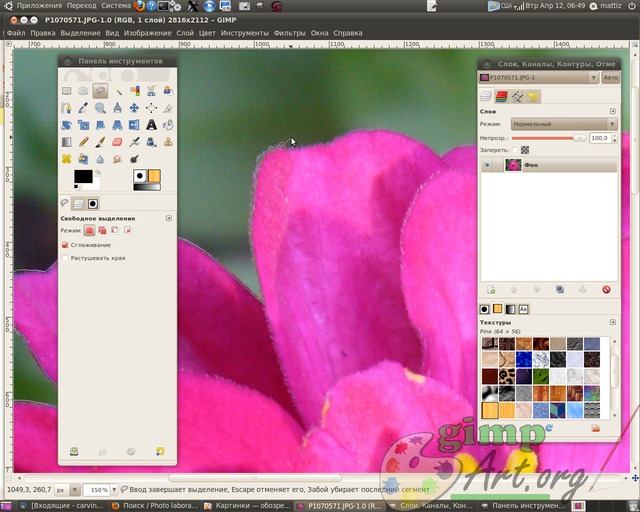
And so the image is open. And as you remember from the assignment: you need to select the object in the foreground, and in the foreground we have beautiful flower... On the toolbar, select the tool "Free selection" or as it is also called "Lasso". Now, carefully using the mouse, draw a line around the flower. Take your time, the more control areas you get, the clearer the object will be.
To enlarge the image, hold down Ctrl key and use the mouse wheel to adjust the scale you want.
Learn more about different ways the selection in the gimp read in the article methods and ways of highlighting in a gimp, from simple to complex.
We end the selection of the flower at the starting point from which we began to trace (just click on it). This will change our selection to the so-called "ant track".

Now let's use one more command to improve the selection. We need to soften the edges of the selection, blur them a little and the tool will help us with this. "Shade" from the Selection menu item.
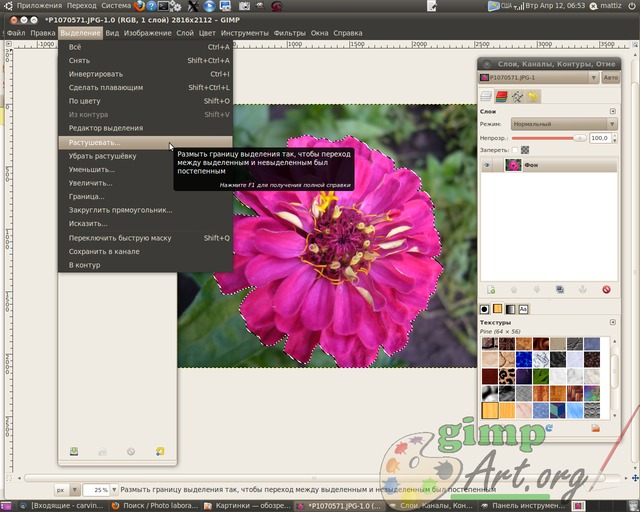
Set the value to 5 pixels.

Well done. Copy the selected fragment of the flower through the menu Edit | Copy. Now paste the copied flower through Edit | Insert. And as you will notice in our window Layers a layer called Floating selection.

A floating selection is a temporary layer; it appears whenever you paste a picture or a fragment of an image from the clipboard. Next, right-click on the floating layer and select the command from the drop-down context menu - Create a layer.
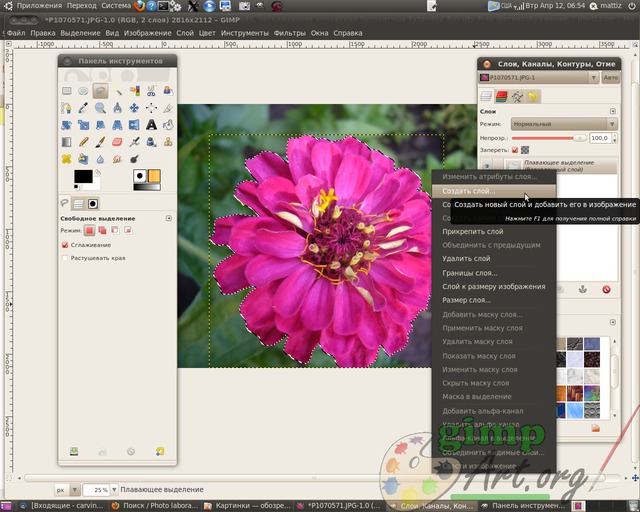
Visually, nothing happened, but in fact the flower is now contained in a new upper layer, and to show this, turn off the visibility of the background lower layer by clicking on the eye icon opposite the layer.
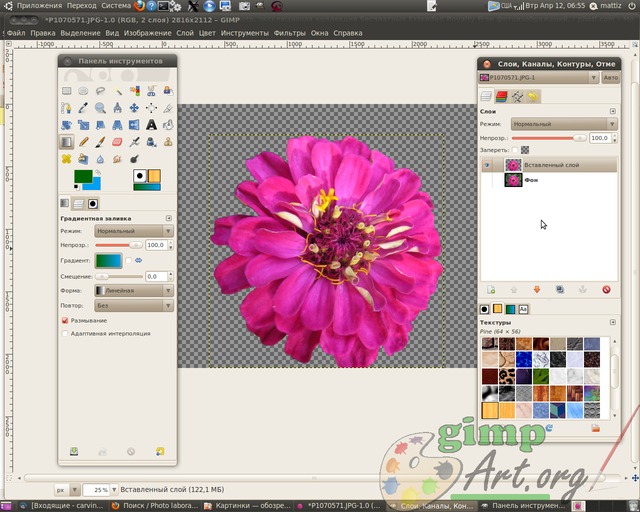
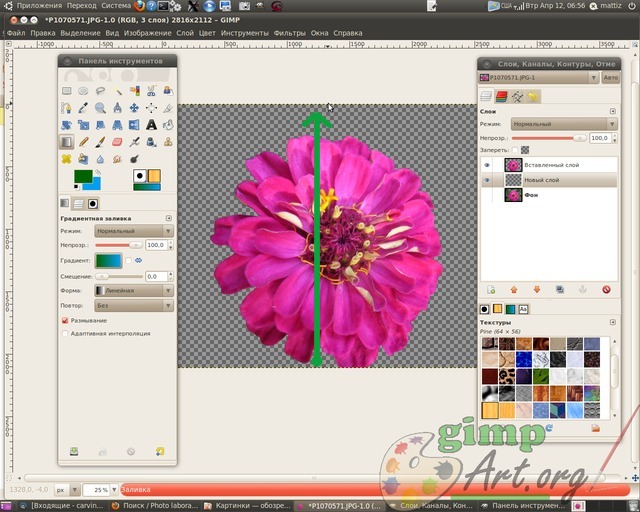
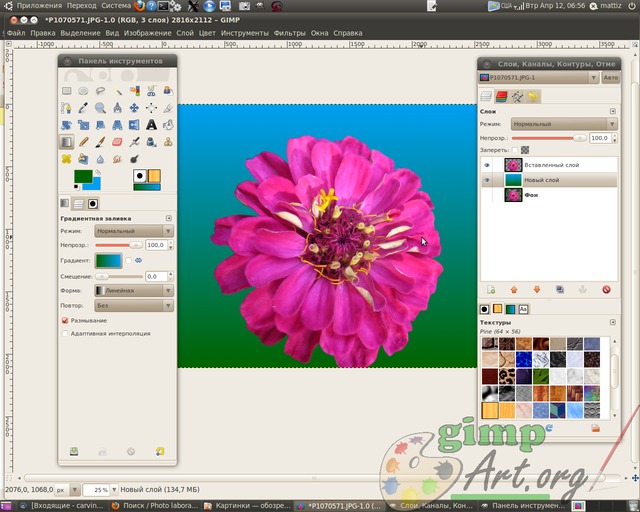
This will separate the foreground object from the background. Now let's create transparent layer through the menu Layer | Create layer

or by clicking on the corresponding icon in in the Layers window. Next, place it between the background layer and the newly inserted flower fragment by clicking on the "Lower active layer down"

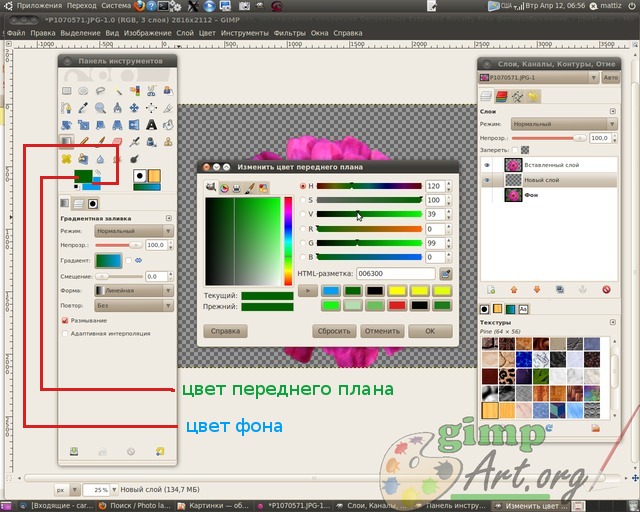
This layer will serve as a new background for the flower layer. We will not complicate our first task too much, and just take and fill this layer with a gradient fill. To do this, select the tool Gradient with the following parameters: color foreground green, background color blue, gradient linear shape. we carry out from the bottom edge to the top.
To choose desired color click on the corresponding rectangle: the top rectangle is the foreground color, and behind it the rectangle is the background color. A color selection dialog box will open, where you can select the desired color with the mouse or enter the code designation (HTML markup) of the desired color.
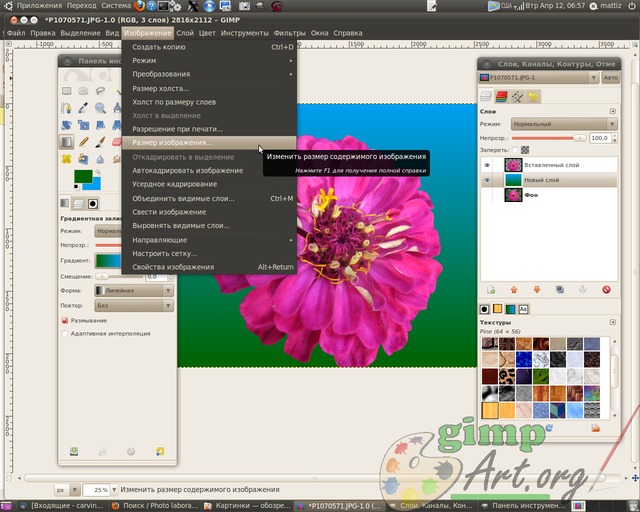
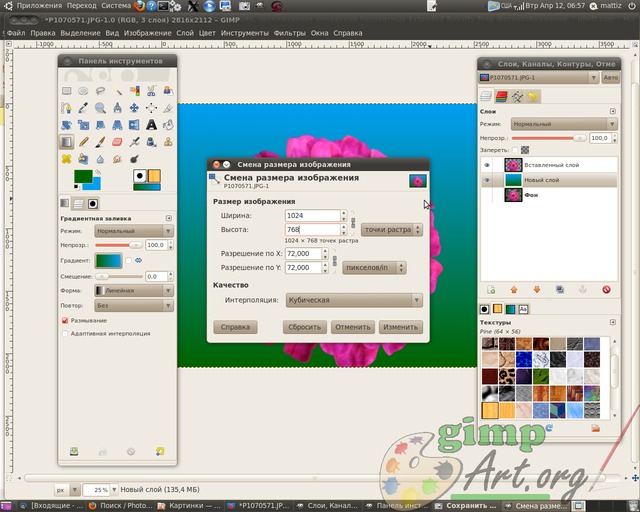
and enter the parameters of 1024 × 768 pixels. I am entering these values for an example. You can reduce the photo to other options (depending on the selected original image).
AND The final stage lessons for beginners it is preservation finished image through the menu File | Save as..

And change the extension of the image from JPEG to PNG in the Name field. Then we press the button "Save"


