Perhaps the most important part of a PC is the hard disk drive (HDD), as it contains all the information that the user creates. Of course, any HDD needs timely maintenance, namely checking for errors and bad sectors, in order to avoid the loss of important information.
 "Bad sector" - unreadable sector on the hard disk. It can be natural: the factory state of a part of the sectors of any hard disk is an inevitable manufacturing defect, or acquired - a successful power failure, a blow, a leakage. The appearance of broken sectors one by one is of little interest to anyone, this is a routine that SMART successfully grinds.
The emergence of interest in bad sectors is usually due to the fact that you have a partially or completely unreadable disk on your hands. From this point of view, the classification is simple:
- Broken sectors are permanent, for example, associated with surface damage - something that cannot be restored.
- Broken sectors are temporary, associated with non-fatal logic errors, then what you can try to pull out, strictly speaking, the question of the operability of the restored sectors remains open.
The number of bad sectors on the disk can be:
- Constant within normal limits (live hdd). No action required.
- Constant above the norm (usually the consequences of a blow). Sometimes it is done with manual intervention.
- Growing (scattered due to age or construction). Requires an urgent replacement of the hard drive.
Reasons for the appearance of a bad HDD sector
To put it simply, the modern hard drive is a product of the evolution of the gramophone. The record spins, the head reads the record sector by sector, the control unit glues the files from the read pieces. The head hovers above the surface of the plate; when stopped, it falls. The sectors on the tracks are readable and unreadable, the sector itself is the minimum part of the track, Wikipedia will confirm.
This model is sufficient to demonstrate the main problems:
- Damage to the surface of the disc - mechanical contact of the plate with the head, can cause the disc to shatter, or it may remain a fixed zone.
- A partial change in the surface properties (magnetization) of a sector (a typical reanimated sector) can be extended by referring to neighboring sectors.
- Various logic errors, arbitrariness of SMART, FS errors (everything is eliminated in the process of work and according to the results of self-diagnostics).
- The crumbling of the magnetic layer from the surface is known as a sign of old age, but may be the result of loss of tightness.
Contrary to popular belief, a shock to the case of a working hdd is not as bad as vibration. The head above the surface is held by such cunning magic that significant force is required to touch the surface, which is unlikely on impact, but is easily achieved by resonance.
How to check a disk for bad sectors and errors
It is worth remembering that the disk is checked for reading, checking the sectors for writing will erase everything that was on the disk! Well, it should also be borne in mind that for a sensible check, the disk must be free of other tasks at the time of testing. Checking a hard disk for bad sectors is not a common common task, Windows does everything that is needed automatically.
Windows has long had a utility that checks and fixes hard disk errors, chkdsk. You can find the utility in the properties of the disk, the button is called "check disk".
Any self-respecting manufacturer, when releasing a disc, puts on the site a diagnostic utility that not only monitors the state of the hard drive, but can also carry out service actions designed to alleviate his suffering, sometimes up to calibration. Checking hard disk sectors must have for this class of programs.
In addition, there is a zoo of diagnostic, repair, "professional" tools, in which the devil himself will break his leg for a long time. And quite a large number of really professional programs for analysis and repair. It is worth noting that most of them are destructive, that is, with their help, you can kill a working hard drive so that not every master will restore it.
Programs for checking the hard disk for bad sectors
 For those who do not believe in chkdsk, graphic programs for checking the hard drive, or rather more or less soft means that do not punish for the wrong key, are HDD Regenerator, HDD Health. Graphic utilities show the health graph, tell what parameters are being tested and, which is important, have adequately signed buttons that make it easy to understand the program. Linux users are less fortunate, most of the utilities are console-based and require an understanding of the parameters.
Of the utilities from the manufacturer, it is worth remembering Seagate SeaTools - a convenient powerful program, all the power is manifested only on native hard drives, but checking hard disk sectors is also available for "newcomers"
HDD check using Windows 7 and 10
Checking the hard disk for errors using Windows means always running chkdsk in recovery mode. This launch can be done with a button in the properties of the disk.
"My Computer" -> "Properties" -> "Service" → "Check disk" "Check".
Or, if the button is absent, this is found on some editions of the fake tenth Windows, this check is easily launched from the command line from the administrator with the command
chkdsk c: / f where c: is the letter of the scanned disk. Checking hdd for bad sectors in the case of a system partition will start after a reboot, since the check requires exclusive access to the disk.
You shouldn't run this command often, but the check window that appears at every boot is the reason for the question: "how to check the hard disk for errors" and the answer to this question, since it is usually associated with disk problems.
What to do if bad sectors are found on the hard disk
Not so long ago, hard drives were produced, on which it was possible to manually reassign sectors, from this, legs grow in the conviction of many that formatting from under Bios cures all diseases. But alas, now the calibration is so difficult that it is carried out once at the factory. It should also be understood that most changes in the surface state are irreversible and nothing can be restored. It can be reassigned often without loss of capacity, although it all depends on the condition of the "patient".
Hard disk status options and next steps:
- The disk is working, it works well, stably, the percentage of bad data does not grow - make a backup, forget that it has broken sectors and enjoy life.
- The disk is, in principle, working, the number of bad sectors does not grow, but when accessing a certain area there are problems - try to divide into partitions without affecting the problem area, save for a new one.
- The disk is not working, strong brakes, smart and BIOS warnings - change the hard drive.
HDD recovery software
Victoria and Mhdd, any of these programs allows you to carry out full diagnostics and save the drive from many problems. They are launched from DOS, they require a thorough study of the manual before starting, as they can irrevocably destroy data or the logic of the hard drive! In general, do not start without knowing what you are doing, especially since such maintenance of the hard drive has long been entrusted to the controller and in most cases he copes with it. Not broken - don't fix it, this old advice is most relevant in the issue of a broken sector.
3 more useful articles:
Many users of computers, smartphones, cameras, cameras and other electronic devices at one time faced with ...
The ability to keep data with you and use it at any workplace is possible with small drives connected to a computer via a USB port. Let's consider three main types of such devices.
Hard magnetic disks
Initially, they were exclusively internal, but necessity forced some to get out of the system unit. In another, more compact, adapter block from hard drive format (IDE, SATA) to USB.
Let's look at how to test an external hard drive for performance:
- connect to a turned off computer;
- launch and wait for the download;
- in the "My Computer" folder, check for a new disk.
If the HDD is not added, restart the computer by pressing DEL or ESC to call Setup. If he does not detect the device, then it is most likely faulty. Either an HDD, an adapter, or both. To determine more precisely, you can take out the hard drive and connect it to another adapter or directly to the hard drive controller.
Solid state drives
The first SSDs, like HDDs, were internal and, for external use, an adapter was used. Now this method is rarely used, due to the large number of initially external devices.
Let's see how to test an SSD for performance:
- we connect to the computer and wait for the operating system to detect new equipment;
- open the drive in the "My Computer" folder and work with it.
If the system does not respond to the connection, we try to restart the computer. You can try formatting the SSD. () If the situation has not changed, then the disk is most likely defective.
Flash drives
The closest relative, or rather the ancestor of the SSD. Differs in less capacity and size, as well as the absence of a connecting cable. These include memory cards: SD and microSD - connected to USB via a card reader.
Testing external drives with software
An approximate and, often, sufficient check of devices can be carried out with standard system programs - formatting and copying. The process should run stably and evenly, without error messages.
For a deeper check, allowing to reveal hidden defects and speed characteristics of drives, there are many programs that perform these functions in whole or in part. They usually have a simple interface where you just select a device and run a test. If there is a malfunction, it will be indicated.
A hard disk drive (HDD) is an essential element of a computer, which stores all the necessary information, programs and user files. Like any other component, over time, the hard drive wears out, its normal operation is disrupted, and failures begin to occur. Along with physical wear and tear, leading to the appearance of so-called bad sectors (bad blocks), logical errors often occur related to the file system, indexes and the main file table.
For the time being, you may not observe problems in the operation of the hard disk, but this does not guarantee that one fine day the hard drive will not order to live long. Therefore, it is important to periodically (once or twice a year) check the hard drive for errors and bad sectors that require correction. Regular monitoring will allow you to monitor the condition of the carrier and respond in time to changes in its condition. Of course, you should not neglect such a proven method of protecting information as backup. The most valuable data must be duplicated on a reserve keeper.
Symptoms of a defective hard drive
In most cases, HDDs work smoothly for several years without requiring special attention. However, in case of improper operation (physical impact, lack of proper cooling), the resource of the information carrier is significantly reduced. In rare situations, there is a factory defect or a sudden breakdown.
The occurrence of failures in the hard disk can be indicated by too long loading of the operating system, unreasonable disappearance of files and folders, slow launch of applications. The obvious symptoms of a hard drive's loss of performance are program slowdowns and long file copying. If the computer is constantly "freezing", and nothing but restarting helps, then in the process of identifying the reasons, checking the hard disk should be the first item.
Using standard Windows 7/10 tools
You can test the media using standard Windows tools. The easiest way is to select the required hard disk in Explorer, right-click on it and go to the "Service" tab.
Then press the button "Perform check" and set the check parameters in the window that opens. If both checkboxes are checked, then Windows during diagnostics will automatically fix all system errors and restore bad sectors.
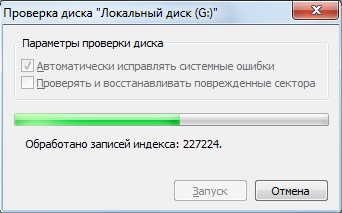
The results of the check can be found in the report.

Command line
You can also audit the hard disk using the utility chkdsk called from the command line. In fact, such a check will not differ much from the above option.
So, we launch the command line by selecting the necessary menu item "Start". Then enter the command in the window: chkdsk G: / f / r
- G - the name of the tested hard disk (select the disk that you will test);
- f - checking and correcting errors;
- r - bad sector detection and recovery.
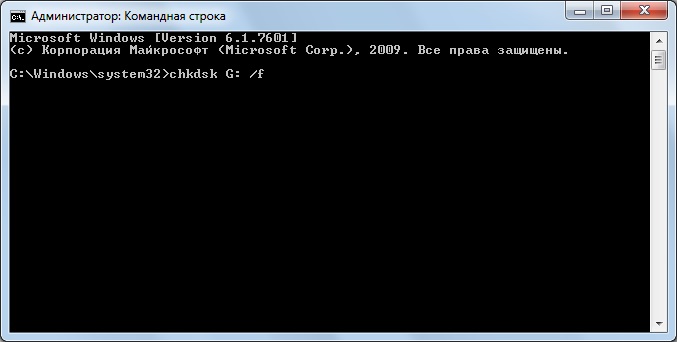
All information about found errors and bad sectors will be displayed as diagnostics are carried out.

Third-party programs for checking the hard drive
There are many programs and utilities for finding bad sectors and fixing HDD errors. We will list only the most famous ones.
Victoria
Perhaps the most popular hard drive checker tool. The program can be run both in Windows environment and in DOS mode from a bootable USB flash drive.
The interface provides five tabs: Standard, SMART, Tests, Advanced and Setup. First of all, go to the section Standard, where in the list of devices we select the hard disk we are interested in. The Drive passport area will display basic information about the HDD.

Next, select the tab SMART and press the "Get SMART" button. SMART (Self-Monitoring, Analisys and Reporting Technology) is a hard drive self-monitoring technology. Those. the hard drive, in the process of functioning, monitors its work, recording information on a set of parameters that make it possible to assess the state of the carrier. It is this service information that we are trying to obtain.
After pressing "Get SMART" to the right of the button, either the inscription GOOD on a green background, or the inscription BAD! on red. The second option will indicate that the media is in an unsatisfactory condition and will most likely have to be replaced. For a more detailed study of SMART statistics, let's pay attention to the list of parameters on the left. Here we are primarily interested in the attribute 5 Reallocated sector count indicating the number of reassigned sectors. If there are too many of them, then the disk began to "crumble", that is, its surface is rapidly degrading and an urgent need to make a copy of all data. In this case, there is no point in restoring the hard drive.

Chapter Tests makes it possible to check the hard disk for bad sectors, as well as try to "cure" or reassign unreadable blocks. For simple testing of the hard drive, set the switch to Ignore and start the test with the Start button. Sector health is assessed by measuring the response time. The smaller it is, the better. Each range of response times has its own color coding. The slowest blocks are marked with green, orange and red colors. Sectors that could not be read at all are marked in blue. If there are a lot of "slow" and unreadable blocks, the hard disk should be replaced.

The Victoria program allows you to restore broken sectors, but we will not consider all the nuances of the procedure. Moreover, "treatment" often contributes to only a slight extension of the service life of the information carrier. To reassign bad blocks, perform a check with the mode enabled Remap... If the recovery was successful, don't be in a hurry to rejoice. Re-diagnose the drive after a certain period of use. The appearance of new bad blocks will indicate that the degradation of the hard drive is irreversible, and it is time for it to find a replacement.
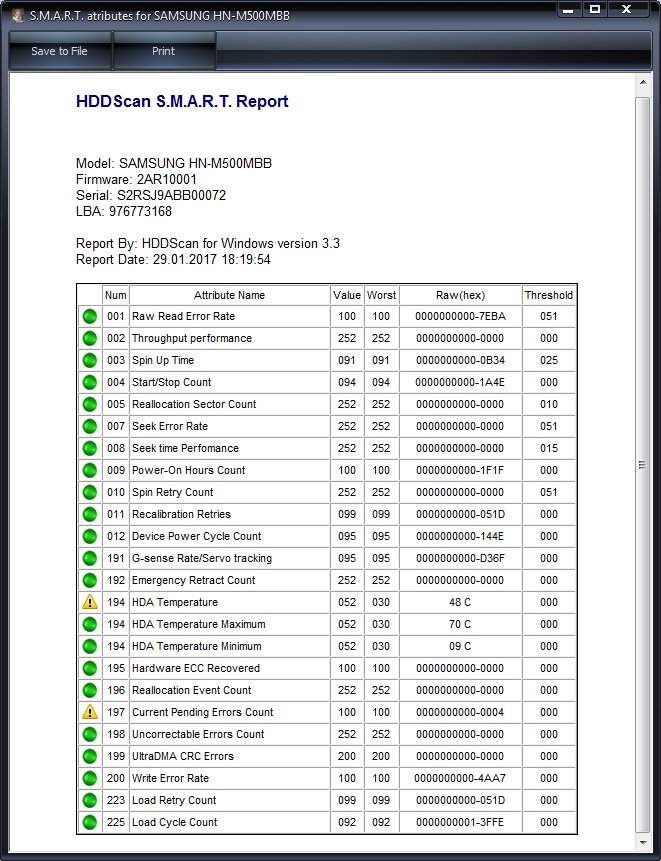
HDDScan
This is another handy program for diagnosing hard drive problems. After starting the application, select the drive that needs to be checked from the Select Drive list.

At the bottom, click on the "S.M.A.R.T." and get acquainted with the provided report.
Now let's diagnose the disk surface. Click on the round button to the right of the drop-down list of media and select Surface Tests in the menu that opens.

Click on the Add Test button, thereby adding a test to the list and starting its execution.

You can get information about the progress of testing in the graph (Graph), map (Map) and report (Report) modes. All blocks are also divided into groups with the corresponding color marking depending on the access time.


At the end, a final report is generated.

Perhaps this is all that we wanted to tell about the methods of checking the computer hard disk for operability. We hope this information will be useful to you and will help you save important data.
Friends, hello everyone! In this article, we will continue to diagnose the technical condition of the computer hard drive. Therefore, the agenda will be the question of whether how to check the hard drive for serviceability and broken sectors.
As you remember, we have already done this using the standard capabilities of the Windows operating system. But now everything will be different. Let's just say, let's approach this task more professionally.
So, my dears, now is the time to get acquainted with a very popular utility called Victoria... It is she who will help us diagnose the hard disk of a computer with very high accuracy.
At this step, you should download the installation archive with the program and unpack it on your computer. Then we run the file named vcr447.exe with rights:

After that, in fact, the main window of the application will appear in front of us. In order to better understand the basic principles of work, the author suggests watching a short introductory video:
So, let's carry out the above actions on our experimental disk. To do this, you need to select it on the "Standard" tab:

Now the passport data of the hard drive will open:

As you can see in the picture above, here we can find out the exact model of the disk (Model), firmware version (Firmware) and serial number, full size (Disk size), acoustic noise level during operation (APM val) and much more.
At the next step, go to the "SMART" tab and select the "Get SMART" item in it. After that, at first glance, a completely incomprehensible list will open in the main window of Victoria:

Let's take a closer look at what's what. Look, the SMART function is the internal self-diagnostic system of the hard drive. This firmware is built into all modern models of hard drives without exception.
It monitors vital parameters, analyzes them and determines the general condition of the disk. As you can see in the picture above, in our case it is "GOOD". This means that you can calmly exhale, since everything is fine.
Now a little about how this state is calculated. In fact, everything is very simple. Each parameter from the table has a current value (Val) and a threshold (Tresh):

So, if the current value is equal to the threshold or is even less than it, it means that trouble has already come. We need to seriously think about saving information on a backup medium, so that later we do not shed tears of crocodiles.
Also worth mentioning is the column Raw, which displays the current raw value. The lower the number, the better. It is on the basis of the data in this column that the Val value is formed.
Now let's look at the most significant parameters from the general list of the SMART system. They are highlighted in pink by the program itself:

If the Raw value of this parameter is constantly increasing, then the hard disk began to "crumble". The fact is that the replacement of defective areas with workers is carried out from the reserve area, which also has its own permissible limit. Let's go further down the list:

- Current pending sectors (# 197): indicates the number of candidate sectors that will soon stop being read;
- Reallocation Event Count (№196): shows the total number of operations to replace bad sectors with workers;
- Offline scan UNC sectors (№198): displays the real number of bad sectors of the hard drive at a given time;
- UltraDMA CRC Errors (# 199): indicates errors that occur when transferring data over the hard drive loop. May also indicate a loose connector on the drive itself.
So, this is what we looked at of the points of primary importance. Now let's go through other, no less interesting and informative positions. For example, this one:

- Power-on time (# 9): the total number of hours that the tested hard drive has worked. A Raw value close to 20,000 will be quite critical in this case.

- Seek Error Rate (# 7): the frequency of errors during positioning of the magnetic head unit. With an increasing Raw value, there may be problems with the mechanical part or there was a strong overheating
For owners of wearable laptops, it will be useful to pay attention to the values of the G-Sensor Shock Counter attribute:

This is nothing more than a shock sensor. Again, the larger the Raw parameter, the worse it was for the hard drive. Although for some manufacturers this sensor can be very sensitive and react even to minor shocks.
Well, friends, now let's get down to the fun part. Now we will check our hard disk for serviceability and the presence of bad (bad) blocks. But before this process, an important recommendation must be followed.
In order for the Victoria program not to show false bad sectors, before starting the check, you should definitely disable all extraneous programs that can access the disk in the background. Here is an approximate list of those:
After that, boldly go to the "Test" tab:

Here we need to check the "Remap" option, and then click the "Start" button. After that, a long process of scanning the surface of the hard drive will start. And the included function Remap will automatically overwrite bad sectors with healthy ones.
Now pay attention to the sector status indicator. Beginning with the green color (reading delay 120 ms), problem blocks are already starting. Those marked with a blue "Err" mark are not read at all. That is, they are non-working:

In conclusion, it should be said that the very curious should not experiment with the "Erase" parameter, as this will lead to the complete deletion of the data:

You also need to understand that with such tests, the hard drive is very heavily loaded, so it is recommended to provide good cooling. For example, you can open the side cover of a PC case.
And on this, the story about how to check the hard disk for serviceability and bad sectors has come to its logical conclusion. If you have any questions, ask them in the comments to the article. And for dessert you can watch a cool cartoon.
HDDScan
The program is designed to check hard drives and SSDs for bad sectors, view S.M.A.R.T. attributes, changing special settings, such as: power management, start / stop of the spindle, adjusting the acoustic mode, etc. The storage device temperature value can be displayed in the taskbar.
Capabilities and requirements
Supported drive types:- HDD with ATA / SATA interface.
- SCSI HDD.
- HDD with USB interface (see Appendix A).
- HDD with FireWire or IEEE 1394 interface (see Appendix A).
- RAID arrays with ATA / SATA / SCSI interface (tests only).
- Flash drives with USB interface (tests only).
- SSD with ATA / SATA interface.
- Linear verification test.
- Test in linear reading mode.
- Linear recording test.
- Butterfly Reading Test (Artificial Random Reading Test)
- Reading and Analyzing S.M.A.R.T. parameters from disks with ATA / SATA / USB / FireWire interface.
- Reading and analyzing log tables from SCSI disks.
- Launching S.M.A.R.T. tests on ATA / SATA / USB / FireWire drives.
- Temperature monitor on ATA / SATA / USB / FireWire / SCSI drives.
- Read and analyze identification information from ATA / SATA / USB / FireWire / SCSI drives.
- Changing AAM, APM, PM parameters on ATA / SATA / USB / FireWire drives.
- View information about defects on a SCSI drive.
- Spindle start / stop on ATA / SATA / USB / FireWire / SCSI drives.
- Saving reports in MHT format.
- Printing reports.
- Support for "skins".
- Command line support.
- Support for SSD drives.
- Operating System: Windows XP SP3, Windows Server 2003, Windows Vista, Windows 7, Windows 8, Windows 10 (NEW).
- The program should not be run from a read-only drive.
User interface
The main view of the program at startup
Rice. 1 Main view of the program
Main window controls:
- Select Drive is a drop-down list that contains all supported drives in the system. The drive model and serial number are displayed. There is an icon next to it that determines the type of the drive.
- S.M.A.R.T. button - allows you to get a report on the state of the drive, based on the attributes of S.M.A.R.T.
- TESTS button - shows a pop-up menu with a choice of read and write tests (see Fig. 2).
- TOOLS Button - Displays a pop-up menu for selecting available controls and functions on the drive (see Figure 3).
- More button - Shows a drop-down menu with program controls.
When you press the TESTS button, a pop-up menu offers you one of the tests. If you select any test, the test dialog box will open (see Fig. 4).
Rice. 2 Test menu

When you press the TOOLS button, a pop-up menu will prompt you to choose one of the following options:
Rice. 3 Function menu

- DRIVE ID - generates an identification information report.
- FEATURES - opens a window of additional program features.
- S.M.A.R.T. TEST - opens the S.M.A.R.T. window. tests: Short, Extended, Conveyance.
- TEMP MON - Starts the temperature monitoring task.
- COMMAND - opens a command line build window.
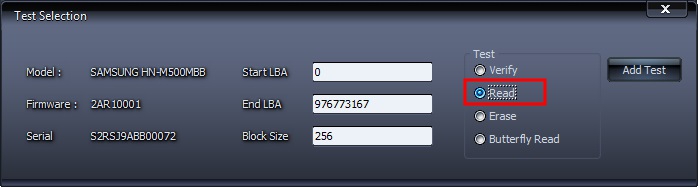
Test Dialog Box
Rice. 4 Test Dialog Box
Control elements:
- The FIRST SECTOR field is the starting logical sector number for testing.
- The SIZE field is the number of logical sector numbers to be tested.
- BLOCK SIZE field - block size in sectors for testing.
- Previous button - returns to the main program window.
- Next button - adds a test to the task queue.
- Only one surface test can be run at a time. This is due to the fact that the author of the program has not yet managed to obtain stable high-quality results when running 2 or more tests simultaneously (on different drives).
- The Verify test may have a block size limit of 256, 16384, or 65536 sectors. This is due to the peculiarities of Windows.
- The Verify test may not work properly on USB / Flash drives.
- When testing in the Verify mode, the drive reads the data block into the internal buffer and checks their integrity; no data is transferred through the interface. The program measures the readiness time of the drive after performing this operation after each block and displays the results. Blocks are tested sequentially - from minimum to maximum.
- When testing in the Read mode, the drive reads data into the internal buffer, after which the data is transmitted via the interface and stored in the temporary buffer of the program. The program measures the total readiness time of the drive and data transfer after each block and displays the results. Blocks are tested sequentially - from minimum to maximum.
- When testing in Erase mode, the program prepares a data block filled with a special pattern with a sector number and transfers the data to the drive, the drive writes the received block ( information in the block is irretrievably lost!). The program measures the total time of transmission and writing of a block and readiness of the drive after each block and displays the results. Blocks are tested sequentially - from minimum to maximum.
- Testing in Butterfly Read mode is similar to testing in Read mode. The difference lies in the order in which the blocks are tested. Blocks are processed in pairs. The first block in the first pair will be Block 0. The second block in the first pair will be Block N, where N is the last block of the given section. The next pair will be Block 1, Block N-1, etc. Testing ends in the middle of the specified area. This test measures reading and positioning times.
Task management window
Rice. 5 Task manager

This window contains the task queue. This includes all tests that the program runs, as well as the temperature monitor. The manager allows you to remove tests from the queue. Some tasks can be paused or stopped.
Double-clicking on an entry in the queue brings up a window with information about the current task.
Test information window
The window contains information about the test, allows you to pause or stop the test, and also generates a report.
Graph Tab:
Contains information about the dependence of the testing speed on the block number, which is presented in the form of a graph.
Rice. 6 Graph Tab

Map Tab:
Contains information about the dependence of the testing time on the block number, which is presented in the form of a map.
Rice. 7 Map Tab

You can select “Block Processing Time” in milliseconds. Each block tested that took longer than the "Block Processing Time" will be logged in the "Report" tab.
Report tab:
Contains information about the test and all blocks, the test time of which is longer than the "Block Processing Time".
Rice. 8 Report Tab
Identification information
The report contains information on the main physical and logical parameters of the drive.
The report can be printed and saved to an MHT file.
Rice. 9 Sample Identity Window

S.M.A.R.T. report
The report contains information about the performance and "health" of the drive in the form of attributes. If, according to the program, the attribute is normal, then next to it is a green icon. Attributes that should be paid attention to are indicated in yellow, as a rule, they indicate some kind of malfunction of the drive. Attributes that are outside the normal range are shown in red.
Reports can be printed or saved to an MHT file.
Rice. 10 Sample S.M.A.R.T. report

Temperature monitor
Allows you to evaluate the temperature of the drive. Information is displayed in the taskbar, as well as in a special window for information about the test. Rice. 11 contains readings for two drives.
Rice. 11 Temperature monitor in taskbar

For ATA / SATA / USB / FireWire drives, the information window contains 2 values. The second value is displayed in the taskbar.
The first value is taken from the Airflow Temperature attribute, the second value is taken from the HDA Temperature attribute.
Rice. 12 Temperature monitor for ATA / SATA disk

For SCSI drives, the information window contains 2 values. The second value is displayed in the taskbar.
The first value contains the maximum allowable temperature for the drive, the second shows the current temperature.
Rice. 13 Temperature monitor for SCSI disk

S.M.A.R.T. tests
The program allows you to run three types of S.M.A.R.T. tests:
- Short test - usually lasts 1-2 minutes. Checks the main nodes of the drive, and also scans a small area of the drive surface and sectors in the Pending-List (sectors that may contain read errors). This test is recommended for quick assessment of the drive's health.
- Extended test - usually lasts from 0.5 to 60 hours. Checks the main components of the drive, and also scans the entire surface of the drive.
- Conveyance test - usually lasts a few minutes. Checks the nodes and logs of the drive that may indicate improper storage or shipping of the drive.
A SMART test can be selected from the SMART Tests dialog box accessed by pressing the SMART TESTS button.
Rice. 14 SMART Tests Dialog Box

Once selected, the test will be added to the Tasks queue. S.M.A.R.T.information window test can display the progress and completion status of the task.
Rice. 15 S.M.A.R.T.information window test

Additional features
For ATA / SATA / USB / FireWire drives, the program allows you to change some parameters.
- AAM - this function controls drive noise. Enabling this function allows you to reduce drive noise due to smoother head positioning. At the same time, the drive loses a little in performance during random access.
- APM - the function allows you to save power to the drive by temporarily reducing the rotation speed (or complete stop) of the drive spindle during idle time.
- PM - the function allows you to set the spindle stop timer for a specific time. When this time is reached, the spindle will be stopped, provided that the drive is in idle mode. Any program accessing the drive forces the spindle to unwind and resets the timer to zero.
- The program also allows you to stop or start the drive spindle forcibly. Any program accessing the drive will force the spindle to unwind.
Rice. 16 Information window of additional features of ATA / SATA drive

For SCSI drives, the program allows viewing defect lists and starting / stopping the spindle.
Rice. 17 Information window of additional features of SCSI drive

Using the command line
The program can build a command line to control some drive parameters and save this line to a .bat or .cmd file. When such a file is launched, the program is called in the background, changes the drive parameters in accordance with the specified ones, and closes automatically.
Rice. 18 Command line build window

Appendix A: USB / FireWire Drives
If the drive is supported by the program, then tests are available for it, S.M.A.R.T. functions and additional features.
If the drive is not supported by the program, then only tests are available for it.
USB / FireWire drives supported by the program:
| Storage device | Controller IC |
| StarTeck IDECase35U2 | Cypress CY7C68001 |
| WD Passpopt | Unknown |
| Iomega PB-10391 | Unknown |
| Seagate ST9000U2 (PN: 9W3638-556) | Cypress CY7C68300B |
| Seagate External Drive (PN: 9W286D) | Cypress CY7C68300B |
| Seagate FreeAgentPro | Oxford |
| CASE SWEXX ST010 | Cypress AT2LP RC7 |
| Vantec CB-ISATAU2 (adapter) | JMicron JM20337 |
| Beyond Micro Mobile Disk 3.5 "120GB | Prolific PL3507 (USB only) |
| Maxtor Personal Storage 3100 | Prolific PL2507 |
| In-System ISD300A | |
| SunPlus SPIF215A | |
| Toshiba USB Mini Hard Drive | Unknown |
| USB Teac HD-15 PUK-B-S | Unknown |
| Transcend StoreJet 35 Ultra (TS1TSJ35U-EU) | Unknown |
| AGEStar FUBCP | JMicron JM20337 |
| USB Teac HD-15 PUK-B-S | Unknown |
| Prolific 2571 | |
| All Drives That Support SAT Protocol | Majority of Modern USB controllers |
USB / FireWire drives that the program may support:
| Storage device | Controller IC |
| AGEStar IUB3A | Cypress |
| AGEStar ICB3RA | Cypress |
| AGEStar IUB3A4 | Cypress |
| AGEStar IUB5A | Cypress |
| AGEStar IUB5P | Cypress |
| AGEStar IUB5S | Cypress |
| AGEStar NUB3AR | Cypress |
| AGEStar IBP2A2 | Cypress |
| AGEStar SCB3AH | JMicron JM2033x |
| AGEStar SCB3AHR | JMicron JM2033x |
| AGEStar CCB3A | JMicron JM2033x |
| AGEStar CCB3AT | JMicron JM2033x |
| AGEStar IUB2A3 | JMicron JM2033x |
| AGEStar SCBP | JMicron JM2033x |
| AGEStar FUBCP | JMicron JM2033x |
| Noontec SU25 | Prolific PL2507 |
| Transcend TS80GHDC2 | Prolific PL2507 |
| Transcend TS40GHDC2 | Prolific PL2507 |
| I-O Data HDP-U series | Unknown |
| I-O Data HDC-U series | Unknown |
| Enermax Vanguard EB206U-B | Unknown |
| Thermaltake Max4 A2295 | Unknown |
| Spire GigaPod SP222 | Unknown |
| Cooler Master - RX-3SB | Unknown |
| MegaDrive200 | Unknown |
| RaidSonic Icy Box IB-250U | Unknown |
| Logitech USB | Unknown |
USB / FireWire drives not supported by the program:
| Storage device | Controller IC |
| Matrix | Genesis Logic GL811E |
| Pine | Genesis Logic GL811E |
| Iomega LDHD250-U | Cypress CY7C68300A |
| Iomega DHD160-U | Prolific PL-2507 (modified firmware) |
| Iomega | |
| Maxtor Personal Storage 3200 | Prolific PL-3507 (modified firmware) |
| Maxtor One-Touch | Cypress CY7C68013 |
| Seagate External Drive (PN-9W2063) | Cypress CY7C68013 |
| Seagate Pocket HDD | Unknown |
| SympleTech SympleDrive 9000-40479-002 | CY7C68300A |
| Myson Century CS8818 | |
| Myson Century CS8813 |
Appendix B: SSD Drives
Support for a particular drive largely depends on the controller installed on it.
SSD drives supported by the program:
| Storage device | Controller IC |
| OCZ Vertex, Vertex Turbo, Agility, Solid 2 | Indilinx IDX110M00 |
| Super Talent STT_FTM28GX25H | Indilinx IDX110M00 |
| Corsair extreme series | Indilinx IDX110M00 |
| Kingston SSDNow M-Series | Intel PC29AS21AA0 G1 |
| Intel X25-M G2 | Intel PC29AS21BA0 G2 |
| OCZ Throttle | JMicron JMF601 |
| Corsair performance series | Samsung S3C29RBB01 |
| Samsung SSDs | Samsung Controllers |
| Crucial and Micron SSDs | Some marvell controllers |
SSD drives that the program may support:
Additional Information
HDDScan 3.3 can be downloaded from 2.8
| Support: |


