In a modern computer, the hard drive is the most unreliable device. Since the number of failures of this component is very large, and the whole danger is that you cannot predict the time when it will break, but you can periodically check the hard drive for serviceability. Due to untimely diagnostics and prevention, many users lose important information. Therefore, I recommend that you always pay attention to how your computer works.
If, then you need to check the hard drive for serviceability. How to do this, I will tell you in this article.
Let's first look at how a hard drive works and what it consists of.
HDD consists of glass and aluminum plates, which are covered with a special layer of ferromagnetic material. In simple terms, a hard drive is a magnetic recording device.
For clarity, I attach an image of the insides of the HDD.
In the production of hard drives, at the final stage, low-level formatting is carried out, which forms a “disk map”, marking it into tracks and sectors. Special marks are also applied so that the head falls into the desired sector. A sector is a unit of measure for a hard disk and is equal to 512 bytes.
To check the hard drive for serviceability, we will use special programs.
It is important to monitor the temperature of the hard drive, as overheating can lead to its failure. To check the temperature of the hard drive, you can use utilities such as AIDA or HDD Life.
You can download these programs on the official websites, for this, enter in the names of the programs.
After installing the HDDLife program, run it, and you will clearly see the status of your hard drive, as well as its temperature.
You can also test the disk if you wish.

In the AIDA program, you can also view the disk temperature parameters.
To do this, run the program, open the item "Computer" - "Sensors"

All information at a glance. If you see that the temperature of the hard drives is high enough, you need to install active cooling. Special cooling systems for hard drives are sold in stores.
We check the status of the hard drive with CrystalDiskInfo.
You can download the CrystalDiskInfo program from the official website, it is distributed free of charge, but it has quite rich functionality and can provide all the necessary information to the user about the state of the disk. If the program after diagnostics determines that the disk is fully functional, it will give a status assessment as “Good”. If there are any problems, the program will give an "Alarm" or "Bad" rating if the drive is in a dying state.

You can also see S.M.A.R.T information in CrystalDiskInfo - this is the initial data by which the program evaluates the state of the disk.
We check the status of the hard drive with the Victoria program.
In order to prevent problems with the hard drive in advance, I recommend using the Victoria program under Windows. With its help, you can get a lot of important information about the disk, as well as check the disk for bad sectors and preventive measures. The program has a free and paid version, to determine the status of the disk, it will be enough for us to use the free version. The program is suitable even for beginners, as it has an intuitive interface, and when scanning the HDD, the user clearly sees the state of the sectors.
Since we are only interested in the state of the disk, we will not delve into the process of deep checking and restoring problem sectors, if any, but for a complete understanding, I will describe the main functions. To begin with, we download the program, it is quite light and weighs less than 1 mb, so after downloading, we launch the application - an icon with a green cross. In the main window of the program, you will see a horizontal menu with switching tabs. Let's consider the most important ones.

During the test, the program will scan the disk for readability of sectors, as you can see, the quality of the sectors is highlighted in different colors. Let's see what each color means.
- Gray sectors are the fastest sectors, we have no questions about them.
- Green - sectors that work slower, they are also in good condition.
- Orange - slow sectors, if the disk has a lot of such sectors, then you need to think about its health, because because of them, the disk starts to work more slowly, and as a rule, such sectors will fail in the future.
- Red - sectors are damaged and cannot be read. If the program detects them, you need to think about a new disk.
- Blue sectors with a cross are those that caused a failure when reading. Information from them cannot be recovered, but you can make the replacement of this sector a working one, and perhaps the disk will work a little more, but it’s better not to delay the replacement.
If you pay attention, then there are four buttons on the test tab panel: Ignore, Erase, Remap, Restore, they will also be useful to us, consider their purpose.
- Ignore - a function in which only a surface test is performed and no actions are applied to bad sectors.
- Erase - when this function is enabled, bad sectors will be overwritten.
- Remap - if this function is enabled, the program will try to replace bad sectors with working ones. That is, when scanning, the program finds a bad sector, marks it as not working and replaces it with a good, working sector.
- Restore - this feature is available only in the paid version of the program. When enabled, the program will try to restore the non-working sector.
I have described the main functions of the program, you just have to select the one you need and run the scan. It may be quite long, depending on the capacity of the hard disk, as well as on its condition. Therefore, be patient. If a lot of problem sectors are found on your disk, then do not delay purchasing a new one, and make sure that you transfer all important information to another as soon as possible.
A hard drive is a storage medium that stores all of your computer's information. It is for this reason that it is important to monitor the condition of the HDD and regularly conduct diagnostics in order to troubleshoot in a timely manner. This is ideal, but before encountering problems with the drive, users often do not even think about how the hard drive is diagnosed, and why it is needed at all. If your computer and the information on it is of any importance to you, take the time to read the guide, which will help you learn how to check the operation of the hard drive using the software without spending a lot of time on it.
We check the performance of the built-in Windows tools
If you do not have the time or skills to use the special software needed to diagnose the HDD, you can use what is built into Windows from the very beginning. Actions are simple:
Through the explorer or the "My Computer" shortcut, go to the HDD.
Right-click on the drive icon, then select "Properties" from the menu that opens.

On the page that appears, click on the "Service" tab located at the top. Click Check.

Wait for the built-in program to finish checking the health of your drive.
Unfortunately, this method is not as effective as diagnostics using special software - it can only point out some errors and push the user to more serious scanning of sectors. A more serious approach is needed to thoroughly scan and eliminate malfunctions and damage.
Scanning the HDD in third-party software
There are a lot of programs with which you can find out about the presence of hard drive errors, as well as deal with their removal, and parsing the instructions for using each of them is a very long and complicated matter. For this reason, below you can familiarize yourself with the method involving the use of the popular Victoria program. When choosing other software, keep in mind that the principle of operation of applications for diagnosing disks is practically the same from program to program. Here is the instruction for Victoria:
Run the application as an administrator by calling the menu with the right mouse button on the program shortcut.

In the application window that opens, at the top, find the Standard tab and click on it.
On the new page, you will see a list of media detected by your system - they are listed on the top right side of the application. Select your HDD, then click the Passport button. If you've done everything right and the media is available for use, Victoria will let you know right away.

Click on the SMART tab, usually located next to the tab you previously opened. Here you need to select Get SMART and wait for approval from the application.

Go to the TEST section, then press the START button to start diagnosing your HDD.

During the verification process, Victoria will display the status of the HDD with a grid of squares. Gray squares indicate that everything is fine - for the normal operation of the equipment, either all or the vast majority of all sectors should be like that. Red squares are damaged sectors that hang like a dead weight and interfere with the operation of the drive.

If you have blue squares - unreadable sectors, they must be rescanned in Victoria with the Remap mode enabled.
Now you know how to check the media status.
Remember that over time, there are more and more unreadable sectors on the disk - they appear as a result of mechanical deformations, intensive memory use, and also for numerous other reasons. This is normal and can be compared to the wearer aging.
Share the article with your friends so that they also know about it, and also learn how to diagnose HDD errors on their own. Don't forget to subscribe to our updates so you don't miss out on new exciting content!
Hello admin! I read several articles about the Victoria program on your site and a question arose. But what, the latest operating system from Microsoft - Windows 10 is so flawed and does not have a built-in hard drive diagnostic tool? Can't she herself determine the state of the hard disk on which it is installed and it is necessary to download third-party programs? I have a new laptop with Windows 10, and if there is such a tool, then I ask you to tell about it in your articles. Also wanted to ask. In one of your comments, you said that it is useless to run the built-in Windows 10 hard disk health check utility - CHKDSK to find and fix bad sectors (bad blocks). Why? After all, on all sites like yours it is written that chkdsk, launched with the /R parameter, can fix bad blocks!
How to find out the status of a hard drive using the built-in tools in Windows 10
Hello friends! There are about a dozen articles on this topic on our site, but interestingly, I didn’t tell you about this method, but it nevertheless exists.
In fact, you can find out the status of the hard drive in Windows 10 using the built-in tools, but these tools will simply tell you: “Yes, the disk condition is good” or “The disk condition is bad”, but how bad it is and whether it is urgent to copy data from HDD and replace it, or you can still wait at least until tomorrow, that's what they won't tell you. Why?
In simple words, the operating system simply reads the hard disk self-diagnosis (S.M.A.R.T.) and if it is GOOD (good), then the system tells us so - “The disk is working fine.” If the S.M.A.R.T status of the hard drive is BAD (bad), then the system will indicate that the disk is faulty. But in life, everything is relative and very often the HDD is on the verge of failure, and Windows still shows us that the disk is working fine.
In short, if you want to make an accurate diagnosis of a hard drive, then you cannot do without special programs, and even chkdsk won't help you. I will try to prove it to you in today's article.
To find out the status of the hard drive in Windows 10 using the built-in tools, you need to go to« Control Panel»
"Center for Security and Service"

"Service"

As you can see, Windows 10 evaluates the status of the hard drive as normal: All drives are working fine. OK.

But in fact, if you now run a special program for diagnosing hard drives, you will see that the state of the hard drive is C grade (Alarm!) And it is full of unstable sectors that the hard drive's built-in firmware could not fix.

The Victoria program will say the same.

How else can you find out the status of the hard drive using the built-in tools of Windows 10 or how to use the disk check utility (chkdsk). Running Check Disk from the GUI
Windows 10 has a chkdsk disk check utility and you can run it directly in the graphical interface or using the command line. After checking, the utility will issue a complete report on the state of the file system of the operating system you have installed.
Note: You may read on many sites that the chkdsk utility, run with the /R option, can fix bad sectors (bad blocks), but in fact this is not the case. Bad sectors can be reassigned to healthy sectors from backup tracks only by the tech control firmware built into the hard drive. disk status. What the chkdsk utility does is fix NTFS or FAT32 file system errors and it is best to use the utilitychkdsk to fix file system errors, not to diagnose the hard disk condition. I'll explain a little.
You all know that the minimum unit of information on a hard disk is a sector, the amount available to the user is 512 bytes. When formatting a hard disk into a file system, all sectors are combined into clusters (one cluster is located on several sectors), respectively, the cluster is the minimum area of the file system. So here, utility chkdsk does not work with hard disk sectors, but a level higher - with clusters. In turn, Victoria and MHDD programs are used to check hard disk sectors, not clusters, so they do not treat the file system.
Enter the Computer window and right-click on the drive (C:), select "Properties"

Go to the "Service" tab and click on the "Check" button

"Check disk"

The disk is being checked for errors.

The disk has been verified successfully. No errors found.
- the most unreliable component of a modern computer. As a rule, modern models work up to 3 years, after which they have to be replaced. The worst thing about this situation is that it is very difficult to predict exactly when a hard drive will fail. Because of this, inexperienced users often lose important data. In this article, we will talk about how to check the hard drive for health and correctly assess its condition.
Health check based on data from S.M.A.R.T.
If you want to check the hard drive for health, then the first thing to do is install the program. This free program collects all available information about the drive and, based on it, issues an assessment of its technical condition. If the drive is fully functional, then its "technical condition" will be indicated as "Good". If it has any problems, then you will receive an "Alarm" rating, but in cases where the HDD is on the verge of death, the program gives a "Bad" rating.
Also in the CrystalDiskInfo program you can see the initial data of the S.M.A.R.T. (their program uses to assess those states). To understand what this or that parameter means, you can use . There is a table with a detailed description of all the parameters of the S.M.A.R.T. system. In addition, in the CrystalDiskInfo program, you can see the number of inclusions, the number of hours worked, the exact model name and even the serial number of the drive.
Checking the health of the hard drive under load
If the S.M.A.R.T. does not show any problems, then the hard drive can be checked for serviceability by creating a large load. To do this, simply try to write a large number of small files (a couple of megabytes in size) to the drive. For example, you can try to copy a large folder of photos to it.
- If the disk is good, then the copying process should pass without any incidents. At the same time, the copying speed should be more or less stable throughout the copying (except for a slight drop in speed immediately after the start of copying).
- If the hard drive is faulty, the copy speed will fluctuate greatly (from normal to very slow). In some cases, the copying process may hang or be interrupted. Some files may not be copied, the system will report errors. In especially advanced cases, a crack or rattle may be heard, the drive may turn off ().
If the test with writing files went well, then try testing how reading data works. To do this, try copying the data from the disk under test.
Checking for errors in HD Tune
The next step is to check the health of the hard drive using specialized programs. Such programs allow you to check the hard drive for errors and identify existing problems, even if they do not appear in normal use. Let's start checking with a free program (or its paid version HD Tune Pro).
In order to check your hard drive for errors, run the HD Tune program, go to the tab and click on the "Start" button.

After that, HD Tune will start checking the hard drive for health. During the check, you will be able to observe this process. Normal parts of the hard drive will be marked in green, and damaged in red.

On a fully functional hard disk, there should be no damaged (red) blocks at all, the entire surface should be marked in green.
Error checking with Victoria 3.5
To get the most accurate check, you need to use the program, you can download it as an iso file, for example, (here is version 3.5, which is best for checking outside the operating system). The downloaded iso file must be written to a CD (or USB flash drive) and booted from it to a computer. After booting the computer from this CD, you will need to select one of the versions of the Victoria program. For desktop computers, you need to choose the version "Victoria for Desktop", and for laptops, respectively, "Victoria for Notebook". Other options in this menu launch the DOS operating system and Volkov Commander.

To start scanning the entire surface of the hard disk, press the F4 key. After that, a menu with settings should appear. Here you need to select "Ignore Bad Blocks" and "Line Reading". It should be noted that you need to use the Victoria program very carefully, since using some of its functions can delete data on the drive. For example, this can happen when the options "Record (erase)", "Record from file", and "BB = Erase 256 sect" are enabled.
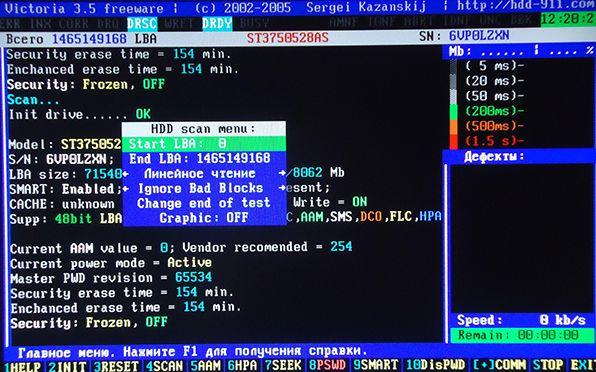
To start scanning, you need to press the F4 key again. After that, it remains only to wait until the verification is completed. At the end, if the hard drive is fully functional, you should see a screen like this.

If the hard drive has some problem areas, then orange and red blocks will appear on the scanning screen. The more such blocks, the worse the condition of the HDD surface. If the number of red blocks is large, then this means that the hard drive is faulty and it is time to replace it. Detailed information about the problems found can be viewed on the right side of the screen, in the "Defects" window.
Checking for errors in Victoria 4.46
If you do not want to burn an iso image and boot from a computer from a disk, then you can use the Victoria 4.46 program, which runs from the Windows operating system. You can download this version of the program, for example,.
After downloading, you will receive an archive that will need to be unpacked to any folder. To run the Victoria 4.46 program, open the folder with the contents of the archive and run the vcr446f.exe program. After starting, you will see the main Victoria window, it will look something like the picture below.
You should start studying the program from the Standard tab. Here, on the right side of the screen, there is a list of hard drives that Victoria was able to determine, information about the currently selected drive is displayed at the top left (if you wish, you can select another one), and at the bottom there is a log of events, errors and other information.

To check the hard drive for errors, you need to open the "Tests" tab. Here you must first click on the button " Pass"(To get information about the drive), and then on the button" Start»(To start the check).
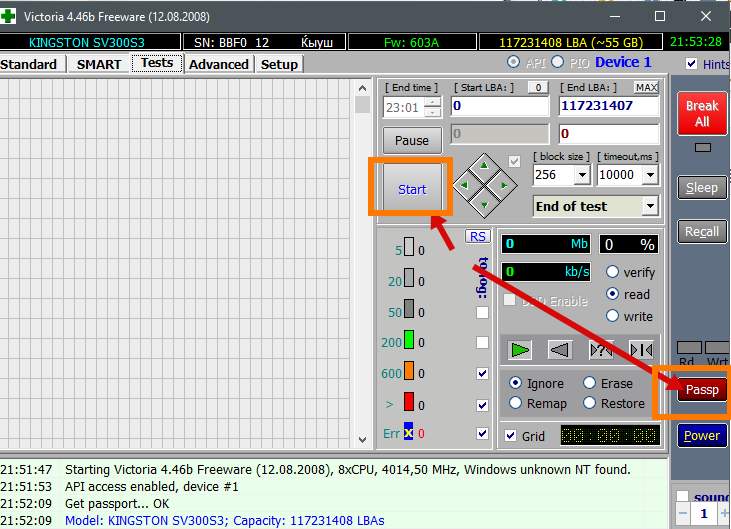
After that, you just need to wait until the program finishes checking the hard drive.

During the verification process, Victoria will find bad and problematic drive blocks, the number of which will be displayed in the column on the right, as well as at the bottom of the screen.
Results of checking the health of the hard drive
A fully functional hard drive should pass all of the above tests without any problems. CrystalDiskInfo should be rated Good, manual write and read tests should run smoothly, and HD Tune and Victoria should show no problems. If this is the case for you, then most likely your hard drive is fully functional and will work for a long time.
But, of course, there are no guarantees here and cannot be. Therefore, the only way to reliably protect your data is backup. The most important data (personal photos, videos, documents) should always be stored on multiple drives.


