The processor makes a lot of noise - the problem of most people who use system units (in common people, out of ignorance, they call the processor). To be more precise, then fans are noisy, which cool the system from overheating.
There are various reasons why a fan may make noise. Most often, they need to be thoroughly cleaned of dust (including the cooling radiator) and lubricated. But there is one more thing that caused noise at my workplace - the speed of the cooler.
Coolers are divided into two types: with speed control function software tools and without. Luckily, I have a Sumer cooler that supports software rotation control.
Everything could be perfectly configured in the BIOS, which itself regulated the rotation of the cooler. But there was one thing. The principle of adjusting the BIOS cooler is that you set minimum speed rotation adhered to by the BIOS. And as the temperature rises, the cooler rotation speed increases in order to lower it.
And since I work in the range of 45-50 degrees, the system thinks that this is overheating and always turns the fan, so this is not an option. It was necessary to manually control the rotation speed of the cooler without any resistors, etc. A couple of searches on the Internet and found program to control the speed of rotation of the coolerspeedfan.
Fortunately, the program turned out to be free and compatible with Windows XP and Windows 7 (x32-64). Launched in the same way ubuntu linux through Vine, but the program refused to work.
Speedfan setting. Increasing and Decreasing Cooler Speed
To get started, go to the download page and download latest version programs. Now that the program is installed, it can take about a minute to load (sometimes much faster). The first launch of the program reads information about the hardware and coolers that are installed. Here's how I have it set up:
- all hints disabled
- the program starts with Windows
- launch program in tray
- when "closing the program" it is minimized to tray
The program has a lot of settings, and since the interface is in Russian, it’s easy to customize it for yourself. Initially, the program is installed in English, to install the Russian language, click on the configuration button:
In the window that opens, find the "Options" tab and select the language you need in it and click Ok:

Now the program works in Russian. Hints are turned off at the moment they are shown. They hinder more than help. Therefore, the next time you see a hint, check the box next to "Do not show again."
In order to the program was loaded withWindows, open start and select the startup folder. In this folder you need to copy the shortcut to SpeedFan. This is the easiest option.
If you want the program to be loaded invisibly (in the tray), then go back to the settings tab and check the box next to “launch minimized”.
In the same tab, check the box “Minimize on Close” and when you click on the cross in Windows, the program will not close, but will be minimized to tray. I think this is very convenient, since it is inconvenient to open and close the program every time.
The coolers themselves are defined in the main window of the program. These windows with percentages are the speed controllers. I have three coolers in my system, so exactly three are displayed. By changing the power in percent, the speed will decrease or increase. Accordingly, 0% fans stop, 100% fans spin at full power.
A fan or cooler (as it is also called) is designed to cool computer parts that heat up during operation. However, it happens that overheating of parts is not observed, and the cooler works too actively, causing too much noise. There is also the opposite situation: when the PC is heated, and the fan does not want to work at all. In this article, we will figure out how to increase or, conversely, reduce the cooler rotation speed on a laptop.
You can increase or decrease the fan speed programmatically
The fan speed itself is determined motherboard based on the settings in the BIOS. It just so happens that these settings are not always optimal, and this, in turn, leads to the fact that the laptop either makes noise as if it is trying to take off, or heats up so that you can get burned. You can solve this problem directly in the BIOS or using third party programs. Let's consider all the ways.
Setting up through the BIOS may not seem very convenient, since this method does not always work as well as we would like. And if you need to configure everything manually, on the go and quickly, then the BIOS is not an assistant at all. If you do not have a laptop, but a desktop computer, then the cooler may not be connected to motherboard, which makes configuration through the BIOS completely impossible.
Most convenient option- use special software to adjust the fan speed. Similar software products enough, there is even plenty to choose from.
Simple, good, and most importantly, free program Speedfan perfectly solves the task, in the article we will analyze this particular utility in more detail because of its convenience and popularity. Its interface is quite simple to understand, and therefore even the absence of Russification is unlikely to create any difficulties when working with it.
The Speedfan installation is standard, we will not dwell on it. Immediately after installation, the utility will collect all necessary information about the fans installed on the computer and will show it to you in the form of a list.

Highlighted in red are the areas to pay attention to. The upper block shows the rotation speed of each cooler in RPM (revolutions per minute), and the lower one shows their parameters that can be adjusted. As for the top block, CPU Usage shows the level of processor utilization (a separate scale for each core). If you check Automatic fan speed, the rotation speed will be set automatically. It is not recommended to use this function due to its inefficiency. In the end, the program was not installed for automatic, namely for manual setting. The window may also look like:

If the fan is not connected to the motherboard, but to the power supply, then the values will not be displayed. This is not your fault, it was done by default. If you want the parameters to be displayed and all coolers to be detected, you will have to reconnect them to the motherboard.
You can adjust the rotation speed of each fan in the block with the Speed parameters. Just use the arrows to set the percentage. It is strongly not recommended to turn off any coolers, as this can lead to overheating and damage to the laptop.

In the event that you do not know which cooler is not working correctly, you need to change the Speed value for each until you notice a difference by ear. Please note that the percentage value you set will be constant, that is, it will not change depending on the load level.
A separate story is the video card fan. It is this part of the laptop that often heats up the most, which means that the correct operation of the cooler is especially important here. Great for setting up a fan on a graphics card. MSI program afterburner. It works with all video cards, which makes it very convenient. This utility is enabled by default. auto tuning speed. This feature should be disabled.
Use the slider to set the desired speed value. The graph next to it will display all the changes in the work. Thanks to this, it will be convenient for you to choose the optimal settings.
During operation of the computer, all its electronic mechanisms gradually heat up. And some components are heated very noticeably. For example, while playing heavy load on the processor and video card. But even with normal computer idle, the temperature individual components stays at 50-60oC above zero.
What if system unit or a laptop is very rarely cleaned of dust, then the heating of the main parts will occur even faster. Overheating leads to constant computer freezes, and fans, trying to solve this problem, work on increased speed. And this leads to annoying noise. Constant overheating can result in an emergency breakdown of one or more parts of the equipment.
Therefore, to get rid of constant noise, you need to reduce the cooler speed. And there are only three reasons that lead to the appearance of noise. The first is overheating of computer components. This is especially true for laptops, especially in summer time when the room temperature is often above normal. To reduce the amount, you need either a laptop or change the thermal paste on the processor.
The second reason is bad or just an old cooler. For better job it needs to be cleaned and lubricated.
And the third reason is new fan was selected with more than necessary, the number of revolutions. In this case, you just need to reduce its speed.
Setting the cooler mode via BIOS
You can change the mode of operation of the cooler through the BIOS. To enter it, you need to restart your computer and immediately, as soon as the system starts to boot, press the Delete button several times. The main BIOS menu will open, where you should go to power section. Next, select the line Hardware Monitor, and then change the value in the CPU Q-Fan Control and Chassis Q-Fan Control lines to Enabled (that is, enable).
As a result of these actions, new lines will appear CPU Fan Profile and Chassis Fan Profile. They have three different modes work: productive (Perfomans), quiet (Silent) and optimal between performance and noise (Optimal). After selecting the required operating mode, press the F10 button to apply the changed settings. After such simple manipulations, coolers will make much less noise during the operation of a computer or laptop.
Everyone active users laptops are known for the problem of overheating, especially in the hot season, and entails not only freezing and a long system response to user action, but also failure of components.
Based on this, the question arises, how to increase the speed of rotation of the cooler on a laptop?
Since the fan is responsible for cooling, the only right decision will be its acceleration. There are several ways to do this, but consider the most common of them.
Speedfan
Very popular free overclocking software. First of all, it is designed to monitor the temperature of all components, and one of its functions is the ability to monitor the fan as well. With its help, you can control the speed, depending on the needs and workload of the processor.
So what's to be done:

But this is only one of those methods that allow you to overclock the cooler on a laptop.
BIOS
You can also increase the fan speed using the BIOS. This is also done according to a certain scheme.
If you do not have experience with bios, then it is better to entrust the work experienced master, otherwise the integrity of the system may be violated and the computer will simply stop booting.
You need to do the following:

The appearance of the settings may differ depending on both the manufacturer of your laptop (Lenovo, Samsung, Packard Bell, etc.) and the BIOS version.
AMD OverDrive
For owners of laptops with an AMD processor, it has been developed special utility which allows not only to control the speed of rotation of the cooler, but also allows you to change the settings of the entire chipset, thereby increasing the performance of the PC.
To overclock the fan, do the following:

After all the manipulations, the rotation of the fan will be completely under the control of the utility, and you will no longer have to worry about anything.
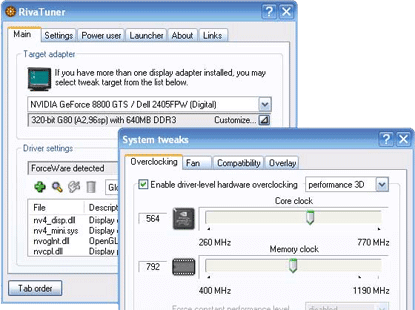
Riva tuner
Another utility that allows you to increase or decrease the fan speed on laptops running Intel processor. The whole point is that the installation necessary settings is produced here according to the algorithm described in the method where the technology was used AMD OverDrive, so we will not dwell in more detail, even a beginner can handle it.

When installing any software, it should be understood that it is preferable to download programs exclusively from official sites, otherwise there is a risk of introducing malware onto your computer.
In what cases the cooler cannot be overclocked
There are two types of fan connectors: 3-pin and 4-pin (PWM). And only the last of them can be controlled.

I learned it on own experience, when in the process of upgrading the hardware, I replaced the old 4-Pin cooler with a newer 3-Pin and ran into the problem that it could not be accelerated in any way. Therefore, when choosing, always consider this.
Programs from the manufacturer
There are times when third party software does not detect laptop fans or change the speed does not work. And then they come to the rescue original programs from laptop manufacturers.
A small list of such programs:
- In some HP models, you can only speed up work using the Notebook Fan Control utility.
- Acer also provides its users with Smart Fan, Fan Controller and ACFanControl utilities.
- Lenovo has a "Fan Control" utility.
You can find and download them on the official website. However, not all laptop models may have such software.
If none of the methods brought desired result, and it was not possible to increase the speed of the cooler, then we recommend using special cooling pads. They will help you achieve optimum temperature laptop and it will last a long time.
This article describes the program for adjusting the speed of the processor cooler, video card and other PC elements. Whether you need to change the speed of the fans due to their excessive noise or because of overheating, SpeedFan will help in any case. The main condition for the correct functioning of the utility is the ability to adjust coolers from the BIOS.
speedfan
SpeedFan is an absolutely free program for a video card cooler, CPU cooler and any other equipment with active cooling. The fan can be controlled automatically or manually.
Before running the utility, it is advisable to disable automatic change speed in BIOS. If this condition is ignored, the correct functioning of the application is not guaranteed. After turning on, SpeedFan reads information about the fan speed and takes these values as the maximum. From this it follows that if BIOS settings do not allow you to spin the cooler to the limit, then the utility will not be able to do it either.

For example, the CPU cooler rotated at 1000 RPM when SpeedFan was turned on. The application will accept this value as an upper limit and will not be able to increase the frequency when it reaches a critical level. If the computer does not automatically turn off, then it CPU will fail.
First start
After starting the program for adjusting the speed of the cooler, it will draw a window with brief reference. After studying the text, check the box next to the only item and close the window. After that, it will no longer appear on the screen.
Now the program will determine on which hardware it is installed active cooling with the possibility of adjustment and reads the readings of the sensors. After that, the display will automatically show a list of fan speeds and the temperature of the main elements of the PC. In addition, in the application panel, you can see information about the processor load and voltage.
To switch the language to Russian, go to the "Configure" > "Options" menu. Set the "Language" switch to the "Russian" position. Click "OK".
Main window
The program for adjusting the speed of coolers in Russian displays all the information necessary for the user in separate blocks. In the middle of the window are data describing all found fan controllers. Their names - etc. At the same time, the list can include many more coolers than there are in the PC. Opposite some of them, the real speed of the fans will be displayed. Others will either show values zero, or "garbage" (less than 1000 rpm).

Opposite the data describing the operation of the screws, there is a block of information about the temperature of the main components of the PC:
CPU - processor.
GPU is the core of a video card.
HD0 - hard drive.
There may also be "garbage". To determine which values are not real, one must think logically. For example, the temperature of appliances in a running car is unlikely to reach 5 or 120 degrees.
This is the only drawback that the program for adjusting the cooler rotation speed has not lost over the years of development. It is worth saying that the official website offers a collection of necessary utility settings for popular PC configurations. However, it is often much faster to do all the settings manually.
The main blocks of the utility
The utility block listing Speed01, 02, etc. contains propeller speed switches. It is indicated as a percentage. the main task- determine which switches from this block are responsible for which fans.
Go to the first selector and change its value to 20-30%. Observe, the speed opposite to which line "Fan" changes. Now change the settings of the next switch. Memorize or write down each match you find.
If the sensors cannot be identified, it makes sense to use the AIDA64 utility. Run it and SpeedFan at the same time. Change the values of the Speed switches, and in AIDA see which particular fans start spinning at a different speed.
Configuration
Go to the "Configuration" menu. Here you can set clear names for all lines of blocks in the main window. For example, rename the CPU cooler rotation sensor to "TempCPU". To do this, click on any item in the settings, wait a second and click again. After that, the line will be highlighted, and a cursor will appear in it.

Highlight the name of the desired sensor and pay attention to lower part application window. Here you should enter what temperature of each PC device the program for adjusting the speed of the cooler will consider normal. When the equipment has cooled to this level, the fan speed will be at a minimum. The alarm temperature must also be specified. Heating up to this level will turn on the maximum speed of the cooler.
To find out which values to use, refer to the official websites of your PC device manufacturers.
Now click on the "+" next to the sensor name. Remove all checkmarks from the "Speed" list. Leave only the one that corresponds to the regulator of this device.
Go to the "Fans" tab and, if necessary, rename them the same as the sensors. Disable unused by unchecking the boxes.
Speed
For the program to adjust the speed of the cooler to perform automatic control, open the "Speeds" tab. Highlight a line desired fan and rename it as you see fit. Now pay attention to the bottom block of the window. There are two points here: