When the first computers appeared, all programs, games and other files practically did not take up disk space. Now things are quite different, and it is often necessary to install an additional storage medium. Therefore, every user should know how to connect a second hard drive to a computer. In fact, this is not difficult to do, you just need to follow simple instructions.
The device must first be purchased from a store. Please note that the hard disk has several connection interfaces. After purchasing the purchase, you can proceed with the installation of the device.
Preparing for installation
- How many hard drives are already connected to the motherboard? Most often, a computer has only one hard drive, so installing a second drive is not difficult. In most cases, the HDD is located directly under the DVD-ROM, so it won't be difficult to find it;
- Is there extra space for installing a second hard drive? In the event that it is not possible to install a second or third disk, then you will have to purchase a USB drive;
- What type of cable is used to connect the hard drive to the computer? If the purchased device does not have the same interface as on a PC, it will be difficult to install.
Please note that you need a 3.5-inch hard drive. You don't need to buy small drives designed for laptops.
Physical disk connection
If the system unit has not yet been disassembled, disassemble it. It is now recommended to get rid of static electricity. This is done by any means known to you. If you wish, you can purchase a special grounding wristband in the store.

After small manipulations, the hard drive will be fixed in the case, now all that remains is to connect the hard drive. Before plugging in the power cable and ribbon cable, it should be noted that the procedure is slightly different for the IDE and SATA interface.
IDE interface
When connecting a disk with an IDE interface, it is recommended to pay attention to such a nuance as setting the operating mode:
- Master (main).
- Slave (slave).
If an additional hard disk is installed, then you need to enable the Slave mode. To do this, you need to use a jumper (jumper), which is installed in the second place. The first row turns on the Master mode. It is important to note that on modern computers, the jumper can be removed completely. The system will automatically determine how hard the master is.

At the next step, you need to connect the second or third hard disk to the "mother". For this, the IDE interface is connected to a ribbon cable (wide, thin wire). The other end of the cable is connected to the IDE 1 Secondary socket (the main drive is connected to the zero connector).

The final stage of connection is power supply. To do this, a white chip with four wires is connected to the corresponding connector. The wires go directly from the power supply (box with wires and fan).
SATA interface
Unlike IDE, a SATA drive has two L-shaped connectors. One is for power connection and the other is for data cable. It should be noted that such a hard drive lacks a jumper.

The data cable plugs into a narrow connector. The other end connects to a special connector. Most often there are 4 such ports on the motherboard, but there are only 2 ports with an exception. One of the slots can be occupied by a DVD drive.
There are times when a SATA disk was purchased, but no such connectors were found on the motherboard. In this case, it is recommended to additionally purchase a SATA controller, which is installed in the PCI slot.
The next step is to connect the power. The L-shaped wide cable is connected to the corresponding connector. If the drive has an additional power connector (IDE interface), just use one of the connectors. This completes the physical connection of the hard drive.
BIOS setup
When all manipulations with the hard disk are completed, turn on the computer, and then enter the BIOS. It is important to note that the BIOS is launched on each computer in its own way. To do this, use the key:
- Delete;

After entering BIOS, you need to go to the configuration setting. It is important to assign boot from the disk where the operating system is installed. If the priority is set incorrectly, the system simply will not boot.
If one of the disks is not displayed in the BIOS, it means that the hard drive was connected incorrectly or the ribbon cable was damaged. It is recommended that you inspect all wires and reconnect (remember to turn off your computer).
As soon as the BIOS setup is completed, you can boot with the operating system. After that, all that remains is to assign a letter to the disk.
The final stage
Since connecting a hard drive to a computer is not enough, you need to make the final settings directly from under Windows. On some computers, this procedure is carried out automatically. To check this, you should open "My Computer" and then see if a new disk appears.
If nothing happens, you need to start the control panel. Then select "Administration". As soon as a new window opens, you will need to select "Computer Management". In the left column, you need to find the "Disk Management" tab (on some computers "Disk Manager").

- At the bottom of the window, select disk 1 (if more than 2 hard drives are connected, select the disk with the highest number). This will be the new hard drive;
- You must assign a letter to the logical volume. To do this, right-click on the disk, and then select "Assign letter";
- As soon as a new drive letter is assigned, it needs to be formatted. The procedure can take a long time, it all depends on the size of the hard drive. It is important to choose the NTFS file system when formatting.
When the formatting process is complete, a new disk will appear in the root directory "My Computer". If for some reason it is not possible to connect the HDD using the built-in manager, it is recommended to use third-party programs.
Partition Manager is an excellent tool for working with hard drives. In addition, such a utility allows you to partition a disk into several logical volumes.
Conclusion
Attaching a hard drive takes no more than 15 minutes. If you follow the instructions, difficulties should not arise. Modern computers do not need additional BIOS setup, of course, if the disks are not installed in a completely new computer. Also, do not forget that the operating system depends on how large the plug-in hard drive can be.
Video review: connecting a hard drive
Articles in the same category
I will tell you how I solved the problem related to my hardware. He worked, worked ... and there was not enough space. Thought how to install a hard Acer AX3910 on your computer? There are not enough connectors for it.
I have been using this computer for several years now and to be honest, it has never let me down, it works super reliably, quickly and the most important thing that I like about it is its noiselessness. Works like a laptop. Stands on the table and you can't even hear it.
Installing a second hard drive on your Acer AX3910 computer.
Prior to this model, I used the same desktop computers of the same brand, only less powerful and with a smaller hard drive. As they were used, there was a need for a faster processor and a larger hard disk. I have been using this model for more than two years and am not going to change it yet. Except that there was not enough space on the hard drive.
Computer parameters:
For more space for storing information, I have been using an external hard drive “WD Elements” for a year now. The brand is not known to me, it is produced in Thailand. 
This HDD with USB3 connector, the data transfer rate is very high, so I didn't even need to increase the built-in hard disk.
And I would not worry if at one fine moment he did not start working slowly. The time for loading files into my programs from this external drive has increased dramatically. And the programs are energy-intensive - Adobe Premier Pro, Adobe Muse. The brake has become specific.
And there was anxiety. When checking the disk, Windows announces a system error on the disk, but it cannot fix it. And on it “my whole life”! Archival photos, work for many, many months. It became creepy even to think, if suddenly ... I don't even want to pronounce this word! I handle it very carefully, blow off the dust.
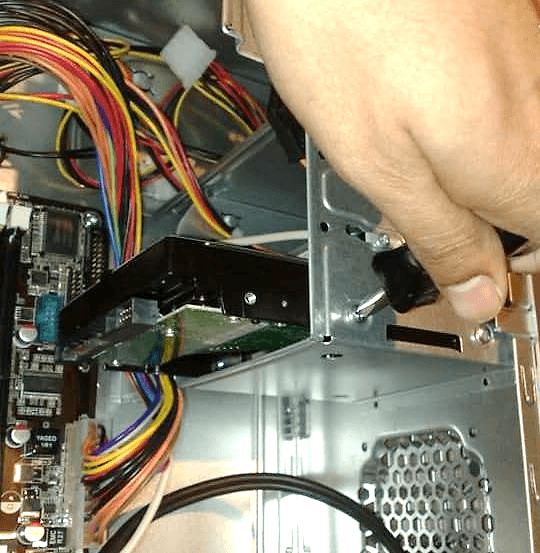
How to install a second hard drive
What to do? I decide to urgently install an additional 1 TB hard drive, leaving the native disk of the same manufacturer under the system, without reinstalling the system or changing anything. I bought it for 3820 rubles. And knowing that there is no free space for it in this compact case, I decide to put it instead of a CD / ROM, and use an external CD / ROM, connected via a USB connector. It is not often that he is needed now. And the motherboard also has only two SATA connectors for drives.
I disassemble the case, it's easy

unscrew the CD / ROM 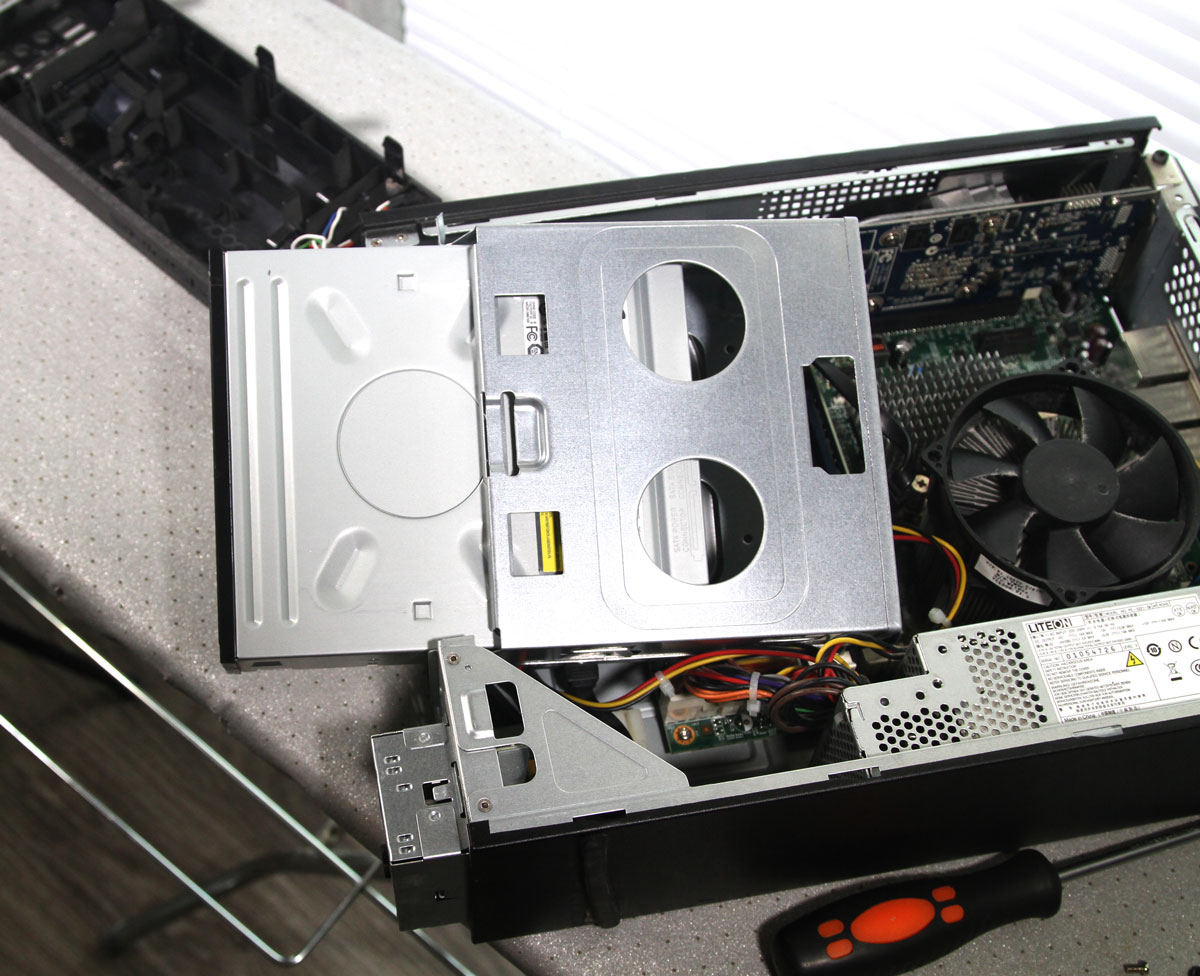

Connecting a second hard drive
How to install a second hard drive programmatically. I attach the connectors to it from the CD / ROM and assemble. I just swap the connectors of the native HDD and CD / ROM. This is done so that the new HDD does not act as the root disk. If you don't flip the connector, the computer simply won't boot the system. Tried in setup I didn't succeed in switching the disks, so I had to re-wire the wires. This is quick and easy. 
Next, we connect all the wires, turn on and press on the keyboard Del... This is necessary in order to go to setup and just in case, set the boot priority from our native hard drive. 

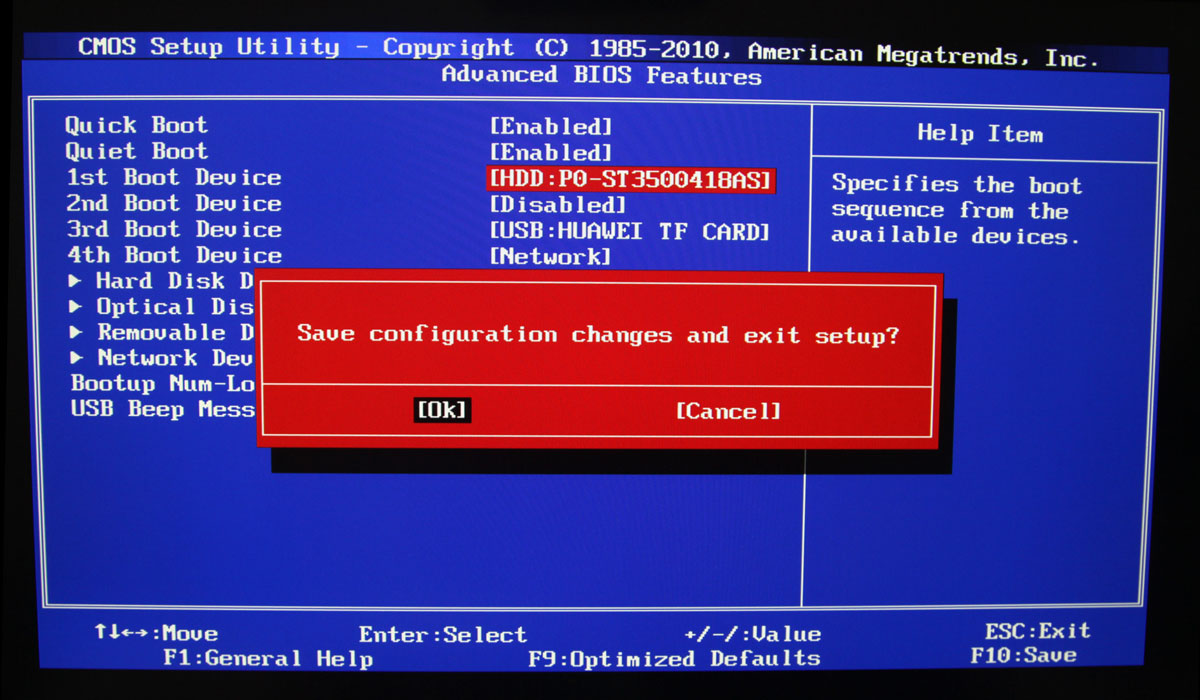 We leave, having saved the settings.
Windows will boot, but when you open Explorer you will not find the new drive. To do this, we will make the following bases:
We leave in Control Panel-Administrative Tools-Computer Management-Disk Management
.
Hover the mouse over this disk 
and right-click the pop-up menu in which we create a simple volume.
The Create Simple Volume Wizard window will appear, which will guide you through setting up this disk. 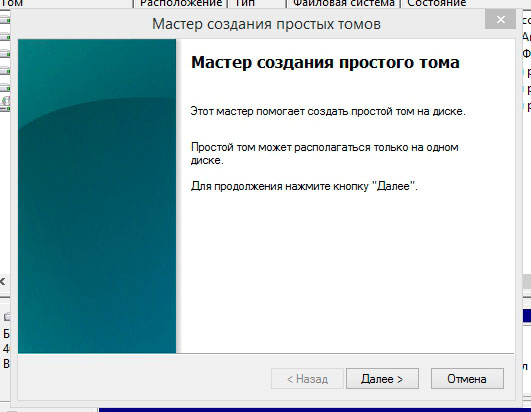
In the process of creation, we assign a drive letter, you can come up with a name for it. Let's format. And the second hard drive appears on our computer. This operation is simple and intuitive. 
Thus, the computer acquired new storage, essentially tripling the amount of memory. It remains to add RAM up to 16 GB. And you can still use it for two years.
Modern technologies are developing more and more every year. The time has long come when one hard drive in a computer cannot do. A huge number of people connect the second HDD to a personal computer. The connection procedure is not fancy and even a beginner can figure it out. We will understand everything more thoroughly and in detail.
Connecting a second HDD to a laptop or personal computer
There are two options for adding an additional hard drive:
- To the PC system unit. This method is great for standard desktop computers;
- Adding, in the form of an external drive. This is a very easy way and works for all devices.
Method 1: Adding to the system unit
The process of adding additional media to the system unit can be roughly divided into several small stages. Let's consider each of them in more detail.
Type definition
At the very first stage, you need to decide on the type of interface with which the hard drive interacts. It is worth noting the important fact that the majority of computers have a SATA interface, therefore, it is desirable that the second hard disk is of the same type. The motherboard may not have an IDE bus, as it is considered very old, which may cause some problems with installing outdated hard drives.
The best way to define a standard is to carefully consider contacts.
SATA connector example

An example of an IDE connector

Adding a second SATA drive to the system unit
Adding an additional disk is the simplest process that goes as follows:

SATA Boot Priority
There are four holes on the motherboard as standard for adding SATA drives. It should be understood that their numbering starts from zero. Namely, the priority of the hard drive directly depends on the slot number. To set the priority yourself, you must use the BIOS. Each specific type of BIOS has its own special controls, as well as a special interface.
In the earliest version, you need to go to the "Advanced BIOS Features" menu and start working with items such as "First / Second Boot Device". In modern versions, the path looks like this: "Boot / Boot Sequence - 1st / 2nd Boot Priority".
Adding an additional IDE drive
There are also cases when you need to connect an old IDE disk. The step-by-step instructions for the process are as follows:

Connecting the second IDE to the first SATA
If you need to carry out this procedure, you will need an appropriate IDE-SATA adapter. An example of an adapter can be seen below:

Step-by-step instruction:
- First you need to put the jumper in the Master position.
- The IDE plug is connected to the hard drive.
- Take a red SATA cable and attach one side to the motherboard and the other to the adapter.
- The power cable connects to the PSU and the adapter.
Possible display problems
Sometimes it happens that after an additional hard drive has been connected, the system cannot recognize it. Do not panic, as most likely you did everything right. It's just that for the second hard drive to work properly, it needs to be initialized.
Method 2: Connecting an external hard drive
Connecting an external HDD is convenient if the stored files are needed not only at home, but also outside it. In addition, this method is the only correct one for laptop owners, since they simply do not have a special additional connector for a new hard drive.
In fact, everything is easy here, because an external hard drive is connected via USB, just like any other device (mouse, keyboard, flash drive, webcam and much, much more).

Winchesters that are installed in the system unit can also be connected via a USB connector. Here you will need an external case for a hard drive or a special adapter. The bottom line is the following: the required voltage is supplied to the HDD through the adapter, and the connection with the Personal Computer is via USB. Different hard drives have their own wires, so you should always pay special attention to the standard that sets the dimensions.
Every year the amount of information stored on a computer is increasing. As a result, the computer starts to boot for a long time and periodically freezes. And this is natural, because all data is stored on a hard disk, the memory of which is limited.
Users solve this problem in different ways. Someone transfers information to various media, someone turns to the master and asks to increase the computer's memory, and someone decides to connect a second hard drive to the computer. Therefore, let's figure out how, without the help of a specialist - on our own - to connect a second hard drive to a computer.
To begin with, you need to completely de-energize the system unit: disconnect all cables and power cable. Now it is necessary unscrew the side covers sistemnik. We unfold it with the back towards us and unscrew the four screws on the sides. Pressing lightly on the side parts, move them in the direction of the arrow and remove.
Hard drives in the system unit are installed in special bays or cells. Such bays can be located in the back of the system unit at the bottom or in the middle, some hard drives are installed turned on their side. If your system unit has several slots for hard drives, install the second one not right next to the first one - this will improve its cooling.

Depending on the method of connecting to the motherboard, internal hard drives are divided into two types: with IDE and SATA-interface. IDE is an older standard, now all system units are designed for connecting hard drives with a SATA interface. It is not difficult to distinguish between them: IDE has wide ports for connecting a hard drive and power supply and a wide ribbon cable, while SATA has both ports and a ribbon cable much narrower.
Connecting a hard drive via SATA interface
If your system unit has a hard drive with a SATA interface, then connecting the second one will not be difficult.
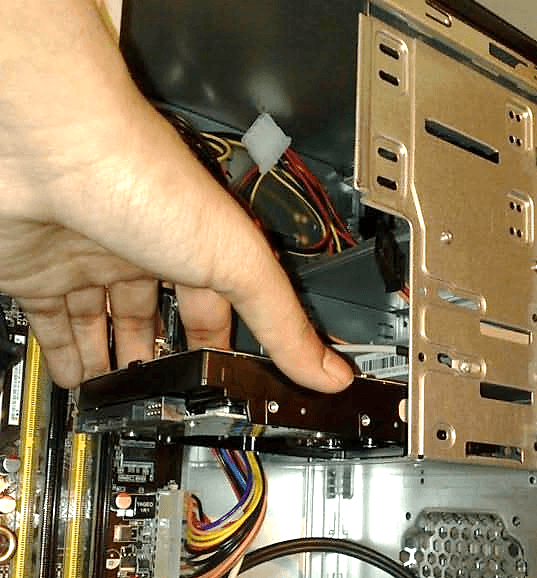
Insert the second hard drive into a free slot and attach it to the body with screws.

Now we take the SATA cable through which the data will be transmitted and connect it to the hard drive by either side. We connect the second plug of the cable to the SATA connector on the motherboard.

All system units have at least two SATA connectors, they look as shown in the picture below.

To connect to the power supply, a cable is used, the plug of which is slightly wider than that of the SATA cable. If only one plug comes off the power supply, you need to buy a splitter. If the power supply does not have a narrow plug, you will need to buy an adapter.

Plug in the power cable to the hard drive.

The second hard drive is installed on the computer. Replace the side covers of the system unit and secure them with screws.
Connecting a hard drive via IDE interface
Although the IDE standard is outdated, IDE hard drives are still found. Therefore, we will further consider how to connect a second hard drive via the IDE interface.
First you need install a jumper on the hard drive contacts to the desired position. This will allow you to determine in which mode the hard disk will operate: Master or Slave. Usually the hard disk that is already installed on the computer works in Master mode. It is he who is the main one and the operating system is loaded from it. For the second hard drive we are going to install, we need to select Slave mode. The pins are usually labeled on the hard drive casing, so just set the jumper to the desired position.

The IDE loop through which data is transmitted has three plugs. One is located at the end of a long section, in blue, that connects to the motherboard. Another one - in the middle, white, is connected to the slave disk. The third, at the end of the short section, black, is connected to the master disk.

Insert hard drive into a free cell. Then secure it with screws.

Choose free plug from power supply and insert it into the corresponding port on your hard drive.

Now insert the plug which is located in the middle of the train, into the hard disk port for data transfer. In this case, one end of the cable is already connected to the motherboard, the other to the previously installed hard disk.

This completes the connection of the second hard drive via the IDE interface.
As you can see, we didn’t do anything complicated. Just be careful, and then you will definitely be able to connect the second hard drive to your computer.
And also watch the video
They are the main accumulator of information. In most cases, user data is stored on it. And the volume of this data is increasing every day. Therefore, it is not surprising that sooner or later all users are faced with the fact that free space is running out. There is only one way out of this situation, you need to buy and connect a second hard drive to your computer. In this article we will try to help solve this problem.
Step # 1. Disconnect the power from the computer.
Before doing anything with the computer, it must be completely de-energized. Disconnect all cables from the system unit. Simply turning off the button on the power supply is not enough, all cables must be disconnected.
Step number 2. Remove the side covers of the system unit.

One of the bays will already have one hard drive installed. This is your first hard drive and contains your operating system and all your data. The second one needs to be placed side by side. If the bay is designed for more than two drives, then it is advisable to place the second drive not right next to the first. This will greatly improve its cooling.
Gently slide the hard drive into one of the installation locations. Please note that the drive should rest on small projections and be fixed with four screws. If there is not enough space inside the system unit, then you may have to remove the video card or other components before installation. But, as a rule, this is not required.
After you have installed the hard drive in your computer, you need to secure it with four screws. Two screws are tightened on one side and two on the other. Do not skimp on screws, as this can cause unnecessary vibration and noise when the computer is running.
Step # 4. Connect the second drive to the motherboard and power supply.
After the second drive is installed and securely fixed inside the computer, you can start connecting it. To use two cables, one goes to the motherboard, and the second to the power supply.
To connect to the motherboard, this is used (picture below). It is usually red in color, so it is difficult to confuse it. You plug one connector on the cable into the hard drive and the other into the connector on the motherboard.

A similar cable with a wider connector is used to connect to the power supply (picture below).

If your power supply unit is not equipped with a cable with such a connector, then you will need an adapter (picture below) from the old connector to the new one.

Step number 5. Close the system unit.
After you have connected the second hard drive to the computer, you can close the system unit. Install the side covers and secure them with the screws. When the covers are in place, you can turn on the computer. If you did everything correctly, then after the computer boots up, a new drive will appear in the system.


