Good day! All users who are going to start creating websites or blogs will find it useful to know what FTP is and how to use Filezilla. . File Transfer Protocol is a way of exchanging data between a local computer and a remote server.
About Filezilla
FileZilla is one of the best free license FTP clients. And in this case, free distribution does not at all indicate any limitations of the program. Quite the opposite, FileZilla beats even most similar paid apps in many ways. And FileZilla's immense popularity is due to its superbly designed management system and extremely usable user interface.
As an FTP client, FileZilla allows you to upload site files from your computer's hard drive to the hosting provider's server. In addition, FileZilla supports editing, updating, deleting and setting properties of site files on a remote server right from the desktop of a personal computer.
So, dear webmasters and bloggers, now you know FileZilla - what kind of program it is and you can start working.
FileZilla - where to get it, how to install it and how to get it going
Since the program is completely free, there is no need to look for distributions on random sites and through the fifth person. You can pick up a malicious virus and destroy a computer dear to your heart (and wallet). Just enter the coveted address of the official website of the FileZilla developer into the search bar of your browser and download the latest version.
You can download FileZilla in several versions, depending on your needs.
- Installer for installing the program on a computer disk.
- Archive for use in portable mode. You can unpack the archive onto a USB flash drive and always carry with you an FTP client already configured and ready to work with the site on any computer.
- Getting the source code of the program is for programmers and developers who want to bring their own innovations to the program.
How do I install FileZilla on my computer? Download the installer and then follow the instructions of the program. The installation is the most common. If you want to use the portable version of FileZilla, just download the archive to any convenient folder on your computer disk and unpack it there.
- For convenience, create a pack called FileZilla.
- To launch the application, click on the executable file filezilla.exe.
- Use the context menu (right mouse button) to create a shortcut on the desktop.
If you have Lancher installed on your computer, add FileZilla to the list and assign hotkeys. For example - “Win + F”.
Getting Started with FileZilla - Easy Getting Started
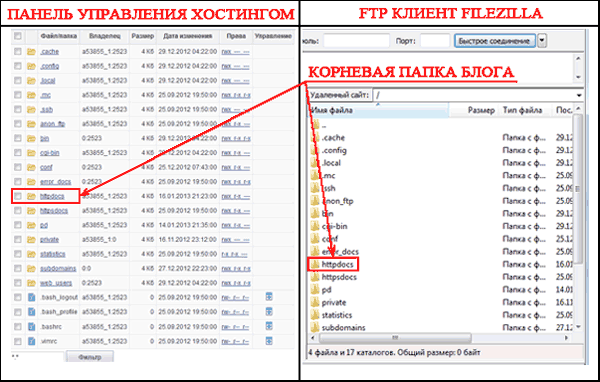
After installing FileZilla, how do I use my site? Before you can use an FTP client, it's a good idea to stake out space on your hosting provider's server. If you have not yet decided on the specifics of your mega startup, for practice it is recommended to register a free domain and hosting.
- After registering for the hosting, you will receive the data to access your site to your e-mail address. Store this information in a dry pad. It is these small, blue letters and numbers that you will need when you try to publish your site using
So, it is assumed that you have already created some HTML pages using the website builder, installed the FileZilla FTP client, how to connect to the server when you are almost done?
Setting up the connection and connecting to the server
The popularity of this program is largely due to the fact that the FileZilla setting is already done by default and you do not need to go to complete webmaster courses in order to upload a site to a remote server.

The second method is suitable if you have a lot of sites. Then in the Menu click “ Site manager”, Enter the connection data there and create a new Project. In the future, using this Manager, it will be possible to instantly connect to the desired site without filling in logins and passwords.

Working with the site with FileZilla
Usually, if all the data is entered correctly, the Internet connection is normal and the remote server is working, the connection is made within a minute without any problems.

FileZilla works exactly like Windows Explorer with local folders and files. You can copy or move files by simply dragging with the mouse arrow or using the context menu.
Occasionally it also happens that FileZilla cannot connect to the server. . Most often, problems arise due to erroneous user settings. Return the default settings and re-enter the connection data.
Data transfer may fail if the user tries to upload too many files to the server at the same time. An overload occurs and the connection is terminated. It is recommended to set data transfer restrictions in FileZilla settings.
Sometimes, when trying to connect, a notification appears about an incorrectly entered password. This most often happens in cases where the user has always connected to the server on one computer, and an error occurs when trying to access the site from another computer.
To solve the problem, go to the site's control panel and change the password. After that, the connection should go well.
That's all for me. See you soon!
Best regards, Evgeny Kuzmenko.
Good day, gentlemen! Today we will take a look at the FileZilla program: let's talk about setting up this FTP client and tell you when using Filesilla can significantly reduce your time and nerves. So let's go!
This protocol is used purely for file transfer. As a rule, by transferring files via FTP you do not risk damaging them in any way. The process will either complete successfully, or everything will end with an error and you will be prompted to try again.
In modern realities, FTP is most often used when working with remote virtual servers (the same webmasters or freelancers). You can learn more in detail from the article about what an FTP connection is and what connection options are there.
In the same material, as I said at the beginning, we will talk about one of the most popular FTP clients - FileZilla.
FileZilla - Free FTP Client
FileZilla is a free FTP client for transferring files using the protocol of the same name. The program is distributed free of charge and is available for download from the official website. It occupies one of the leading places among all FTP clients.
And it's not just that: the application is very convenient and multifunctional. FileZilla is a pleasure to use. An intuitive interface, a variety of different tools and functions - these are far from all the advantages of Filezilla.
Program installation
You can download Filezilla absolutely free. To do this, just go to the official website, where the desired button will be immediately available in the main menu.

Documentation for beginners is also available here, which will tell you how to work with this application.
After we click on "Download FileZilla", we will be immediately taken to the download page, where versions for different operating systems will be available.

Select the required version (most likely Windows x64), and then download the installation file to your computer.
Important! If you are using Linux, you do not need to download the application image from the official site, you can install the program from the repositories.
Immediately after downloading and running the installation package (in exe format for Windows), you will see the standard installer.

There should be no problems installing FileZilla on Windows, just click “I Agree”, then “Next” - “Next” - “Continue”. After installation, the application shortcut will appear on the desktop and in the list of programs.
Setting up an FTP client
After starting Filezilla, you will see such a window. This is the standard configuration option that you will have immediately after installation. If you wish, you can change the display of some specific windows using the icons that are the second row after the main menu (shown by the arrow).

The interface here corresponds to the system language (I have it in Russian), but if you want, you can change it in the settings (Editing - Settings - Language).

Here, just above, you can change the icon theme, date and time format, and much more. In a standard setup, FileZilla is quite usable: you can easily connect to a host to transfer files. It does not require any special settings, everything is intuitive and simple.
Application appearance
Let's take a closer look at the FileZilla interface. While it is extremely simple, it can be a little tricky for beginners. Filesilla itself (its main window) is divided into 6 components. Each of them is important and responsible for a certain action. This is what it looks like.

Here you can see:
- Main menu: access to the settings and functionality of the application.
- Block of tool icons: with their help you can control interface elements, as well as reproduce any actions to control file transfer.
- Authorization fields: here you enter information in order to log into the server (the host server itself, username and password, and port, if necessary).
- File manager on the remote server (when connected to the host).
- File manager on your PC.
- Operation status (files in job, transfers in error, etc.)
It is with these components that you will work. Here (in the screenshot) I have not marked the command log. It is located right below the authorization fields - there you can observe all the actions that will be played when working with the program.

With the help of those same icons, you can disable all unnecessary interface elements, leaving only the file managers to transfer files from the computer to the server and vice versa. By the way, their appearance can be changed in the settings: Editing - Settings - Interface - Themes.

Site manager function
In order not to enter connection data every time, you can use the site manager. A fairly convenient function for automating connections to servers via FTP. Here you can not only “fill in” all the data for automatic connection in one click, but also group them into folders, creating individual settings for each site or group of sites.

Convenient, isn't it? Pay attention to “Protocol” in the “General” tab. Here you can choose which protocol to connect to this or that site. Besides standard FTP, you can use SFTP and Storj. Each of them has its own advantages.
Here you can also set up encryption and even choose a background color for each site (so as not to get confused).
How to use an FTP client
Server / host connection
Now it's time to get to the main topic of this article - how to use the FileZilla FTP client, and most importantly, how to create an FTP connection to the server.
First, we need to understand how exactly you can find out the site host for FileZilla. Beget hosting will be used here as an example. We go to the official website of the hoster and register an account there, immediately after that all the necessary data for access via FTP will be sent to us by mail.

If we want to create separate accesses for each site (if there are several on one account), then, as can be seen from the information in the screenshot, we just need to go to the corresponding section.
In this case, when connecting to the FTP server, we will see only the files of the site to which we have created a separate access. I will have access to all sites on my account, because I log in through default access.
For access, we need the following data:
- host (server),
- Username (login),
- password.
I have all of them (screenshot above), you will have your own. Enter the data in the appropriate fields in Filezilla and click "Quick Connect".

If you also disabled unnecessary interface elements (using icons), this is the window you will see after a successful connection. As you can see, in the “Remote site” field there are files that are currently located on my remote host. I can download, modify and edit them at any time with FileZilla.
When connected to a remote server, we can transfer files back and forth. The easiest way to do this is to drag it while holding down the left mouse button.

However, if you so desire, you can use the context menu, which can be invoked by right-clicking.

If you enable the operations window, you will be able to see when and which files were transferred.

A list of files that could not be transferred will be available in the next tab.
You can transfer files in whole batches. It is enough just to select the required number of files and / or folders with the mouse, and then drag them to the adjacent window.
To edit a file, for example, PHP code or any other, it is not necessary to manually upload it to your machine. It is enough just to click on the desired file with the right mouse button, and then select “View / Edit”.

It will immediately open automatically in your familiar program. Immediately after editing and saving the file, you will be prompted to update it on the remote host as well.

In this case, the edited document will not be saved on the computer. It has a temporary status and is removed after a restart.
Most files can be edited in this way.
Search for files
Sometimes there are countless files on a remote host. In this case, the built-in search tool with an advanced type of settings can help us. As you can see in the screenshot, there are a lot of possibilities here.

Files can be searched by keywords in the name and by content. Through this tool, you can also search on the local PC if the standard tools of your operating system do not cope with the tasks.
Other
With the help of file managers, you can reproduce any actions with files and folders: renaming, creating directories and much more.
Conclusion
FileZilla is a great application that suits your purposes perfectly. With it, you can upload and download various files from remote servers. The multifunctionality of Filesilla will allow you to forget about the inconveniences. A lot of the stuff in this FTP client is just automated, so you should definitely give it a try.
By the way, if you want to make money on sites, then you are welcome to our site.
Greetings to all readers and guests of the site. Kalmykov Anton with you.
First of all, let's figure out in general what FTP is and what it is for.
FTP is a file transfer protocol that allows you to upload various objects to your server, delete them, edit them, and of course, back up your blog.... Without these manipulations, at the moment it is impossible to imagine a single successful blogger.
When I started working on our project, at the beginning I tried to pick the code in the WordPress panel, but it was inconvenient and unsafe. You ask me why? Because when I saved any changes and they did not lead to the desired result, I had to make a backup.
Now, on my computer, I have created two directories. In the first, with the help of Filesil, I copy the original files from the hosting, and in the second, I download the files, with which I carry out all my experiments.
What is Filezilla and where to start?
So, let's take a closer look at my favorite, and not only mine, FTP client FileZilla. It is one of the most common and convenient free FTP clients in the blogosphere.
Downloading and installing the program
First, you need to download and install the program on your computer. You can do this by clicking on this link. http://filezilla.ru/get/ to the official website of the developer and choose the appropriate version.
After installation, you need to connect to the hosting by clicking on the File → Site Manager tab.

In the window that opens, click the "New site" button (1) and enter the name of your site (2).

Then, in the "Host" field (3), insert the IP address of your server. It is given to you when you buy your hosting, most often by email. It will also contain "User" and "Password" (5)

By the way, to activate the fields with login and password in the "Login type" field (4), select "Normal" in the drop-down menu. Well, to connect, do not forget to press the "Connect" button (6).
If you did everything correctly, then in the first window you will see that "Connection is established."

Filezilla interface and capabilities
Now let's take a closer look at the interface of our program. It is visually divided into two parts.
The first part is the Local Site (2, 3). In it you can see the contents of your computer (disks, folders, files). The second part is the Remote Site (section 4, 5). In them we see the objects of your hosting.
For a beginner, before starting work, I would advise you to create a backup copy of all blog content on your computer.
How to create a backup
To do this, on any disk, except for the one where your operating system is installed, create a directory and copy all files from the remote server into it.
Let's take a closer look at how to do this, and at the same time learn how to work with the program.

We click with the cursor on any file or folder in the window №5. Then, using the keyboard shortcuts Ctrl + C, select the entire contents of the window 5. Next, press the right mouse button and we have a drop-down menu, with the help of which you can copy, create, delete everything that you do not need, add to task, etc.
I want to warn inexperienced users right away that after deleting a file from the server, it will no longer be possible to restore it, because FileZilla lacks a recycle bin feature like Windows does.
So, something I digress from our educational program, in the drop-down menu, select "Download". At the same time, do not forget to check that the directory you created in advance is open in window # 3.
In my case, it is "Test" on disk D (this can be seen in windows # 2 and # 3). Well, now we have created a backup copy of our site, and at the same time we learned how to download files from our hosting to our working disk.
An example of working with files
I want to note that the transfer of the required object to the server must be done in the same order, the only difference is that the selection takes place on the left side (Local site area).
Many will ask, what is all this for, why download to a computer, what will it give me?
Let's look at a small example: you need to fix your index.php code. We find it on the server, download it to our folder on the computer.
Note: I draw your attention to the fact that you should not use the standard Notepad program in Windows to edit files, because when saving, it is possible to change the encoding and incorrect display of the content. To edit the code, I recommend using Notepad ++.
You can read a more detailed description of it on our blog in one of the following articles. And in order not to miss -
If the opening happened in another program, then we find our file on our disk, in my case - click on the Start menu → Computer, select Local disk D and go to our "Test" folder. Then I right-click on index.php and select "Open with" in the drop-down menu.

In the window that appears, find Notepad, select it, also do not forget to check the box "Use the selected program for all files of this type" and click "OK".

Now you can safely work with this object.
I will tell you in more detail how to work with Notepad in the following articles.
After you've edited your file, save it and simply drag it into zone 5.

Since the file already exists on the server, the program will clarify your actions. Do not be alarmed, in the window that appears, simply select "Overwrite" and click OK.

Well, here we are with you and figured out what an FTP client is and how you can use it when working with your blog.
I hope I managed to explain all this in an accessible language. Please do not judge me harshly, because this is my first article :). If you have any comments or suggestions, write about them in the comments.
And here are a couple more useful programs:
Anton Kalmykov
Hello everyone!
Today I will show you. Filezilla (filezilla) is an ftp client or it is also called ftp manager that allows you to connect to your hosting server. Those guys who now hear for the first time about the ftp client and how to use it will, frankly, be shocked when they find out how much easier it is for a web master! And the filezilla program is distributed absolutely free!
With filezilla, the time for processing, moving, uploading, editing, deleting files ... on your hosting will be reduced several times! Now I will show you how this wonderful ftp manager works.
I am sure that each of you who maintains your own blogs or websites at one time had to, even if not edit, but certainly upload some files to the server of your hosting provider. For clarity and comparison, let's look at a specific example of how all this happens. Let's say you need to upload an image to the images folder with the theme of your blog. What will you do with this?
Open your browser, go to your hosting control panel, open the folder where all the files of your resource are stored. Sound familiar? I think every blogger has come across this, and some continue to work in the same mode to this day. But that's not all! Then go to the root directory. To download the file, you need to go to the same images folder. Click on the "Upload file" button, then click on the "Browse" button, specify the path to the file, and click "Upload"! And only then will your file be in the right place!
Can you imagine how many different actions you need to perform in order to upload just one image? Many will now say that this is all done in just a minute! Yes, I agree, especially when you often come across this kind of thing! I used to do exactly as I described above and did not bathe at all. It seemed to me that it does not take a lot of time.
But the further my resource began to develop, the more I had to edit and add various files to the server. And when you upload one file to the hosting server - it's a trifle, but when you need to upload 20-30 of them? But here it will take a lot of time! When I got acquainted with the filezilla ftp client, the time for working with files decreased significantly.
Now all the above described actions, I do only using the filezilla ftp client and I will tell you honestly, everything is done much faster than through the browser! So let's show you how it works.
How to use filezilla
First, you need to download it. This can be done. Download the latest version for your operating system and install it on your PC. Installation does not require any special knowledge, everything is more than elementary there. Press, all the time further, wait until the program is installed, run the program.
After starting the program, you need to go to the "Site Manager" and once enter such data as: "Host", set "Login type: Normal", "Username" and "Password". Your hoster should have provided you with these data after paying for hosting. For clarity, I made a screenshot, looking at which, you will understand everything:

Now, after clicking on the "Connect" button, in the lower right window you will see the same root folder of your resource as in the hosting control panel:
Everything, the connection is established, we can start editing the files. A minimum of different actions, maximum benefit. Now, when you need to go to the root folder, all you have to do is launch the filezilla ftp client, open the site manager and connect to the server by clicking the "Connect" button.
Now, let's compare how many actions need to be played in order to move the same image that I described above to the images folder. Launch the ftp manager, click connect, go to the images folder and simply drag the image by holding it with the left mouse button. You do not need to specify any paths to the file every time. Everything is done much easier.
This is especially useful when you have to edit a lot of files. Another example: you need to edit five files. How will editing be done through the browser in the hosting control panel? You will need to download each file one by one to your PC, edit it and upload it back to the server one by one!
Editing with ftp client is much nicer. Select all the files you need in the ftp client window, and move them in one motion to the desired folder. Edit and in the same way, selecting all the files, move them back to the server. How do you like this program? Believe me, this is a super program, I advise everyone, you will not regret it!
How to use fillezilla you now know, and soon I will write another very detailed one, which is also able to simplify the life of a webmaster! Don't miss, subscribe to blog updates! Now that you have learned how to use fillezilla, your productivity will increase dramatically!
Awarding of the winners of the crossword puzzle to the site # 3
Well, it's time to announce the winners. Each time there are more and more participants, which cannot but rejoice. Thank you all for being so active. I will not rant for a long time, we are meeting our winners:
The winners of the crossword puzzle to the site # 3 are:
1st place - Sergey ( [email protected]) - 200 rubles
2nd place - Mishuta () - 100 rubles
3rd place - Konstantin () - 50 rubles
Well done boys. Congratulations to all the winners. Send your wallet numbers and take the prizes you deserve. And on this I say goodbye to you and see you soon.
How do you like the article? Do you use an ftp client in your work? I look forward to your comments!


