Sometimes, users think about creating an image from a flash drive, especially a bootable one. This may be necessary in many cases, but the most common is the transfer of all data from one drive to another.
It is not so difficult to create an image, however, in most cases it will not be in iso format, although this is not entirely correct. This is because the iso was created for copy discs, despite the fact that the format itself can be written to any drive. However, you can still write a flash drive to iso, and this article will present several ways to do this.
Using UltraISO to create an image
This application is very popular with Russian users. Has a clear and accessible interface, allows you to create and record images. There are several ways to do this.
In the first case, you will need to click on the drive itself and drag it to the part of the window that is responsible for the list of files in the program.
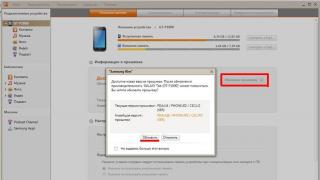
The next window will have agree with the transfer data. In the menu item, you need to click on the item responsible for extracting the boot data from the disk and saving it to your device. Then, in the same menu item, select “ Upload download file". After that, you can go to File - Save As. Here you can select the iso format and save all data. This completes the creation of the copy. However, you can doima file, which will be better, tk. this format is designed to work with storage devices.
This is much easier to do. You just need to click on the marked item and select the drive from which the byte copying will be performed. In this case, the carrier will copied completely, even empty data. That is, if there is only one data on a 4 GB flash drive, the image will still take four. 
Using the USB Image Tool
It doesn't take long to create a copy with this app. You need to download and install it. After starting, on the left side of the screen, the user sees all drives. Select the desired and to pushbackup... This will produce an img file that contains all the data from the drive. 
To record the created image, you can use the same utility. Just press the left button. However, this is more of a data backup. It is impossible to write the received file to another drive, only back to the same one.
PassMark ImageUSB App to Create Full Copy
This program does not even require the user to install it on a computer. It only needs download and run.
After launch, you only need select media to be copied. In the second step, you should select the same as in the picture. In the third paragraph, you need to specify the directory in which the final file will be saved. Then it remains to press Create and wait for the end of the process. To write a file, you need to select the first item in the second step.
ImgBurn Utility
This program will create an image from a disk or from a folder. To get started, you need to select the item indicated in the image. 
After that, in the next window you will need to specify the flash drive as a source. To do this, you can click on the marked icon. 
You will also need to go to tabAdvanced on the right side of the screen and set the same settings as in the image. This will turn the created image into a bootable one. If this is not necessary, then this item can be skipped.
As you can see from the article, create an image from a drive is not that difficult if it's just a file. If you need to make a bootable image, then you should use specialized utilities.
If you have a bootable flash drive, then after simply copying its contents to a second flash drive, you will not be able to install the operating system from it, in which case you need to make an image of the flash drive. Let's take a look at how to make a bootable USB flash drive from an ISO image so that everything works. Making an image of a USB flash drive through UltraISO is one of the easiest methods, since the program is very popular among users. But we will consider a different program.
How to make an ISO image from a flash drive:
- You need a program
- Windows installation disc
A bootable flash drive differs from a simple flash drive with files and folders in that a special bootable area is created in it, which is hidden for viewing through Explorer. Therefore, it cannot be copied in the usual way. And when we create an image of a bootable flash drive, this area is correctly saved and subsequently written to another flash drive. Now let's take a closer look at how to create a flash drive image. For this we need a special program, here are some suitable options:
In this example, we will be using the USB Image Tool. Download its current version, unzip the downloaded archive, open the folder and run the USB Image Tool.exe file.


The process of creating a bootable USB drive will begin. In the status bar, you can watch the process of creating the image.

After successfully completing the image creation process, you can check the folder that you specified for saving.

The file with the IMG extension is the saved image of the flash drive. Now you can proceed to the process of writing to another flash drive.
Before you write the image to a USB flash drive, you need to free up the USB ports and insert the desired USB flash drive to which you are going to write the image.
It will immediately appear in the USB Image Tool.

To write an image to a USB flash drive via USB Image Tool.
Several times readers have asked how you can create an image of a bootable USB flash drive, make an ISO image from it for subsequent writing to another flash drive or disk. This instruction is just about creating such images, and not only in ISO format, but also in other formats, which are a complete copy of a USB drive (including empty space on it).
First of all, I want to draw your attention to the fact that you can create an image of a bootable USB flash drive and there are many tools for this, but usually it is not an ISO image. The reason for this is that ISO image files are images of CDs (but not any other storage devices), data on which is written in a certain way (although an ISO image can be written to a USB flash drive). Thus, there is no program like "USB to ISO" or an easy way to create an ISO image from any bootable USB stick and in most cases an IMG, IMA or BIN image is created. Nevertheless, there is an option on how to create a bootable ISO image from a bootable USB flash drive, and it will be described first below.

USB flash drive image using UltraISO
UltraISO is a very popular program in our latitudes for working with disk images, creating and burning them. Among other things, with the help of UltraISO you can make an image of a flash drive, and there are two ways for this. In the first method, we will create an ISO image from a bootable USB flash drive.
In UltraISO with a USB stick connected, drag the entire USB drive onto the file list window (empty right after launch).

Confirm to copy all files.

In the program menu, open the Bootstrap item and click "Extract boot data from floppy / hard drive" and save the download file to your computer.
Then, in the same section of the menu, select "Upload download file" and download the previously extracted download file.

The second way, with which you can create a complete image of a USB flash drive, but already in the format ima, which is a byte-by-byte copy of the entire drive (i.e. an image of even an empty 16 GB flash drive will take up all of these 16 GB) is somewhat simpler.

In the "Bootstrapping" menu, select "Create hard disk image" and follow the instructions (you just need to select the USB flash drive from which the image is taken and indicate the location of its saving). In the future, in order to burn the USB flash drive image created in this way, use the "Burn hard disk image" item in UltraISO.
Creating a complete image of a USB flash drive in the USB Image Tool
The first, the easiest way to create an image of a USB flash drive (not only bootable, but any other) is to use the free USB Image Tool program.

After starting the program, on the left side of it you will see a list of connected USB drives. There is a switch above it: "Device Mode" and "Partition Mode". The second point makes sense to use only when your drive has several partitions and you need to create an image of one of them.
After selecting a flash drive, just click the "Backup" button and specify where to save the image in IMG format. Upon completion, you will receive a complete copy of your flash drive in this format. In the future, in order to write this image to a USB flash drive, you can use the same program: click "Restore" and specify from which image it should be restored.

Note: this method is suitable if you need to make an image of some kind of flash drive you have in order to someday restore the same flash drive to its previous state. Writing an image to another drive, even of exactly the same size, may not work, i.e. this is a kind of backup.
You can download the USB Image Tool from the official website http://www.alexpage.de/usb-image-tool/download/
Creating an image of a flash drive in PassMark ImageUSB
Another simple free program that does not require installation on a computer and allows you to easily create a complete image of a USB drive (in .bin format) and, if necessary, write it back to a USB flash drive - imageUSB by PassMark Software.

To create an image of a USB flash drive in the program, follow these steps:
- Select the drive you want.
- Select Create image from USB drive
- Select the location to save the flash drive image
- Click the Create button.
In the future, to write a previously created image to a USB flash drive, use the Write image to USB drive item. At the same time, for writing images to a USB flash drive, the program supports not only the .bin format, but also ordinary ISO images.
You can download imageUSB from the official page http://www.osforensics.com/tools/write-usb-images.html
How to create an ISO image of a USB flash drive in ImgBurn
Attention: More recently, the ImgBurn program described below may contain various additional unwanted programs. I do not recommend this option, it was described earlier when the program was clean.
In general, if necessary, you can make an ISO image of a bootable USB flash drive. However, depending on what is on USB, the process may not be as simple as it was in the previous paragraph. One of the ways is to use the free ImgBurn program, which can be downloaded from the official website http://www.imgburn.com/index.php?act=download

After starting the program, click "Create Image File from Files / Folders", and in the next window, click the icon with the image of a folder under the "plus", select the USB flash drive as the used folder.

Bootable USB drive image in ImgBurn
But that's not all. The next step is to open the Advanced tab, and in it - Bootable Disk. This is where manipulations need to be done in order for the future ISO image to become bootable. The main point here is Boot Image. Using the Extract Boot Image field at the bottom, you can extract the boot record from the USB flash drive, it will be saved as a BootImage.ima file in the place where you want. After that, in the "main point" specify the path to this file. In some cases, this will be enough to make a bootable image from a USB flash drive.
If something goes wrong, the program corrects some of the errors by itself determining the type of drive. In some cases, you will have to figure out what's what on your own: as I said, there is, unfortunately, no universal solution for converting any USB to ISO, except for the method described at the beginning of the article using the UltraISO program.
One of the most pressing questions for home users and not only. A bootable flash drive or USB hard drive can help bypass the use of an optical drive, and can also be carried around if you frequently install a system or repair computers. After all, manufacturers have already stopped equipping their devices - netbooks and ultrabooks, with optical drives. If there is no disk drive, you can reinstall the system only by booting from the installation flash drive. The easiest way to create such a medium is to use a special utility. You can write anything to such a USB drive: ERD Commander, a program for working with a hard disk such as Paragon or Acronis, as well as an image with Windows, MacOS, etc.
To make a bootable USB flash drive from an ISO image necessary (ISO image is a copy of the installation disk in a special container with the ISO extension):

The program will automatically process the ISO image and make bootable USB drive, with which in the future it will be possible to install the OS on a computer without using a CD / DVD-ROM or download an image of a portable version of your favorite OS and install it so that it is always at hand. Also, the YUMI utility, which is an analogue of UNetBootin, copes well with recording images.
How to create / burn an ISO image
It is worth noting that you can create an ISO image from a finished DVD or CD containing a distribution kit with Windows or other necessary program using the CDBurnerXP program. Launch the application and select the item in the main menu "Copy Disc"... Specify your installation disc in the drive as a source, and to save the finished ISO image folder on your hard drive. Click on the button "Copy Disc"... With this program you can burn previously saved images to optical discs. Having created an image, you can use it to transfer it to a USB flash drive or memory card using the above programs.
Bootable USB drive with antivirus
You can check the system for malware by running an antivirus program from a removable device (flash card, portable hard drive, etc.), if Windows has stopped loading at all. I recommend using the following software as a portable antivirus for bootable USB: Kaspersky Rescue Disk and Dr.Web LiveUSB. These antiviruses have been tested many times in practice and have proven themselves well. By clicking on these links you can download an application for recording an antivirus, all you need is a flash drive with a volume of at least 512 MB. If you want to boot from a flash drive or USB HDD some other antivirus or scanner program, having an ISO image, then use.
Windows emergency boot
Let's say Windows does not start, and you need to save your personal data. If no tools help restore the system's performance, then it is best to use the ERD Commander distribution kit (for Windows 7 32bit, Windows 7 64bit and Windows XP 32bit) and an external HDD. ERD Commander is a set of programs that allow you to boot the system from removable media, which makes it possible to start the computer even in the event of total damage to the OS files. Burn the ISO file using UNetBootin to a USB flash drive or any program for burning images to disc (ImgBurn, Ashampoo Burning Studio or Nero Burning Rom) at minimum speed and boot the system from it. The interface of this loader is in Russian and is intuitive. We call the file manager and get access to the hard disk. We mark all the files that need to be saved and open the external HDD to copy the data to it. There is a risk that you have copied to your hard drive and virus. Therefore, before transferring data to a new Windows system, be sure to install antivirus and check the files on the portable HDD.
How to burn Windows to a USB flash drive or USB disk (Windows ISO image on a USB flash drive)
Attention, the Windows 7 USB / DVD Download Tool works fine with both Windows 7 and Windows 8 images.
1. Download the utility Windows 7 USB / DVD Download Tool.
2. Run the downloaded file as administrator and install.
How to burn Windows to a USB stick with Windows USB / DVD Download Tool(analogue of UNetBootin from Microsoft) .
1. Specify the Windows 7 or 8 ISO image file by clicking Browse
2. Click Next... Select the device on which the image will be created. Click on USB device(if you want to create an installer flash drive) or DVD(if you want to create a bootable DVD). Before specifying the desired device, insert the USB flash drive into the USB port or the DVD disc into the drive, respectively.
3. Specify the USB flash drive to which the bootloader image will be written. To start creating an installation flash drive, click Begin copying.
4. Now wait for the end of the process of creating a bootable USB flash drive. After completing the process completely, you will receive a ready-to-install USB flash drive with Windows 7 or 8.
* Do not forget to enable the computer boot from a USB device in the BIOS before installing Windows 7 from a USB flash drive!* The minimum size (volume) of a flash drive must be at least 4GB!
Bootable USB flash drive with Acronis Disk Director 11, True Image 2012, Paragon Partition Manager 11
This assembly is a universal solution for bootable USB with a choice of the most popular data recovery software, OS and hard drive. You just need to write the downloaded archive to a USB flash drive and you will receive universal bootable USB disk... You can also burn this assembly to disk.
Supported OS bitness: 32bit + 64bit
Vista and Windows 7 Compatible: Full
Interface language: Russian
System requirements: Processor: Intel Pentium or its equivalent, 1000 MHz or higher; RAM: 512 MB or higher; Mouse; SVGA video adapter and monitor;
USB flash drive larger than 2 GB (for all boot images)
Bootable USB stick Windows-based Preinstallation Environment 3.1 (WinPE) includes:
- Acronis Disk Director 11
- Acronis True Image Home 2012
- Paragon Hard Disk Manager 11
- Paragon Partition Manager 11 Professional
- Paragon Home Expert 11
- Windows 7 x86 Recovery Environment
- Windows 7 x64 Recovery Environment
Instructions for installing a bootloader on a USB flash drive
Booting a computer from a USB flash drive or other removable media
In order for your computer to start up from a CD, DVD, flash drive or external USB drive when rebooting or turning on, you need to make changes to the BIOS settings. Most modern motherboards provide the ability boot from USB stick, but on older models, sometimes you can only enable booting from optical discs. In some cases, this problem can be solved by installing the latest BIOS version, but for very old motherboards, such updates may not be released.
After turning on the PC, enter the BIOS by pressing the key "Del" or "F2"... Then find the appropriate menu items, specifying the boot order and used for this device. Depending on the manufacturer and BIOS version, this can be done in the sections "Boot" or "Advanced BIOS features"... In addition, modern motherboards allow, without reconfiguring the BIOS, to specify the device from which the system will boot. To do this, when starting the PC, you need to call "Boot menu"... As a rule, this can be done with the key "F12".
Unlike regular data stored on USB sticks, bootable USB stick data cannot be transferred to another USB stick by normal copying or cutting and pasting files. If, for example, you have a bootable USB flash drive with an operating system installation disk, but the original ISO file is lost, you will not be able to free such a flash drive temporarily by temporarily moving the data to your computer. After moving back to the USB flash drive, it will not become bootable. By the same principle, you cannot copy the contents of one bootable USB flash drive to another. If you don't have the original ISO file so that you can create any and all bootable flash drives with it, you need to resort to using special software. It's easier, of course, to store the original ISO file somewhere and burn it, if necessary, to any USB media. But if with installation disks of operating systems and Live disks for their reanimation it is only a matter of free space on the hard disk, then with multiboot flash drives for installing several systems it is both a matter of free space and a question of the process of their creation.
Below we will consider the simplest way, how to clone a bootable USB flash drive to another empty USB flash drive in a Windows system if there is no original ISO file. This method is also suitable for the case when there is only one flash drive available, and it needs to be freed from the data for a while, and then returned to its original state.
For these purposes, you can use the capabilities of backup programs or disk space managers for Windows. In particular, software assemblies from the developers of Acronis, Paragon, AOMEI Technology provide functionality for backing up and restoring partitions and disks, which can be used to create a backup copy of a bootable USB flash drive. The created backup copy can later be restored either to the same flash drive or to another. These programs also provide for the functionality of directly transferring the contents of a bootable flash drive to another USB drive - this is functionality. Just as a partition or an entire hard drive with an installed operating system can be cloned, so will a bootable USB flash drive be cloned.
In our case, as mentioned, the simplest way to solve the problem will be considered. To transfer the contents of a bootable flash drive, we will use a small free utility USB Image Tool. It can be downloaded from the developer's website.
USB Image Tool is a portable program that does not require installation into the system. You just need to unpack the downloaded archive and run the application file.

The utility is intended only for work with USB-drives. It works on the principle of creating a backup image of a bootable USB flash drive. The created image in IMG format is later used to restore the contents of a bootable flash drive, even on the original one, at least on any other USB drive.
After launching the USB Image Tool, on the left side of the window, we will see a list of all connected USB drives. If there are several devices, select the one you need and click on it. In the right part of the window below, click the "Backup" button.

We indicate the location on the computer where the image of the bootable USB drive will be stored. Click "Save".

We are waiting for the completion of the backup process.

As soon as the image is created, we can restore it to another flash drive. We make a click on the necessary flash drive in the utility window on the left, and at the bottom of the window we press the "Restore" button.