Many Android users are familiar with the problem of insufficient internal storage in their phone or tablet. One of the main ways to free it is to transfer games and applications to a memory card, of course, if you have one.
However, deciding to transfer the game to an SD card, many are faced with various difficulties. In this article, we will try to figure out what's what and look at a couple of useful applications for transferring data to Android.
For starters, it's worth noting that transferring applications to a memory card can be done without third-party applications, using built-in tools. But the very possibility of transfer depends on each specific application. Some developers block this possibility, apparently for the reason that the internal memory provides better performance than an SD card.
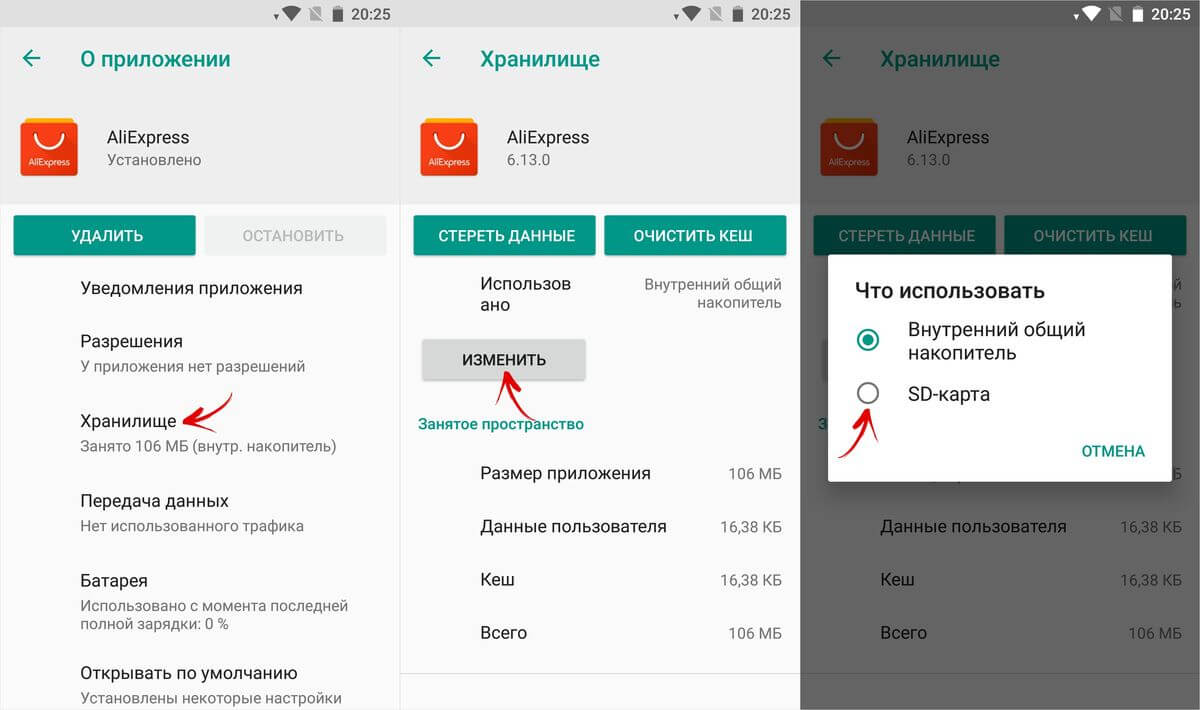
In order to check whether it is possible to transfer an application to a memory card, in the system settings, open the "Applications" item and see if the "Move to SD card" button is active.
If the button is active, then the application supports transfer, if not, or there is no button at all, then transfer is not supported.

Transferring Applications Using AppMgr Pro III
A more convenient way to transfer applications is the special AppMgr Pro III application (Formerly App 2 SD), which, in addition to transferring applications, has several more useful functions:
- Hiding an app in the apps menu
- Application installation completion notification
- Clearing the cache with one tap
The main advantage of AppMgr Pro III is the automatic sorting of applications based on location. This sorting is done in the form of tabs:
- On phone - applications in the phone's memory and supporting transfer to a memory card
- On SD card - applications already moved to the SD card
- Phone only - applications that do not support transfer

Transferring the cache to a memory card
If the first method doesn't work. (And it does not work in the latest versions of Android)
The above methods are good, but, as already mentioned, they do not always work, and in addition, they leave a cache in the internal memory, which often takes much more than the application itself. The FolderMount application, in contrast to AppMgr Pro III, allows you to move not the application itself to the memory card, but its cache. For this program to function, you need root rights, if you do not know what it is, but how to get it.
Cache migration is done in a few simple steps:
- Run the application and click on the “+” icon in the upper right corner
- In the menu that opens, in the "Name" column, specify the name of the application whose cache you want to transfer
- In the "Source" column, specify the folder with the game cache, which is located in Android / obb / your folder with the name of the application
- In the "Purpose" column, select the folder on the external SD card where you want to transfer the cache
- After everything is filled in, click on the checkmark at the top right and then on the “pin” opposite the name that you gave in the first paragraph.

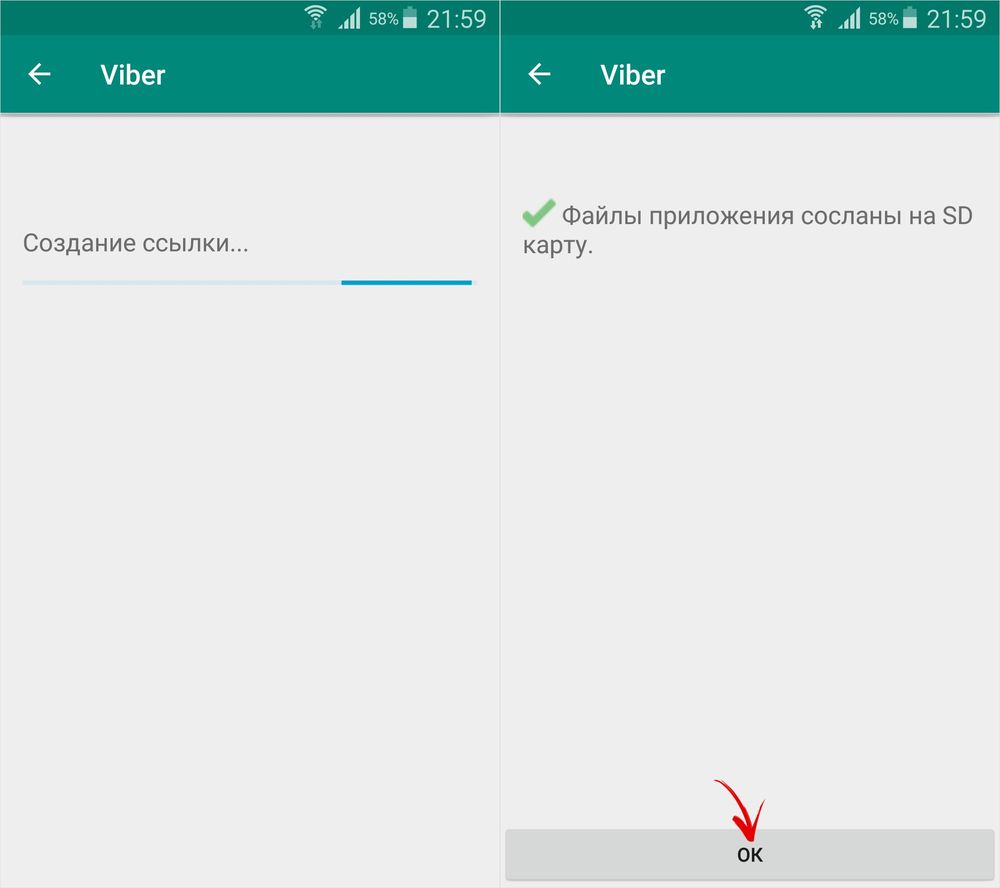
After the data transfer is completed, the “pin” will turn green. Then you can use the application
Want to download another app but don't have enough internal storage? There is a solution: just move the already installed apps to the SD card. Our instructions are suitable for version 6 and higher. Some menu item names may differ slightly depending on the smartphone model and system version.
Transferring apps to SD card via Android settings

- Go to the gadget settings and select the "Applications" section.
- Open Application Manager to see all installed programs.
- Select the application you want to move to the storage card. In our example, this is Instagram.

- Open the "Memory" tab and in the "Used" section click "Change".
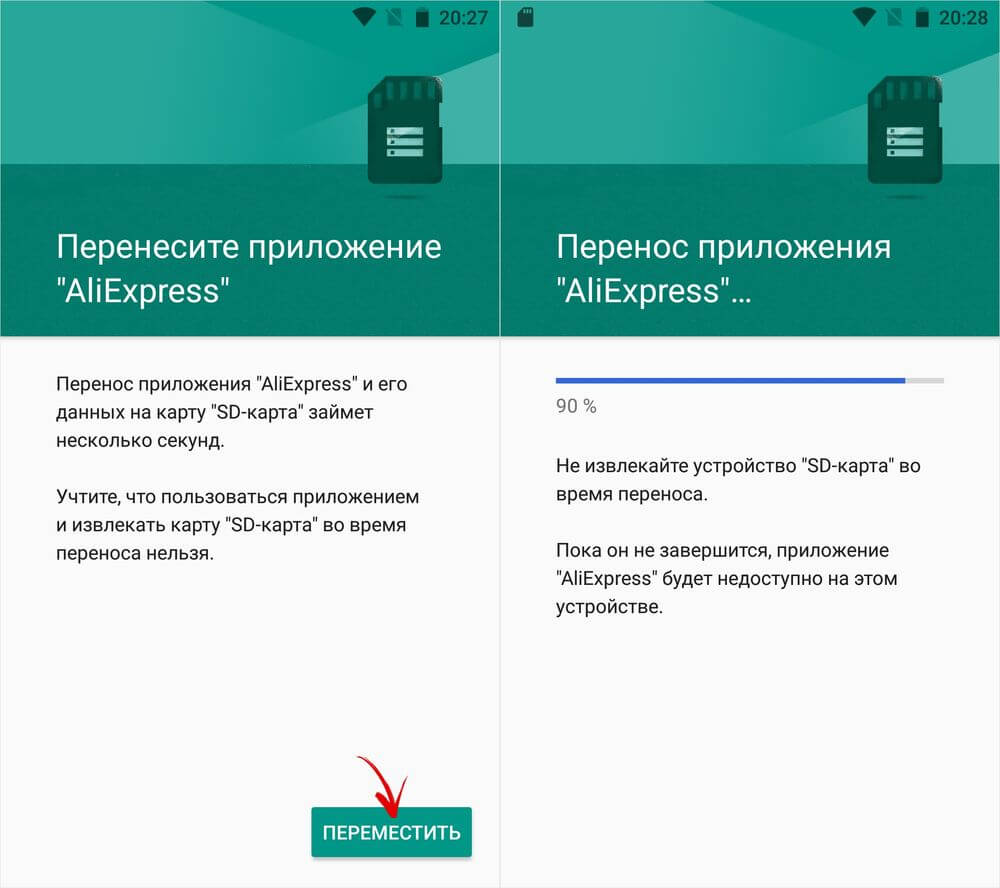
- Select a memory card as the storage area and click "Move".
- The location changes will take some time. Typically, this procedure is completed in a minute.
Important: Not all apps can be moved to the SD card. To move some programs, you need to have root rights and the Link2SD application.
We transfer applications to a memory card using App 2 SD Pro
If you want to move multiple applications at the same time, download App 2 SD Pro - this program will greatly simplify the transfer process.
After installing App 2 SD Pro, a window will open with information about all installed programs. Here you can check the boxes next to the applications that you want to move to the map. Just click OK and App 2 SD Pro will complete the transfer process.
Often, owners of Android smartphones are faced with the fact that the internal memory of the device is crammed to capacity, and therefore it is not possible to install a new application. In order to answer the question of how to transfer applications to a memory card, we have prepared this material.
Longtime Android OC fans know that from Android 2.2 to Android 4.4, there was a feature to transfer applications to a memory card. Some firmware still have it, and therefore, first of all, we recommend trying the following method.
Internal capabilities of Android OC
We go to "Settings" and select the item "Applications". After choosing the software that you plan to transfer, open its settings window and select “Transfer to SD-card” from the menu. We remind you that almost all developers guarantee the stable operation of their product only if it is installed on an internal drive.
Another option is available starting from Android 6.0. You can use the SD card as part of your internal storage with the Adoptable Storage feature. The system will format and encrypt the flash drive, making it impossible to use the card outside of your smartphone.
Activation of the Adoptable storage function is as follows: in the smartphone settings, select the "Memory" section, then click on the SD card and go to its "Settings" with a long tap, then select the item "Format as internal memory" and "Erase & Format".

After completing these steps, you should select the "Use as internal storage" option, and then restart your smartphone. After that, an additional tab "Memory" will appear in the applications menu, with which it can be transferred to the SD card. If these methods are not available in your firmware, and the desired application cannot be transferred, then you should refer to special applications.
Software
« Move to SDCard"- the simplest program designed to transfer applications. Selecting "Transfer to memory card" in the menu, find the desired application, click on it and click "Move". Also among the functions of the program, you will find the ability to uninstall applications and manage APK-files, that is, install applications from third-party sources.

If you have root rights, you can use this application to clean your smartphone from pre-installed garbage. The program is free in nature, but if you are annoyed by ads inside the application, you will have to pay 67 rubles for its disappearance.
AppMgr III

A more advanced tool that allows, in addition to the banal transfer of applications, to perform any manipulations with them. The transfer works exactly the same way as in the previous application, so let's dwell on its other features. AppMgr III can uninstall or hide an app, open its page on Google Play, navigate to its settings in Android, or clear the cache.

Using root rights, you can significantly expand the functionality - delete applications without confirmation, freeze them, and also automatically transfer applications to the memory card after installation. The full version of the program, which allows you to install the program widget, update modules hourly, and so on, costs 179 rubles.
Link2SD
And here is a fully functional manager for advanced users. Let's make a reservation right away that the application requires root rights and settings, and therefore, for a one-time transfer of the application, you can use a less laborious option.

First, you need to create a hidden area on the memory card in the ext3 / ext4 filesystem. The application uses this area as an emulator of the phone's internal memory. This can be done through the Android axis itself through Recovery, and with the help of third-party applications for Windows.

In the first case, the route is as follows:
 Switch to Recovery mode. Depending on the smartphone, this can be achieved by the following methods:
- press the volume and power buttons at the same time;
- press the power button, and immediately after - the volume button;
- press the Volume, Power and Home buttons at the same time.
- Once in Recovery, select the Advanced item and click Partition SD Card.
- We select the ext3 file system and specify the size, for example, 1024 megabytes. Set the paging file size to zero, it is already present in the system.
- We reboot the smartphone, after the reboot the memory card should decrease by the size of the hidden partition.

Another way for those who don't want to experiment with Recovery is to create a partition using EaseUS Partition Master. After installing this utility on your home PC, connect the SD card to it.

Having found the desired drive in the main program window, click on its sections and click “Delete Partion”. When we have only one partition with the Unallocated file system, select the opposite action - “Create Partition” and select ext3 as the file system type. Now we have a hidden section at our disposal.

Working with Link2SD
After creating the hidden partition, you should give the application root-rights and restart the smartphone. Transferring an application to a memory card is now done in two ways:


Other features of Link2SD include the following:
- convert to system;
- freeze;
- run, reinstall and uninstall;
- clear cache;
- erase data;
- create shortcuts on the desktop;
- open the settings page in Android;
- send the installation APK file.
All this is available even in the free version of the application, but for only 100 rubles you can purchase an extended version that also allows you to automatically clear the cache, transfer external data of various applications, and of course get rid of ads.
We hope, thanks to this article, you have figured out the question of why the data is not being moved to the flash card and how this problem is solved.
If you are reading this, it means that you were interested, so please subscribe to our channel for, well, for one please put a like (thumbs up) for your efforts. Thanks!
Subscribe to our Telegram @mxsmart.
Almost all phones and tablets released in 2018 have a large amount of internal storage, which is expandable with a microSD card of 32 GB or more (in the mid-range and flagship models). But among the owners of old and inexpensive devices with internal storage of 4 GB or less, the issue of lack of free space on a smartphone is especially acute. In this article, we will take a closer look at all the ways how to transfer applications to an SD memory card in Android.
The instructions are intended for both beginners and experienced users, therefore it tells about the transfer of applications not only by standard means, but also with the help of special programs that require root rights.
You can also free up space in the internal memory by deleting system applications.
How to transfer applications to a memory card using available means
Starting with the earliest versions of Android, the system had the function of transferring most of the installed applications to the SD card. Instead, in Android 6.0 Marshmallow, it became possible to use a memory card as an internal storage (this method is also described in the article).
Let's take a look at a function using a Samsung phone running Android 5.0 as an example:
Go to Settings and select Applications. Depending on the manufacturer and firmware, the item may be called "Application manager", "All applications".

Select the downloaded game or program. If the application can be transferred, the "Move to SD card" button will be active. Click on it.

If the button does not work, the developer has forbidden the installation of the application on the memory card and it will not be possible to move it by standard means.
AppMgr III (App 2 SD) for transferring applications
In order not to open the settings of each game or program and not watch, you can transfer them or not, use the AppMgr III utility (App 2 SD) - in it, the applications to be moved are collected in a separate tab.

Hold your finger on the app cards to mark them. Select the ones you want and click on the folder icon at the top. In the new window, click on the red arrow, and then you will be taken to the application details page. To go to the settings of the next selected program or game, press the "Back" button.

AppMgr III will also tell you which applications are best not to be installed in external memory so that all their functions work correctly.
We use the SD card as internal memory
This feature was introduced in Android 6.0 and works in Android 7 Nougat, Android 8 Oreo, and Android 9 Pie. It allows you to use a memory card as built-in storage. Since SD replaces the internal storage, it makes sense to have a larger flash card than the built-in memory. And for applications to work quickly, the SD card must have a fast write speed.
Data formatted as an internal storage, memory cards will not be read if you insert the SD into another smartphone or tablet. To use the card in a new device, you will need to format it as portable media.
After connecting, a message will appear in the notification curtain that a new memory card has been detected. It is enough to click "Configure", in the window that opens, select the item "Internal memory" and follow the further instructions. Be sure to transfer files from the SD card to another medium, as they will be deleted during the formatting process.

Detailed instructions for configuring the map:
1. Go to "Settings" → "Storage" (may be called "Storage and USB-drives" or "Memory").

2. Tap on "SD Card".

3. In the upper right corner, open the menu, select "Settings" (in some firmware "Memory").

4. Click "Internal Memory".

5. A warning will appear on the screen that all data saved on the SD card will be deleted during the formatting process. Therefore, first copy them, and then click "Clear and Format".

6. If the smartphone uses a low-grade SD (for example, microSD Class 6), a message will appear on the screen that the memory card is working slowly.

7. Before completing the formatting process, you will be prompted to transfer some files and applications to the SD card. Select the option you want, click Next and then Migrate.

8. Finally, click Finish and manually restart your phone.

Now open "Settings" → "Applications" → "Information about applications" (if this item is not there, go to the next step) and select the installed program or game.

Click on "Storage" (may be called "Memory"), then click on the "Change" button and select the SD card.
In the window that appears, click "Move" and wait for the transfer to complete.
We format the memory card as an internal drive using ADB
If the smartphone has Android 6, 7, 8 or 9, and the settings menu does not have the function of formatting the SD card as internal storage, the manufacturer has not added such an option to the firmware. But users can format the memory card by themselves using the utility.
To do this, activate on Android, connect your mobile device to your PC and run ADB from the command line or from Windows PowerShell if one of the latest builds of Windows 10 is installed on your computer. Type the following command and press Enter (in Windows PowerShell add. / Before the command).

The console will start and a "$" sign will appear in it. Enter the command and hit Enter:

The line below will display the ID of the SD card like disk: NNN, NN... Replace NNN, NN to the value of the received identifier and run the command:

Wait for the command to execute. Then go to Settings → Storage and select your SD card. Expand the list of options by clicking the three dots at the top and click "Transfer Data".

Select "Transfer" and wait for the process to complete. Finally, click Finish.

How to Move Multiple Apps to SD Card in Android 8 Oreo and 9 Pie
In order not to perform the same type of steps to transfer applications separately, use the AppMgr III (App 2 SD) program, which was described at the beginning of the article. Only Android 8 Oreo and Android 9 Pie will have to give AppMgr III a couple of permissions.
Run the application. A notification will appear that the program needs access to the usage history. Click "Allow", select "AppMgr III" from the list of applications, activate the switch and return to the program. You can also configure access to usage history by going to Settings → Apps and notifications → Advanced settings → Special access → Access to usage history.

Highlight the games and programs that you want to move to the flash card and click on the image of the folder with an arrow inside. In the "Move to Map" window, click on the red button below.

A message will pop up that AppMgr III needs permission to change system settings. Click on the switch, and then you will be taken to the settings. Activate the toggle switch and return to the app. The options for this permission are located under the path "Settings" → "Applications and notifications" → "Advanced settings" → "Special access" → "Change system settings".

Next, you will be asked to allow AppMgr III to automatically perform actions without manual confirmation for each application. Press "YES", go to the "Accessibility" section, select "AppMgr III", turn the toggle switch to "ON" and confirm by clicking "OK". Then return to the program.


The application transfer will start immediately. Just wait for it to complete.

At the end, it will show that the applications have been moved to the memory card.
Transferring games to SD card in Android
Most of the user memory is occupied by the cache of installed games. To move it, we will use the FolderMount program, which can mount directories from internal memory to external. Required for her work.
Download FolderMount from Google Play, launch and grant Superuser rights.

In the "List of pairs" tab at the top, click on "+".

Think up and enter the name of the pair folder on the first line.

Click on the second, and then the built-in file manager will open. The game cache is located in the "Android / obb" directory, and the application cache in "Android / data". Navigate to the folder you want to mount and click on the checkmark.
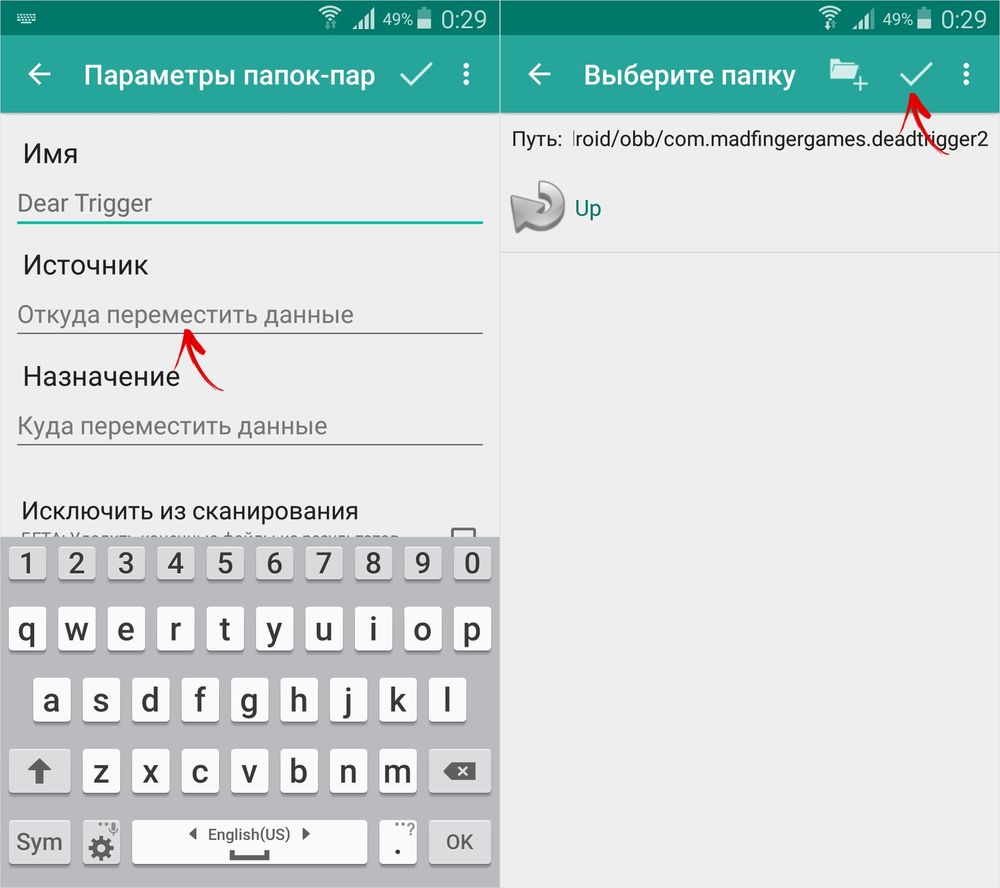
A screen will ask if you want to create the destination folder automatically. Click "YES" if you agree. In this case, FolderMount will copy the path from the internal storage and create the same on the external storage. Click "NO" if you want to manually set the mount endpoint and select a folder to move the files to.

To start copying, click on the checkmark and confirm the transfer by selecting "YES" in the next window.

The process will be displayed in the notification bar.

Upon completion of copying, switch the toggle switch in the "List of pairs" tab to mount.

At the bottom there is a button with a pin, clicking on which will mount all directories at once.

To move files back from the destination folder to the source folder, first unmount the pairs: to do this, turn off the toggle switch or click on the crossed-out pin, then hold your finger on the pair and click on the trash can icon.
How to move apps using Link2SD
Link2SD is a program that can mount application data to a memory card. In order for it to work, on a mobile device it is necessary to create an additional partition on the SD in the ext3 / ext4 file system. Partitioning a memory card is done in one of the following ways.
(!) Before creating a new partition, copy all the files on the SD, as they will be deleted when the memory card is divided.
Splitting a memory card on Android via TWRP
If the smartphone is installed, mark the SD card through it. To do this, click "Advanced".

Select “Partition SD card”.

Check "Micro SD card" and click "OK".

Select the file system of the ext-partition to be created and specify its size. For example, 2048 MB - this memory will become available for transferring applications and the size of the SD card will decrease by that much. Leave the Swap size at 0.
Drag the slider to start SD layout.

At the end, click "Reboot System" and "Do Not Install" if you don't want to download the official TWRP app.


The device will reboot. If you go to "Settings" → "Storage" (or "Storage" in the latest versions of Android), you will see that the size of the SD has decreased. The second section "sees" only Link2SD, App 2 SD and similar applications.
Create a hidden SD partition with AParted
The second way to split the memory card into 2 sections, if you have Superuser rights, but no TWRP:
Go to "Settings" → "Memory", click "Unmount memory card" and confirm the action.

Launch AParted and grant root access.

There are 2 stripes in the Create tab: the top one will display the new partition, and the bottom one shows the current SD size and its file system.

Click "ADD" to create the first section. This will be the new size of the memory card where you can save photos, music, videos and other files. Leave the checkbox opposite "Format", the file system is fat32 and use the slider to select the size. To specify it more precisely, click on the number next to MB, enter the desired value and click "OK".


Press "ADD" again and create a second hidden section to which games and applications will be transferred. Drag the slider all the way down, leave Format checked and select the ext filesystem.

Click "APPLY" and select "OK" in the warning window that appears.

The SD split process starts.

When finished, the second line displays 2 sections.

Now connect the memory card through the "Settings", if it did not happen automatically. The new SD size should be displayed there.
Working with Link2SD
Open Link2SD and give the program Superuser rights.

A window will immediately appear with the choice of the file system of the hidden partition of the SD card. Check the appropriate ext version and click "OK". If the window does not appear, expand the menu on the left and click "Recreate Mount Script".


Then click "Reboot Device" to mount the second partition of the memory card. The device will reboot.

After launching Android, go to Link2SD, click on the 3 dots in the upper right corner and select "Multiple".

Check the applications you want and reopen the menu. Click Submit.
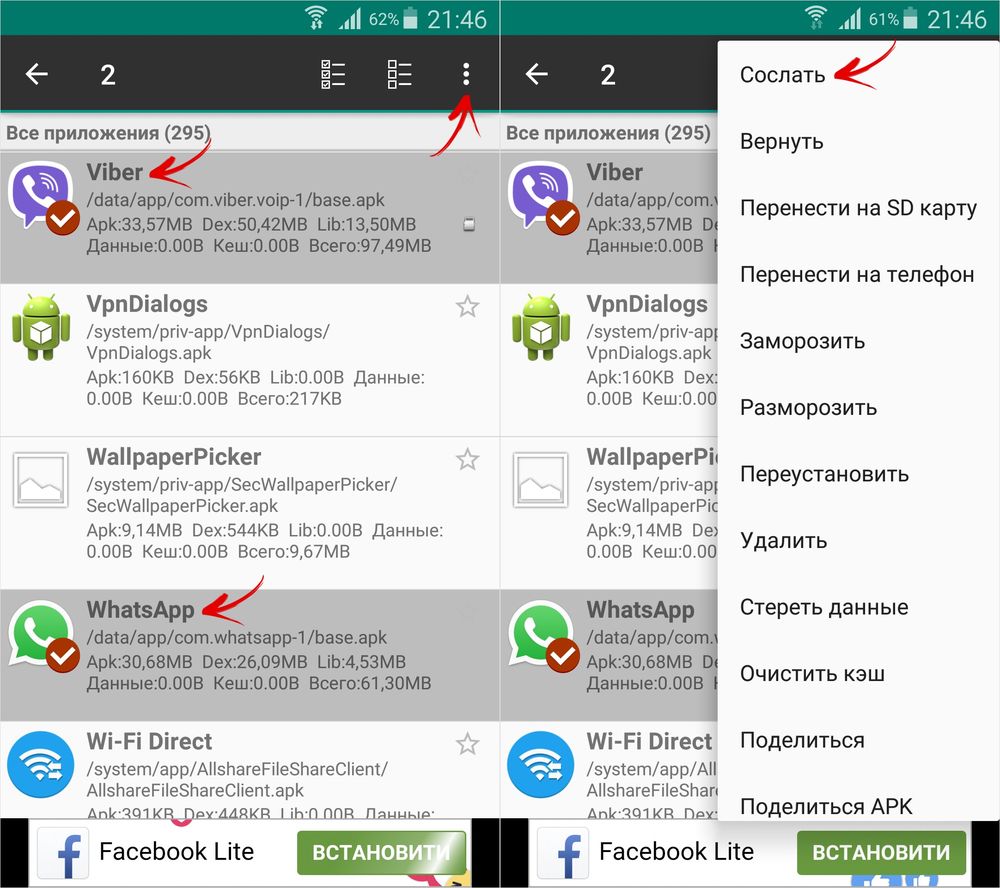

There is also a "Transfer to SD card" function, which moves applications using the standard Android method, which is not available to users without Link2SD.

If you need to move one game or program, find it in the list, click on it and select "Send" or "Transfer to SD card".

Good afternoon. All happy owners of smartphones and tablets with an operating system Android sooner or later there will be a need to transfer photographs or images to another place. I will not go into details of why this is needed. We will proceed from the fact that this needs to be done. For this we need an SD card and one program. Thank God that Android has the ability to manage your files. Well, today we will find out how you can move a photo from your Android to an SD card from this article.
We check for the presence of an SD card. From the Menu we go to “Settings”, then to the “Storage”. Here you can see all the information about your SD card. If it is not there, then there are two possible scenarios for the development of events. Either you do not have it installed, or your phone does not support the ability to install it. You can visually see if there are slots for its insertion. They are usually found on the sides of our device or in the battery compartment.
How can I transfer a photo from Android to an ESD card using the file manager
Now we need to see if we have any file manager. They are installed by default, but you may not find it. We find and download it on Google Play or on the vast expanses of the Internet. Let's assume we have found, downloaded and installed one of the best "EStrongs File Explorer". You can download it completely free of charge, the most recent version can be found at this link:
- Click on its icon on the screen i.e. let's activate it. We find "Device memory". It happens that the inscription "tablet" or "phone" appears instead of it. If this is not the case, then we are looking for the inscription "/ storage" on our own.
- Let's go to the folder in which we store our photos and images. This is usually not difficult. Folder names are similar to Photos, images, or slight variations. We look for the files captured by the camera of our device in the "DCIM" folder.
- We find and select those photos that we want to move and use the “Move” function in the application.
- In the memory cell of our SD-card (in different file managers it is designated differently, but mostly as “External Memory”), we find the already created folder to move or create it ourselves.
- Directly move our photos using the Paste function. That's all.
As you can see, there is nothing difficult about moving photos from our Android device to a regular SD card.

I hope that I did not powder your brains too much and everything worked out. The main thing is to remember the order of how to transfer the photo to the sd card and everything will be fine.
P.S. Some devices may require root. It is also possible that the SD card breaks down due to which it will not be possible to transfer files. Try to figure out the reason in case of failure.
Good luck and goodbye.
Come and visit us again !!!


