In the event that when working with a new browser Microsoftedge problems are observed in Windows 10 (the browser crashes, does not start, slows down, gives some errors, etc.) that interfere with the user's normal work, you can try to reset its settings and current state. MS Edge in Windows 10 (like IE in previous versions of Windows) is part of the system and cannot be completely uninstalled or reinstalled. The main technique for restoring its performance is to clear and reset its parameters and state.
There are two ways to reset the Edge browser: soft(resetting the current user settings made in the course of his work) and hard reset(restore the browser to the original state of a clean system). Before proceeding with the reset, make sure that the problem is related to the browser, and not to one specific site.
Important! Both of the methods below will completely delete all user data in Edge, including bookmarks, favorites lists, web form data, saved passwords, etc. Therefore, take care to save important data first.
Soft reset Microsoft Edge
If the browser still launches, the first thing to do is to soft reset Microsoft Edge using the built-in tools.
Hard Reset Edge Using PowerShell
If the previous method did not help, try a more radical method of resetting MS Edge.
To do this, first of all, you need to clear the contents of the C:\Users\ directory. %username% \AppData\Local\Packages\Microsoft.MicrosoftEdge_8wekyb3d8bbwe, which stores the user's browser settings.
where, %username% is your account name.
The cleanup can be done manually, or (preferably) from a PowerShell command line run as administrator (Edge must be closed):
remove-item $env:localappdata\Packages\Microsoft.MicrosoftEdge_8wekyb3d8bbwe\* -recurse -Force 2>$null
This command recursively clears the contents of the localappdata\Packages\Microsoft.MicrosoftEdge_8wekyb3d8bbwe\ directory in the current user's profile.
Then install the default copy of the browser from local storage:
Get-AppXPackage -Name Microsoft.MicrosoftEdge | Foreach (Add-AppxPackage -DisableDevelopmentMode -Register "$($_.InstallLocation)\AppXManifest.xml" -Verbose)

Restart Windows 10 and check if Edge works.
Anyone who has purchased or upgraded to Windows 10 knows what's out there Edge default browser(in earlier versions of the operating system there used to be Internet Explorer), and sooner or later the user will have a question - How to reinstall Microsoft Edge? In this article, I will just tell you how to do it.
Not a single computer, and even more so a program, is immune from failures and technical problems, and the mentioned web browser is no exception. In my work with him, I have not yet noticed any problems, but when reading forums and websites, users encounter them quite often. On what it depends, it is difficult to say. Only three things come to mind - a "raw" OS, viruses and a pirated version of Windows 10.
How to reinstall Microsoft Edge
I will describe several ways. I'll start with the simplest - resetting the settings. To do this, you need to launch a web browser, go to "Settings" -\u003e "Clear data ...". Clearing the browser cache is usually enough, but I would also recommend clearing cookies and history (see screenshot below).

Select the desired options with checkmarks and click the appropriate button. When finished, restart your web browser.
And the second option. I advise you to make a backup at the very beginning, just in case. In general, make it a rule - before you install, clean, test something or perform any other manipulations, always create a Windows 10 restore point / backup.
So, before you reinstall Edge on Windows 10, you should first:
a) Close all running programs, including our web browser.
b) Enter poweshell in the search.
c) In the utility window that opens, you need to enter this code ->
remove-item $env:localappdata\Packages\Microsoft.MicrosoftEdge_8wekyb3d8bbwe\* -recurse -Force 2>$null Get-AppXPackage -Name Microsoft.MicrosoftEdge | Foreach (Add-AppxPackage -DisableDevelopmentMode -Register "$($_.InstallLocation)\AppXManifest.xml" -Verbose)
remove - item $ env : localappdata\Packages\Microsoft. MicrosoftEdge_8wekyb3d8bbwe \* - recurse - Force 2 > $null Get - AppXPackage - Name Microsoft . Microsoft Edge | Foreach( Add - AppxPackage - DisableDevelopmentMode - Register "$($_.InstallLocation)\AppXManifest.xml"-Verbose) |
If you do not go into too much detail, there are two teams. One removes the browser and all its folders from the system, the second reinstalls it.
On Windows 10, the default browser is the Microsoft Edge browser, which may experience issues and malfunctions. Therefore, users are faced with the need to reinstall Edge to resolve problems with the browser.
The Edge browser is integrated into the operating system, so it's not easy to answer the question of how to reinstall Microsoft Edge on Windows 10. However, it is possible to reinstall the Edge browser on a computer running the Windows operating system.
Why is there a need to reinstall Edge? The browser may experience crashes and malfunctions. I will tell you what I myself encountered when using the Microsoft Edge browser in Windows 10.
Sometimes, for no apparent reason, problems appear in the browser: Microsoft Edge browser starts, but cannot find web pages on the Internet. At this time, the Internet connection is working as usual, all other browsers open sites without problems, including the Internet Explorer browser.
In this article, we will look at two ways to restore the health of the Edge browser. First, let's try to solve the problem in the first way: resetting the Microsoft Edge browser. Then we'll look at the second more complicated method: how to reinstall Microsoft Edge using the built-in Windows PowerShell utility.
Reset Microsoft Edge browser settings
Launch the Microsoft Edge browser. In the browser settings, click on "Options". In the "Clear browsing data" section, click on the "Choose what to clear" button.
Some items have already been selected here, you can add other options to clear the browser. Click on "More", select additional options.
If this method did not solve the problem with the browser, then you need to use a more complicated method: uninstall and reinstall the Microsoft Edge browser.
How to reinstall Edge on Windows 10
The Microsoft Edge browser is integrated into the operating system, so create a system restore point before uninstalling it. You will secure the operating system in case of your erroneous actions, as you will have the opportunity to perform a system restore.
In order to reinstall the Edge browser in Windows 10, you must follow these steps:
- Close the Microsoft Edge browser.
- In the search box, type "powershell" (without quotes). Run the built-in Windows utility
- Enter the following code in the PowerShell window, which you can copy from here:
The first command removes the Microsoft Edge browser from the operating system, the “Microsoft.MicrosoftEdge_8wekyb3d8bbwe” folder is cleared, it does not need to be removed from the system manually, as advised on the Internet.
The second command installs Microsoft Edge on the Windows 10 operating system.
After entering the code in the Windows PowerShell window, press the "Enter" key. Wait for the command to complete.

After executing the commands, you will see a message about the completion of the operation.

Close the Windows PowerShell utility, and then restart your computer.

After Windows starts, open the Edge browser. You will see that Microsoft Edge has been restored.
Article Conclusions
In case of problems with the Microsoft Edge browser, the browser can be restored in two ways: by resetting the browser settings, or by reinstalling the Edge browser on the Windows 10 operating system.
Hey! Today I will write about the most sacred thing that can be in the computer business, this is about how to install windows 7. I think that everyone at least once had such a problem as “Windows crashed”, and only specialists can reinstall it and take a lot of money from you.
But you think so, today I will write how to install Windows 7 yourself and completely free. I've been meaning to write this article for a long time, but never got around to it. Until the time when I myself needed to reinstall Windows 7 on my computer. I quickly figured out and made photos for this article. I apologize in advance for the quality of the photo, I photographed it with a video camera. And then I will describe point by point what you need to install Windows 7 and how to actually install it.
This article describes in detail the process of installing Windows 7. But I wrote another article in which I collected . Take a look, I think you'll like it.
What do you need to install Windows 7?
1. Naturally, we need a Windows 7 disc. You can buy it in a store or download it on the Internet. After you download it, it will most likely be in .iso format, I wrote about how to burn a disc in the article.
2. Before installation, we need to “save” your files that are on the disk on which you have the operating system installed. Usually this is drive “C”, the fact is that during the installation process we will format it and all files from it will be deleted. If you have a new computer (only from the store), then this does not concern you, but in another case, you need to transfer all the files from drive “C” to another drive. Data that is stored on the desktop and in a folder "My documents" will also be removed!
3. And the last thing to prepare is to put in BIOS booting from the CD / DVD drive, so that we can boot from it in the first place (By default, the computer boots from the hard drive). I wrote about what BIOS is and how to enter it here and. You can check how your computer is configured, maybe you already have boot from the drive installed. Just insert the Windows 7 disc into the drive and restart the computer, if the computer boots from the disc, then everything is OK (you will see a white inscription and dots). Well, if the PC did not boot at all, or Windows started loading, then you need to configure the BIOS. Preparation for installation is completed, proceed to the installation. About that, I already wrote.
Installing Windows 7
1. Put the disc in the drive and restart your computer. If you did everything correctly during the preparation, then you should see a white inscription with dots. You need to quickly press any key. Then you should see something like this:


3. After that, we see such a picture, on which we click “Install”


5. In the next step, press “Full Installation”

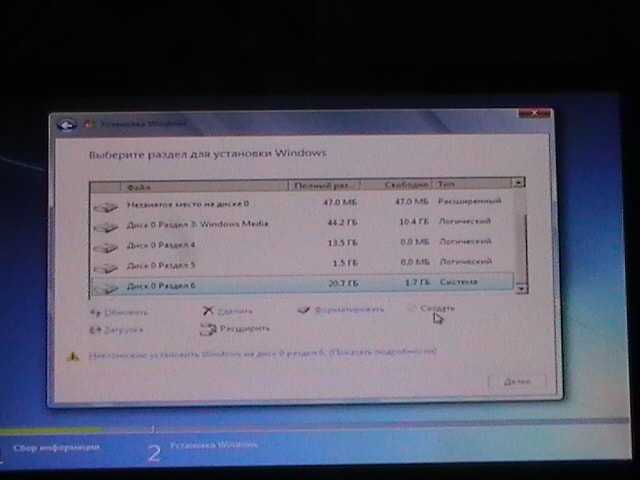
6. Now the fun part. If you already had an operating system, and your hard drive has already been partitioned, then we do this: We are looking for the partition that we need in the list (we need drive “C”) opposite it should be written “System”. The names may differ from what I have. I have for example “Disk 0 Partition 6”, yours may be different. If you are sure of your choice, then press “Disk Setting” and “Format”, confirm, wait for completion, look so that our disk is highlighted (Remains selected) and only after you check everything again click “Next”. When formatting, all data from the selected partition will be deleted!
If you have a new computer, then you will need to partition the disk. In your case, you will only have unallocated area. I described in detail the process of breaking down a new hard drive in the article. Do this: Select it (unmarked area), click “Disk Setting” and “Create” and enter the size of the first partition. The first partition that you will create will be a partition for the system (disk “C”), I advise you to allocate 50-100 GB for this partition. The rest of the unallocated area needs to be divided, preferably two more times. Again we take create and enter for example 200 GB, and for what remains we create another partition and you should get a picture like mine:

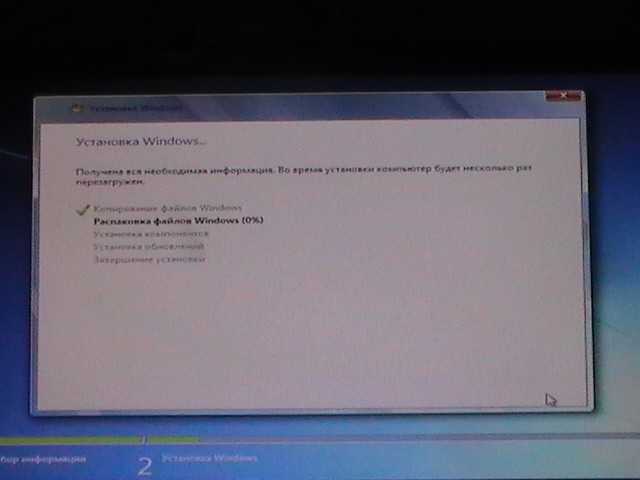
7. After clicking on the “Next” button in the last paragraph, the process of copying files and installing Windows 7 will begin.

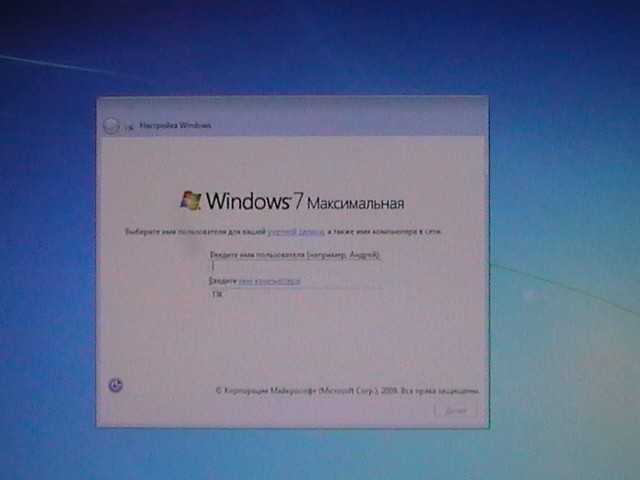
8. Now let's move on to setting up Windows 7. Enter the username and click "Next"
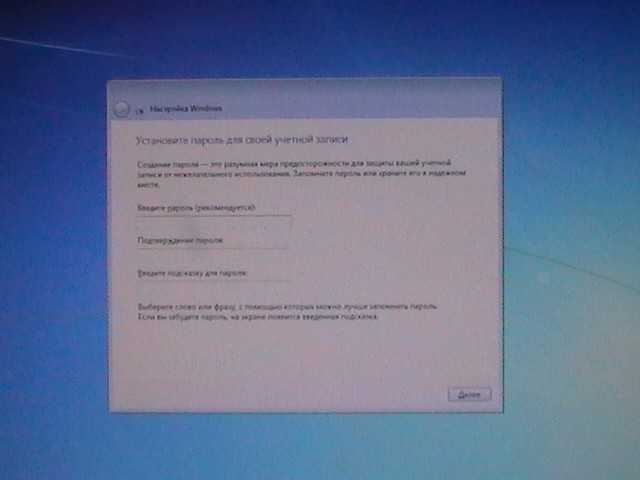
9. Enter the password, or not, as desired and click "Next"
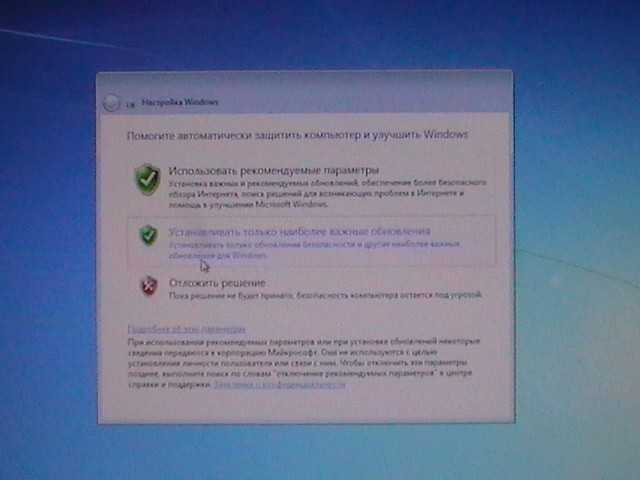
10. If you have a key, then write it, and if not, then uncheck “Activate when connected to the Internet” and click "Next"

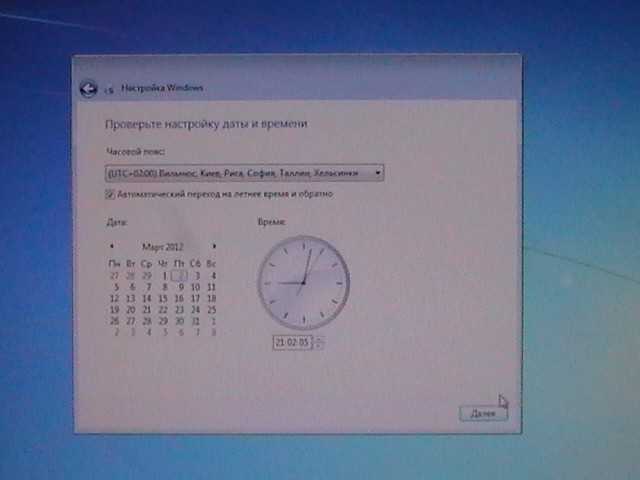
12. The last stage. Specify the time zone, time and date. And of course, click “Next” 🙂
13. That's it, I congratulate you! Windows 7 is installed, a couple more beautiful pictures and the desktop is in front of you.


Updated: January 11, 2013 by: admin
Any Windows 7 or XP operating system installed on a computer or laptop starts to work slowly or freeze over time. You can solve this problem by trying to remove all sorts of garbage. To do this, you can run cleaning programs, such as Ccleaner and antivirus. Sometimes it helps, sometimes it doesn't. If you have the second case, then nothing can be done with the PC. You need to reinstall Windows 7 or another operating system, such as XP on a laptop or PC. In general, any OS is reinstalled according to the same principle. Moreover, the newer its version, the easier it is to remove the old system and install a new one.
This instruction will tell you about a clean installation of Windows 7 or XP through the BIOS. You can do this yourself using one of two methods: using a USB drive or a disk with a system image (the image can be downloaded via the Internet). Using a flash drive is much easier. In addition, when reinstalling on a laptop, there may be no disk drive. Therefore, installing from removable media may be the only way. How to make an installation USB flash drive with Windows 7 or XP read here. Whichever method you choose: from a USB drive or a disk, the following instruction may help you. So, let's look at how to reinstall Windows 7 or XP on a laptop correctly.
How to reinstall Windows 7
To begin with, it is worth mentioning that when reinstalling the operating system on a laptop or PC, all programs and data located in the memory of the system disk (usually this is the local drive C) will have to be deleted. Therefore, all files, as well as application data, if possible, should be transferred to the memory of another local PC drive, for example D, or saved on external media or on a cloud service on the Internet. Through the explorer, transfer all files and folders to a safe place.
Also, now is a good time to think about PC drivers. If you do not have the appropriate disk, then they can be found and downloaded via the Internet from the official website of the manufacturer. It is correct not to use unreliable utilities and drivers found on the Internet, as they may contain viruses.
You will need drivers for a video card, a sound module, a network card (responsible for connecting to the Internet via a LAN cable), Wi-Fi, Bluetooth, etc. First of all, it’s right to take care of the drivers for working online via the Internet on a laptop. If you only have one computer, then this will be appropriate. Since without them you will not have access to the Internet and you will not be able to download everything else. To make it easier to deal with drivers, you can download a program to automatically install them. DriverPack Solution, which works offline, is quite suitable:

Please note that the image of the Windows 7 or XP operating system must be the same version as that installed on your PC or laptop. For example, you have Windows 7 Home Edition or Ultimate. So install the same version correctly. Otherwise, your license key listed on the computer case will not work. You can find out exactly which version of the system you have installed by clicking on the folder " My computer» with the right mouse button and selecting « Properties". Here you can see what you have installed. How they differ read on the Internet.
Starting the installation correctly
Now, through the BIOS of the PC, you need to boot from a USB flash drive or disk. The BIOS is the starting point - the program that is flashed into your motherboard. Typically, the computer starts from the hard drive on which the system is installed. But now you need to change the boot priority and start the computer through the BIOS from a USB flash drive. To do this, when you turn on the computer, depending on the manufacturer, press the correct key or key combination. In most cases, this is the Delete button. What to click on a particular model can be seen below in the picture. The BIOS will open on the laptop or PC - device selection menu:

After that, the computer will boot from the USB flash drive or installation disk through the BIOS. Next, following the prompts, we proceed to start installing the operating system on the laptop. We don't need the BIOS anymore. Select the language of the system and installation:

After accepting the license agreement, a window will pop up with the hard disk partitions you have. If the old system was in your memory of the “C: /” partition of your hard drive, then you need to right-click on it and format (delete all data). If you are doing this for the first time, then you can get by with a quick format of the disk (surface cleaning). However, to completely delete the data, you need to use careful formatting (it will take a little longer). The speed of the operation also depends on the power of the device.
After that, select the formatted partition and click the Next button (we perform the same sequence of actions for any other version, including XP).

The reinstallation of Windows 7 will begin.

It remains only to wait for the computer to complete the operation. If the installation is interrupted due to the fact that the PC reboots and starts again from a USB flash drive, then this problem must be solved using the BIOS.
In the BIOS of the computer, you need to set the initial boot priority in order to start again from the hard drive. After that, the installation will continue.
When installing Windows 7 or any other version of the system (XP) downloaded from the Internet, you will be asked for a product key. It can be found on the case of a PC or laptop. Here's what the sticker looks like:

What can you do if you do not have such a sticker? In this case, enter the code that you purchased online from the official Microsoft website.
We hope that the instruction "for dummies" helped you and now you will know how to reinstall Windows 7 or XP. In this article, we wanted to shed light on such terms unfamiliar to beginners as BIOS, bootable flash drive, etc. So, as you can see, if you follow the procedure outlined here, you can quickly and easily reinstall the system.
Related videos


