Page 3
Workstations along the length of the machine must have Stop buttons. Instead of separate buttons, a shut-off bar can be equipped, allowing shutdown from anywhere along the machine.
Selection buttons appear in selection groups. The meaning of each separate button can be one if enabled, or zero if disabled. The value of the group of selection buttons is the key selected in this moment buttons. A check is made that only one button is enabled. An application can assign an action to each individual selection button, but it is more acceptable to assign an action to a group of selection buttons as a whole and use the supplied key to determine which of the buttons is currently selected.
Both motors are stopped at the same time. For pre-start testing of electric motors, separate buttons are installed for each of them.
Operating modes of the line are divided into automatic (continuous repetition of cycles), semi-automatic (single cycle operation), special (exclusion from the operation of some units) and commissioning. In setup mode, jogging is performed by pressing individual buttons. So that with such a press the signal is not transmitted in the circuit, sometimes they use the open contact of the 1KU button (IP relay circuit), which breaks the circuit automatic control... However, with automatic operation accidental pressing 1KU stops work on automatic cycle. Manual control carried out when starting constantly running motors, when choosing operating modes, starting and stopping the line and setting up control of machines or units.
The specifics of your work in MS Word may turn out to be such that you often have to give the same command, climbing for this in the menu. If you create a separate button for this command, it will save you a lot of time and effort.
With semi-automatic control, the program of movement of the crane mechanisms is typed on the keypad. The lifting mechanisms, the movement of the trolley and the crane are started by separate buttons on the control panel. The drives end automatically when the container reaches the set position.
The dredger can be driven with the auxiliary pump idle. The actuators of each of the valves can be switched on independently and switched off by separate control buttons.
If the status buttons and request buttons (or their equivalent) are grouped, then their functional purpose can be easily secured with lettering and color coding. If the buttons are completely surrounded by glued plastic labels, then you can highlight separate groups buttons and assign a name to both each group and each individual button. Assigning a specific color to a status button usually indicates a degree of importance or danger. Assigning a color to an opaque request button provides separation between the types of function called. A color, such as red, can be highlighted for buttons that implement essential functions, such as Input or Control is removed from the installation. It can also be envisaged that only the operations with the red buttons require the one described in Sec.
The control device ensures the operation of all other devices of the machine in accordance with a certain program processing the original numbers. The control device consists of a switching board, on which the program is typed in the form of connections of switching sockets with special conductive cords, a control device, an interval machine, switches on the control panel, individual buttons and electrical equipment located inside the machine.
It is recommended to use the standby sweep mode. Interruption (a separate button on the layout No. 2) provides periodic disconnection of the circuit from sources with a frequency much lower than the self-oscillation frequency. This makes it possible to observe on the screen the process of transition from the state of equilibrium to self-oscillations. The M thus determined should be written in the last line of the table, and then plotted on the graph in Fig. 14.4. Deviations of these points from the theoretical curve can be explained by measurement errors and accepted assumptions that simplify the calculation part of the experiment.
Sometimes it's convenient to have a button quick access which acts like a switch. The toggle button is used to turn on and off some option, while it is not included in the group. To turn an individual shortcut button into a radio button, set its Grouplndex property to a nonzero value and at the same time set the AllowAllUp property to true. Grouplndex is not used by any other form component. When a user clicks a button like this, it sticks. When the button is pressed again, it is.
When working with a jib crane, a light and sound alarm is used. The winch operator lifts the load, guided by the mark on the load rope. For the Stop signal, a separate button is installed, which in parallel with sound signal turns on the red warning light in the winch control room. For safety, a limit switch is mounted on the upper lift mark, which automatically turns off the winch drive when the load is lifted above the set limit.
Interaction with the computer largely takes place from the keyboard, which, if necessary, can even replace the mouse. The keyboard often breaks, for example, one of the buttons that is often used can break in it. In such a situation, you should not get rid of the keyboard, since at the software level you can reassign the functionality of the faulty button to any other. In this case, there are opposite situations in which, for example, you need to completely turn off the keyboard. We will consider how to perform certain non-standard actions with the keyboard in the framework of this article.
How to disable keyboard in Windows
It may sound unusual, but some users in one situation or another have to think about how to turn off the keyboard completely. For example, this may be needed on a laptop, if it is left to the child as a TV, running cartoons on the screen. To prevent the child from accidentally closing the video, it is enough to turn off the keyboard and mouse (touchpad). This can be done both by means of the system, and by some third party applications... Let's consider the main options.
How to disable the keyboard using the system
To completely disable the operation of keyboard keys, it is enough to make changes in the "Device Manager". You will need to do the following:

After completing 3 simple actions, it will be possible to completely disable the keyboard on the computer, after which not a single key will work on it. To turn the keyboard back on, you will also need to go to the "Device Manager", again right-click on the disabled pointing device and turn it on.
Please note: In rare cases, the "Disable" button is inactive when you right-click on the keyboard. In such a situation, in order to disable the manipulator, it will need to be removed. When it is removed, you can enable it by clicking in the "Device Manager" button "Action" - "Update hardware configuration".
How to disable the keyboard with third-party applications
There are a number of programs from third party developers which allow you to completely disable the keyboard. They do not differ much in terms of functionality, but they do have some differences in the interface and controls. There are two most popular programs which allow you to disable the keyboard of a laptop or any other computer on Windows:

There are dozens of other apps that allow you to completely disable your keyboard in Windows.
How to replace or disable a button on a keyboard in Windows
There are situations when you need to disable only one button, for example, if it sinks and is spontaneously pressed. You may also need to replace the assignment of one of the buttons with another, for example, if Esc is broken, set its action to the F12 key or another "useless" key on the keyboard. In such a situation, you can use the MapKeyboard program, which has the necessary functionality.
Download the MapKeyboard application from the official developer site and run it to replace or disable a key on the keyboard. Next, do the following:

It is worth noting that if you need to reset all the changes made and return the buttons to their default values, you must click "Reset keyboard layout".
There are quite a few keys on the keyboard with which we type text. And each of them is needed for something. In this lesson we will talk about their purpose and learn how to use them correctly.
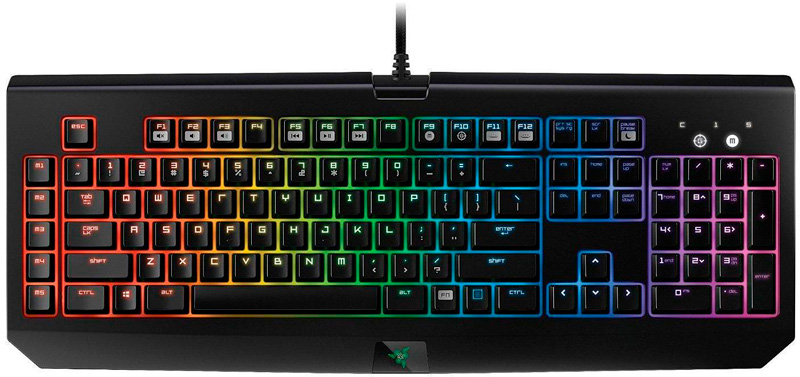
Here is a photo of a typical computer keyboard:
Keypad buttons meaning
Esc. The full name of this key is Escape (pronounced "Escipe") and it means "Exit". With it we can close some programs. To a greater extent, this applies to computer games.
F1-F12. Along with Esc, there are several buttons whose names begin with latin letter F. They are designed to control the computer without using a mouse - only the keyboard. Thanks to them, you can open and close folders and files, change their names, copy and much more.
But knowing the meaning of each of these buttons is completely optional - most people have been using a computer for decades and have no idea about any of them.

Immediately below the F1-F12 keys, there is a row of buttons with numbers and signs (! "" No.;%:? *, Etc.).
If you just click on one of them, the drawn number will be printed. But to print the sign, press together with it the Shift button (bottom left or right).

If the character is printed not the one you need, try changing the language (at the bottom of the screen on the right) -
By the way, on many keyboards, numbers are also found with right side... The photo shows this part separately.

They are located in the same way as on a calculator and are more convenient for many people.
But it happens that these numbers do not work. You click on desired key but nothing is printed. This means that the numeric keypad is turned off. To turn it on, just press the button once. Num lock.
The most important part of the keyboard is the keys used to type text. They are located in the center.

As a rule, each button has two letters - one foreign, the other Russian. To print a letter on the desired language, make sure it is selected correctly (at the bottom of the computer screen).
You can also change the language in a different way - press two buttons at once: Shift and Alt or Shift and Ctrl
Win. The key that opens the Start button. Most often, it is not signed, but is simply drawn on it Windows icon... Located between the Ctrl and Alt buttons.
Fn. This key is on the laptop - on conventional keyboards it is usually not there. It is designed to work with special functions- increase / decrease brightness, volume and others.
To enable them, you need to press the Fn key and, while holding it, press the button with the desired function. These buttons are usually found at the top - on F1-F10.
Let's say I need to increase the brightness of my laptop screen. To do this, I am looking for a button on the keyboard with a corresponding picture. For me, for example, this is F6 - the sun is drawn on it. So I hold down the Fn key and then press F6. The screen gets slightly lighter. To further increase the brightness, I press F6 again together with Fn.
How to type a capital (capital) letter
To print one capital letter (capital), you need to hold down the Shift key and press the desired letter with it.

How to print period and comma
If the Russian alphabet is installed, then in order to print point, you need to press the last key in the lower letter row (on the right). It's in front of the Shift button.
To print a comma, press the same button while holding Shift.

When the English alphabet is selected, to print a point, you need to press the key that is in front of the Russian point. It usually has the letter "U" written on it. And the comma in the English alphabet is located where the Russian letter "B" (before the English dot).
Text decoration buttons
Tab - Creates indentation at the beginning of a sentence. In other words, you can use it to make a paragraph (red line).
To do this, click the mouse at the beginning of the text and press the Tab key once. If the red line is configured correctly, the text will shift slightly to the right.
Used to print large letters. Located under the Tab key.
Press Caps lock once and release it. Try typing a word. All letters will be printed in large. To cancel this function, press once again on Caps key Lock and release it. The letters will be printed small as before.
(space) - makes spaces between words. The longest button on the keyboard is below the letter keys.

According to the design rules, there should be only one space between words (not three or even two). Aligning or displacing text using this key is not correct. Also, a space is placed only after the punctuation mark - there should not be a gap before the mark (with the exception of a dash).
Delete button. It erases the letters that are printed in front of the blinking stick (cursor). Located on the right side, immediately after the numbers / signs. Often there is no inscription on it at all, but just an arrow pointing to the left.

Also the Backspace button is used to move the text up.
Enter - intended to move to the next line.

Thanks to her, you can omit the text below. Enter is located under the delete text button.
Additional keys
These are keys such as Insert, Home, Page Up and Page Down, arrow buttons and others. They are located between the letter and numeric keypad... Used to work with text without using a mouse.

The arrows can be used to move the blinking cursor (blinking stick) over the text.
Delete is used to delete. However, unlike the Backspace key, it deletes letters not before, but after the blinking cursor.
Home moves the blinking cursor to the beginning of the line and the End button to the end.
Page Up moves the flashing cursor to the top of the page and Page Down (Pg Dn) to the bottom of the page.
The Insert button is needed in order to print text over the existing one. If you click on it, new text will be printed, erasing the old one. To undo this, you need to press the Insert key again.
Key Scroll Lock almost always completely useless - it just doesn't work. And in theory, it should serve to scroll the text up and down - just like the wheel on a computer mouse does.
Pause / Break almost never works either. In general, it is designed to suspend an active computer process.
All of these buttons are optional and are rarely or never used by people.
But the button can be quite useful.
She "photographs" the screen. Then this snapshot can be inserted into Word program or Paint. In computer parlance, such a photograph of a screen is called a screenshot.
Keyboard buttons to remember
 - if you press this button and, without releasing it, on any key with a letter, the letter will be printed in capital. In the same way, you can print a symbol instead of a digit: No.! () *? "+ Etc.
- after pressing this button once, all letters will be printed in large. You do not need to hold it for this. To return to the small print, press the Caps Lock again.
- indents (red line).
![]() Is a space. With this button you can make the distance between words.
Is a space. With this button you can make the distance between words.
 - lowers one line below. To do this, put a blinking stick (blinking cursor) at the beginning of the part of the text that you want to move down, and press the Enter button.
 - deletes the character in front of the blinking cursor. Simply put, it erases the text. Also, this button raises the text one line higher. To do this, put a blinking stick (blinking cursor) at the beginning of the part of the text that you want to move up, and press Backspace.
All other keys on the keyboard, except for letters, numbers and signs, are used very rarely or not at all.
A keyboard is a device for entering information into a computer. With its help, you can quickly type text, manage programs, play games. Newbies are often intimidated a large number of buttons with unknown functions. But do not be afraid, in this article we will take a closer look at the keyboard structure and the purpose of the buttons.
Keyboard selection
By the type of connection to a computer, keyboards are wired and wireless.
Wireless keyboard with USB adapter
By design, keyboards are divided into membrane, scissor, mechanical, semi-mechanical.
- Membrane - the most common and cheapest. There is a silicone backing under the button. When pressed, it is pressed through and closes the contact. Some models are water resistant. Withstand up to 5 million clicks.
- Scissors - found on all laptops. More expensive, smoother and more precise small stroke, quiet. Withstand up to 10 million clicks.
- Mechanical - there is a metal spring and a contact under the key, because of this, the keyboard is heavy and high price... The buttons work even before they are fully pressed. Loud, but the typing feel is very different. Withstand up to 50 million clicks.
- Semi-mechanical - a hybrid of membrane and mechanical keyboards... Instead of springs, elastic silicone elements are used.


On sale you can find exotic options: rubber, wood, glass, laser keyboards... But they are not popular because they are not very practical.

There are also two comfortable types of keyboards: ergonomic and gaming.
Ergonomic keyboards have a non-standard shape, the keys are not arranged in straight rows, but repeat the position of the hands. Convenient for quick print blind, but you need to get used to.

Gaming keyboards stand out for their striking design, convenient key layout for gaming, and additional keys and functions. For example, on some keyboards, you can write macros to automate some actions. Often gaming keyboards come with backlit keys, which is convenient for use in the dark.
When choosing a keyboard, pay attention to the type of printing on the buttons. In normal printing, the letters visually appear slightly like stickers. Over time, they will wear off, you will have to change the keyboard or apply stickers. Laser-printed keys last long, but not as bright.
 Laser printing on the keys
  Simple printing
Laptop keyboards are usually more compact, without unnecessary buttons, with a small key travel. Sometimes without the number block on the right.
How to clean
Dust, crumbs, hair gets under the buttons. The keyboard should be cleaned every 1-2 months.
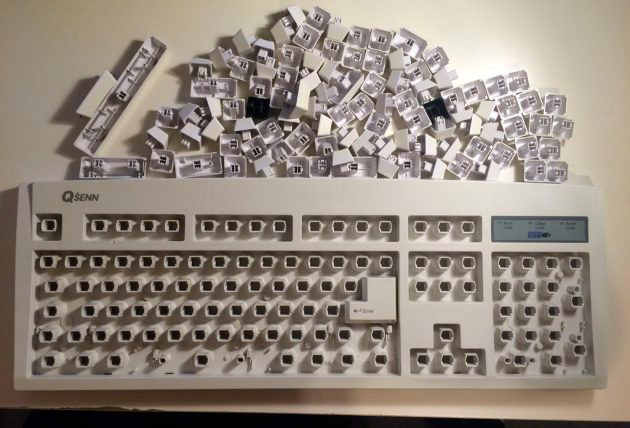
The best way to clean it is to remove each button and wipe it down with an alcohol solution (be careful not to erase the lettering). The buttons on membrane keyboards are easy to pull out; you need to pry them off with a knife or screwdriver. Remove large keys carefully so as not to break the mount.
You can also clean the keyboard without removing the keys using pneumatic cleaning - this is compressed air with a straw for hard-to-reach places, sold in computer stores. You can replace it with a vacuum cleaner in blowing mode.
There are special cleaners similar to slimes - they leak into the cracks between the buttons and dirt sticks to them.
Read more about it in a separate article.
Button assignment
A standard keyboard with a separate numeric keypad has 101 or 102 keys.
 Keypad buttons assignment
 The main part of the keyboard is occupied by the typing keys. The upper row is occupied by numbers from 0 to 9, below there are 3 rows of keys. This keyboard is often called QWERY because of the first row of keys in English layout.
 Keyboard close-up
 Function Keys F1 to F12 perform various auxiliary actions. They differ depending on the programs. Usually, the F1 button calls up the help for the program.
The Esc key always means exiting the program or canceling the action; in games this button is used for the pause menu.
Button Print screen takes a screenshot of the click and places it on the clipboard. Then you can paste it into another program (Edit - Paste). To take off only active window without unnecessary elements, press Print Screen while holding down the Alt button.
The Scroll Lock key is now almost never used, as it is ignored by many modern programs... When you press it, the indicator on the keyboard lights up and the cursor keys control the position of the screen (up, down, left, right). When the button is off, the cursor keys control the position of the cursor.
The Pause Break button is almost never used. Pauses the computer. In modern Windows versions works only while the computer is booting. In some programs and games, it is used to interrupt the current process.
The Tab key (sometimes denoted by two arrows pointing against the wall). Performs a jump function. For example, it can shift text alignment, switch between form fields, switch windows in combination with the Alt button.
Shift key (left and right). Modifier key, used in conjunction with other buttons. When you press Shift together with a letter - will be printed capital letter, together with a digit - the symbol will be printed. It can be used in conjunction with any buttons on the keyboard and mouse to access program functions.
Caps Lock. When you press this button on the keyboard, the indicator lights up and all letters when typing become uppercase, as with holding Shift. Pressing it again turns off the mode.
Backspace. Deletes one character in front of the cursor in text editors... In other programs, it often performs the function of going back (to the previous page, to the previous folder).
Del (Delete). Deletes one character after the cursor in text editors. In other programs, deletes something (selected file, object). In combination with Shift, it permanently deletes the object (bypassing the trash can). Combined with Ctrl + Alt, launches the task manager or reboots the computer. Some laptops do not have this button; its function is performed by the Fn + Backspace key combination.
Ctrl (left and right). Usually used in conjunction with other buttons, as a modifier key. For example Ctrl + C copies the selected object or text, Ctrl + V pastes. On laptops with macOS Ctrl key differs in function from Windows. There it is replaced by the Cmd button. On the Internet, you can also find a mention of the Strg key. This Ctrl button on a German keyboard.
Alt (left and right). Like Ctrl, it is a modifier key. Used in conjunction with other buttons to perform some action. For example Alt + F4 closes the program. Sometimes the right button is referred to as AltGr.
The Menu key on a keyboard is usually represented by a list icon and an arrow. She is between the right with the Win button and Ctrl. Opens when clicked context menu... Analog of pressing right button mouse (RMB).
Enter The largest key on the keyboard. There is also a second Enter button on the number pad on the right. V text programs moves the cursor to new line... In other programs, it serves to confirm an action. Analogue of clicking with the left mouse button.
Win (left and right). Windows key between Ctrl and Alt and between AltGr and Menu. Opens the Start menu. Performs various Windows functions in combination with other buttons.
Space The longest button on the keyboard is below the letters. Used to separate words with a space.
Insert - defines the input mode. Toggles the mode of inserting new or replacing existing text, to transfer the status of an object from passive to active.
Page Up - scroll up the page.
Page Down - scroll down the page.
Home - move the cursor to the beginning.
End - move the cursor to the end.
Arrows ← ↓ → move the cursor position.
In the digital block, the numbers from 0 to 9 are duplicated in the usual position for dialing, like on a calculator. There is a period, an additional Enter, separate buttons for basic arithmetic operations: plus, minus, divide, multiply. Some keyboards instead of the second Enter on the number pad have Return button... Often it duplicates the functionality of Enter, but in some programs it has a line break function without confirming the action.
The digital block works when active mode Num Lock. Without it, the keys will perform different functions. For example, numbers 2, 4, 6, 8 play the role of arrows, 0 plays the role of Insert button, point - Delete.
Which button should be pressed to ...
You can change the layout from English to Russian (or vice versa) with the keyboard shortcut:
Alt + Shift (default), Win + Space, Alt + Shift.
The comma above (apostrophe) is placed using the E key. It must be pressed together with Shift on the English keyboard layout.
The period on the keyboard is set using the / and? (next to the letter U) in the Russian layout. On the English keyboard layout, the period is put by the button with the> and symbol. (letter Y).
The comma on the keyboard is entered using the button with the / and? (next to the letter Y). It must be pressed together with Shift. In the English layout, the comma is placed using the signed key< и, (буква Б).
The letter ё is in the left upper corner keyboard. On some keyboards it has been moved to Enter or Left Shift.
The colon is inserted by the Shift + 6 key combination in the Russian layout. In the English layout, the colon is entered with the combination Shift + Ж.
You can cut, copy and paste an object using the hot keys Ctrl + X (cut), Ctrl + C (copy), Ctrl + V (paste).
The lattice is inserted in the English layout with the Shift + 3 keys.
The root sign √ cannot be typed on standard layout keyboard. You can do this by holding the Alt key and typing 251 on the numeric keypad.
The vertical stick mark is placed on the English layout with a clamped Shift key with a \ (next to Enter). Some keyboards have a dedicated key under the Backspace or next to the Right Shift.
A question mark is inserted by the key combination Shift + 7 on the English layout or on the Russian layout with the button with a slash / (between the right Shift and Y) together with the pressed Shift.
The division and multiplication signs are located on the numeric keypad at the top. Also, the division sign (forward slash) is next to the right Shift, and the multiplication sign is at the number 8 (press together with Shift). In the text, the division sign can be replaced with a colon, and the multiplication sign with a cross (letter x).
If digital block(right) on the keyboard does not work, check if the Num Lock indicator on the keyboard is on. If not, turn it on with the Num Lock button.
If only big letters, disable Caps Lock with this button.
The Fn key is only found on laptops. This is an optional modifier key. Usually used in conjunction with the F1-F12 keys to control screen brightness, volume, touchpad.
Video about popular keyboard shortcuts in Windows:
If the keyboard is missing a button, or it does not work, use virtual keyboard... It can be found through the search in Start or Control Panel - Special abilities... Also, many text programs have the ability to insert additional characters. For example, in the Word on the "Insert" tab there is a button " Additional symbols". If you often need to enter non-standard characters, I recommend installing on your computer typographic layout Birman.
Option 1.
after the work done, we see that the screen in the upper part began to show the distance that the car will travel on the remaining fuel until the next refueling. At this stage, this is all that the screen of our open bookmaker can show us. But maybe he's more, let's go further!
In a semi-disassembled state, I drove to the workshop, removed the tidy and gave it to a man to solder wires for additional button management of BC. As it turned out, in order to bring out the positive wire to control the new button, it is enough to solder just one wire without any resistors (in the case of a resistor and closing the switching modes to one standard button, it is necessary to solder the resistor to two contacts on the board), and the negative wire the wire to the vehicle weight. In my case, the master found a "minus" on the board itself and soldered the second wire there. Here's what happened:
Places for soldering wires for additional. buttons
A thin wire is a "plus" of our add. buttons, the one that is thicker is a "minus" (Again, thanks to smarTxdxT for showing where to solder the positive wire on the board). Next, we bring these wires out through the protective casing, which we snapped off at the very beginning:
 Wire outlet and fixing with electrical tape
There is nothing complicated here, there are a lot of holes through which you can bring the wires out. Again, if the negative wire from the button is thrown to the ground of the car, then only one positive wire will go from the board.
Place for add. buttons have been selected on the cladding dashboard... Everything is simple here, I drilled a hole of the required diameter and inserted 2 contact button... It turned out like this:
Save to Album
 Add. BC control button
 Another view
The button itself was purchased from the guys involved in installing additional. equipment and alarms for 100 rubles.
Final stage... I took everything to the machine, connected the wires to the button and put everything together in the reverse order.
 Assembled
Add. the button looks neat in my opinion, it does not strike the eye. What have we got? The standard button, as before, switches modes at the bottom of the screen: "odometer", "Mileage A", "Mileage B". And here is the new add. the button now allows you to control top screen: "Distance to refueling on remaining fuel", "Average speed", "Travel time", "Air temperature overboard" (if there is a wiring and the sensor itself). Of course, I didn't have a sensor, but the wiring with a connector for it was brought out to the standard place of attachment of the sensor itself to the body. This place is located, when viewed from the street, behind the radiator grill. To clarify, we look at the radiator grill from the street, just above and to the right of our Chevrolet badge there are open cells for air intake, shining a flashlight through them, we will see a square hole in the car body. The sensor itself is squeezed into this hole. I inserted it from the other side, opening the hood and sticking my hand between the top edge of the radiator and the body of the car. It turned out that the sensor body "looks" into the salon. Sensor number, original:
Catalog number  temperature sensor environment
There is one moment, some write: "I bought a sensor, and when I began to install it, I saw that the holes on the connector are round and the pins on the sensor are flat. What should I do? The sensor does not fit."
Yes, indeed, there are these round holes on the connector under the hood, and flat terminals on the sensor. But in fact, everything is in order, since the connectors we need are located above these very round holes and they are just the same flat (at first I was confused, since the round holes immediately caught my eye).
I don’t know about the others, but I had one such flat entrance was clogged with green plastic, apparently so that moisture would not come to the + contact and it would not oxidize. I plucked out this "plug" with a needle and inserted the sensor, everything is clear! Then I attached the sensor to the body as described above.
Option 2.
As in the first variant, we solder only "plus" on the board.
The toggle button was made here:

For this:
1. It is difficult to disassemble the BUZ, but it is possible, for this I used single "folders" from the connectors, the most difficult thing for me was to disconnect the two side latches: 
2. Carefully remove the plates from the mirror switch, CAREFULLY - there are small springs under the brackets, they must not be lost !!! Next, we remove the contact group of the mirror regulator and remember the location of this group and the bar under it.
Next, we will slightly improve the guide of the wells where the plug sits so that the plug does not snap into place. 
3. When the BUZ is disassembled, push the plug from the inside. We see the hooks on which the plug is located.

4. Cut them off.

5. Cut out a plastic square 7 * 7 mm from a floppy disk.


6. Insert the button to the end, gently spread it with superglue butt buttons and glue the previously cut out square from the floppy disk to it. The second photo shows how it should turn out.
Attention 1 !!! The button must not stick to its seat!
Attention 2 !!! It is necessary to glue when the button is pushed in! The photo shows how it should turn out. Unfortunately, the photo of the square inside the BUZ has not survived ...

7. Take the usual square button (available in any electronics store). Preferably 11 mm in
height (from the board to the top of the head). We cut it down a little, as a result, you should get a button with a height of 10.5 mm. We cut off the leads diagonally, but not flush, but so that 1 mm remains. The remaining two are slightly folded. It should look something like this.


