When fully installing the Windows 7 operating system, it is recommended to format the hard drive first. Unlike regular deletion, formatting completely deletes all files from the disk, their paths and completely clears the headers. In addition, during the formatting process, you can select the type of file system, which will significantly affect the operation of the computer. During the installation of Windows 7, before how to format, you need to get a little familiar with the basic concepts: file system, volume label, formatting method and partition types.
Filesystem types
The file system in an OS of the Windows family can be of several types FAT16, FAT 32 and NTFS.
FAT 16 is one of the simplest and oldest systems, which is now practically not used due to the very small maximum file size by modern standards - 2 gigabytes.
FAT 32 - Maximum file size - 4 gigabytes, currently used on flash drives
NTFS is a type of file system that is used as a standard in operating systems of the Windows family, with a maximum file size for writing - 16 terabytes.
A volume label is a kind of name that can be given to a hard drive or partition when formatting. This parameter is optional, but it greatly simplifies working with hard drives that have more than 2 partitions;
Formatting methods
When installing Windows 7, it is desirable to format the disk, but it is divided into 2 types:
- fast - clears only the paths to the files, after which the computer does not see them, and all new data is written over the old ones;
- full - the hard disk or its partition is completely cleared, all new data is written to new cells. (it is recommended to use this type).
Partition types for Windows 7 also come in two main types: basic and logical. One hard drive can have only one main and several logical ones, as well as a hidden partition of about 100 megabytes for Windows 7 system files.
How can I format a hard drive when installing the Windows 7 operating system?
There are many formatting methods, which can be conditionally divided into two types: formatting during the installation process and using third-party programs.
Formatting during installation
The installation program at a certain step prompts you to select the partition where the operating system will be installed. At the same step, you can perform a number of the most basic work with the hard drive: create and delete partitions, as well as resize them.
Step-by-step instruction
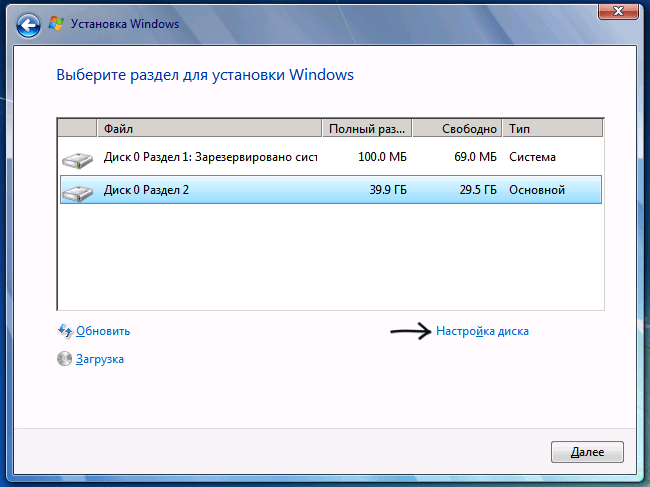
1. After selecting the type of installation, a window appears prompting you to select a disk for installing Windows 7: 
2. Here you need to select the required disk and click the link "disk settings" and an additional set of functions will appear, where you need to select the "format" item: 
3. In the pop-up warning window, you need to confirm the action: 4. We are waiting for the process to complete and proceed to install Windows 7: 
The disk management program when installing Windows 7 uses a quick format method and does not have additional functionality, so you can use additional disk utilities that can work even without an operating system on your PC.
The easiest to learn and easy-to-use program is Suite (the program is paid, but you can find pirated versions on the Internet or use a demo version of a licensed program).
How to format a hard drive using Acronis Disk Director Suite?
Consider the method in which the Live CD with the program will be used.
1. Insert the disk into the drive and make sure that the main boot device in the BIOS is the CD / DVD drive.
2. Select the item "Acronis Disk Director (full version): 
3. A pop-up window will prompt you to select a mode, select the "manual" mode: 
4. In the next step, select the section with which we will work with the mouse and select the "Format" item in the menu on the left:
5. In the next window, you will need to select the type of file system, cluster size and create a volume label. We set everything except the label according to the picture and press the “OK” button:
6. After clicking “OK”, we again enter the disk selection window, this is done in order to make a number of changes to the current or other partitions, but since we only need to format the disk on which Windows 7 will be installed, click on the checkered checkbox:
Formatting a hard drive is an important step in the Windows 7 installation process. If you don’t do it and install a new OS on top of the old one, it is possible that the latest version of the operating system will not work for long and will cause a number of problems during operation. The computer will get confused in the remnants of files, trying to associate them with freshly recorded ones. And every time you spend a certain amount of time to reinstall all the software and drivers in the system, it simply may not be.
As various statistics show, not all users know how to perform the specified action. The biggest problems arise if you need to format the C drive in Windows 7, 8 or Windows 10, i.e. system hard drive.
Formatting a non-system hard drive or partition in Windows
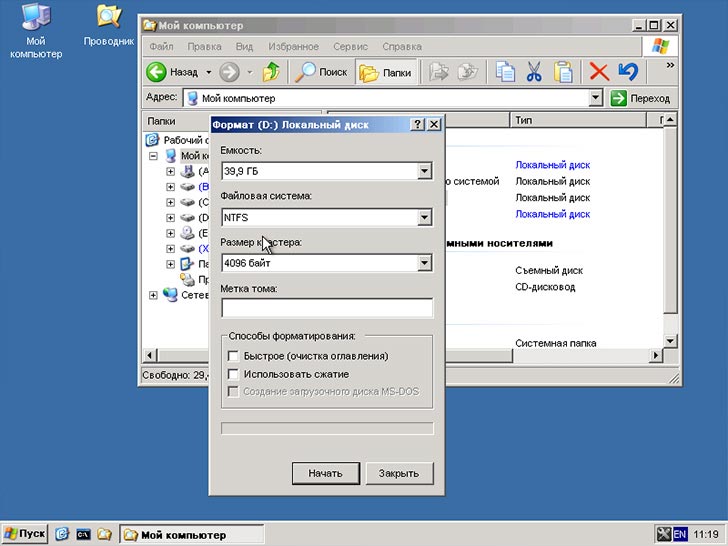
In order to format a disk or its logical partition in Windows 7, 8 or Windows 10 (relatively speaking, drive D), just open Explorer (or "My Computer"), right-click on the disk and select "Format".
After that, simply specify, if desired, the volume label, the file system (although it is better to leave NTFS here) and the formatting method (it makes sense to leave "Quick Format"). Click "Start" and wait until the drive is completely formatted. Sometimes, if the hard drive is large enough, this can take a long time and you may even think that the computer is frozen. With a 95% chance it's not, just wait.

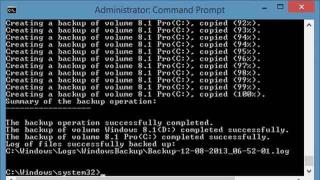
Another way to format a non-system hard drive is to do so using the format command on a command prompt run as administrator. In general terms, a command that performs a quick format of a disk in NTFS will look like this:
Format /FS:NTFS D: /q
Where D: is the letter of the drive being formatted.

How to Format C Drive in Windows 7, 8 and Windows 10

In general, this guide will work for previous versions of Windows. So, if you try to format the system hard drive in Windows 7 or 8, you will see a message that:
- You cannot format this volume. It contains the version of the Windows operating system currently in use. Formatting this volume may cause your computer to stop working. (Windows 8 and 8.1)
- This disk is in use. The disk is being used by another program or process. Format it? And after clicking "Yes" - the message "Windows cannot format this disk. Quit all other programs using the drive, make sure no windows are displaying its contents, and then try again.
What is happening is easily explained - Windows cannot format the drive on which it is located. Moreover, even if the operating system is installed on disk D or any other, the first partition (i.e., disk C) will still contain the files necessary to boot the operating system, since when you turn on the computer, the BIOS will first start loading from there.
Some notes
Thus, when formatting the C drive, you should remember that this action implies the subsequent installation of Windows (or another OS) or, if Windows is installed on a different partition, the boot configuration of the OS after formatting, which is not the most trivial task and, if you are not too an experienced user (and apparently it is, since you are here), I would not recommend taking it.
Formatting
If you are confident in what you are doing, then continue. In order to format the C drive or the Windows system partition, you will need to boot from some other media:
- , boot disk.
- Any other bootable media - LiveCD, Hiren's Boot CD, Bart PE and others.
There are also special solutions such as Acronis Disk Director, Paragon Partition Magic or Manager and others. But we will not consider them: firstly, these products are paid, and secondly, for the purposes of simple formatting, they are redundant.
Formatting using a bootable USB flash drive or disk Windows 7 and 8
In order to format the system disk in this way, boot from the appropriate installation media and select "Full installation" at the stage of choosing the type of installation. The next thing you will see will be the selection of the partition to install.
Another way is to press Shift + F10 at any time during the installation, a command prompt will open. From which you can also format (how to do this, it was written above). Here you need to take into account that in the installer the drive letter C may be different, in order to find it out, first use the command:
Wmic logicaldisk get deviceid, volumename, description
And, to clarify whether something was mixed up - the DIR D: command, where D: is the drive letter. (With this command, you will see the contents of the folders on the disk).
After that, you can already apply format to the desired section.
How to Format a Drive with LiveCD
Formatting a hard drive using various kinds of LiveCD is not much different from formatting just in Windows. Since when booting from a LiveCD, all the really necessary data is located in the computer's RAM, you can use various BartPE options to format the system hard drive simply through Explorer. And, just like in the options already described, use the format command on the command line.
There are other formatting nuances, but I will describe them in one of the following articles. And in order for a novice user to know how to format drive C, this article, I think, will be enough. If so, ask questions in the comments.
Often, before installing the operating system, users are wondering how to format a hard drive through BIOS. You have to resort to such a procedure to clear partitions that are inaccessible after Windows starts. However, it is worth remembering that it will not work to completely delete information from the hard drive itself in this way.
Description of the procedure
To execute it, you will need a boot device with a recorded OS (it is desirable to create it in advance). The sequence of steps to format a disk through the BIOS is as follows:
- Reboot the computer with the media connected and, immediately after the start, enter the I / O system using the appropriate key. This is usually F12, F8, or Escape, but if the version is very outdated, other combinations may apply.
- In the window that appears, open the Boot tab, then Boot Option Priorities. This section allows you to choose where the OS will be loaded from (from a USB flash drive or other device), which is what you want to do. Depending on the removable media, mark the USB port or CD-ROM.
- Exit, saving the changes, after which the computer will restart. Before you start formatting the disk, you will need to launch the OS from the selected device by pressing any key on the laptop.
- Call command line. If the procedure is carried out using media with Windows 7, you should press the combination Shift + F10. For version 8, this method does not work, it is replaced by the user interface.
- Make sure the drive letter is correct before formatting the drive. After starting from the boot device, it may change, so in order not to delete important files, you need to enter "wmic logicaldisk get deviceid, volumename, size, description".
- Go directly to the cleaning procedure. To do this, you need to drive in the “format / FS: NTFS X: / q” window, instead of X, enter the desired designation, for example, C (the drive that most often needs to delete data from the system partition).
Then it remains only to wait for the end of the process, confirming the command by pressing Enter.
Other Methods
The Windows installer allows you to do without CMD, which some people are afraid to use for some reason. Only the familiar interface will be involved here, however, before proceeding with formatting the hard drive through the BIOS, you will have to complete the first 3 points of the previous section.
After the language selection stage, you should click on "Full installation", call up a list of available disks and configure the installation. In the parameters that open, you need to mark the “Formatting” item with the cursor and follow the further instructions. However, this method will not work if the installation of the Windows operating system is not required.
In addition, you can use the ERD Commander program by creating a bootable CD based on it. In BIOS, you will also need to select a priority device to start (in this case, a drive). When the program opens, enter the MicroSoft Diagnostic and Recovery Toolset section and click "Next" until the working window opens. In it, you need to click on the “Cleanup” item, after which the formatting of the hard disk will begin (this is impossible through BIOS without third-party tools).
There is another program that allows you to do the same and burn an emergency flash drive - AOMEI Partition Assistant Standard Edition. It is a free analogue of utilities for working with various drives and has a friendly interface, so the user will be able to understand how to format a hard drive without third-party prompts.
In general, the algorithm of actions is almost the same for most operating systems, but the names of the items can differ significantly from each other. The same applies to the I/O system: the names of the sections may not match those given above due to the difference in versions. However, although it is easier to clean a Windows hard drive, it is important to remember that the use of third-party tools is mandatory. Formatting via BIOS is not possible due to the lack of proper functionality, so you will have to stock up on a boot device.
There are 2 types of Windows 7 installation, after which the operating system works correctly:
- Direct update through a previously installed system, such as Vista.
- Clean installation with removal of the old OS, performed by formatting.
Advice! For a clean installation, you will need a disk or USB flash drive with the installation files for the new OS.
Why is formatting necessary?
In order for the new system to work without bugs and crashes, it is necessary to prepare a flat platform for it by deleting old files. Manual deletion is not effective, so it is better to format disks after copying the necessary information from them.

Deep formatting solves the following tasks:
- Resetting all data and preparing the disk for a new OS. Formatting removes "dead" files that no longer carry a functional load. Prevents the system from stalling after installation by cleaning the remnants of old games and programs, invisible Internet files and much more.
- Removes viruses and malicious files.
- Produces markup and systematization.
Important! If you unknowingly formatted a disk with the necessary information, then Active Partition Recovery will help to restore it partially or completely. Advanced EFS Data Recovery recovers and decrypts NTFS partitions.
Clean installation from a flash drive or disk formatted via BIOS (BIOS)
Before formatting, you need to close all windows, and then reboot the system. After starting, enter the BIOS, usually the Del, F12, F8 key is used for this command. After entering, select the Boot-Device Priority tab in BIOS, and select a disk or USB flash drive as a boot device. Next, the priority of the device from which the boot will be performed is saved and the F10 button is pressed to exit the BIOS.
When restarting the PC, the disc names are different from what you are used to. Therefore, for a formatted disk, enter on the command line: for NTFS systems format / FS: NTFS X: / q, and for FAT32 format / FS: FAT32 X: / q. After that, Enter is pressed and the end of the process is expected.
Cleaning through BIOS using the OS installer
On Windows 7 and older versions of the OS, it is made directly during installation. At the stage of selecting the system disk on which the installation will be performed, you need to go to the Settings section, select formatting and confirm it. After completion, the installation process of the new operating system will continue automatically. All actions are performed in this order:
- Insert the media with the boot file of the new OS into the device, select the desired installation language.
- After determining the language, select Full installation.
- Now select the disk that needs to be formatted and go to the Disk Settings section.
- That's it, click the "Format" button, wait for the process to complete and continue installing the fresh OS.
Important! Formatting permanently erases the data that is on the hard drive. Therefore, first copy the necessary files to any medium.
Formatting via cmd (command line)
Full cleaning through the command line is performed in this order:
- Bring up the command prompt by pressing the Win-R keys.
- In the window that appears, type CMD, press Enter.
- Directly on the command line, enter "format *:", where * is the name of the desired drive (C or D). Press Enter again.
- After clicking, a dialog box will appear asking you if you agree that all data from the selected drive will be deleted. Confirm and wait for formatting to finish.

Follow the algorithm of actions, and formatting will not cause difficulties
Formatting with Acronis Disk Director
To format a hard drive, it is most convenient to use Acronis Disk Director, although there are many others.
Advice! To download the program, enter the query "Acronis Disk Director Boot ISO" into the search engine. Once downloaded, mount the image or burn the program to a CD/DVD.
Set the BIOS boot priority from disk, wait for the program menu to appear on your monitor:
- In the window that appears, select the "Formatting" section, left-click on the desired drive and select "Format" again.
- In the new pop-up window, you can not change anything except for the file system: it should appear as NTFS.
- Confirm the action in the window with the "Apply Pending Operations" checkbox.
- In the window that appears, click "Confirm".
If you format the disk where the OP was stored, then the computer will not boot after formatting. Further installation of the operating system is carried out from a USB flash drive or disk via BIOS.
Acronis Disk Director will come in handy for you in the future, it has a number of useful features:
- restores damaged or deleted disk partitions;
- has support for mirrored volumes;
- spans volumes to different disks;
- converts ordinary discs to dynamic ones and vice versa;
- optimizes the structure and free space on the hard disk.
Updated versions of the program are indispensable assistants in working with system disks.

What other programs can be used?
To format a new operating system, the following software is most often used:
- Convenient free program HDD Low Level Format Tool. Be careful, the developer promises that files cannot be recovered after cleaning.
- English-language program Paragon Hard Disk Manager, with the principle of operation as in Acronis Disk Director. Formatting is done through the Format Partition section.
- Another program of this type is Partition Magic, which received excellent reviews.
Formatting before installing a new operating system greatly improves the quality and life of the operating system. Formatting in one fell swoop gets rid of the old OS and all the garbage, along with viruses that have accumulated on the disk over the years.
Pay close attention to the entire process, especially choosing the right disk. Some information after formatting cannot be restored, and in the service center such a service costs more than 4 thousand rubles.
How to format a hard drive: video
Formatting a disk with Windows 7 may be necessary in rare cases: for example, if a computer has got a virus that is difficult to remove; an operating system that has accumulated a lot of errors; a virus that extorts money from the user and the like. How to format Windows 7 in this case - read this article.
Ways to format hard disk drives
There are several ways to format a drive in the Windows operating system. Choose your option by studying each of them a little. Some of the most convenient ways:
- Through the built-in menu.
- With the help of third party programs.
- When installing the OS.
Each of them is suitable for a different situation, so before you use, study everything. Because you can format a hard drive with Windows through the built-in menu using "quick format", which does not delete data, and this can lead to an unplanned result.
When installing Windows
If you have ever installed Windows, you know that during installation you can select the item: "Formatting". This is done through the BIOS.
To open this menu, you need:
- Connect the installation disk or flash drive to your computer.
- After that, go into the BIOS and assign this device as a startup device.
- When restarting the computer at a certain moment, press the desired key on the keyboard. It will be marked on the screen.
 The installation window will open OS. It will show the drives installed on the computer. After any of them is selected, the button will be highlighted below: "Disk Settings". It is there that you can clean the drive from all data.
It will be possible to completely clean the disk with the installed operating system only during installation. This is done so that a user who does not have an installation disk does not remove the OS and lose access to the computer.
This is the only way to clean the hard drive that contains the Windows operating system. The rest of the methods presented in this article are able to format a hard drive that does not have Windows. With their help, you can format the drive with the former Windows if you start with a new one.
Built-in menu
The hard drive is divided into partitions that have names. They can be found in the My Computer folder. Sometimes there is only one partition on a disk. Using this method, you can only format a volume without an operating system. Where it is installed is the Windows icon.
You can format a partition by right-clicking on it and clicking on the "Format..." button. In the window that appears, select the type of file systems, which will have a formatted partition, format mode, or restore the default settings.
There are two formatting modes: quick and normal. With a normal one, files cannot be restored, and with a fast one, it will be possible with the help of special programs. When you try to format a partition with Windows, an error will pop up. This is done so that an unknowing user does not delete important data, without which the computer will not work.
Third Party Programs
 The essence of such programs in the presence of a convenient menu and additional functions. A very interesting option is Acronis Disk Director. In addition to the formatting functions, it allows you to split the drive into volumes, change their size, and the like. You can download the program on the Internet, the main thing is to use trusted sources.
After starting, the program will open a window in which the disks connected to the motherboard will be displayed. By clicking the right mouse button, you can open a window with functions, among which there is "Format". After pressing this key, a window will open where you can select the basic formatting settings, for example, the file system or formatting type.
It is recommended to use the default file system. Between quick and regular formatting, you need to choose the one that suits your purpose. Quick formatting will only remove the table of contents. The computer will show that the drive is empty, but there will be data on it and it can be restored.
If you use full formatting, the data will be permanently deleted. You can also try to restore them using special software, but the chance that the actions will lead to the desired result is very small.
There are many answers to the question : "How to format a hard drive in Windows 7?". Any user can use the above methods to delete the local disk of their computer.