Good day, dear readers of my blog. In the previous article, we learned how to make charming. Now let's move on to the second part. We will create a beautiful single picture for the avatar and think about a spectacular transition.

If this is your first time on my blog, then you don't have to start from the first lesson. You can read this publication first and proceed with the design, starting from this step. Now I will tell you how to make a beautiful Vkontakte group, and you can decide whether to use additional features later.
By the end of this article, you will have a spectacular and unified picture.

lazy method
In order not to distract those who already know how to do everything, are in a hurry or simply do not want to bother with important matters, I can offer a video tutorial. He will tell you how to do the same thing that I am going to tell you, only without Photoshop through the service www.vkprofi.ru .
I haven't used it and can't tell if it's paid or not. I would be grateful to those who check this information and leave a comment on this article with an answer to this burning question.
For those who want to learn
If you decide to stay and go the long way, then an exciting job awaits you. It will be very useful if you are just starting your journey in the Internet business.
You will learn a lot of tricks, for which I will give useful recommendations for working with advertising, as well as you will gain useful skills and experience.
You will need…
- Photoshop.
- Base picture.
The photo should be large and of high quality, if you are looking in search engines, then pay attention to desktop wallpapers. If you work for a cool community, especially related to business, then I recommend using the service http://ru.depositphotos.com . There you will find advertising images.

Choosing a picture that will promote a product is not so easy. If it is used for the business community, then it must meet many requirements. Not everyone understands this. If you are promoting a hotel, inn, bar or club, then it is not recommended to take pictures of empty premises.
First of all, we should not sell a place where a person can swell, but show the emotions that he will receive from visiting an institution. The beauty of the interiors now does not surprise anyone. It is necessary to create a unique atmosphere in which the buyer wants to plunge.
Nobody likes shabby photos. If they are used all the time, then the chance to get customers decreases. About quality, well-exposed light, etc. I won't even speak. I hope you understand this. Such options as in the photo below have not been rolled for 5 years.

From personal experience… on one of the projects I worked with a very cool advertising manager. We disassembled each picture piece by piece. The object must be at a certain distance from the center, at a specific angle, preferably in the correct optimistic range.
We had to change the color of the frame in which the picture hung in the farthest corner! At first, I thought that all these were unnecessary troubles, and then they showed me the conversion after working with such trifles for comparison.
We make a template for a future beautiful group
So, when everything is ready, you need to decide on the dimensions and prepare a template for the future image. By the way, if you learn how to do this, then you can then use this technique for many other tasks and create incredible pictures on Vkontakte. You will soon understand what I am talking about.
So, let's open a contact. If you look for the standard sizes of Vkontakte posts, you will see 200x500 and 700x500. However, if you use the ruler, you can make sure that the thumbnails do not correspond to these indicators. The service compresses them when downloading.

Everything is so with the picture on the ava, it is really 200x500.
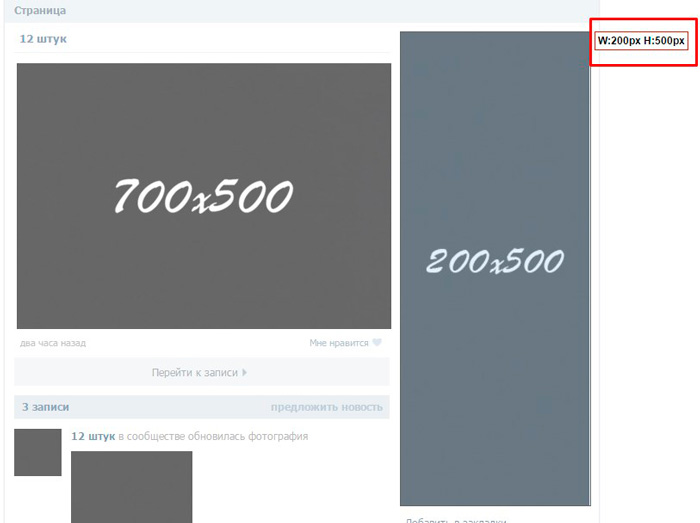
Posting is different.

In any case, you need or download my template, or take your own screenshot. I advise you to choose the second option. Why? So you can make templates for different tasks yourself. For example, if you have a product gallery or "Latest News" displayed on your main page.
My version is only suitable for pinned posts. The simplest and most popular design method.
Open your or any other group where a post with a photo is pinned on top. As in my drawing. You can also take this photo by clicking on it with the right mouse button and "Save as ...". However, I'm not sure that you will get everything right as a result. Got time to experiment? Share your results in the comments.

For others, the step-by-step instructions will be different. First of all, enlarge the image in the browser to 100% (press the Ctrl button and move the mouse wheel). Frankly, I don’t really understand why this was done, but on my first attempt, just because of the scale, I didn’t succeed.
Now press the PrtSc button. It is in the top row on the keyboard, after the countless F's. After you click on it, nothing will happen. Everything is fine, you don’t need to click 100 times, open Photoshop.
Press Ctrl + V, thereby you will insert your screen into the working field of the program. Now take the Rectangular Selection Tool and work on the left block.

Drive straight along the edge of the image. You should not succeed in the picture below. It is not right.

Move strictly along the edge.

Grab the cursor at the upper left corner of the rectangle and move to the lower right. In order not to fool your head with a magnifying glass, use the magnification with the Alt button and the mouse wheel.

Now press Ctrl+J. Thus, you will transfer the selected fragment to a new layer, it will appear above the background.

The same must be done with the avatar. Select and move to a new layer (Ctrl + J)

When you transfer to a new layer, the background should be active, not the one you just created. Make sure it lights up.
Then you can get rid of the background. Click on the lock next to this layer, this will allow you to manipulate it.

Drag the layer to the trash like a normal file from the desktop.

Finished with this. The template has been created.
Unique image for the group
I recently wrote an article about . Incorrect opening and further work with the size can significantly degrade the quality of the coolest picture, if you are interested, you can read an article about this on my blog.
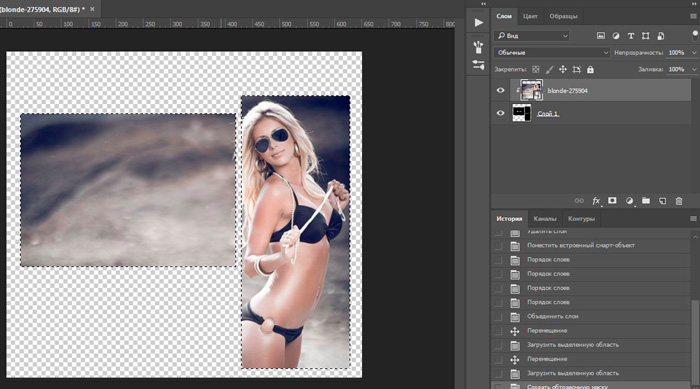
Drag the photo that we will use as the main one.

It reflects incorrectly.

If you have the same nonsense, just make it the top one. Then Alt-click on Layer 1 and Layer 2 so that both of them are highlighted.

They need to be combined with the right mouse button and the corresponding option. In this case, it will be more convenient for us to work further. You don’t have to overlay and cut out the photo first for the avatar, and then also for the post.

If you press Ctrl and then click on the thumbnail of the layer you just created. Ants run along the edges of objects from the new layer, which will tell you how to put the bottom picture. You can remove them by pressing Ctrl+D. What is now in the inner part will later be inserted into the VK.

If you start moving the photo, then running ants will “go” with it. I can advise you to set the guides. Don't know how to work with them? Watch this video.
After you set everything as it should, you can proceed to the next step. I will show two options to achieve the same effect. The first one is simple. On the top layer, right-click and select "Create Clipping Mask".

But I love the second one. He's faster. Press Alt and move the cursor between the two layers, it will visually change. Then left click.

The result is this photo.
Each part can be cut using the Crop tool and then saved as a jpeg. The right photo is added as an avatar. The left one you can just add as a regular entry and then pin it.
It's not difficult, but if you have problems, I can recommend you to read the third post in this series, in which I tell you in detail how to make the reader click on your photo and go to the site.

And today, I decided to continue this topic and talk about how to create VKontakte graphic menu. After all, not every webmaster who wants to beautifully design his group will be satisfied with the text menu. Now, perhaps, a graphical menu is more relevant, since various images are perceived much better by visitors than text links. Yes, and with the help of graphics, you can really mold something beautiful and colorful.
Where to begin?
Well, of course, it’s worth starting with the selection of suitable graphics or drawing a menu from scratch. Of course, not everyone can draw a menu from scratch. But the problem is solvable, because the World Wide Web is full of various graphics, both free and paid, with which you can implement your plan. At this stage, I will not go into details, since it is not difficult to find pictures on the net, and I do not know how to draw. I’ll start right away with the fact that we already have suitable graphics, but what to do next is not clear?
After you have downloaded or drawn the menu, you need to cut it. What is it for? This is necessary to create separate links for a particular image. Since, if our menu is put completely into a group, then more than one link cannot be made, or I don’t know something. In addition, our menu needs to be resized, that is, it is immediately worth considering that the maximum visible width is 388 pixels (one image), and the rest will either be cropped or adjusted to the sizes that you specify when creating the menu in the group, while the image can stretch or shrink, which can ruin the original idea. It is also worth considering that, for example, for a horizontal menu, we will have to focus on a width equal to 370 pixels, otherwise the menu will not line up horizontally.
So, I will show, for example, the most common buttons. I will do all manipulations with graphics using Photoshop, so I recommend that you use it. After we figured out the dimensions, it remains to cut the menu. To do this, you can use the handy tool "cutting".

Just select the necessary areas with these tools, for example:
And save, for web devices.

In the window that appears, we can select the image format, its quality and much more. In this case, I will choose the format: JPEG and the best quality, and leave the rest as it is, and save the VKontakte graphic menu.

Let's go to our group page. And we do some preparatory actions: In the community management, connect the "materials", save. If something is not clear at this stage, then read the article about the VKontakte text menu, everything is detailed there, it is said about it.
After that, we need to upload our pictures that we received when cutting the menu. That is, click "add photos".


After the pictures are loaded, we can start creating the menu. To do this, click on "edit", next to the latest news.

And now, we can add our menu code. In my case, it will look like this:
So, let's take a closer look at what's what here:
photo-48249652_297601976 - the path to our picture. The path is formed as follows: album number_number of the photo itself. How to find out the path to our image? Everything is very simple. We go to the photo album in which our pictures are located and click on the desired image. Then, in the address bar, we will see the full path to our image.

130x46px;nopadding; - image options: 130x46px; - the width and height of our picture (may differ from the size of the picture itself) - it is not necessary to specify for the vertical menu in VKontakte; no padding; — no spaces — when using this option, all spaces (indents) are removed and the images are merged into one.
Here's what I got:

The horizontal menu of VKontakte is done because of the same principle. The only difference is that when writing code, new menu items do not need to be wrapped on a new line. And also, do not forget that with this arrangement of images, we can only use 370 pixels of width. I slightly corrected the code shown above and this is what I got:
[][][]
And this is how it looks:

And I would also like to add: There are situations when we need to insert an image into the menu, but it should not be a link. It should serve as a decoration. To do this, just use the "nolink" option. Here's a good example: The same horizontal menu, only the first button is not an active link, but a simple picture.
[][][]
Well, that's basically all. As you can see, making a graphical VKontakte menu is not difficult, the most important thing is to draw it. And then, using all the knowledge gained in this article, you can make the best menu for your VKontakte group. And I want to note that the horizontal and vertical menus can be combined, thereby achieving absolute uniqueness.
Now any manipulations in Vkontakte groups (menu, navigation, pagination, news, etc.) will be much easier to perform, for this it is enough to study my VideoCourse on the technical secrets of Vkontakte groups. You asked for video lessons, and I recorded a whole video course - take it !!!
Successful experiments!
Hello everyone, dear readers blog site. I continue my topic about - in fact, not everything is as complicated as it seems, and there is nothing special to study here. Your professionalism depends entirely on practice. Well, okay, today we'll talk about the beauty of your groups, the beauty of the menu in your groups, and how to decorate the menu and the groups themselves beautifully with your own hands, i.e. for free!
Speaking of the simplicity of the smm industry - even in there are more branches and tricks that you need to know in theory in order to achieve results. Oh well, I also accept the fact that I'm still perhaps too weak in these areas, although I have clients in both of them.
Well, what Let's go to draw up a menu for VKontakte groups?
How to design a menu in a VKontakte group yourself
Yes, it is on your own, because after reading this article, you will not need the services of freelancers. Although this business is not expensive, for 1500 you can make a menu on workzila (I wrote a detailed experience about working with this exchange).
So here's what we need to design a group in VK:
1. Layout (graphical arrangement of elements) - we must know where everything should be.
2. Basic knowledge of wiki markup. (we will talk about the most standard things a little lower, and for a detailed study - I recommend this group ).
3. Basic Photoshop skills. It will be necessary to cut out pieces of the layout of the desired size.
Where can I get menu layouts?
Layouts for designing the VKontakte menu can be taken in different ways, for example:
1. Freelancing or Workzilla.
2. You can create your own if you have photoshop skills. If not, I recommend Evgeny Popov's courses, here's one of them, just click on Photoshop.
3. You can google and download ready-made ones. Believe me, there are not many of them.
Well, on the other hand ... Why google? Just subscribe to my website updates. And click on the social media buttons below.
I have prepared an archive specially for you, in which more than 100 different design options for decorating VKontakte groups!. When unpacked, the archive takes up about 2.5 gigabytes.
The main conditions are to be a subscriber and go through the social buttons.!
Thank you. Now you can download the archive from this link.
Do not forget to go through the rest of the social buttons.
Sizes of avatars and menus that are useful for designing VK groups
In order to correctly design a group or public, you need to know about the sizes of the pictures that you need to use. Please pay attention to this picture.
As you can see, the avatar group needs a size of 200 wide and 500 pixels high. And for the image of the main menu - 395 pixels wide and 289 pixels high.
Here, in principle, is all that is needed. There are layouts, there is an understanding of dimensions.
The creative part is over - there is little left to do. We begin the technical part of the entire process of creating a menu for groups.
How to arrange a VKontakte group on your own, having layouts on hand
So we have group design layouts. Now you need to cut out the necessary parts.
For the group avatar, of course, nothing is needed. We cut out the desired part from the layout or picture - and inserted it into the group. I think you can already insert yourself? Well, I hope so. If not, write comments, I will add this section to the article.
Now the menu, it needs to be cut. Not the menu itself, of course, but each part for the menu (button) definitely needs to be cut out.
First, a little educational program.
How is the group menu different from the public menu?
They differ in that the group menu is already in fact a set of buttons. But this menu is always hidden! Always! And the public menu is always open and in fact is a fixed post-link leading to a page with sections of the menu itself (buttons).
So, once again: in the group - to see the menu, you need to click on the button "Group Menu", by default this button is called "Latest News".
 And in public (in a group, by the way, you can also) - the menu is always open.
 But this picture is one big and beautiful link that leads to a larger separate menu. Here:
 This picture-button on the menu is created through a pinned post. It's just a group post that we're pinning forever! This post link leads to a separate page that we will gently pre-create.
How to create a separate page for the VKontakte menu
To create a page for the future menu (navigation) - you need to send a request to VK the following:
where XXX is the group number, YYY is the page name (here all question marks and dashes are required).
Moreover, I recommend making the name normal, attractive and meaningful, because it will glow and people will add a certain impression about you and your group by this name. For example, “Navigation” or “Group Menu” are normal names, but they seem banal. Use your imagination.
I entered the following query
And I immediately opened the created page with the ability to edit it.
 This is where you will need to insert your code for the menu itself using wiki markup. But more on that later.
By the way, I’ll tell you a secret, if you have a group (and not a public one) - a standard menu that already exists by default - it is already a page in itself. So you can use it if there are problems with creating additional pages.
How to make a pinned post in a group or public
Yes, and in any type of community, a pinned post is created the same way! Everything is done very simply.
 And in the window that appears, click the "Pin" button - everything is simple!
Many groups, by the way, use pinned posts as announcements. If the time of relevance of this announcement has passed, you simply click again on the publication date and on the "Unpin" button.
In fact, everyone now uses this particular menu method.
Guess why?
So, we already know how to create pages and pin posts. Cool. We return to our sheep layouts.
Cutting the layout for the design of a group or public
So, everything is clear for the avatar, we don’t cut anything here. We created a picture of the required size and uploaded it to VK. All. We're done with the avatar for the group!
Now the menu.
For example, I took the menu from this group. I made it myself, and still have access to it, so I can even show the code of the pages.
So, you already know how to make the main picture for the menu - this is just a pinned post.
Click on the menu, see the picture.
 We need to select "clickable" zones.
those. select the buttons themselves. Let me highlight these areas for you with red lines.
 How much do we get? 5 pictures. And not every picture will be a button!! As you can see, the top big picture is not a button, but in itself ...
So, we cut out pictures along these lines. Now you need to “upload” it to VK.
If you created a separate page for the menu, then click on the "Fill with content" button on the newly created page.
 If you did not create this page, but used a ready-made page for the menu, then you immediately have a page editor in front of you and you can immediately upload photos:
 Filled in and you should have the following:
 Perhaps you will have just a code, as in the picture below. If not, click the "Source code" button, I highlighted this button in the top picture. And you will see the following:
 Here we need to line up all the pictures in a row so as not to get confused (well, I do this).
And so that there are no indents between the pictures, enter the “nopadding” tag, it should look like this:
this is page-58190479_45419120 - this is the address of the VKontakte page itself, you will find this identifier in the address bar of your browser.
 That's all :) Isn't it difficult?
Here is what I ended up with in my code. If you have something like this, then everything is in order.
 If you have any problems with any of the items, please contact us. I'll be glad to help.
Taking this opportunity, I want to remind you that there are wonderful services for any promotion and cheating, these are:
prospero | sociate | socialtools
Perhaps I didn't tell all the secrets that needed to be told. I admit that I missed something, after all, the article turned out to be not small - write to me if you notice obvious omissions. Thanks in advance.
The social network Vkontakte is able to please its users with a huge number of beautifully designed groups. Some groups look no worse than a full-fledged site. All this thanks to the competent design of the avatars and the group menu. For experienced users, designing a Vkontakte group is a simple task, but if you are a beginner, our article will help you.
How to make a group in contact
Creating a beautiful banner
The first thing a user pays attention to when viewing a Vkontakte group is the avatar and menu. Below we will figure out how to create two pictures in Photoshop, cut one of them correctly and arrange a special code with external links.
Stage 1
Open the Photoshop program and create a new document in it, which should have a size of 630x725 pixels. Then fill this document with white. After that, cut out two windows in the layer. Through these windows, the graphic design of our group will be visible. First, select a 200x710 pixel rectangle and press the Del button. Select the next 382x442 rectangle, combine both rectangles along the bottom and press the Del button.
Stage 2
Under the created layer we place the graphic design of our group. It will be most convenient to write the required text on the picture with the main background in advance and create several menu items.
Stage 3
Now we save the right rectangle of 200x710 pixels as a separate image. We have received a completely finished image for the design of our group. It should be uploaded to the block located in the upper right corner of the group, where you will find the "Upload photo" button.
What do we do with the left picture? We cut the left picture into several parts depending on the number of menu items. For example, if we have 5 menu items, then in the end we get 5 pictures with a width of 382 pixels and a height of at least 50 pixels.
Stage 4
We upload the received 5 pictures to the group's album: My photos - My albums - Add photos. After that, go to the group page and select the special "News" block, which can be renamed to "Group Menu". Press the "edit" button.
Stage 5
Go to the "Source code" tab. The code located in the lower window should be copied and pasted into the "source code". In the code, we change photo to the names of the files and specify the height of the file (width 382 pixels). Then paste the url of the menu links. We take the name for the file from the album. An open picture has something like this http://vkontakte.ru/photo7236095_23453800. Everything after photo is the name of the picture.
Stage 6
In order for the pictures to fit perfectly, the group name should be on one line, the description on ten lines, and the website url on one line.
Vkontakte wiki markup
How to design a Vkontakte group using wiki markup
What is wiki markup?
Wiki markup is a page editing system similar to HTML. In addition to the social network Vkontakte, wiki markup is used to edit Wikipedia articles. Wiki markup is much simpler than html and is easy to understand even for a beginner.
Before you are going to design your Vkontakte group, decide on the type of design. Design can be textual or graphic.
How to arrange a Vkontakte group, menu design
Text menu with icons
The code for this menu will look like this:
The code starts and ends with tags. Each icon has the form [] and description text.
Graphical menu
The code for this menu looks like this:
! !! !!
We have scratched the surface of what wiki markup is and what it is intended for. If you want to learn more about wiki markup, visit the official group on the Vkontakte social network
If you are actively promoting your group and want to make it more, then you probably know that a beautifully designed group is a very important aspect of developing your brand, but before you think about the design of your Vkontakte public, you should think about the purpose of your VK group!
As a rule, an SMM specialist, after completing the creation of a VK group, begins filling it. It is the content that can keep people in the group. But you just need to do it efficiently and competently! After the group will have: descriptions, wall posts, photo and video albums, audio recordings, you should start implementing the functional menu. And let the menu at the beginning of the journey not be super beautiful, as we used to see at the beginning of work, but rather simple. First of all, the usefulness of the existing content is important!
In this article you will find information on how to create a VK group menu yourself! Therefore, if you are puzzled by the question: how to make a VKontakte group menu, this review is for you!
Quick navigation:
What is a group menu
The menu can be considered a list of all available public functions. Using the menu, you can put all the important elements in one neat and beautiful list, set an individual icon or image for a specific link, send alerts to visitors about planned changes quickly and easily. The menu can display the following elements: all kinds of links to third-party sites, callouts to discussions, music, albums and other subsections within the VK site, images and the usual structure of your public. Based on the instructions below, you can make a menu for your Vkontakte community with your own efforts.
Creating a Vkontakte group menu online
If earlier, to create a menu, you had to bother entering various codes, which is quite difficult for people who do not have programming skills, now you can create a high-quality and beautiful group menu in contact online using specialized series.
So, now let's take a closer look at how such constructors work. It is worth noting that all of them have identical functionality, so having understood one, you can freely work in any of them.
The principle of creating a menu can be divided into several steps:
Step 1. Decide on a design template.
On sites that allow you to create a group according to templates, professional designers work, who draw dozens of templates of different styles and colors with high quality. You can choose the one that suits your group. In the future, you will have the opportunity to change the template at any time.
Step 2 Determine the number of buttons.
Decide how many button links to various pages will be on your menu.
Step 3. Specify links and inscriptions.
Step 4. Check and export.
Make sure that the completed menu works the way you wanted it to and then upload it to your community. The services will independently produce all the necessary pictures, generate the code, and, with your permission, upload everything to your public.
Step 5. Making changes.
If you need to make changes, for example, add new buttons, fix links and labels, change the design, just go to your account, make changes and export the menu again.
As you have already seen for yourself, creating a high-quality, affordable and beautiful menu using special servers is the best option for VK administrators. It is worth noting that such servers offer free services only for one time - trial. The subsequent use of resources of this kind must be paid. But, despite this, the result of using the functionality will undoubtedly justify your investment.
Banner for the Vkontakte group, create for free!
There are specialized sites where, without much effort and software, you can make yourself a beautiful banner for the Vkontakte group. For example https://bannermakers.ru/banners-vk/ .
In addition to creating a menu in this way, there are also ways to make a menu in a VK group in another way. Read about it below.
Menu VK wiki markup
Wiki markup is a great helper in creating a beautiful and effective community! This is a very convenient and effective way to create a public on the popular VKontakte network. This markup is very similar to the html code in terms of its action scheme. But for those who are not related to programming,
it will be clearer enough due to the ease of implementation. This markup got its name thanks to Wikipedia, where for the first time numerous users got the opportunity to get acquainted with the main features of its functions. Wiki markup allows people without programming skills to easily and quickly design a group:
· Create spoilers and tables graphically.
· Format images and text.
So, let's move on to the analysis of how to make a menu for the VK community?
Of course, in the process of designing the group menu, additional recommendations may be required, but in general, you can figure out the principle of creation using this guide. If we consider html, then to study it and work with it, we need to spend several days or about a week. Working with Wiki markup with a good memory will only take some time. How should it be created? What approaches should be taken?
Let's dwell a little on its history, and then we'll talk about technology. Ward Cunningham first introduced people to the concept of "wiki", which in translation from the Hawaiian language means "quick". In this way, he expressed the simplicity and speed in using the markup.
Fast clearance
Now we will consider the questions: “How to make a menu in a group in VK”, and clarify how to implement it effectively. In the process, you can go several ways, each of which has its own direction and leads to the ultimate goal - the presence of a quality group menu.
We will understand in order. If the group carries the meaning of a social direction, then a text menu can be introduced. Its advantages lie in a serious appearance. It is desirable for communities of commercial and entertainment type to determine the bet on the menu - graphics. Do not forget that there are ready-made templates for the VK group menu. The use of images will draw the attention of visitors to what should be visible. Using this approach will give you the opportunity to make being in a group more fun and relaxing. Wiki markup allows you to make a group menu with pictures and photos, make tables, embed and open links, and much more. Of course, this is not the whole list of functions, but designing the menu of your community is easy and on a rather impressive scale.
Basics of Wiki markup in creating a menu for a VK group
 Thematic pictures and photographs will allow you to create a VK group menu, beautiful and interesting. It is important to know that it is possible to insert the necessary photo or picture using wiki markup on VKontakte only when they have already been uploaded to the site's albums. So, go to the album, decide on the desired photo and copy its address. Let's say it will be like this: photo14523_90678. Now you need to capture it in double square brackets. It should end up like this: []. But what if you need to attach a link or text to a picture or photo? Or maybe there is a need to edit the external image? Then the following action will help here: you need the file to look like this - [[ photo14523_90678|options|text/link]], and instead of the last three words, you need to substitute what you need. Text - enter what you need. Here, for sure, additional explanations will be inappropriate. Link in translation from English - "link". It is indicated so that the visitor's car understands where it needs to go. Options - here the following values \u200b\u200bare set:
Noborder - the frame located near the photo is removed. Box - the image is located in the window.
Nopadding - spaces between images are not displayed.
NNNxYYYpx or NNNpx - indicate the size of the picture (in pixels).
As a rule, it is necessary to embed an element in the text and graphic menu of the VK group that allows you to present information in a form convenient for the visitor, namely tables. Few communities on VKontakte can do without it. To create a table using wiki markup, you need to apply a certain list of characters. Next, you will find out what functionality this or that symbol is responsible for:
(| - designation of the beginning of the table. It is impossible to do without this symbol when creating a table, it is a mandatory attribute.
| - used to give cells a transparent effect.
|+ - using this set of characters, the table name is centered. This is not a mandatory attribute at all, but it should be placed immediately after the signs that characterize the beginning.
|- - this is how new lines are denoted (also for cells).
Gives a dark color. In the absence of this symbol, the sign from paragraph No. 2 must be used.
|) is a character set that marks the end of the table. This is an optional attribute. But it is still recommended to use it to prevent the occurrence of an error.
Now let's look at how the cell is filled. All information that must be entered into them is placed after the signs |. If you need to separate the cells one from the other, you just need to duplicate this way: ||.
Now you have gradually studied the information on how to make a menu in a VK group using wiki markup. Using the example of compiling a menu for your public, it will become even clearer to you.
How to make a menu in a VK group with a new design 2018
The new design of VK not only brought convenience to the functionality of the site, but also some confusion for public administrators. In this section, we'll take a step-by-step look at how to create a menu for a group in a new design.
So, a guide on how to make a menu in the new version of VK quickly and, most importantly, without errors in the code is in front of you. By following the instructions exactly, you will be able to create the menu yourself, correctly and quickly! Let's start!
1. Open the menu image in Photoshop or another graphic editor.
2. We examine the size of the picture and if it exceeds 600 pixels in width, change the size to 600, the height of the picture changes proportionally, do not set it manually!
3. Use the cutting tool and cut our image into buttons.
4. Save the picture in the "for WEB" parameter. Photoshop work is now complete. Let's go to the community.
5. Go to the community settings in the "Materials", select "Restricted" and click "Save".
6. Go to the main page, in the subsection "fresh news" click "edit".
7. So we ended up in the Wiki editor, now the main activity will begin. We change the column "fresh news" to "menu" or any other and click on the camera icon, implement all the cut pieces from the saved folder.
If instead of the code images appear immediately after entering the wiki markup editor, you need to switch the wiki markup mode!
Now we have the code for our menu, but it needs to be tweaked a bit to remove the spaces between the images. Now our code looks like this: [][-][-][-][-]
Moving to the preview, we will notice that the images are not where they should be, and, in addition, there are spaces between them.
8. We edit the code: By default, VK has a built-in resolution for the maximum image size in width of 400px, the first button is 600, we change the parameters of the first button 400x89px to 600px, you do not need to specify the height. We also enter the following tag in each line: nopadding must be separated by a semicolon.
Important! Don't click ENTER after lines of code if you want two buttons side by side on the same menu bar. The editor will automatically transfer to a new line those parameters that do not fit! This code should be after editing:
[][-][-][-][-]
Now, going to the "preview" we see that everything is in place. We add the necessary links to each of the buttons to the code, for a good example, the link to the first button is not clickable here! Don't forget to remove the extra space between | And ].
[][-][-][-][-]
After making sure that everything is done as planned, click "save" and return to the page. Please note that in the new 2018 version there is no “back to page” button, so you just need to click on the page name at the top.
9. Now we need to fix our menu. To do this, copy the link to the page from our menu and return to the main page of the group.
10. Paste the copied link into the new message field. After a piece of the menu is displayed, the link must be removed! And using the camera icon, you need to add a pre-prepared image for the banner. We put "on behalf of the community" by clicking on the circle to the left of the "send" button, and click on "send"
11. Now we fix the menu, refresh the page and evaluate our result. For the whole job, slowly, it takes about 15-20 minutes.
How to make a menu in a VK group with transitions
Now let's look at how you can make a VK group menu with transitions.
So, how do you make one wiki menu inside another? First of all, the first menu should be ready. We will start from the picture already cut into buttons. Add cut pieces of the image through the camera stash in the wiki editor. If images appear instead of the code, then the markup wiki mode is not enabled, before adding an image, click<>
Don't forget to click "Save" at the bottom of the page! If necessary, you can resize the image and add the nopadding tag to the code, it is absent by default, and the image size should be a maximum of 400 pixels in width, if the image is larger, you need to correct it to the desired size!
1. After editing the code, save and click "return".
2. Check if the first menu is displayed correctly.
3. If everything is as it should, click "edit" again.
Now we need to create a new wiki page where the second menu will be located. At the very end of the code, we write the menu value for public VK 2, well, or any text you need. Save and return. An active link with a new name should be formed at the bottom. For the greatest convenience, open it in another browser tab.
While your newly formed page is still empty, click "edit" or "fill with content"
Just like we did at the very beginning, we add segments of the second menu, save and see how the new menu looks like.
If everything is as it should, copy the link to the new menu page in the address bar of your browser.
Let's say a new menu should open when you click on the "Reviews" button of the first menu. You need to go to the tab where we formed the first menu and find the third line and paste the link from the buffer, save and return.
Thus, when you click on the "Reviews" button, our second menu will open.
How to make a VK group menu from your phone
 If you are “lucky” to work as an administrator of VK groups or create your own group with only a phone available, then if you adapt, it is quite possible to make a group menu from your phone without experiencing much effort.
Everyone knows that the creators of VK offer their user a fairly convenient mobile version, and earlier you have already learned about different ways to create a menu. But, manually entering codes using wiki markup is possible, but not very convenient. But downloading a template from the sites of specialized services and inserting it into the necessary columns is quite simpler and more convenient, and it will not take you very much time. Thus, you can administer Vkontakte groups simply and conveniently.
Vkontakte group menu templates
All of the above methods to create a VK group menu are quite simple, and if you put them into practice, you can make sure that there is absolutely nothing complicated about this. Adapting to the introduction of pictures and tables using wiki markup is quite simple and fast. But it is even faster and more convenient to use ready-made templates for the group menu, which can be found either on the resources mentioned above, or downloaded from blogs and websites of the same users.
It is worth noting that the templates imply the presence of pictures and images of various topics. They also have versatile designs. If you do not have time to search for images, or do not have enough imagination to create a bright menu, you are better off using ready-made menus.