Hello dear blog visitors! Today I decided to update the BIOS on my computer and write about it in a blog. I made photos and screenshots, so the article will be interesting and most likely big, well, it's okay, but understandable :).
About the system BIOS I have already written many articles, and if you want to know what BIOS is, then read this article. My computer is already a little old :), and I have not updated the BIOS on it yet, so I decided that there should be an update. Now we will look at how to determine which motherboard is installed on your computer, where to look for BIOS updates, how to update BIOS and solve possible problems during the update process.
Why update BIOS?
Well, I think everything is clear here. Updates will almost always improve the performance of devices, with BIOS everything is the same. After the update, new functions may appear, stability of work will increase, support for new technologies and components will appear. In short, you need to update, and it's best to do it often.
I want to say right away about the danger of updating the BIOS system. Everything must be done carefully and according to the instructions, in the event of some kind of failure, there may be bad consequences. Although this method of updating which I will write about today, it seems to me that all risks are minimized.
Motherboard and BIOS version
Before proceeding with the BIOS update, we need to find out which motherboard and BIOS version is installed on our computer. Because we will download updates from the motherboard manufacturer's website.
For this we need a program EVEREST, you can download it on the Internet by typing in the search engine the request “download EVEREST“. Install the program and run it. If these steps seemed very difficult to you, then you better not update the BIOS yourself, but if you really want to, then contact a computer service.
Well, if everything is fine, then run EVEREST, go to the tab "Motherboard" and see which motherboard is installed on your computer.

As you can see I have a motherboard MSI MS-7267, so for her we will look for BIOS updates. Below I have highlighted the link that leads to the page for downloading various updates from the manufacturer's website. We follow this link, and also open the BIOS tab in the EVEREST program, in order to see which version of the firmware is installed.

After flashing, we will compare these dates and versions. As you can see, I have a BIOS version since 2007, and a video adapter since 2005. We will update :).
Where can I get updates for BIOS?
Now we return to the site of the motherboard manufacturer, I have this site MSI, I opened it using the link in the EVEREST program, but you can find it simply through the search. Or just the Russian version of the download section of the MSI website ru.msi.com/service/download/.
As you can see, there are three options for searching for updates.
- The first method, as requested by MSI MS-7267, did not give me any results, probably because the motherboard is already old.
- I did not even use the second method, because it immediately says that it is an option for new models. If you have a new product, you can search the list for it.
- Well, the third option allows you to download a utility that scans your computer and displays a list of necessary updates, with the ability to download them. Fine! Push "Click here" and click "Open".


The archive will open, run the LiveUpdate.exe installation file in it and install the Live Update 5 utility in a few steps.
After the installation is complete, launch it and click on the “Scan” button, wait a few seconds while the utility looks for updates.

The program will display a list of results. We are interested in an update called “MB BIOS”. If such an update is listed (usually at the very top), then there is a BIOS update for our motherboard. Download it to your computer by clicking on the "Download" button (arrow).
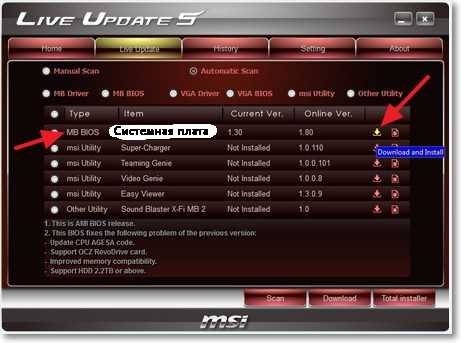
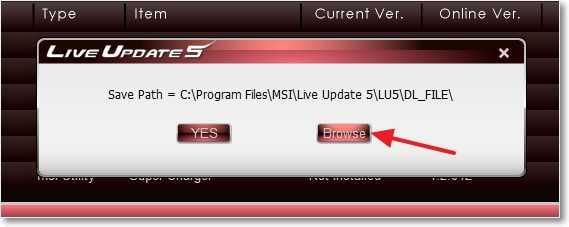
Better to click “Browse”, and choose a location to save the update file yourself. For example, I saved it to the desktop.

That's it, we now have the BIOS update file, now we can proceed to the next stage.
Run the saved BIOS update file and follow the instructions.

Click “Next”.
 Let's continue ...
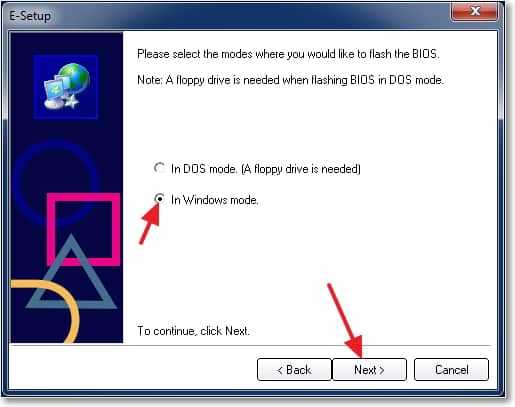
There are two options here: the first is probably to write the firmware image to a USB flash drive, and update the BIOS from the flash drive (or for firmware, if it is impossible to update from under Windows). But since I did not have a free flash drive, I chose the second option, which, judging by the title, means BIOS firmware from under Windows.

Here we need to close running programs and click “Next”.

Press any key. The computer should restart. That's all, BIOS has been updated!
Problems after updating BIOS
I have two small problems that I think are worth writing about.
1. Immediately after the first reboot, a black window appeared with white text (unfortunately I did not take a picture), in which it was necessary to press F1, seemingly for setting. And F2 to load the optimal BIOS settings. I pressed F2 and this message did not appear again.
2. The second problem is the absence of the A: drive.

You can just press F1, but this message will still appear. It's just that the computer does not find the A: drive, this is a floppy disk, I do not have it, but it is listed in the BIOS. I got this kind of error after. Disabling it is very easy.
Go to the section.

Hover the cursor over the item and press “Enter”.

Select from the list, press “Enter”.

We save the changes by pressing F10 and confirm the saving of the settings. We leave the BIOS by pressing "Esc".
Well, that’s all my friends, the BIOS has been updated, the problems have been fixed, I hope the computer is working :).
At the beginning of the article, I posted my screenshot from the EVEREST program, with the BIOS firmware version before the update. Let's see what has changed there.

As you can see, everything has been updated. Although the update was released in 2009, this is due to the fact that I have an outdated motherboard and updates for it are no longer available.
I hope everything worked out for you. Good luck friends!
More on the site:
Updated: January 12, 2015 by the author: admin
The basic input-output system (BSVV), better known to users as BIOS, is a set of programs responsible for the operation of computer hardware and devices connected to it. The BIOS boots the PC by performing hardware tests and transferring control to the bootloader.
If you have a question about how to update the BIOS, then you are at least well versed in the operation of a PC. If this is not the case, then do not perform the update yourself and contact the specialists. One mistake can lead to negative consequences, the elimination of which will cost a large amount.
How to update BIOS
Why update BIOS?
Updating BSVV is a complex procedure, the incorrect implementation of which leads to the fact that the motherboard fails. Therefore, this procedure should be performed only as a last resort. Good reasons to upgrade:
- Obvious errors in work (blue screen constantly pops up, ports do not work, sound and image disappear).
- Manufacturer's recommendations.
- Adding support for components and functions.
If the work of BSVV does not cause any complaints, then leave it alone and forget about the update for now.
Viewing BIOS information
Before updating the software, you need to find out the model and revision of the motherboard, and also see which version is already installed. The revision is indicated on the board itself or in the documentation. Check it out, because sometimes manufacturers release different updates depending on the revision.
Then you need to look at the exact model of the motherboard and find out which BIOS is currently installed. You can do this using the built-in Windows tools (Win + R - msconfig), but it is more convenient to use the AIDA64 program.
This is a paid utility, but it has a demo period, so you can learn the information you need for free.

If you have an old motherboard, then when you go through AIDA64 to the page with available modifications, you are unlikely to find suitable software. For example, I didn't find it, so I went the other way: using the built-in search on the manufacturer's website, I found the model of the motherboard and went to the "BIOS Download" section. 
The AIDA64 program showed that the computer has BIOS 1.60 from 2010. In the list of available updates there is a later version - 1.80 from 2011, which can be installed in three ways - in the Windows environment, in DOS mode and directly in the BIOS (Instant Flash).
BIOS update
The manufacturer's website must contain instructions for installing BIOS updates, which must be carefully read. On the ASRock website, next to each method there is a link "How to update", everything is written there. Europe, USA and China are the servers from which you can download the update. You can choose any, no difference.
Now, in detail about the upgrade procedure. If it is possible to update in the Windows environment, then choose this method.

Then the update procedure will begin, during which it is better not to touch the PC, as the system may freeze. It is imperative that the computer does not turn off during this operation, so if possible, use an uninterruptible power supply. After the update is complete, a window will appear prompting you to reboot. Click "Yes". 
When you start your computer, go to the BIOS and in the "Exit" section, select the "Load Default Settings" to return to the factory state. Then exit BIOS saving the configuration.
Update by means of BIOS
If Windows does not start, try updating the base I / O system using the built-in utility.

The system will automatically detect the presence of upgrade files on the connected media. It is noteworthy that only the versions suitable for your motherboard model are displayed, so you will not be able to accidentally install other software. After a successful update, go to the "Exit" section, reset the base system to factory defaults and save the new configuration.
DOS Upgrade
If in the basic I / O system you could not find a built-in utility for upgrading, then try upgrading in DOS mode. This is the most difficult method and requires a little preparation. The first step is to create a bootable USB stick that will work in DOS mode. I am using the Rufus utility to perform this operation.

You must transfer the update file downloaded from the manufacturer's website to the prepared removable drive. Don't forget to unpack the archive. Restart your computer and boot from the connected flash drive. Run the update with a command like G: \ M3N78D_1.80.exe, where "G" is the letter of the flash drive, and "M3N78D_1.80.exe" is the upgrade file.
After about 30 seconds, a message appears stating that the operation completed successfully. Reboot the computer, reset the BIOS parameters to the factory state and save the new configuration.
In case of problems with the motherboard, buying new hardware for the system unit in the BIOS, errors may occur. In some circumstances, it is enough to update the BIOS. But it must be done with caution and only in those cases when it is really necessary.
Reasons for flashing
With the help of BIOS, the joint operation of all equipment located on the motherboard is ensured. And since processors and RAM are changing quite rapidly, there is a need to improve the compatibility of these devices with the "motherboard". With the right approach, it is certainly possible to harm a computer or other devices with an installed OS, but it tends to zero. The process is usually short and takes from a few seconds to a minute.
Determining the current version
Before updating the BIOS, you need to check which version is installed on your computer. The newest ones can solve problems with some processors and motherboards, and you may have the latest version.
The check can be carried out by means of the OS. For example, on Windows, it is run through the command line by typing:
- wmic bios get smbiosbiosversion.
Alternatively, you can use third-party software such as msinfo32 or AIDA64.
In other operating systems that are becoming more and more widespread as desktop and are most widespread among server operating systems - GNU / Linux - this check is carried out through the terminal (console):
- dmidecode -s bios-version.
This command is executed with administrative rights.
Downloading the update

The BIOS update for different motherboard manufacturers is somewhat different. They share common methods, but the tools, files, and instructions are different.
First of all, you need to find out the name and model of the motherboard. This can be done by opening the system unit, finding sales receipts for the purchase of computer components, or using special programs that will display available information about the equipment.
You need to download the firmware provided by the manufacturer. You should not search through a search engine, because you can find one that can lead to infection of computers with malware.
Updates are usually in zip format. After downloading, they need to be written to a bootable disk or USB flash drive.
Updating using USB via BIOS
Motherboards, as a rule, have special modes through which BIOS updates can be installed. You can start it directly from this program or using hotkeys after the computer is started.
Updating BIOS through BIOS is carried out by installing the first boot device of the one on which the new version of the downloaded firmware was unpacked. After booting from this media, you may need to indicate where the installation file is located.
Update for motherboards from Gigabyte using Q-Flash

Here it is possible to use the previous variant as well. In addition, the BIOS update of Gigabyte boards can be carried out using the Q-Flash mode:
- To activate it, when the system unit starts loading, you need to press the End button.
- The files with the updated firmware must already be on the appropriate media.
- After selecting this mode, the file browsing starts, in it we select the item "Update BIOS from the drive".
- Then we indicate the device on which the firmware is saved.
- After confirmation by pressing the Enter key, a rather long period of updating the microsystem code starts.
The recording process cannot be interrupted, since this will contribute to the failure of the computer, and then it will be possible to "revive" it only using special equipment.
Update for motherboards from Gigabyte from various OS

In addition, the update for this card can be performed from under Windows OS using @BIOS flashing software. It is downloaded from the manufacturer's website, where you need to select the download option that matches your computer's configuration.
- After that, we launch the program to update the BIOS, after killing the processes that take up a lot of memory and heavily load the processor and close the running programs.
- What's next? In the running application, select "Update BIOS from file", indicate where the unpacked firmware is located and start the recording process.
- After a short period of time, the update will be completed.
Similar actions can be carried out using distributions of the GNU / Linux OS. There, in the ways intended for installing programs in this particular distribution, you need to install the flashrom package.
- #flashrom -r (file_name_to_which_store_flash_store) .bin;
where (file_name_to_which_saving_firmware) is the name given directly to the firmware.
Then we issue a command to install a new firmware into BIOS using the same command, only instead of the -r key we enter the -w key and, accordingly, the name of the new version file. The program can check the installed version (additionally specify the -v switch), and also make the output of the work informative (-V switch). There are other keys that can be found using the help.
If several chips are used on the motherboard, then the choice is made with the -c key.
This system allows not only flashing the BIOS, but also saving or recording by loading the nvram module. Then from the root, using the dd program, read from this device into a file:
- dd if = / dev / nvram of = (file_name) .bin.
The settings can be written back by swapping if and of.
Flashing BIOS of MSI motherboard

In this case, you can reflash in any available way. The company itself produces the Live Update program, which is capable of updating the BIOS for MSI boards in computers. It is undesirable to use it in other gadgets, since such use can lead to unexpected errors that will be difficult to fix later.
The program is run with administrative rights. It is better not to use the automated version of the firmware, since there are reviews that it does not always work correctly, it is better to download the archive and unpack it.
In the "System Information" tab, click on the "Scan" button. The application will search for the required firmware, and then click on "Install in Windows".
The update can also be performed when the computer is booted by selecting the M-Flash option. When using it, the entrance is carried out into the BIOS and the given name is found there. In the "M-Flash Function as" option, set: "BIOS update".
It is possible to install and like Gigabyte, using the device with the written firmware as the first boot.
In a GNU / Linux system, the steps are the same as described above.
Flashing the BIOS of an HP motherboard on a laptop under Windows OS

Let's take a look at the example of this manufacturer, how to carry out a flashing in a laptop.
Download the WinFlash application on his website. Updating BIOS in HP laptops with corresponding motherboards is carried out using this program by clicking on the "Start" button. The program will do the rest by itself. You can also use the Phoenix Tool program.
If suddenly something went wrong:
- Take a USB flash drive, format it into fat.
- Overwrite the firmware file with the .fd extension on it and rename it to a file with
- Disconnect both the power and the battery, then press the "Super" (Win) + B key and hold until the power is turned on.
The computer will beep but will restore the previous BIOS version.
Flashing the BIOS of an HP motherboard on a laptop under GNU / Linux OS
On GNU / Linux OS, the firmware can be downloaded from the official HP website. True, it will be in EXE format, but it can be unpacked either with wine or using the 7z program. From the entire list, only 3 files are needed: one with the .bin extension, another - .efi and the third - .sl12.
- Create the HP / BIOS folders in the / boot / efi / EFI boot partition.
- In it, create the New directory, into which we place the bin file, and place the two remaining files in the HP / BIOSUpdate directory.
- We reboot the laptop, press Esc (F10) (see what is written below) and select File → Update System BIOS.
The firmware is updated when the power is on. The process takes several minutes. The FS on the flash drive must be FAT32 ESP. If there is a network Internet, the update can be done through it directly using the same menu.
AsRock motherboard BIOS update

This board has an Instant Flash program integrated into the BIOS. With its help, the code of the microcircuit is rewritten.
Updating the BIOS of the Asrock board does not take place in the OS, but through the BIOS itself, so user intervention is minimal here.
You can also update from Windows. To do this, find the downloaded firmware, unpack it and run it with administrative rights. The update will be performed automatically from the command line.
Actions after flashing
You need to study the instructions for your motherboard. If there are no additional actions provided, then they do not need to be performed, except for restarting the computer. After that, its work can be tested.
If there are any failures, then it is better to roll back to the old version of BIOS, which is better to save beforehand. How it is done in the OS of the GNU / Linux family was described above; in Windows, this function is built into the corresponding programs, with the help of which the flashing is carried out.
Thus, after updating the BIOS, the main action is to reboot.
Finally
As you can see, there are enough programs to update BIOS. First of all, the user must decide whether he needs to reflash a computer, laptop, or he is quite satisfied with the way these devices work at the present time. Indeed, as a result of an incorrectly carried out update, you can get non-working equipment.
If the user nevertheless decides to carry out this step, then he needs to download the firmware from the official websites of the motherboard manufacturers, having previously found out the name of the specific model. Then you need to follow the instructions given or search on the manufacturer's website, because, although not so often, the software and BIOS menu items can change.
The most dangerous thing that can happen during an update is a blackout, so it is better if an uninterruptible power supply is available.
BIOS is interesting. It can be easily recognized that it is the most important part of the computer and at the same time the least noticeable - until problems begin to appear in the system. Updating the BIOS often fixes many of those problems, but it can also render your computer completely inoperable if you do something wrong. So, how to properly update the BIOS.
In general, BIOS (Basic Input / Output System) is the first code during computer startup and the system's basic software. It is "sewn" into a chip on the motherboard and is responsible for quickly checking all components and loading the operating system from the hard drive. You might think that these are all his responsibilities. In fact, the BIOS will continue to coordinate communication between software and hardware, even when Windows is running.
If the BIOS is outdated, the following problems may arise: a quad-core processor can be recognized as a single-core processor, which significantly limits system performance, incorrect fan speed does not provide the necessary heat dissipation, and a new video card may not turn on at all, as a result of a black monitor screen and some frustration ...
Fortunately, all these problems can be solved by simply updating the BIOS. But keep in mind that updating your BIOS is not without risk. If something goes wrong, the functionality of your computer could be compromised. In general, the update includes overriding basic algorithms that tell the computer what to do with all of its components at boot time. Be careful and follow the instructions when updating, and also make sure that the process is not interrupted or canceled.
The easiest way to do this is to look in the motherboard manual and find information about the manufacturer and model. Additionally, the full model name of the motherboard, for example P5E3 Deluxe, is usually also printed on the board itself. It is also important to know the version number, eg REV 1.03 g.
You can determine the BIOS version when you restart the computer, the first thing that appears on the screen is the BIOS logo and the version number, or using DEL, ESC, or F2. Second method, press Windows + R and in the Run window enter the command "msinfo32". Then, in the System Information section, look for the entry for "BIOS version".
Step 2: Where to Find the Corresponding Update
All the necessary information about possible updates can be obtained on the website of the motherboard manufacturer. Here in the search box, enter the model number of the motherboard and a list of all files will be displayed in the browser.
If the BIOS update isn't among them, it's time to check the version number. Make sure whether you entered the name of the motherboard correctly, whether there are later changes for the current version.
If there is an update, it's a good idea to install it. Typically, most service packs consist of Flash programs that are responsible for installing and updating the system BIOS, and are often accompanied by a text file detailing the version.
If the BIOS update is actually one of them, it's time to check the numbers: you enter the name of your motherboard, are the changes more recent than the current version, and if so, you will find that a specific question will be included in the documentation. If all? problems, upgrading the BIOS may cost the rule pomysł. Jako, most service packs consist of Flash, which is responsible for installing and actually updating the BIOS, often accompanied by a text file with detailed version information.
Step 3: Update Windows System, DOS or BIOS UI
Especially older BIOS versions need to be updated through the DOS interface. This can be a problem for many modern computers, because they have not been equipped with a traditional floppy disk drive for a long time. Instead, you can simply use a USB stick. On the other hand, many manufacturers provide an easy-to-use configuration assistant for Windows. It may even have a built-in procedure for updating BIOS settings.
BIOS update via Windows
If you want to update on a Windows system, you need to download the necessary tools for updating the operating system.
The BIOS update procedure must be performed very carefully. If the current version of BIOS works fine and without critical errors, then just in case it is better to save a backup copy. In addition, when updating the BIOS, you need to take into account that all responsibility for the consequences of the update lies with you, and if the system fails, it will only be your problem. Therefore, for the update to be successful, you need to know how to update the BIOS. And in case of an unsuccessful outcome, you can always contact the service centers to solve this problem. But before updating the BIOS, you must first know what it is and why update the BIOS.
What is BIOS and why update it?
BIOS (BIOS) is special software that is stored on a ROM (read only memory) chip in your computer. The BIOS is located on the motherboard and is a code that is responsible for the correct operation of all devices in the computer - video cards, disks, USB connectors, etc. The more perfect this code is, the higher the system performance and resistance to critical errors will be.
All computer hardware settings are stored in the BIOS. Although some of them can be installed by the operating system (for example, Windows 7). As soon as the user turns on the computer, the system is controlled using the BIOS. This program quickly checks and tests hardware for operability (for example, whether the video card is overheating or whether the CPU coolers are doing their job), and then transfers control to another program in the boot disk that loads the operating system. BIOS makes it possible to change many settings: changing the date, time or language, switching devices to various modes (silent operation, etc.), monitoring the status of all devices, overclocking the processor, etc.
A BIOS update is required in the following cases:
- the presence of errors in the code of the current version, which leads to malfunctions in the computer (for example, the sound has completely disappeared);
- the motherboard does not want to recognize new hardware (for example, or a cooler);
- to improve the overall performance of the system, as well as its individual components.
You will also need a BIOS update just to make it work better. Typically, the motherboard manufacturer periodically releases new versions that fix bugs or add support for new devices. Therefore, it is desirable in the same way as, for example, drivers for a video card.
Preparing for the upgrade
Before performing a BIOS update, you must first find out which motherboard and which BIOS version are installed on your computer. It is advisable to install updates only from the official website of the motherboard manufacturer. In addition, you also need to know.

So, to get the necessary data, you can use the Everest program. To do this, you need to run the program and go to the "Motherboard" tab. The line "motherboard" will indicate which motherboard is installed on your computer. Below is the item "Downloading BIOS updates", which contains the address of the site from which you can download various updates. Then you need to open the "BIOS" tab and see what version of the firmware is installed. Next, you need to go to the update site and compare the date and version of your firmware with similar data on the site. If your data is outdated, then you can update the BIOS.
The entrance to the BIOS is slightly different on different computers, depending on the motherboard and the BIOS version. To call it, you must press a certain key or key combination. Most often this is the "Delete" (Del) button, but it can also be "F1", "F2", "F10", etc. You can find out the key you need at boot time at the very bottom of the screen. This information appears immediately, even before the OS is loaded. The key can be pressed frequently (for example, with a frequency of 1-2 seconds), nothing bad will happen. If you did not have time to read the desired key combination or did not manage to enter the BIOS, you must restart the computer and repeat the procedure again.
BIOS update
Fun fact: Reinstalling the BIOS is an operation that is considered both legal and illegal at the same time. That is, on the one hand, motherboard developers recommend immediately (or if possible) updating through their official website. On the other hand, BIOS update occurs at your own risk and fear. That is, if something happens to the motherboard and it breaks down (and it doesn't matter if it is related to the update or not), the service center will probably refuse you free repair or replacement of the motherboard. Therefore, if you are not confident in your abilities, then it is better not to update the BIOS yourself. It will be much safer to use the services of a service center.
BIOS update can be done in 3 main ways:
- in DOS mode;
- in Windows mode;
- using special utilities provided by motherboard manufacturers.
Updating the BIOS in DOS Mode

Before updating, you need to know the manufacturer of your motherboard, its model, and the exact BIOS version.
In addition, it is necessary to prepare a firmware file in advance, with the help of which the BIOS will be updated. But all this has already been done before, so you can immediately move on to the next item.
So, you need to take a blank floppy disk, format it and make it bootable. Then the firmware file must be written to this floppy disk. In addition, you will also need a so-called flasher, which can also be downloaded from the manufacturer's official website (for example, awdflash.exe). Then, in the autoexec.bat file, you will need to register this "flasher" and the path to the firmware file for it. It will look something like this: "awdflash.exe bios1.bin / py". It is advisable to keep the current BIOS version before updating.
The preparatory stage is now complete, now you can start updating the BIOS. But first you need to configure the BIOS so that the installation starts from a floppy disk. To do this, go to the BIOS (for example, using the "F8" key) and find a line that has one of these names - "Boot", "Boot Device" or "First Boot Device". As a rule, this line will indicate the option "Hard Disk", that is, the hard disk. By default, when the user turns on the computer, all data is first loaded from the hard disk, and then from DVD-ROM, USB and other media. But in this case it is necessary to select the option "Floppy Disk" (ie floppy disk) in this line. After a while, when the update is completed, it will be necessary to return everything to its place. You cannot turn off or restart your computer during the update.
Updating BIOS in Windows mode
This method is much easier. All you need to do is download the updated BIOS file and the firmware for Windows OS. As a rule, each manufacturer has its own software for these purposes. For example, Asus has such a program called AsusUpdate. You need to install it, run it and select the "update from file" item, specifying the previously downloaded file. Although this program is able to independently find the latest BIOS versions and install them in automatic mode.
Updating BIOS without entering Windows or DOS mode
In this case, the update is performed using the utilities that are in the BIOS. For example, you can update through the Instant Flash utility. To access it, you must press the "F6" key when turning on the computer. The program will independently find all storage media where the BIOS firmware is stored. In addition, the utility will display only those firmware that fit your motherboard model. The update procedure is quite easy, and the new BIOS will be installed in one click.
In conclusion, it is worth reiterating that you only need to update the BIOS if you really need to. Otherwise, it is better to either completely abandon this venture, or seek help from specialists.


