Android includes a built-in feature to create a complete non-rooted Android phone backup, as well as a tool to restore it. All you need is a computer and a device running Android 4.0 (Ice Cream Sandwich).
You can also create and restore a backup of your Android device using the Titanium Backup utility. Titanium Backup is probably one of the best backup solutions out there, but it does require root.
Installing the Android SDK
To create and restore a backup, we will use the ADB (Android Debug Bridge) commands. This utility is included in the Google Android SDK, which you can download for free.
First, you need to install the Java Development Kit (if not installed), as the Android SDK requires it. Download and install the 32-bit version of the Java Development Kit (Android SDK requires a 32-bit version even if you have 64-bit Windows installed).
Next, download and install the Android SDK. If the SDK says that it cannot find Java, then perhaps you have installed the 64-bit version, in this case, install the 32-bit one.
After you have successfully installed the SDK, launch Android SDK Manager from the Start Menu. Check the Android SDK Platform-tools checkbox and click the install button to install the platform tools package that contains the ADB. If you see an error, then launch SDK Manager as Administrator (click on the SDK Manager icon in the Start menu and select "Run as Administrator").

Preparing the device
You must enable USB debugging on your device. You can do this from the developer tools in Android settings.

Now connect your PC and your device with a USB cable. You must have installed drivers for your smartphone, usually they can be downloaded from the manufacturer's website. Install Google USB Driver via Android SDK Manager (Extras subfolder), it might work.
ADB check
Remember the path where the Android SDK is installed. It appears at the very top of the Android SDK Manager window next to SDK Path.
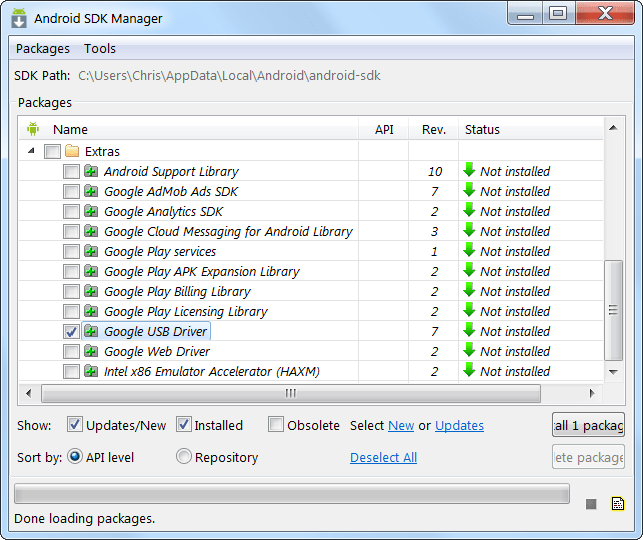
You need to find the adb.exe file in the platform-tools folder. It is usually located in the path C: \ Users \ NAME \ AppData \ Local \ Android \ Android-sdk \ platform-tools.
Go to this folder and, holding down the Shift key, right-click on an empty space, in the context menu that opens, select "Open command window". To test adb connection to your device run adb devices command.

Your device should appear in the list. If not, then the driver is not installed correctly.
Now you can use adb commands to back up your device files. For a full backup, run the following command:
adb backup -apk -shared -all -f C: \ Users \ NAME \ backup.ab
The command will create a backup copy of all installed applications (apk files) and data on the SD card to the C: \ Users \ NAME \ backup.ab file on your computer. Replace NAME in the command with your computer username or specify a different location.

When executing the command on the phone, you must confirm the creation of the backup. You can also password protect your backup.

The process may take some time depending on the amount of data.
Restoring a backup
To restore a backup, you must run the following command:
adb restore C: \ Users \ NAME \ backup.ab
A confirmation message appears, informing you that the backup will overwrite all data on the device. If a password is set for the backup, you will need to enter it.

To create a full backup of an Android phone without root rights, you need to be an average user who understands the peculiarity of Android, but with the help of our instructions, a beginner can also do this. Hopefully this feature will be available in the Android interface in the future.
10 Best Backup Apps for Android | Introduction
Responsible people will not forget to back up their data on a desktop PC, but how many behave in the same way in relation to their phones? Backing up data on an Android device doesn't seem like a very interesting activity, but only until the time when a real problem arises - after all, your phone can be stolen, you can install the wrong firmware, or just drop your device into a puddle, after which you will find yourself in a very difficult position. ... While Google automatically backs up your contacts, mail and calendars, you yourself can do the same with your programs - both with their data and settings. Today we publish the top 10 backup apps for Android to help keep your data safe.
10 Best Backup Apps for Android | Helium App Sync and Backup
Cost: Free / $ 4.99
With this program, ClockworkMod successfully debuted in the field of data backup on mobile devices. Like its best counterparts, Helium allows you to back up programs, contacts, SMS messages, and call history, but unlike many, it does it without rooting your phone. Non-rooted users will have to install an additional program to run the mobile application when connected to a PC, while those with root access can literally take advantage of Helium right away. The paid version disables ads and includes cloud backup and backup scheduling.

10 Best Backup Apps for Android | Holo backup
Cost: Free
It is not even a mobile app, but a desktop data backup software with Android 4.0 ADB features, responsible for backing up programs and data to PC even without rooting the phone. Users can also back up SMS messages and can even backup wirelessly (although you need to be rooted to back up ADB over Wi-Fi). Holo Backup doesn't come with all the fancy frills like cloud backups or backup schedulers, so you have to go through the manual backup process. But the bottom line is that Holo Backup is a practical and free app that doesn't need rooting.

10 Best Backup Apps for Android | Ultimate backup
Cost: Free / $ 2.99
J. Rummy Apps developers offer to use a universal application manager for backing up programs and information. Ultimate Backup backs up data stored on both local storage and cloud storage (data and settings require root privileges), working with Drive, Box and Dropbox. The application also contains a built-in uninstaller, a "task killer" function, a function to clear the cache, and much more. In addition to backing up apps, you can back up your call logs, browser bookmarks, and Wi-Fi settings. Ultimate Backup offers a decent yet free set of system tools even without root, and the premium version contains some additional features, including scheduler and cloud backup restore.

10 Best Backup Apps for Android | Titanium Backup
Cost: Free / $ 6.58
Already rooted your Android device or are you thinking about getting root access? Titanium Backup is a reliable working backup application for Android devices, and the free version allows you to back up and restore applications and various data, including contacts, SMS logs and more, with tools that significantly automate the backup process. The premium version has many great features, including backup and restore from the cloud, as well as an automated scheduling, selective archiving of items, and moving backed up data to SD card.

10 Best Backup Apps for Android | My Backup Pro
Cost: $ 3.99
My Backup is another powerful backup and data management app for Android devices. This program includes backup functions and an automatic scheduler, as well as the ability to create a backup in the cloud and many other features. Despite the fact that My Backup works great on phones without rooting, its true potential is revealed on devices with root access, since the user can back up not only applications, but also various data and settings, such as saved games. In order to try the program in practice, you can use a 30-day demo version.

10 Best Backup Apps for Android | Super backup
Cost: Free / $ 1.99
Super Backup is a fast free application for an Android smartphone, capable of backing up and restoring data along with applications and settings (you need root access), carry out these processes automatically through the scheduler. The backup is saved to SD card, internal memory, PC or Gmail (although this will look ridiculous for all other data except phone data). There is no cloud backup option from Gmail, so you have to import your backups to the cloud, SD card or PC yourself. The advantage is that all of these features are free, and buying a premium account only serves to get rid of ads.

10 Best Backup Apps for Android | GCloud Backup
Cost: Free
If you need to save mostly not programs, but photos, music, videos, contacts or call log, then GCloud Backup will satisfy your needs. Users need to create a dedicated GCloud account that provides 1 GB of free backup space (expandable with the purchase of a premium account), and all you need to do is select the desired backup information, which will then be automatically copied to your account ... The backup process can be done using the scheduler, and the cloud browsing can be done through the cloud service account.

10 Best Backup Apps for Android | Mobile Backup & Restore
Cost: Free / $ 1.99 per month
Mobile Backup & Restore is something new from Avast for Android backup applications. The free version allows you to back up your contacts, SMS messages, call history and photos, and with a monthly premium account, you can use the same features for music, videos and apps. Mobile Backup & Restore stands out from the crowd with its task scheduler and automatic features that are easy to configure, as well as many options for backing up completely or selectively to Drive and Avast servers. Rooted and premium users can save app data. In general, Avast's program is not as demanding as some others, and besides, it is one of the easiest to use.

10 Best Backup Apps for Android | SMS Backup +
Cost: Free
If in the matter of backup you are only interested in saving SMS messages and call logs, then SMS Backup is worth a try. The app automatically syncs SMS, MMS and call logs with your Gmail account, tagging each group. Automatic backup settings allow you to adjust the time and frequency of backing up messages, which can then be restored using tags. And although this application does not have as extensive a set of functions as many other programs (moreover, some users report problems with KitKat), it makes it very easy to make an additional copy of messages and call logs.

10 Best Backup Apps for Android | ROM Manager
Cost: Free / $ 5.99
Another program from ClockworkMod this time is not an application exclusively for backup, but it is a powerful system tool for rooted devices that can actually completely clone the software part of your device in its current state. In addition to creating backups, you can view their contents and restore the firmware. And although this program is not as focused on the backup process as specialized applications, the functions of ROM Manager are great for those users who like to tinker with custom firmwares and variations of Android, since with this program you can create system restore points and use them if you you need to bring your device back to life.

As the well-known IT wisdom says, sysadmins are divided into those who do not make backups, and those who already make backups. I think everyone had to set up a phone / tablet from scratch at least once after a firmware or a failure. But this is not at all necessary if there is a saved backup. In this article, we will look at different types of backup (backup) of the contents of Android devices for all occasions.
Introduction
Having gotten root on a smartphone, the average user begins to experiment with the device and install various interface modifications, themes, fonts, new kernels, firmware, radio and root applications. As a regular, long-time and active user of the forums w3bsit3-dns.com and XDA Developers, I can say that very often such experiments end with questions with the wording: "The phone does not load, what should I do?"
Even after reading the instructions very carefully, you can make a typo or press the wrong button, and then get a bootloop - an eternal phone boot with repeated bootanimation. In the worst case, you can get a "brick" - the phone will not turn on at all. This happens very rarely, and, frankly, you need to try very hard to, for example, kill flash memory. Usually, what users consider a "brick" can be successfully restored using simple manipulations. And backup will help us a lot with this.
The basic backup features that will satisfy most regular users are provided by Google itself. There is a "Accounts" tab in the phone settings, where you can put the necessary checkboxes. After flashing or resetting the device to factory settings or activating a new phone, Android will restore contacts, history and Chrome browser tabs, Google Keep notes, photos, app data, calendar events and so on. In the latest versions of Android, you can restore the desktop with all shortcuts and automatically install all previously installed applications.
However, Google cannot back up everything. System and application settings will be reset, saved passwords (or rather, authentication tokens) will disappear, applications from third-party markets will not be reinstalled. Therefore, we need tools that can save everything in general. We will talk about them.
WARNING
Most of the applications described in this article require root and BusyBox.
Backup applications and their data.
I myself take a "clean install" approach. When switching to a new firmware, it is easier for me to set up programs from scratch. And the appearance of bugs in this case is reduced to nothing, especially when switching to the next major version of the firmware. But many users find it more convenient to save application settings and restore them to the new firmware. This is especially true for third-party programs that are not in the market. I will focus on two of the most popular applications with millions of downloads.
Titanium Backup
The most powerful tool for backing up, restoring, freezing and removing applications along with their data (including system and pre-installed by the manufacturer). Allows you to set up an automatic backup on a schedule without closing the application, and transfer any application to the SD card. You can store different backups of one application, save SMS, MMS, call history, browser bookmarks, Wi-Fi access points in the form of an XML file. Can sync all backups to Dropbox, Box and Google Drive. With this application, it is easy to make any user application a system one, add encryption, link the application to the market after recovery (for further updates). A convenient function is to create an update.zip archive based on a backup of applications and data, which can be flashed from the recovery console to restore applications and settings.
One of the most useful uses of Titanium Backup is transferring apps and their settings between devices. As an example, I'll show you how to get the popular WhatsApp messenger to work on a tablet without a SIM card. When you search for a program in the market, the description page will indicate that this program is not supported on your device. Even if you download and install the APK, to activate the program you need to dial up the device, which a tablet without a SIM card (or LTE with a tariff without voice calls or a dealer cut from the firmware) cannot do.
So, go to Titanium, look for the desired application, click on it and click "Save" in the pop-up menu. If you make a swipe to the left in the menu, you can call additional functions. The same menu can be called up with a long tap on the application in the list. After running the script, a new entry will appear in the notification panel about creating a successful backup. For convenience, I advise you to configure the program to upload backups to the cloud. Synchronization can be configured on the third tab - "Schedules". Click "Start" on the item "Synchronization with Google Drive", and a notification in the shutter will inform you about successful completion.
Launch Titanium on the tablet and sync backups with the cloud. In this case, the just made backup is downloaded from the phone. WhatsApp will be at the very end of the list of programs. A strikethrough name means that the program is not installed on the tablet. Click on the program and select "Restore" in the pop-up menu. Everything. You can launch WhatsApp.
Helium - App Sync and Backup
The main difference of the program is the ability to work without superuser rights (the application uses the standard backup manager, available in any Android since version 4.0. - Ed.). At the same time, some of the functions have been cut down and a companion application on the computer is required. The program will allow you to make a backup of the user dictionary, messages and call logs, Wi-Fi access points. System applications cannot be backed up, even if there is a root. Also, redundancy may be prohibited by the developers of some programs. They will be at the bottom of the list. For example, you won't be able to back up the same WhatsApp.
Helium remembers all devices on which it was launched and allows you to restore backups separately on different devices. Backups can be stored on a memory card or in the cloud (Google Drive, Box, Dropbox), as well as made on a schedule. Another feature of the application is that data between devices is easy to transfer, for example, having started a game on one device, you can continue it on another.
IMEI
There are frequent cases when after the firmware the cellular communication and the Internet stop working. This is a sure sign that IMEI (International Mobile Equipment Identity) has flown. This number is unique for each device and is used to identify the device on the network. If it fails, it can reset to zero, and the device will stop seeing the network.
To avoid such cases, I advise you to make a backup of the EFS partition containing IMEI in advance: using programs from the market, by hand through the console (adb shell) or on the device through a terminal emulator. It should be noted that for different devices, the partition table can be drastically different depending on the chips used. In the case of Nexus 4, enter the following commands in the terminal:
Backup IMEI:
Su dd if = / dev / block / mmcblk0p8 of = / sdcard / m9kefs1.img dd if = / dev / block / mmcblk0p9 of = / sdcard / m9kefs2.img
Repair IMEI:
Su dd if = / sdcard / m9kefs1.img of = / dev / block / mmcblk0p8 dd if = / sdcard / m9kefs2.img of = / dev / block / mmcblk0p9
The Nexus 5 does not have a separate EFS partition. Therefore, it is necessary to back up sections 12 and 13, containing not only IMEI, but also other data:
Su dd if = / dev / block / mmcblk0p12 of = / sdcard / modemst1.img dd if = / dev / block / mmcblk0p13 of = / sdcard / modemst2.img
Recovery is carried out by a similar team.
Photos and Videos
After an unsuccessful firmware or, for example, damage or theft of the phone, the most unpleasant sensations are the loss of the captured videos and photos. After all, applications can be reinstalled, passwords can be restored if necessary, and photos, if not secured in advance, will disappear forever. And in the market there are programs for every taste to save your photos and videos. Let's consider a few of them.
Google+
The standard program from the "corporation of good", preinstalled on all stock firmware. I have been using it for a long time and on all devices (at the moment, the albums contain more than 10 thousand photos). Automatically syncs all captured photos with closed Picassa albums (soon the same feature will appear in Google Drive). Photos will be available on all devices that are signed in to one account. If you have the Internet, all photos can be viewed even on a new device by logging into your Google account. A nice bonus - auto-correction of some photos, creation of collages from similar photos and GIF-animations from a series of photos. Auto creatives also appear automatically - a cut to music from a variety of photos and videos taken on the same day. When you change the location of taking photos and videos, "Stories" and "Travels" usually appear.
Other options
- MEGA- Gives 50 GB storage by default, has flexible settings, a sync client for a computer and an extension for the Chrome browser. Different viewing modes, the ability to open folders for other users.
- Cloud Mail.ru- 100 GB for new users. Has a nice interface and a client for a computer.
- Dropbox- interesting in that it has a companion application Carousel, which can not only automatically download photos, but also clean the smartphone from those that have already been downloaded.

INFO
It is better to store important backups in the cloud or on a computer so that they can be used even after a full wipe of the device.
Backup arbitrary files
There are also various programs for backing up files on an SD card. In general, they have similar functions and differ in interface or supported cloud services.
Foldersync
Material Design, support for Amazon Cloud Drive, Box, Dropbox, FTP, Google Drive, Mega, OneDrive, SMB / CIFS, WebDav, Yandex Disk. Has a built-in file manager, many settings, filters, convenient planning. The ability to configure two-way synchronization, transfer hidden files, configure transmission via Wi-Fi / mobile Internet, Tasker support, PIN protection, the ability to synchronize subfolders.
DataSync
Ability to sync between devices via bluetooth, schedule, app data, files and folders. Automatic two-way data synchronization will save game progress and automatically download it to all connected devices when data changes on one of them.
Dropsync
An advanced dropbox sync client. Uploading photos and videos, monitoring the battery level, Wi-Fi / 3G / 4G / WiMax connections and adaptation in accordance with user preferences, customizable auto-sync interval, plug-in to Tasker, the ability to select a synchronization mode: only upload, download and delete, only download, mirror download and more.
In fact, this is an analogue of the Dropbox desktop client with on-the-fly synchronization (as in the Linux version of the client, file changes are tracked using the inotify mechanism, so everything is synchronized at once, and not at regular intervals).

INFO
For Linux / UNIX users, rsync backup for Android is suitable, which will allow you to send and receive files from a remote server via SSH. Has the support of Tasker.
Full device backup
Nandroid backup (from NAND - the type of memory used in modern smartphones) - a complete backup of the entire firmware together with applications, data and settings. The function is supported by TWRP or CWM. In addition, a backup can be done directly from Android using the Online nandroid backup program. The already reviewed Titanium, as well as the Nandroid manager, will help to recover individual data. First, let's see how to make a backup from the Recovery Console.
CWM
To create a backup, you must select the Backup and Restore item, and then Backup to / sdcard. Before clicking, you can select the backup format or free unused data. To restore, select the item Backup and Restore and then Restore from / sdcard. If you select Advanced restore from / sdcard, you can specify the boot, system, data, cache, sd-ext partitions for recovery separately.
For greater safety, the resulting backup can be transferred to a computer. But there is a catch here. The fact is that if the device has an "external" (real) memory card, CWM will place the backup in it and it will be available for saving on the computer by standard means (directory clockworkmod / backup / date-and-time-backup on the memory card ). Everything is all right here.
Lyrical digression, or declaration of love for Nexus devices
If you look at the partition structure of Nexus devices using the adb shell busybox fdisk / dev / block / mmcblk0 command (you need root and installed from the BusyBox market), you can see the following picture (see the screenshot "Partition structure on Nexus 5 and Nexus 4" ).
The aboot section is the primary bootloader. It can be damaged if, for example, flashing the kernel or bootloader from another device or pulling the cord out of the phone during the flashing process. At the same time, the partition table flies and the phone stops loading into the bootloader and recovery, and also stops responding to the fastboot and adb commands.
An ordinary user thinks that this is a "brick", and takes the phone to the service center, where he pays more than a hundred dollars for a new one to replace the allegedly burned out fee. In fact, in section 15 for the Nexus 4 and section 11 for the Nexus 5, there is a backup copy of the bootloader - abootb. This is one of the reasons that it is almost impossible to kill the Nexus, as the backup bootloader can be restored without any problems.
Turn off the smartphone and turn it on while pressing the keys
$ adb shell su
The partition table will be restored, and if necessary, you can further flash the desired bootloader.
However, in smartphones without a memory card slot or in its absence, the backup will be invisible to the user. This is due to the fact that since version 4.2 in Android, the mount points of internal memory have changed to support multi-user operation. The virtual (internal) memory card itself is mounted in / data / media, and there is also a CWM backup. But the main user data is in / data / media / 0, and it is this directory that is then mounted as / sdcard. Therefore, the backup will remain unavailable using standard tools and without root rights.
You can get a backup from / data / media using a file manager with superuser rights or by connecting a smartphone to a computer in recovery mode. Next, enter the adb shell command, and then ls / sdcard / clockworkmod / backup / to search for the directory with the last backup. We transfer the backup with a command like this:
$ adb pull /sdcard/clockworkmod/backup/2015-04-20.15.46.18 \ "D: \ Nexus5 \ Backup \ Nandroid \ 2015-04-20.15.46.18"
where the numbers are the previously found backup, corresponding to the date and time of appearance, and at the end - the path on the computer for storing the backup, which can be arbitrary.
TWRP
To create a backup, press the Backup button and mark the necessary sections with crosses (not sure - select all). Additionally, you can remove encryption, enable compression, skip the creation of the MD5 hash and choose to save to a USB - OTG flash drive. As a result, the backup will be in the / sdcard / twrp / backups / date-and-time-backup directory. Unlike CWM, it will be available regardless of the presence of a memory card. To restore, click Restore and select the desired one.

INFO
The market has a large number of programs for a separate backup and recovery of SMS, calls, contacts, kernels, recovery, and so on.
Nandroid Manager
It is a one-stop tool for managing all Nandroid backups. With the help of Nandroid Manager, you can recover from Nandroid applications and data, SMS, call log, Wi-Fi hotspots, saved paired Bluetooth devices, user dictionary. The application sees backups created in both custom recoveries, and allows you to rename them and search for information in separate databases inside the backup.
 Nandroid Manager features
Online nandroid backup
Allows you to make a backup on a device operating in normal mode without overloading in recovery. In the settings, you can select the following parameters:
- The name of the backup - each time manually / according to the UTC time zone / according to the time zone of the phone / based on the firmware version number, including the creation time.
- Backup type - CWM / TWRP with or without compression.
- Mode - normal (full) / selection of sections to copy. When you select the latter, a list with a choice opens.
- Where to save the backup.
- The number of backups for storage is from "all" to 10 (older ones are deleted in case of overflow).
- Saving Yaffs2 partitions as Tar files.
- Excluding Dalvik Cache from backup.
- Excluding Google Music files from backup.
The program supports uploading backup files to the cloud, FTP or Google Drive. A configurable schedule for automatic backups is available, from “every day” to “every 30 days” with the option “only when the device is charging”. In addition, the plugin supports actions for Tasker.
Backup with ADB
A way, so to speak, for geeks. We connect the smartphone to the computer, enable USB debugging. Next, we use the adb backup command, which has the following keys:
- -f FILE - location and name of the backup file on the computer. If this parameter is not present, the backup will be created in the current folder called backup.ab. For Windows, paths with spaces and special characters must be enclosed in quotation marks.
- -apk | -noapk - whether or not to backup the APK application. The default is not to save.
- -system | -nosystem - whether to save system applications in the backup. The default is to save. Choosing -nosystem will prevent system applications from being saved when the -all switch is given.
- -all - save all installed applications, including system ones, in the backup.
- -shared | -noshared - whether to include application data and the contents of the memory card in the backup. The default is not to save.
- - here you can write a list of applications that will be backed up. Ignores -nosystem.
Accordingly, to perform a full backup, we use the following command:
$ adb backup -f "D: \ Backup \ ADB-2015-04-20.ab" -apk -shared -all -system
After that, Now unlock your device and confirm the backup operation will appear in the console, and a notification on the phone asking you to confirm the operation and set an optional password for the backup. The process of creating a backup copy itself can take more than forty minutes, so there is no need to worry. To restore, use the command "adb restore path-to-file", for the example above it will be:
$ adb restore "D: \ Backup \ ADB-2015-04-20.ab"
We confirm the request on the phone, enter the password (if set during the backup) and wait for the recovery, which may take even longer than creating the backup itself.
INFO
You can find out the IMEI numbers of all your devices linked to Google (including old ones) at google.com/settings/dashboard, expanding the Android list.
Conclusion
I hope this article will help you save time and hassle while experimenting with the device. And even the loss or theft of your phone will not be a tragedy with backups of photos and applications saved in the cloud.
21.08.2018
In the first case, you can copy important system files to some protected storage, while the utility can even save an entire operating system.
And what is "Backup" if you translate this name from English? The term comes from the English word backup, which can be translated as "reserve". However, with the same success it can mean something like "backup" or "duplicate". Thus, this term refers to the storage of important information on a third-party medium.
By the way, our ancestors knew very well what a backup is! True, they did not call this process that. Did you know that all the manuscripts were rewritten? The fact is that in ancient times, enemies loved to burn libraries, and therefore it would be simply stupid to keep all the books in one place and in one copy. Of course, all sorts of usurers have also mastered backup, keeping lists of their debtors in several copies.

When to back up?
Returning to the topic of sayings and proverbs, you should once again remind about the uselessness of drinking mineral water at a time when your kidneys are no longer working ... Simply put, you need to keep all your working documents all the time! Even if you don't store something incredibly important on your computer, a configured and glitch-free OS is important information in itself.
Thus, before you decide to try any, it is advisable to make a backup copy of the system or important files that affect its performance.
It is not hard to guess that before a complete reinstallation of the OS, it is advisable to transfer all your collections of movies and music to a spare hard drive. today they work almost flawlessly, but it never hurts to play it safe in this matter.
Where can I save a backup?
Writing to an external drive

Check the boxes next to those items that are subject to synchronization, for example, you can select only Contacts, or select all. Then you need to call the context menu and select “Synchronization”.

During syncing, you will see round arrow icons. When the data is backed up, the icons will disappear. To check if the synchronization was successful, you just need to log into your account on another tablet, having previously turned on Wi-Fi, and also having done all the steps described above. After that, all your contacts should appear on the new device, etc.
Backup and restore SMS
If the owners of tablets with support for SIM cards need to reset the data on the tablet to standard settings, or reflash the device, all SMS will be erased, since they are in the tablet's memory. Sometimes I would not like to lose SMS from a dear person, so the SMS Backup & Restore application comes to the rescue. Install it on the tablet, on which you need to make a backup copy of the SMS-juice, and launch it.


Then you need to return to the main application window and select the "Reserve" item. Next, you will be prompted to select the name of the backup file, as well as select the dialogs that you want to back up: those that you choose, or all in a row. Click "Ok" and wait for the end of the reservation process.

The backup copy will be saved in the .xml file in the place where you previously specified in the settings. Go to this folder through any file manager, and make sure that a backup has been created.
Now let's try to restore SMS from a backup after flashing the tablet or resetting the settings. Install the same application, launch it, and press the "Restore" button. If the application cannot find the backup copies, “help” it by specifying the path to the .xml file with the SMS backup in the settings, and then click “Restore” again.
Backup system settings, applications, application data
Backup and recovery using the program. A generic method that can be useful for:
- Restore all system settings, installed applications, their data and settings after, or the device. You don't have to re-install and configure everything.
- Restoration of game saves. It is not necessary to restore all settings and all applications - you can restore just one game, and your game achievements will work.
Backing up with Titanum Backup
- Install ROOT rights on the tablet. We read what it is and why. In short, without Root rights, the Android system will not give the Titanium application access to system files, which means that it will not be possible to make a backup copy.
- Download the application and install it, launch it.
- Go to the menu (top right), and select "Settings".

- There we go to the item "Path to the folder with rk", and choose where the backups will be saved. It is desirable that it was a memory card

- We return to the settings, and select the item "Batch actions".

- In the window that opens, click "Start" opposite one of the three items, which are outlined with a rectangle. If you need to make a backup of installed applications, their data and settings (including game saves), click the first item - “Make r.k. all custom software ”. If you need to make a copy of all system applications and Android system settings, click the second item. And if you need to make a backup of both, choose the third item.

- In this field, the program will prompt you to select applications or data to be backed up. Select the checkboxes as you see fit. Ready? Click the green checkmark on the top right, and the backup process will start immediately.

Restoring a backup using Titanum Backup
- To restore, go to the "Batch Actions" menu item again, and scroll down to the "Restore" section. Depending on what kind of backups you made, click on "Start" opposite the items "Restore all software with data" or "Restore all system data".

- Select the data you want to recover, and click the green checkmark on the top right to start the recovery process.

- We are waiting for the end of the process, we reboot the device, and voila - you have restored the data from the backup!
note... This application is not suitable for backing up personal files such as music, photos, videos, documents. Use manual transfer of such data to a USB flash drive or computer from the tablet's memory.
Question. All this is good, but I want to make a backup, and I do not have a flash drive (there is no microSD slot in the tablet). What to do?
Answer. It's simple - in theory, you can connect a regular USB flash drive to the tablet via, and make a backup to it. And if you are a bit of a hacker, you can make a backup directly to your PC, you just have to carefully study this material.
Backup all firmware (system snapshot) using Recovery
If you are going to take any serious action with your tablet, for example, do a flashing or ROOT, it is better to take a "snapshot" of the current state of the system. At least, if you “kill” the tablet with flashing, you can at least recover to the original state of the system, keeping all settings and software.
Creating a backup using the Recovery menu
- Install ClockWorkMod Recovery on your tablet. We read how this is done.
- We charge the battery of the tablet to full capacity so that the tablet does not turn off during the creation of the backup.
- Make sure that a USB flash drive is installed in the tablet, and that there is enough free space on it to copy the entire Android system.
- We go to the Recovery menu. To do this, turn off the tablet, and simultaneously hold down the combination of physical keys on the tablet case. The combination may be different for each device, and may include simultaneous or sequential pressing of the volume +/- keys, power button, and back button, if available.
- When we got to the Recovery menu, use the volume up / down keys to move along it to the "backup and restore" item. Using the power button, select this item.

- Now we select the item "Backup" - ie. creating a backup copy.

- We are waiting for the process of creating a backup - this may take some time.
- We reboot the device at the end of the process.
Restoring from a backup in Recovery
- We install a USB flash drive with previously recorded recovery files into a fully charged tablet.
- We go to the Recovery menu in the way described above, only instead of the “Backup” item, select “Restore”, i.e. recovery.
- You will be prompted to select the location where the system backup files were saved, as well as select a recovery file.

- After selecting the recovery file, the process of uploading your system snapshot to the tablet will begin. It is strongly not recommended to interrupt the backup restoration process! If everything is completed successfully, a notification similar to the following will appear, with the words “Restore Complete!”

- All that remains is to reboot the device by clicking “Reeboot system now”.

Question. My tablet does not have volume keys. And how do you order to move around the Recovery menu?
Invest in this concept?
Among the most versatile methods that do not require special knowledge and skills is MOBILedit! Enterprise. It provides the user with all the possibilities at once:
- automatic detection of a huge list of devices;
- right during installation, you can download drivers for all types of equipment from global manufacturers;
- owners of Chinese products based on MTK chips need not worry, since there are drivers for all generations of such devices;
- user-friendly interface, which has all the functionality of any exchange programs;
- the ability to save data to cloud storage;
- the program can do cloning - full, which makes a backup copy of everything.

You can make a backup copy of data on Android using both the capabilities built into the system and through additional software, including through a computer. The choice of a particular method depends on what you need to recover - only personal files (music, photos, etc.) or the entire OS with firmware.
To make a backup of the entire Android system, you need to have superuser rights (root access), since in normal mode you will not be able to copy system files.
Creating a backup using built-in tools
Every Android device is equipped with a standard recovery environment (Recovery). To back up all data via Recovery, you must:
Backup files are saved on the built-in memory of the gadget by default. For greater reliability, it is recommended to copy them to a computer.
Using additional software
If for some reason you cannot get into the Recovery area or you simply don’t want to work with it, you can also make a backup copy of the Android firmware through special programs available on the Internet. At the same time, the most demanded applications are:
- TWRP Recovery;
- MobILedit.
How to work with TWRP Recovery
Using this utility, you can not only make a complete "fingerprint" of the system, but also, if necessary, restore it to a saved state.
The sequence of actions will be as follows:

Using the MobILedit program
To make a backup of all user data (files, notes, phone records, installed programs, system parameters) or restore them, you can use the MobILedit utility, which works through a computer, that is, you do not need to install it on your phone or tablet. Its only drawback is that it does not allow you to make a copy of the Android firmware itself.
Before creating a "snapshot" of the data, you need to.
Everyone knows that any owner of a smartphone or tablet can expect an unpleasant surprise. So, you need to periodically save data in a safe place - do backup android... And it is absolutely imperative to do this before launching a new suspicious application or if you are going to delve deeply into the stuffing of the device. For "jailbroken" devices, there are plenty of programs specializing in this, but for those who like to do everything legally - without - everything is a little more complicated.

In fact, if you need a one-time backup or don't mind $ 3.99 for the official full version, there is an ideal option. MyBackup Pro App knows how to do everything that is needed in this area: save data of various types to an SD card or in the cloud storage offered by the developer, restore them at the right time, set up a schedule for regular backups. Free version MyBackup Pro for android allows you to use all functions for 30 days.

Backing up with is easy. A few simple steps are easy to follow from the screenshots posted on the application page on the market. First, choose what you need to do: Backup - backup. Then decide what you will save: applications and media files (applications & media) or information in general (data).

Then you will need to choose where you will save the data: to the SD card or online, on the developer's server. The types of data that need to be saved, you can check the boxes in the list:


