If you are a regular reader of our site, then you probably remember our article in which we talked about. In the continuation of this article, we want to tell you how to set up a Wi-Fi router in an apartment, highlighting the accents when setting it up.
Using a Wi-Fi network at home
For newbies, a few words should be said about what Wi-Fi is for at home and what its benefits are. Wi-Fi at home is necessary in order to divide the Internet into several devices using a router. Wi-Fi is also needed to create a local network. It should also be noted that many devices, such as tablets and smartphones, do not support Ethernet connection, so Wi-Fi is the only way to transfer the Internet to these devices.By creating a Wi-Fi network at home, you can get rid of wires in your apartment, as well as get access to the Internet in any room of an apartment or private house. As mentioned above, to create a Wi-Fi network, you need a router, the correct configuration of which will be discussed later.
How to set up a Wi-Fi router correctly
If you followed the recommendations of the site that were given in the article about a Wi-Fi router, then you should have chosen the right Wi-Fi router that will fully satisfy all your requirements and fulfill all the tasks assigned to it.In the article about how we gave recommendations on where is the best place to install a Wi-Fi router. When a place is chosen, and this place is most likely near a stationary computer, then this computer must be connected to the router using a twisted pair cable (network cable), which comes with all models of routers. If the location of the Wi-Fi router is not near the computer, then in any case, the initial configuration of the router must be done via an Ethernet connection - a cable.

When the router is connected to a computer or laptop, then you need to go to the router settings menu. The router settings menu is made in the form of a website, so you shouldn't have any difficulties with it. In order to open the settings of the router, enter the local address of the router in the address bar of the browser: "192.168.1.1". Before entering the system, enter your username and password to access the settings menu. Login and password are the same: "admin". The router menu will look something like the picture below.
Re-flashing the router for quality work
To begin with, it's worth saying a few words about the firmware. For experienced users, we would advise you to reflash the Wi-Fi router, since in the overwhelming majority of cases, the standard firmware of routers is not fresh, and therefore there may be some flaws in them. To fix this, we recommend reflashing your router to improve the quality of the Wi-Fi network and router performance.
You can download the firmware file on the official website of the router manufacturer. You can reflash the router by going to the "System Tools" section in the "Firmware Update" category. If your router has an English-language shell, then go to the "System Setup" section in the "Firmware upgrade" category. Specify the path to the firmware and update it. Now let's move on to setting up a Wi-Fi network.

Setting up an Internet connection and Wi-Fi network
First, you need to configure the WAN connection, that is, configure the router to connect to the provider so that the router receives Internet traffic.
- WAN connection type. To configure the router - open the "Network" section and the "WAN" category. In the WAN connection settings, you must set the type of your Internet connection. As a rule, most modern ISPs use Dynamic IP, for which you do not need to enter settings. If your provider uses a PPPoE connection, then you need to select the appropriate item in the menu and enter the settings for its connection, specifying the username and password. For a static IP address, you must also select the appropriate connection type and enter the following settings: IP address, subnet mask and default gateway.
- Installing DNS. If in their settings the provider sets the mandatory registration of the DNS server address, then enter the primary and secondary DNS (DNS1 and DNS2). For a dynamic connection type, you do not need to enter DNS, since it will be set automatically.
- Network name. The network name means the name of your Wi-Fi router, which will be displayed in the list of devices for Wi-Fi connection. The name of the router must be unique, because otherwise, if there are 2 Wi-Fi routers with the same names in the same coverage area, this can lead to problems with access to the wireless network. Having come up with a unique name for the router, we proceed to choosing a communication channel.
- Wi-Fi channel. Here you need to select the channel through which the Wi-Fi signal will be transmitted. All routers can work in 13 channels, but you only need to choose one. It is important to note that if a large number of devices work on one Wi-Fi channel, then interruptions in access to Wi-Fi, as well as a drop in speed, are possible. Most often, users set the automatic channel selection by the router, but this can cause problems. We recommend that you check the number of Wi-Fi routers that are available in your apartment, if there are few of them, then leave the automatic channel selection, if there are many, set it manually. We recommend setting the channel from 10th to 13th, as these channels are used less often.
- Transfer mode. Wi-Fi has its own data transfer modes. Today there are several Wi-Fi standards: a, b, g, n, ac. The most used is the "n" standard, but we do not recommend installing only this standard, since devices that do not support this standard simply will not connect to a Wi-Fi network. Therefore, we recommend setting the parameter: "b / g / n".
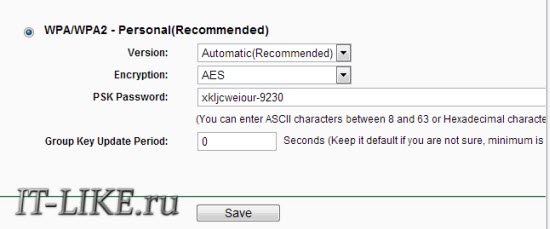
- The type of data encryption. Encryption is used for the security of data transmission. There are several types of Wi-Fi encryption. Unlike the data transfer mode, you can select only one type of encryption, so devices that do not support the latter type of encryption will not be able to connect to Wi-Fi. In turn, we recommend using the encryption type: WPA-PSK / WPA2-PSK. If all your devices support it, then that is very good, since it is the most reliable. If some Wi-Fi devices do not support it, then you will have to set the WEP encryption type.
- Data transfer rate. As for the data transfer speed, we recommend that you set the maximum allowed speed by the router.
- ... Well, the last thing you need to pay attention to is the password. The Wi-Fi password should be as complex as possible so that it cannot be guessed. We recommend using letters, numbers and specials in the password. symbols.

Now let's move on to setting up a Wi-Fi network. Go to the section "Wireless" (Wireless), where set the following settings.

Setting up Wi-Fi on devices
In order to configure Wi-Fi on your devices, just find the name of your Wi-Fi router in the list of Wi-Fi devices and connect to it by entering the password you set.How to set up Wi-Fi on a laptop
You can configure Wi-Fi on a laptop by clicking on the network connections icon in the system tray, which will offer you a list of available Wi-Fi devices. To connect to a Wi-Fi router, select your device from the list of devices and click the "Connect" button. Enter your password and save it.
Sometimes users have a problem accessing a Wi-Fi network when the Wi-Fi network is not available. To do this, look for a function key on the laptop that is responsible for enabling and disabling the Wi-Fi module in the laptop. Turn on the module, and after that the Wi-Fi network will be available.
How to set up Wi-Fi on a computer
Most computers do not have a Wi-Fi module, and therefore, it will be impossible to connect to a Wi-Fi network. In order to have access to a Wi-Fi network on a computer, purchase a Wi-Fi adapter. This device connects to a computer via a USB port. After you install the drivers for the adapter, the Wi-Fi network will also be available on the computer.
The modern world cannot be imagined without wireless networks. In the 1990s, no one suspected that such a rapid development of the Internet would occur. However, already in 1998, the first Wi-Fi wireless network was presented. In this article, we will learn how to connect and configure a WiFi router.
A little background
Surely many of you are familiar with the functionality of wireless networks. However, there are those who do not know anything about it at all. Therefore, all actions will be extremely detailed so that everyone can understand.
Wi-Fi technology was created by an Australian developer, and then it was a very deplorable sight. The transmission was carried out over short distances, and there is no need to talk about data protection. At the moment, "Wi-Fi" is the most common form of transferring an Internet connection without using wires.
It became widespread with the development of smartphones and laptops with network adapters. There was a growing need for wireless connections among users because it was very convenient. Now "Wi-Fi" is used everywhere: in schools, large corporations, entertainment centers and at home. It not only broadcasts the Internet signal, but also connects certain devices to each other.
Now you will learn how to set up your router to receive WiFi. To do this, all data is split into several actions. We will also describe the connection to the most popular routers.
First action. Router connection
After connecting the Internet cables, your ISP will usually provide you with a Wi-Fi router for free. Sometimes it is connected by those who conducted the cable for you, or the master is called to your home. Or you can do everything yourself, the procedure is quite simple:
- Choosing a place for the router. It is closer to the cables that your provider has laid for you. It is recommended to install the router at a certain height, especially if you have pets.
- Assemble the components together. For example, screw on the antennas if they are removable. Then plug the power adapter into a power outlet and turn on the device.
- Connect the cable from your ISP (usually white) to the WAN or Internet port. In most cases, it is specially highlighted in blue so that it is more convenient for the user to navigate in the abundance of wires.
- Connect the router with a computer or laptop with a network cable. On a PC, the wire is connected to the system unit, namely to the network card. And in the router, the cable goes to the LAN port. Sometimes it can be called "Home network", as a rule, there are only four such ports.
Second action. Checking the operation of the router
Before starting the setup, you need to make sure the router is connected correctly. To do this, follow these steps:
- Look at the router, the indicator lights on its screen should be on, which indicate normal operation. If they are not visible, then turn on the router, usually the button is located on the back of the device.
- Check the electrical connection. It is worth noting that this is another reason why the router may not turn on.
- Take a close look at the wires where they are connected.
If everything is fine, then the router will already distribute WiFi. But it won't work, so you don't know how to set up your WiFi router yet.

Third action. Checking the network adapter
Each laptop model has its own function key that allows you to enable or disable the network adapter. For example, on Lenovo notebooks, as a rule, there is no button on the keyboard. The switch is on the front panel.
ASUS notebooks have a hot key combination Fn + F2, while Acer has implemented Fn + F3. You can see the rest of the hotkeys on the official website of the manufacturer or by opening the instructions for the laptop.
Universal advice. Look at the row of keys F1-F12, among them find the icon of the antenna that transmits the signal. Hold down the Fn key and click on your distribution button.

All steps are correct, but Wi-Fi does not turn on - why?
In this case, the problem lies in the software settings. There are three reasons:
- System crashes. If so, just restart your computer or laptop.
- Infection with viral software. Download popular antiviruses and check your device.
- Incorrectly installed drivers or their absence. When a new device is connected, the Windows operating system loads the necessary drivers by itself. However, sometimes this does not happen.
After fixing these problems, you can learn how to set up your WiFi router. Instructions for this and useful tips are presented below.

Configuring the web interface
All routers are made individually and have their own tuning algorithm. To enter it, you need to use a browser and go to the specified addresses.
Everything you need to know to set it up correctly:
- Your device must be connected to a router via cable or Wi-Fi connection. Without this, you will not be able to open the desired site and start setting up.
- The control panel does not require an Internet connection. You just need to set the connection of IP-addresses, which will occur automatically.
- The required address used for configuration is entered into the address bar. It is worth noting that if you do not enter the data into the search bar, then you will not get anything.
- The name and password are on the back of the router. As a rule, the name and password have the same name - admin (with a lowercase letter).
In most cases, ISPs write the address required for configuration on the back of the router. But, if you are too lazy to watch, then use one of the following:
- 192.168.1.1
- 192.168.0.1

How to set up a Rostelecom WiFi router
Before starting the setup, we need to check the connection with the computer. To do this, follow the following procedure:
- Open the "Start" menu.
- Click on the "Control Panel" tab.
- Then go to the "Network Connections" item.
- And then select "Local Area Connections".
- Next, click on "Internet Protocol" and right-click on "Properties".
Make sure you have automatic connection of IP address and DNS server enabled. If everything is fine with the set parameters, then setting up a WiFi router from Rostelecom will proceed normally.
Let's consider an example
Let's take the RT-A1W4L1USBn router model from Rostelecom as a sample. How to set up a WiFi router at home? The procedure is described below:
- Go to the provider's website. To do this, enter in the browser: 192.168.1.1 or 192.168.0.1.
- In a new window, you will be asked to enter your username and password, they are indicated on the back of the router. And in most cases they do not differ in any way, usually both values are admin (in small letters!).
- A new page will open to you where you can configure the router. Unfortunately it is in English.
- Select the Interface Setup item and open the Wireless tab.
- Choose AES for encryption and WPAPSK for authorization.
- Enter the new network name in the SSID field. This will help you discover and connect to your network faster.
- Set a password. Typically, it consists of a set of numbers, letters, or symbols. You are required to come up with a key between 8 and 63 characters long.
After all the manipulations, restart the router. To do this, turn it off and on again. The required button, in most cases, is located on the back of the device. Now you know how to set up a Rostelecom WiFi router.

The settings are off. What to do?
A fairly rare occurrence, but it does happen. A software failure occurs for the following reasons:
- Unfavorable weather conditions.
- Infection with viral software.
- The user is hard on the router.
- Software "illiteracy" of the user.
And despite this, you still have to recover your data. You can call the provider's hotline, explain the reasons, and ask to call the master. It usually does the setup for free, but some providers can cost money.
You can do the reconfiguration yourself, there is nothing difficult about it, especially if you personally configured your router. for a house it rarely breaks down, but here is a list of actions for restoring functioning:
- Take an object that is small in diameter, such as a needle or safety pin. And click on the Reset button, which is located at the back of the router.
- After that, the settings will be reset.
- Check the hardware for problems through the system capabilities. If the computer finds them, click on "Fix".
When the link is restored, measure the speed and signal. Now you know how to set up a WiFi router if the settings have been reset.

Conclusion
In the Russian Federation, the most popular provider is Rostelecom. However, there are others, you can take advantage of their suggestions. Every year the speed of the Internet connection grows and the number of users increases.
For the home it is provided by the provider itself, as a rule, the device is given to the user absolutely free of charge. The configuration is carried out directly by the wizard who connected the network cable for you or on his own. It is quite simple and is described in this article. If you have any questions that are not mentioned here, please contact your provider.
- Recovery Mode
Introduction
I think I will not be mistaken if most of us have an Internet connection as follows: there is some fairly high-speed wired channel to the apartment (now gigabits are not uncommon), and in the apartment he is greeted by a router that distributes this Internet to clients, giving them "Black" ip and performing address translation.Quite often, a strange situation is observed: with a high-speed wire, a very narrow wifi channel is distributed from the router, which does not load even half of the wire. At the same time, although formally Wi-Fi, especially in its ac-version, supports some huge speeds, when checking it, it turns out that either Wi-Fi is connected at a lower speed, or it connects, but does not give out speed in practice, or it loses packets. or all together.
At some point, I ran into a similar problem, and decided to configure my Wi-Fi in a human way. Surprisingly, it took about 40 times longer than I expected. In addition, it somehow happened that all the instructions for setting up Wi-Fi that I found converged to one of two types: in the first one suggested placing the router higher and straightening the antenna, while reading the second one I lacked an honest understanding of spatial multiplexing algorithms ...
Actually, this note is an attempt to fill the gap in the instructions. I will say right away that the task has not been fully resolved, despite decent progress, the stability of the connection could still be better, so I would be glad to hear the comments of colleagues on the described topics.
Chapter 1:
So, the problem statementThe Wifi router proposed by the provider has ceased to cope with its duties: there are long (30 seconds or more) periods when the ping to the access point does not pass, there are very long (about an hour) periods when the ping to the access point reaches 3500 ms, there are long periods when the connection speed with the access point does not exceed 200 kbps.
Scanning the range using the inSSIDer windows utility yields the picture presented at the beginning of the article. There are 44 Wifi SSIDs in the 2.4 GHz band and one network in the 5.2 GHz band in the district.
Solution tools
Self-assembled computer Celeron 430, 2b Ram, SSD, fanless, two wireless NICs based on Ralink rt2800pci chip, Slackware Linux 14.2, Hostapd from Git as of September 2016.
Assembling the router is beyond the scope of this article, although I note that the Celeron 430 performed well in fanless mode. Note that the current configuration is the last but not the final one. Perhaps the improvements are still feasible.
Solution
In fact, the solution should, on a good level, be to run hostapd with minimal configuration changes. However, the experience so well confirmed the truth of the saying “it was smooth on paper, but they forgot about the ravines” that it took this article to systematize the knowledge about all non-obvious details. Also, initially I would like to avoid low-level details for the sake of harmony, but it turned out that this is not possible.
Chapter 2
A bit of theoryFrequencies
Wi-Fi is a standard for wireless networks. From the OSI L2 point of view, the access point implements a switch-type hub, but most often it is also combined with an OSI L3 router-type switch, which leads to a fair amount of confusion.We will be most interested in the OSI L1 level, that is, in fact, the environment in which the packets go.
Wi-Fi is a radio system. As you know, a radio system consists of a receiver and a transmitter. In Wi-Fi, the access point and the client device perform both roles in turn.
The Wi-Fi transmitter operates on a certain frequency. These frequencies are numbered, and a certain frequency corresponds to each number. Important: despite the fact that for any integer there is a theoretical correspondence to this number of a certain frequency, Wi-Fi can work only in limited frequency ranges (there are three of them, 2.4 GHz, 5.2 GHz, 5.7 GHz), and only on some of the numbers.
A complete list of correspondences can be found in Wikipedia, but it is important for us that when setting up an access point, it is necessary to indicate on which channel the carrier frequency of our signal will be located.
An unobvious detail: not all Wi-Fi standards support all frequencies.
There are two Wi-Fi standards: a and b. "A" is older and operates in the 5 GHz band, "b" is newer and operates in the 2.4 GHz band. Moreover, b is slower (11 mbit instead of 54 mbit, that is, 1.2 megabytes per second instead of 7 megabytes per second), and the 2.4 GHz band already accommodates fewer stations. Why this is so is a mystery. It is doubly a mystery why access points of the standard a practically do not exist in nature.

(Image taken from Wikipedia.)

(Actually, I'm being a little cunning, because a still supports the frequency range of 3.7 GHz. However, I have never seen a single device that knows anything about this range.)
Wait, you ask, but there are also 802.11g, n, ac standards, and it seems that they should just beat the unfortunate a and b in speed.
But no, I will answer you. The g standard is a belated attempt to bring b speed to a, in the 2.4 GHz band. But why, you tell me, did you even remember about b? Answer, because even though both b and g ranges are called 2.4, they are actually slightly different and b range is one channel longer.
The n and ac standards have nothing to do with ranges at all - they regulate the speed, and nothing more. The point of the n standard can be both "in the base" a (and operate at 5 GHz) or "in the base" b and operate at 2.4 GHz. I don’t know about the point of the ac standard, because I didn’t see it.
That is, when you buy an access point n, you need to carefully look at what ranges this n works in.
It is important that one Wi-Fi chip can only work in one range at a time. If your access point claims that it can work in two at the same time, as, for example, do free routers from popular providers Virgin or British Telecom, then it actually has two chips.
Channel width
In fact, I have to apologize because I said earlier that some range is longer than another, without explaining what “longer” is. Generally speaking, not only the carrier frequency is important for signal transmission, but also the width of the coded stream. Width is what frequencies above and below the carrier the existing signal can crawl into. Typically (and fortunately in Wi-Fi), the channels are symmetrical, centered on the carrier.So in Wi-Fi there can be channels with a width of 10, 20, 22, 40, 80 and 160 MHz. At the same time, I have never seen access points with a channel width of 10 MHz.
Well, one of the most amazing things about Wi-Fi is that even though the channels are numbered, they overlap. And not only with neighbors, but even with channels 3 from oneself. In other words, in the 2.4 GHz band, only access points operating on channels 1, 6 and 11 are not crossed by 20 MHz wide streams. In other words, only three access points can work side by side so as not to interfere with each other.
What is a 40 MHz Access Point? The answer is that this is an access point that occupies two channels (non-overlapping).
Question: How many channels with a width of 80 and 160 MHz fit into the 2.4 GHz band?
Answer: No one.
The question is, what does the channel width affect? I don’t know the exact answer to this question, I couldn’t check it.
I know that if the network overlaps with other networks, the connection stability will be worse. 40 MHz channel width gives more crossover and worse connection. According to the standard, if there are other working access points around the point, the 40 MHz mode should not be turned on.
Is it true that twice the channel width gives twice the bandwidth?
It seems to be, yes, but it is impossible to verify.
Question: If my AP has three antennas, is it true that it can create three spatial streams and triple the connection speed?
Answer: unknown. It may turn out that out of three antennas, two can only be engaged in sending, but not receiving packets. And the signal speed will be unbalanced.
Question: So how many megabits does one antenna give?
Answer: You can see here en.wikipedia.org/wiki/IEEE_802.11n-2009#Data_rates
The list is strange and non-linear.
Obviously, the most important parameter is the MCS index, which determines the speed.
Question: Where do these strange speeds come from?
Answer: There is such a thing as HT Capabilities. These are optional chips that can slightly adjust the signal. Tips can be very useful: SHORT-GI adds a little bit of speed, about 20 Mbps, LDPC, RX STBC, TX STBC add stability (that is, they should reduce ping and packet loss). However, your hardware may easily not support them and still be quite "honest" 802.11n.
Signal strength
The easiest way to deal with poor communications is to put more power into the transmitter. Wi-Fi has a transmission power of up to 30 dBm.Chapter 3
The solution of the problemFrom all of the above vinaigrette, it would seem that the following conclusion can be drawn: in the wifi, two "modes" of functioning can be realized. "Improving speed" and "improving quality".
The first, it would seem, should say: take the most unoccupied channel, 40 MHz channel width, more antennas (preferably 4), and add more Capabilities.
Second, turn off everything except the basic n-mode, turn on more power, and turn on those Capabilities that add stability.
Remembering once again the proverb about ravines, we will describe what kind of uneven terrain await us when we try to implement plans 1 and 2.
Ravine zero
Although the chipsets of the Ralink rt2x00 family are the most popular chipsets with support for the n standard and are found both in high-end (Cisco) and low-end (TRENDNET) cards, and moreover, they look exactly the same in lspci, they can have radically different functionality. in particular, to support only the 2.4 band, only the 5 GHz band, or it is not clear how to support the limited parts of both bands. What is the difference is a mystery. It is also a mystery why the card with three antennas only supports Rx STBC in two streams. And why they both don't support LDPC.The first ravine
In the 2.4 band, there are only three non-overlapping channels. We have already spoken on this topic and I will not repeat myself.Second ravine
Not all channels allow increasing the channel width up to 40 MHz, moreover, what channel width the card will agree to depends on the card's chipset, card manufacturer, processor load and weather on Mars.The third and largest ravine
Regulatory domainIf you were not happy with the fact that the Wi-Fi standards themselves are a noble vinaigrette, then rejoice in the fact that every country in the world seeks to infringe and restrict Wi-Fi in all sorts of different ways. It's still not so bad in the UK, unlike, say, the USA, where the Wi-Fi spectrum is regulated to the point of impossibility.
So, the regulatory domain may require restrictions on the power of the transmitter, on the ability to launch an access point on the channel, on permissible modulation technologies on the channel, and also require some technologies to “pacify the spectrum”, such as DFS(dynamic frequency selection), radar detection (which each regdomain also has its own, say, in the Americas it is offered almost everywhere by the FCC, in Europe it is different, ETSI), or auto-bw (I don’t know what it is). At the same time, with many of them, the access point will not start.
Many regulatory domains simply prohibit certain frequencies in principle.
You can set the regulatory domain with the command:
Iw reg set NAME
The regulatory domain can be omitted, but then the system will be guided by the combination of all restrictions, that is, the worst possible option.
Fortunately, firstly, the data on regulatory domains is publicly available on the core website:
And you can search for them. In principle, it is probably possible to patch the kernel so that it ignores the regulatory domain, but it is necessary to rebuild the kernel or at least the regulatory daemon crda.
Fortunately, the iw phy info command displays all the capabilities of our device, taking into account (!) The regulatory domain.
So how do we fix our Wi-Fi condition?
First, let's find a country in which channel 13 is not prohibited. The path at least half the frequency will be empty. Well, there are quite a few such countries, although some, without prohibiting it in principle, however, prohibit either the high speed mode n on it, or even the creation of an access point.
But one channel 13 is not enough for us - after all, we want a greater signal-to-noise ratio, which means we want to launch a point with a signal strength of 30. Search and search in CRDA, (2402 - 2482 @ 40), (30) 13 channel, width 40 MHz, signal strength 30. There is a country, New Zealand.
But what is it, DFS is required at 5 GHz. In general, this is theoretically a supported configuration, but for some reason it does not work.
Optional task for people with increased social skills:
Collect signatures / movement in support of accelerated relicensing of Wi-Fi bands in the ITU (well, or at least in your country) in general towards expansion. This is quite real, some MPs (and MP candidates), hungry for political points, will be happy to help you.

This is ravine number 4
The access point may not start with DFS, without explanation. So which regulatory domain should we choose?There is one! Freest country in the world, Venezuela. Its regulatory domain is VE.
A full 13 channels in the 2.4 band, with a power of 30 dBm, and a relatively relaxed 5 GHz band.
The problem with an asterisk. If you have a completely disaster in your apartment, even worse than mine, there is a separate bonus level for you.
Regulatory domain "JP", Japan, allows you to do a unique thing: launch an access point on the mythical 14 channel. True, only in b mode. (Remember, I said that there are still small differences between b and g?) Therefore, if everything is really bad for you, then channel 14 can be a salvation. But again, it is physically supported by few client devices or access points. And the maximum speed of 11 Mbps is somewhat discouraging.
Copy /etc/hostapd/hostapd.conf into two files, hostapd.conf.trendnet24 and hostapd.conf.cisco57
We trivially edit /etc/rc.d/rc.hostapd to run two copies of hostapd.
In the first, we indicate channel 13. True, we indicate the signal width 20 MHz (capability 40-INTOLERANT), because firstly, this way we will be theoretically more stable, and secondly, "law-abiding" access points simply will not start at 40 MHz from -because of the hammered range. We put the capability TX-STBC, RX-STBC12. We cry that the capabilities of LDPC, RX-STBC123 are not supported, and SHORT-GI-40 and SHORT-GI-20, although they are supported and slightly improve the speed, also slightly lower stability, which means we remove them.
True, for amateurs, you can patch hostapd so that the force_ht40 option appears, but in my case it makes no sense.
If you are in a strange situation when access points turn on and off, then for special gourmets you can rebuild hostapd with the ACS_SURVEY option, and then the point itself will first scan the range and select the least "noisy" channel. Moreover, in theory, it should even be able to switch at will from one channel to another. True, this option did not help me, alas :-(.
So, our two points in one building are ready, we start the service:
/etc/rc.d/rc.hostapd start
The points start successfully, but ...
But the one that works on the 5.7 range is not visible from the tablet. What the hell?
Ravine number 5
The damned regulatory domain works not only on the access point, but also on the receiving device.In particular, my Microsoft Surface Pro 3, although made for the European market, basically does not support the 5.7 range. I had to switch to 5.2, but at least the 40 MHz mode started up.
Ravine number 6
Everything started up. Points started, 2.4 shows a speed of 130 Mbit (would be SHORT-GI, it would be 144.4). Why the card with three antennas only supports 2 spatial streams is a mystery.Ravine number 7
Start something started, and sometimes the ping jumps to 200, and that's it.And the secret is not at all hiding in the access point. The fact is that according to Microsoft rules, Wi-Fi card drivers themselves must contain software for searching for networks and connecting to them. Just like in the good old days, when a 56k modem had to have a dialer with it (which we all changed to Shiva, because the dialer that came with Internet Explorer 3.0 was too awful) or an ADSL modem had to have a client PPPoE.
But those who do not have a standard utility (that is, about everyone in the world!), Microsoft took care of, making the so-called "Wi-Fi auto-configuration". This autoconfiguration cheerfully spits on the fact that we are already connected to the network, and scans the range every X seconds. Windows 10 doesn't even have an "update networks" button. Works great as long as there are two or three networks around. And when there are 44, the system freezes and gives out a few seconds of ping 400.
"Autoconfiguration" can be disabled with the command:
Netsh wlan set autoconfig enabled = no interface = "???????????? ????" pause
Personally, I even made myself on my desktop two body shirts "turn on autoscan" and "turn off autoscan".
Yes, please note that if you have Russian Windows, then most likely the network interface will have a name in Russian in the IBM CP866 encoding.
Sammari
I dashed off a rather long sheet of text, and should end with a short summary of the most important things:1.
The access point can only work in one range: 2.4 or 5.2 or 5.7. Choose carefully.
2.
The best regulatory domain is VE.
3.
The iw phy info, iw reg get commands will show you what you can do.
4.
Channel 13 is usually empty.
5.
ACS_SURVEY, 20MHz channel width, TX-STBC, RX-STBC123 will improve the signal quality.
6.
40 MHz, more antennas, SHORT-GI will increase speed.
7.
hostapd -dddtK lets you run hostapd in debug mode.
8.
For hobbyists, you can rebuild the core and CRDA by increasing the signal strength and removing the regulatory domain restrictions.
9.
Autosearch for Wi-Fi in Windows is disabled with the netsh wlan set autoconfig enabled = no interface = "???????????? ???? command
10
... Microsoft Surface Pro 3 does not support 5.7GHz band.
Afterword
I found most of the materials used in writing this manual either in google or in the man pages for iw, hostapd, hostapd_cli.In fact, the problem HAS NOT BEEN DECIDED. At times, the ping still jumps to 400 and is at this level, even for the "empty" range of 5.2 GHz. Therefore:
I am looking for a Wi-Fi spectrum analyzer in Moscow, staffed by an operator, with whom it would be possible to check what the problem is, and whether it lies in the fact that there is a very important and secret military institution nearby that no one knows about.
P.S
Wi-Fi operates at frequencies from 2 GHz to 60 GHz (less common formats). This gives us a wavelength between 150mm and 5mm. (Why do we even measure radio in frequencies, and not in wavelengths? It's also more convenient!) I, in general, have an idea to buy wallpaper from a metal mesh in a quarter of a wavelength (1 mm is enough) and make a Faraday cage to guarantee isolate from neighboring Wi-Fi, and at the same time from all other radio equipment, such as DECT phones, microwave ovens and road radars (24 GHz). One problem - it will also block GSM / UMTS / LTE phones, but you can allocate a stationary charging point for them by the window.I will be glad to answer your questions in the comments.
The wireless Internet is gaining more and more popularity and this process cannot be stopped. To have wireless Internet at home, or a Wi-Fi access point. I tried to detail the process of connecting a Wi-Fi router with photos and videos.
In fact, there is nothing complicated here, but a little care is required and, perhaps, the phone of your Internet provider. The whole process can be broken down into three stages: physical connection, setting up a router and setting up a computer or laptop.
Connecting the router to the computer
After you got the router out of the box, you need to connect it to your computer. By default, I'll keep in mind that you have regular wired internet.


We enter the settings of the router
After turning on the router, he needs time to boot up and put himself in order. At this time, the front panel lamps may come on and off, wait 1 minute. We need to go to the administrative interface of the router and configure it. This is done through any browser, such as Internet Explorer, Google Chrome or Opera. To enter the "admin panel" of the router, you need to write in the address bar:
192.168.1.1
login: admin
password: admin

A small note: the address 192.168.1.1 is used in most routers. If you get the error "Page not found" or "The page does not open", then try using a different address, for example: 192.168.0.1
If there is an ambush here, then you need to find out the correct address, for example, from a sticker on the back of the device:

If it is not there, then you need to look at the instructions, which may be on the complete disc, or search the Internet from your phone. The same applies to login (username) and password (password), i.e. not all of them have admin / admin. If the device is used, then maybe someone changed the default parameters. In this case, you need. To do this, you need to find the "Reset" hole on the router and press the button inside with a match.
Network cable not connected
Let's say the login address and username / password are known, but all the same, it is impossible to enter the admin panel due to a network error. Then you need to check the settings of the network card in Windows 7/10. Go in "Start -> Control Panel -> Network and Internet -> Network and Sharing Center"... There on the left we find "Changing adapter parameters". The "Local Area Connection" connection should NOT be in the "Network cable not connected" status:

If so, then most likely this is the case, i.e. the cable is not connected, not connected there, or is faulty.
Also, the status should not be "Disabled". If so, then right-click on the icon and select "Enable".
Incorrect TCP / IP settings
If you still do not go to the admin panel, then right-click on the connection icon and select "Properties", and there we find "Internet Protocol version 4 (TCP / IPv4)" and double-click on it. In the properties of the protocol, you need to check that the checkboxes were on "Obtain IP address automatically" and "Obtain DNS server address automatically". Click "OK" two times. Now wait 10 seconds and you can check.

I hope we figured it out and managed to enter the router's admin panel without any problems.
Quick setup of a Wi-Fi connection on a router
It is more complicated here, because all routers are different and the interface can be very different. And the Internet settings for providers can also be strikingly different. If you have a TP-Link or another router with the ability to quickly configure, then you are in luck, everything can end very quickly We find the item "Quick Setup" in the menu on the left or above and follow the instructions of the wizard:
On the first screen, just click "Next"

I have a 3G router, so I am asked to choose the preferred connection type: 3G or cable. I do not have a 3G modem, so I choose "WAN only"


If you don't know what to choose, then try the automatic mode. The router itself will try to determine the type of connection. If it succeeds, the wizard will proceed to the next configuration step. But you may need to enter a username and password (in the case of a PPPoE connection)

or network settings (in case of "Static IP" connection)

All this information should have been given to you by the provider, look carefully in the contract. If the master cannot determine the connection automatically, then he will have to call the provider and ask, or try by typing, there are not many options, as it were
In the next step, the wizard invites us to turn on the Wi-Fi module:

- "Wireless Radio" - this is Wi-Fi, should be in the "Enabled" position
- In the field "Wireless Network Name" enter any name of the point in English
- Parameters: "Channel", "Mode", "Channel Width", "Max Tx Rate" set as in the screenshot or leave by default.
- , safety. Don't leave Wi-Fi without a password! Not only will everyone use your Internet and download the channel, it will be such a huge, huge hole in your safety! Virtually anyone can access all of your personal data. We put the switch in the WPA / WPA2 position and enter a complex password.
A small digression: when everything works, if it turns out that the Internet is working too slowly or if it does, then try to select “Channel” not “Auto”, but some number from 1 to 13 and save the settings. You can iterate over all the numbers in search of a suitable one. The fact is that now there is a lot of wifi equipment around, and each device needs its own channel to work. As a result, devices operating on the same channel interfere with each other.
It's good if you don't have the cheapest router and it can operate at 5MHz. In this case, there will be a corresponding option to select a frequency of 2.4 or 5 MHz. Much fewer devices operate at this frequency, and therefore the likelihood that someone will interfere is significantly reduced.
Manual setting
Well, if there was no automatic setup, then you have to go through the points with the pens. We find a section something like "Network" and there is an item with the word "WAN":

There should be similar settings items. Here everything is the same as for automatic configuration, only we ourselves have to choose the type of Internet connection and enter the username / password.
- Leave "Secondary Connection" "Disabled" or "Dynamic IP", this is only needed to access the ISP's internal network.
- Set “Connection Mode” to “Connect Automatically” so that the router connects to the Internet automatically after every reboot.
If the provider requires you to specify the IP address and DNS servers, then this can be done in the Advanced settings, but usually you do not need to do this:

But, for example, I have a provider with problematic DNS servers and I register the google server: 8.8.4.4 that always works! How does a problematic DNS server manifest itself? This is when no site or, but Skype or torrents work without problems! However, if you install the server on Google, then the internal sites of some providers, for example, such as account replenishment and statistics, may not open.
It is here, in the manual settings, that you can specify the type of connection - VPN, if you have one. To do this, select "L2TP", enter the name / password and the address of the VPN server (given by the provider). If the IP address, mask, gateway and DNS are provided, then select "Static IP" and enter all the data. Do not forget to check the automatic connection checkbox below.

That's it, save the settings and look for the "Wireless Settings" menu section:

All settings have been described above. For Wi-Fi to work, there must be a check mark Enable Wireless Router Radio.
The next point, here we turn on encryption, that is, we set up security as already mentioned above:
Configuring the router is complete! I advise you to save all the parameters from the menu "System Tools -> Backup & Restore"... Button "Backup" - saves, "Restore" - restores from a saved file. This is useful in case everything suddenly goes to hell and all the settings go off. You can easily recover them from a file
Oh yes, I almost forgot, change the default password for entering the admin panel. This is done in the "System tools -> Password" section.
How to connect laptop to WiFi
In Windows 8/10, you need to click on the icon at the bottom of the screen:

On the right, a panel will exit where you need to select the desired wireless network. Remember we gave the name of the network in English? Here you need to find it. If this is a public institution and you do not know which network to connect to, then choose any one with a higher signal level. When hovering over the network, a hint is displayed whether a password is required or not. If you see something like WPA / WPA2 when you hover, it means that you need a password to connect to a Wi-Fi network.

You can leave the "Connect automatically" checkbox. Next, the system will connect to the router and ask for the Wi-Fi password that we set earlier. If your device supports QSS technology, then you do not have to enter the password, but simply press the button on the router signed as "QSS". In this case, the password will be filled in without our participation!

When the system asks about file sharing, I advise you to select "No, do not enable sharing" if you do not know why you need it:

I made a short video tutorial on how to do this:
In Windows 7, everything is the same, only the icon and the window with the found networks look "Semyorovski"

Here, too, find the connection you want, click on it and voila.
No wi-fi icon or won't connect
First, check if the wireless module is turned on using the switch on the laptop case. Many Asus, Toshiba, Sony and Acer models have this switch. On some laptops, wifi can be activated using hot buttons, for example "Fn + F2" (look for the antenna icon on the F1-F12 buttons). In any case, the method works through the "Network Control Center", the same way when we "turned on" the network interface to connect to the router via the wire.
In more severe cases, please study.
Hope you succeed! Most likely, questions will arise about setting up a router, tk. the interface and parameter names are different for everyone. To get an answer in the comments, send immediately the link to the screenshot of the window.
Today, many families have long had a couple of computers or laptops, and sometimes both. Plus to all this, there are also smart phones, and maybe a tablet. And, of course, the center of entertainment for every family member is great. Until a certain point, everything usually goes well, while everyone at home uses their devices, but then there is a desire for something more.
This requires a home wireless network. It helps to get rid of unnecessary wires, to be more mobile, of course, makes all the media content accumulated by family members available to everyone.
Such home wireless network is being organized using a wi-fi router that sends a signal to many devices that support a wireless connection. Alternatively, you can join the distribution using network cables, but for this you will need to register IP addresses for each connected device.
For greater comfort of access to content, use a NAS server. It can be either a separate system unit with several HDD disks, or a ready-made box solution. Such a home server allows you to connect any device wirelessly and watch HD videos, music, play games and much more, and most importantly, store all this on your disks. The home server is also connected to a wi-fi router.
The most common internet connection options
- Dynamic IP (Automatic IP or DHCP)
- With a static IP address (Manual configuration field WAN IP address setting, mask, gateway ...)
We will consider the 2nd option, with a static IP address. As soon as you select it, the fields for entering the parameters of the static connection - "Setting the WAN IP address", which must be filled in according to the data received from the Internet provider, will become active.
Click "No" and fill in all the fields sequentially.
It should be noted that in this case the IP address and other network parameters are fixed, they should be entered exactly as indicated by the provider.
If you choose the option with a dynamic IP address, or PPPoE or L2TP, then the configuration is simplified and the router will receive all connection parameters from the provider automatically. Only for the last two types of connection it is necessary to specify the name and password that is issued by the provider (or, in rare cases, the "Service name").
Complete the settings by clicking the Apply or Save button.
In some cases, the provider binds the user to the MAC address (physical address) of his computer so that no one else can connect instead. In this case, an attempt to access the Internet using a router will become impossible.
To avoid this, the MAC address of the external interface of the router should be changed so that it matches the MAC address to which your ISP binds you (usually this is the address of your computer's network interface).
This operation is called cloning the MAC address, however, this function in the web interface of the router does not always have the same name.
To clone the MAC address of your computer, which was connected to the Internet with a cable before installing the router, enter it in the MAC field of the "Special requirements of your Internet service provider" section in the WAN section, Internet connection tab.
Save the settings by clicking the "Apply" button.
How to find the MAC address of your computer
To find out the MAC address of the computer and enter it when setting up an Internet connection on the router,
do the following:
1. Click on the computer icon in the taskbar (tray), click "Network and Sharing Center"
and in the window that opens, select "Local Area Connection".
2. Click on the "Details" button to see the MAC address.
The MAC address will be located in the Physical Address field.
Configuring Wi-Fi Settings Manually
If you did everything correctly and specified the correct connection parameters, then after restarting the router you will have access to the Internet from the computer on which you made the settings. Open your browser and type
the address of any website, eg. The site page has opened, therefore, you can proceed
to setting up a wireless network (wi-fi).
In the menu of the web interface of the router, select the "Wireless" section, the "General" tab.
Please note that some routers support a dual-band wireless network (5 GHz and 2.4 GHz). Set up your wireless network in the more popular 2.4GHz band.
Specify the operating mode of the wireless network. The best option is the universal setting, which provides compatibility with both new and old versions of the Wi-Fi standard. It is called Mixed or Auto.
Specify the SSID of the network (The name of the network that will be displayed during scanning) in the field of the same name. Select a security option in the "Authentication Method" field, I recommend WPA2-Personal, why, read the Wi-Fi heading. Enter your password (or key) in the WPA Preshared Key field. This key and network name (SSID) will be required to configure access on your wireless devices, so it is recommended that you save them to a file or write down somewhere in a safe place.
It is recommended to hide the SSID so that your home wireless network was not visible from the outside, but you can still connect to it, since you already know the SSID. To save the settings, click on the "Apply" or "Save" button. By the way, the wireless network in the 5 GHz band is configured in the same way.
Attention! Be careful when updating the router's firmware. The need for it is due to the incorrect operation of the router and communication problems. Carefully study the section of the user manual on updating the software of the router and strictly follow the recommendations. Updating the router's firmware is a last resort; you should not resort to it unless absolutely necessary, since there is no such need during the initial configuration of the wireless network.
P.S. I would be very grateful if you point out the points that need to be analyzed in more detail.


