Hello dear friends. Nowadays, unlimited Internet will not surprise anyone, as well as its high speed. People are massively buying tablets, laptops and smartphones that have a built-in Wi-Fi module that allows them to use wireless Internet throughout the home. And some people just want to get rid of wires throughout the apartment. In both cases, Wi-Fi routers came to the rescue, making it easy to distribute the Internet throughout the house. We'll talk about this further.
Of course, I decided a little late to get a Wi-Fi router. So again, an article from my own experience. I will write about that today how to connect and configure Wi-Fi router TP-Link TL-WR841N (this is the router I bought for myself). Also set a password for the Wi-Fi network so that the neighbors don’t steal the Internet :).
Before I move on to writing the instructions, I’ll draw your attention to a question that probably worries a lot of people who have thought about installing a Wi-Fi router. This is about the harmfulness of Wi-Fi, I wrote an article about it, you can read it. And one more thing, you ask (what is there to ask, if you are reading this article, you have probably already bought a router) why did I choose the TP-Link TL-WR841N router? According to my observations, this is the best option for this price; I paid 300 UAH for it. (1200 rubles). This is not an expensive router that can provide a full-fledged Wi-Fi network for the home.
I’ve already written a lot of unnecessary text, but I only promised instructions with pictures :)
1. You brought the router home or to the office, it doesn’t matter, we open the box and find a lot of pieces of paper there, a disk with instructions and a wizard for setting up the router. Also included, of course, is the router itself, if not, then you were deceived :), a network cable to connect it to the computer and a power supply, that’s all.
 2.
We connect the router to the computer. Everything is very simple here. We place the router not far from the computer, it’s just that the cable included in the kit is not very long, if necessary, you can crimp more cables (you can even do this yourself, in more detail). This can be done in almost any computer store.
2.
We connect the router to the computer. Everything is very simple here. We place the router not far from the computer, it’s just that the cable included in the kit is not very long, if necessary, you can crimp more cables (you can even do this yourself, in more detail). This can be done in almost any computer store.
We connect power to the router and plug it into an outlet. Then we connect the WAN Internet cable to the blue socket. The TP-Link TL-WR841N router has 4 LAN ports, which means you can connect 4 computers via a network cable. We connect the computer to the router using the cable that comes with the kit. Here are the pictures:
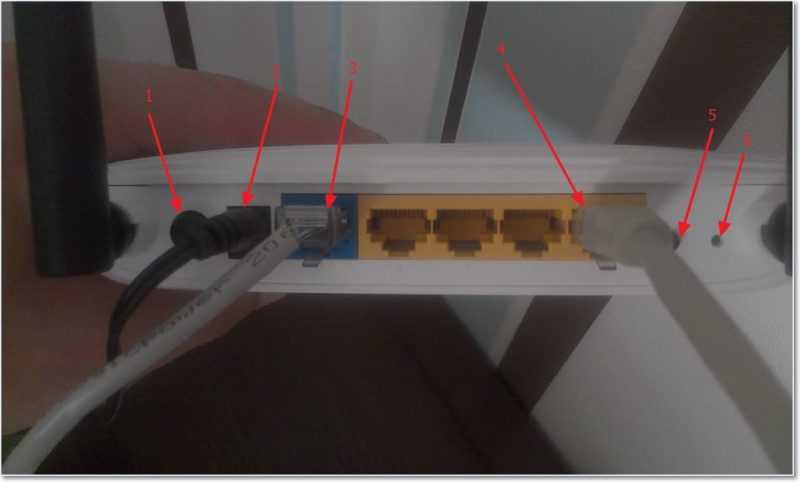 Let's quickly go through the buttons and connectors:
- On/off button.
- Power cable.
- WAN connector for connecting to the Internet.
- LAN connector for connecting the router to a computer via a network cable.
- Enabling the feature.
- Button to reset the router settings.

That's all, our router is connected. Let's now move on to the setup.
Setting up the TP-Link TL-WR841N router
Before you start setting up, I recommend doing .
To configure the router, open any browser and write 192.168.0.1 in the address bar, usually 192.168.1.1 goes through, but I was able to access the settings only through 192.168.0.1. Only after configuring the firmware update do I get access to the settings via 192.168.1.1.
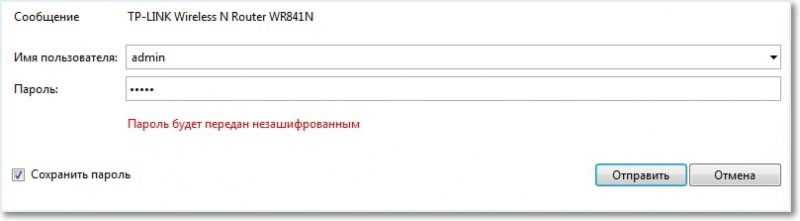
A window will appear in which you need to enter your login and password to access the router settings. By default, the login is admin and the password is admin.
If the router does not accept the password and login by default, then see the article for possible solutions to this problem.
We get to the settings page.
Let's first update the firmware on our TP-Link TL-WR841N. To do this, you first need to download it from the site tp-linkru.com. We find it for our model and download the latest version. Unzip the firmware file to your computer and return to configuration.
Go to the “System Tools” menu and select “Firmware Upgrade”. Then click “Browse”, select the file we downloaded and click “Upgrade”. We are waiting for the router to update the firmware and reboot.
More detailed instructions for updating the firmware on the router -

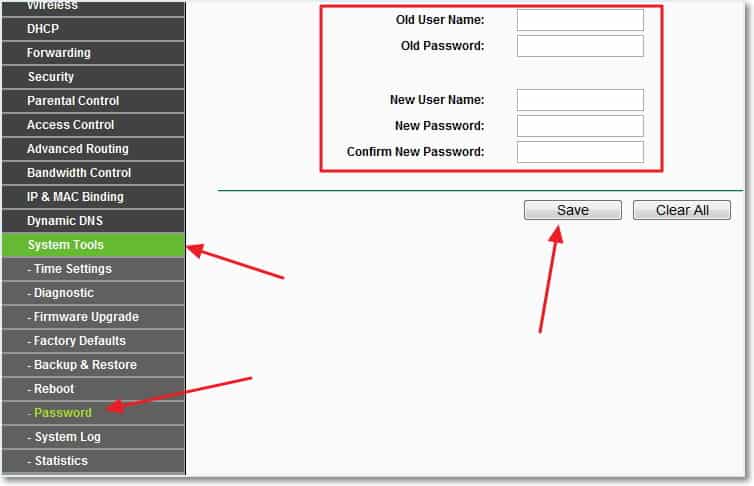
Let's continue with the setup. Let's change the login and password to enter the router settings. Go to the “System Tools” tab, and then “Password”. fill in all fields and click “Save”.
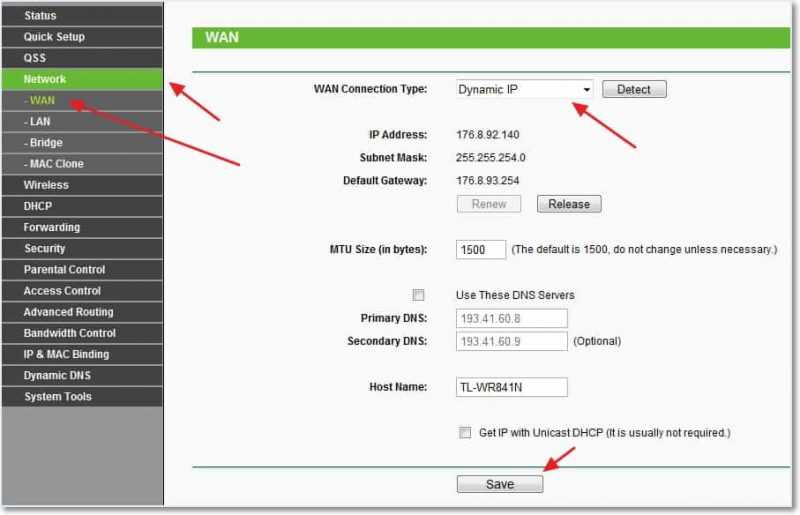
Go to “Network” and “WAN”. Here you need to select the network type. If you don’t know what to install, call and ask your provider. You can also look at a detailed article on setting up a router to work with your provider -

Setting up a Wi-Fi network on TP-Link TL-WR841N
Go to the “Wireless” tab and configure the following parameters. In the “Wireless Network Name” field, enter the name of your Wi-Fi network. Below you can select the region where you live.

Don’t forget to click “Save” and go to the “Wireless Security” tab. This is the most important page, where we will configure the security settings of our Wi-Fi network.
For more information about setting a password for a wireless network, see

We set everything up as I have in the screenshot above. In the PSK Password field, create and enter a password that will be used to connect to your Wi-Fi network.
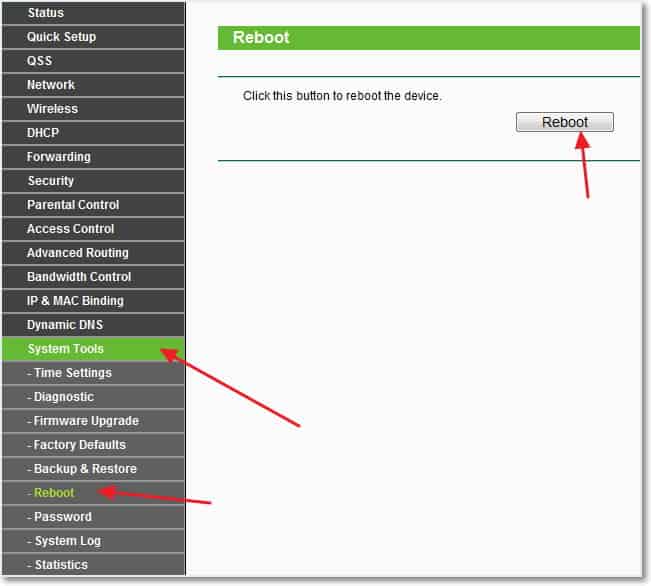
We save our settings with the “Save” button. The setup is complete, let's now reboot our router. To do this, go to the “System Tools” tab, and then “Reboot”. Click on the “Reboot” button and confirm the reboot.
That's all, we have just installed and configured a Wi-Fi router. As you can see, there is nothing complicated here and you can do without calling a specialist. If you have any questions, ask them in the comments. Good luck friends!
Also on the site:
How to connect and configure the TP-Link TL-WR841N Wi-Fi router? Instructions with pictures. updated: February 7, 2018 by: admin

1. By default, login is admin, password is admin.
2. Courier-setters must change the password in the settings to the Serial Number indicated on the box (S/N). When reconfiguring, it is also recommended to use S/N (serial number) as a password for the router and wi-fi.
3. Resetting the router settings is done by pressing and holding the Reset button on the back panel of the router for 10 seconds.
In order to get to the router’s web interface, you need to open your Internet browser and type http://192.168.1.1, User Name in the address bar admin, Password – admin(provided that the router has factory settings and its IP has not changed).

Changing the factory password.
For security reasons, it is recommended to change the factory password.
Default: Login admin, password admin.
In the router interface, you need to go to the tab System Tools and choose Password.
In field Old User Name enter admin, Old Password enter admin.
Into the fields New User Name, New Password, Confirm New Password enter a new login (you can leave the same “admin”), as well as a new password and repeat it accordingly.

Then click the button Save.
SettingsWiFion the router.
In the router interface, you need to select the tab on the left “ Wireless ", in the list that opens, select " Wireless Serrings».
We set the parameters as follows:
1. Field " SSID": enter the name of the wireless network.
2. Region: Russia
3. Chanel: Auto
4. Mode: 11bgn mixed
5. Channel Width: Automatic
6. Max Tx Rate: 300Mbps
7. Click the button below “ Save»

On the left menu select “ Wireless", Further " Wireless Security"and set the parameters:
1. Set the point to WPA-PSK/WPA2-PSK
2.Version: WPA2-PSK
3. Encryption: Automatic
4. PSK Password: you must enter any set of numbers ranging from 8 to 63. They also need to be remembered so that you can specify them when connecting to the network. It is recommended to use the device serial number as a key (indicated on the box, in the form S/N########).
5. Click the button below “ Save»

Setting up an Internet connection.
SettingsPPPoEconnections.
1. Select menu on the left Network, Further MAC Clone
2. Click Clone MAC address, Further Save (for more details see In chapter "MAC Cloning addresses»)
3. Next, select on the left WAN
4.WAN Connection type: PPPoE
5.Username: Your login from the contract
6.Password:Your password from the agreement
7. Set the point to Connect Automatically
8. Press the button " Save».

Configuring PPtP (VPN) while automatically obtaining a local IP address (DHCP).
1. Select menu on the left Network, Further MAC Clone
2. Click Clone MAC address, Further Save (for more details see In chapter "MAC Cloning addresses»)
3. Next, select on the left WAN
4.WAN Connection type: PPTP
5.Username: Your login from the contract
6.Password: Your password from the agreement
7.Server IP Address/Name: ppp.lan
8. Set the point to Connect Automatically
9. Save the settings with the “ Save»

Setting up PPtP (VPN) with a static local IP address.
1.WAN Connection type: PPTP
2.Username: Your login from the contract
3.Password: Your password from the agreement
4. Set the point to Static IP
5.Server IP Address/Name: ppp.lan
6.IP Address: We enter your IP address according to the contract
7.Subnet Mask: We hammer in the mask according to the contract
8.Gateway: We drive in the gateway according to the contract
9.DNS: 212.1.224.6
10. Set the point to Connect Automatically
11. Save the settings with the “ Save».

NAT when automatically obtaining an IP address (DHCP).
1. Select menu on the left Network, Further MAC Clone
2. Click Clone MAC address, Further Save (for more details see In chapter "MAC Cloning addresses»)
3. Next, select on the left WAN
4.WAN Connection type: Dynamic IP
5. Save the settings with the “ Save».

MAC address cloning (required when setting upPPPoE, PPTPwith dynamic settings andDHCP)

Saving/restoring router settings.
menu Backup & Restore.
To save the current router settings, you must press the button Backup. The settings file will be saved to the specified location on your hard drive.
To restore settings settings from a file, you must click the file selection button, specify the path to the settings file, then click the button Restore.
The tp link tl wr841n wireless router is a modern, efficient network device designed to create high-speed public local networks.
The main advantages of the device include:
- - increased data transfer speed (up to 300 Mbit/s);
- - reliability and performance of the device;
- - wide coverage area - the maximum distance at which your gadget can “catch” the network distributed by the router.
But the optimal functioning of the device depends mainly on its proper configuration, so our article is devoted to how to configure the tp link tl wr841n router at home.
Router tp link tl wr841n: entering settings
You can access the tp link automatic Internet configurer using any Internet browser installed on your PC. To do this, just type the combination of numbers 192.168.1.1 in the address bar, press “Enter” and enter the username/password correctly for the user of this device in the authorization window that opens.
By default, the factory setting of the tp link tl wr841n router supports the standard login/password pair: admin/admin.
However, the web interface http://192.168.1.1 is public and for security reasons we recommend creating a private account. To do this, after authorization you need to find the column System Tools(System Tools) and select Password from the drop-down list.
Here in the graphs Old User Name(Previous username) and Old Password(Previous password) must be entered admin, and in the columns New User Name, New Password, Confirm New Password(New username, New password, Confirm password) - your private data .
Of course, the choice of personal login/password is not regulated in any way, but we recommend leaving the login the same ( admin), and use the serial number of your router as a password (which you can find on the device packaging in the form S/N ########). This way, any operator will be able (if necessary) to restore access to the settings of the tr link tl wr841n router.
Router tp link tl wr841n: setting up wifi
The tp link tl wr841n wifi router is configured using the same web interface http://192.168.1.1.
Setting wifi parameters is carried out in the menu bar Wireless(Wireless mode), where you should first go to the section - Wireless Settings(Wireless Settings) and enter the following information there:
In the column SSID(Network name) enter the name of your network (selected arbitrarily: for example, the brand of the router or your home address);
- - In the column Region(Region) enter Russia;
- - In the column Chanel(Channel) – set to Auto:
- - In the column Mode(Mode) – select 11bgn mixed;
- - In the column Channel Width(Channel width) – set to Automatic;
- - In the Max Tx Rate column, enter 300Mbps.
Continue setting up wifi on tp link tl wr841n in the section Wireless Security(Wireless Security), where you need to specify the following set of parameters:
- - Mark the WPA-PSK / WPA2-PSK item with a marker (dot);
- - Specify the version WPA2 - PSK and encryption type - automatic;
- - Specify the PSK Password (which is again recommended to use the serial number of your router)
Be sure to save the settings, after which the wifi setup on the tp link tl wr841n will be completed correctly!
Router tp link tl wr841n: instructions for setting up an Internet connection
1. Setting up a PPPoE connection on a tp link tl wr841n
To configure the tp link tl wr841n router, find the menu item Network(Network) Internet configurer tp-link and go to the subsection there MAC Clone(MAC Address Cloning).
Here you need to click the button Clone MAC address, and then be sure to save the settings.
Next you should go to the section WAN and in the field WAN Connection type(WAN connection type) select type PPPoE. To fill in the fields User Name And Password you need to look into your agreement with the provider and find the login and password provided to you there, after which you should set the marker to Connect Automatically and save the entered data. 
2. Setup PPtP (VPN) connecting the router tp link tl wr841n
As a rule, this type of connection is used to create an internal closed communication channel. For greater reliability, transmitted information can be encrypted using a special MPPE protocol.
Configuring the PPtP protocol on the tr link tl wr841n router is carried out as follows:
- - first of all, you need to configure cloning MAC-addresses(same as installing PPPoE connections);
- - then go to the menu tab WAN and select a section there WAN Connection type(for Russian firmware version – « Type connections WAN"), where you must specify the following data: PPTP connection (in the field WAN Connection type), your login/password from the agreement and the IP server ppp.lan (in the column Server IP Address/ Name).
Depending on whether you know the IP of the PC connected to the router (and the IP of the network when creating a local network), you can choose a static or automatic method for obtaining a local IP address.
 If you want to manually register the IP of the connected PC (local network), you should set the marker to «
Static IP»,
then arm yourself with an agreement with your provider and carefully rewrite the IP address, mask and subnet gateway provided to you in the fields IP Address, Subnet Mask And Gateway respectively. It is recommended to specify the following DNS: 212.1.224.6.
If you want to manually register the IP of the connected PC (local network), you should set the marker to «
Static IP»,
then arm yourself with an agreement with your provider and carefully rewrite the IP address, mask and subnet gateway provided to you in the fields IP Address, Subnet Mask And Gateway respectively. It is recommended to specify the following DNS: 212.1.224.6.
Wireless base stations of the TP-Link series are among the most common Wi-Fi routers in Russia. To set up wireless Internet access, you should follow a number of simple steps. This will ensure an uninterrupted and high-quality connection to the network. Moreover, the algorithm of actions will not differ depending on the operating system installed on the computer. The settings are similar for Windows, Linux and MacOS.
How to set up a TP-Link Wi-Fi router
After purchasing a Wi-Fi router from the TP-Link line in a store, customers become the owners of a kit that includes a number of components:
- Router case.
- Network cable to connect the device to a computer.
- Instructions that describe how to troubleshoot any problems.
- Power unit.
- Documentation with technical characteristics of the product.
- CD with materials.

First you need to connect it to your computer. In frequent cases, the cable that comes with the router is not long. Therefore, you should place the router close to the computer. Insert one side of the cable into the connector for connecting to the Internet, the other into one of several LAN connectors of the router, which are usually highlighted in yellow and have a corresponding inscription next to them.

The Ethernet vendor cable connects to the WAN port marked in blue.

Router Compounds
The back panel of the device is a set of a couple of buttons and holes. Each element is best labeled in order from left to right:
- The first is the OFF/ON button, which accordingly turns off the router and puts it into operation.
- The next one is the power cable connector with the word “power” underneath it, to which the power supply is connected.
- Next is the blue WAN connector described above.
- The yellow panel shows several LAN holes.
- A small button that enables QSS technology to function.
- The last one is the reset button.

There are light indicators on the front panel of the router, which are also important when monitoring the proper operation of the router.
| Indicator | State | Meaning |
|---|---|---|
| 1. Food | On Off | Indicates that the power supply is properly connected |
| 2. WLAN (Wireless Local Area Network) | Off/Flashing | Demonstrates the state of operation of wireless data transmission technologies. A flashing position indicates that this property is active |
| 3. LAN (local area network) 1-4 | On/off/flashing | Indicates whether additional devices are directly connected to the router. A flashing state confirms that such stationary elements are connected and are performing active work. A steady light indicates that the device is connected but not active |
| 4. WAN (Wide Area Network) | Flashing/off | This indicator displays the functioning of the Internet. If any malfunctions are detected, the WAN will not emit light |
| 5. WPS (Wi-Fi Protected Setup) - secure installation | Moderate flashing | Indicates that the router is in the process of enabling the secure installation feature. It will take about eighty seconds |
| Included | The router started working safely using the Wi-Fi Protected Setup function. The pointer will be active for approximately five minutes |
|
| Fast flashing | No connection was made |

Getting started with the router
After connecting all the components, the power, WLAN and WAN indicators should light up and the device is operating correctly. The presence of this fact indicates that you can start setting up the router. To enter the section on establishing the required characteristics, you should:

Configuration using the web utility
There are several ways to make final and detailed adjustments to your wireless connection. The Internet method is suitable for users of Windows, Mac OS, Linux operating systems who are not able to use the supplied CD.
After completing the above described manipulations, the subscriber will be taken to the web utility page. One of the most effective and time-saving methods is the “quick setup”, which will be located in the panel on the left. A number of steps for its operation are very simple:

Thus, by gradually following a simple algorithm, you can prepare the router for operation in a fairly short time - 5-7 minutes.
Types of Wide Area Network connections
It is worth considering this point more carefully, since further configuration of the router may differ significantly depending on the type of WAN.
- If you select a dynamically assigned IP address identifier, you will need to click the “Save” or “Save” line. This will allow you to clone MAC addresses and successfully access the network.

- Using Static Internet Protocol requires the user to specify an IP address, subnet mask, gateway and DNS. This information may be obtained from the provider.

- The PPPoE/PPPoE Russia option will prompt you to enter a Username and Password provided by .

- The L2TP method will require a VPN Server Name and Password also provided to you by the service provider.

- The PPTP/PPTP Russia connection function, similarly to L2TP, will ask you to provide the same data.

Setup using CD
When fully equipped, buyers should find a special information medium in the box with the device. It greatly simplifies setup if your computer has a CD drive and has a function for reading it.

note that this method is only suitable for Windows users if they have the ability to run the CD.

Something to keep in mind that in this way they will be attached to your router. For additional extensions, the utility suggests going to the “WEB settings interface” item and installing them to suit your specific needs.
Video - Setting up a Wi-Fi router TP-LINK TL-WR740N
All modern TP-Link wireless routers have a uniform web configuration interface. The only thing that may differ in different firmware versions of the same model is the language: most often English. To get a Russian interface on http://192.168.0.1 tp-link, you must flash it with firmware that supports the Russian language.
To access the router settings, in some cases you may need to configure a static IP on your computer’s network card. You can also use the hostname tplinklogin.net in the browser address bar instead http://192.168.0.1 Login to access the router settings - admin, default password is used admin.
To configure a connection to the provider’s network on the device, you need to go to the section Network -> WAN (Network -> WAN).
How to set up PPPoE for Dom.ru, TTK and Rostelecom
The PPPoE protocol is used by most providers, both in Russia and in Ukraine, Belarus, and Kazakhstan. The most striking examples include Rostelecom, Dom.ru, TTK, Aist, Tattelecom, Bashinformsvyaz (Bashtel).
We choose the WAN connection type PPPoE/PPPoE Russia:
In field Username you need to enter your login to connect to the Internet, and in the fields Password And Confirm password- correspondingly the password for access. This data was given to you by the provider’s employees upon concluding the contract. Be sure to check the box Connect automatically- this is necessary so that your TP-Link router automatically connects to the Internet every time. Save the settings.
How to configure Dynamic IP for TTK Ural, Rostelecom Udmurtia, Chuvashia (Mac Based VLAN)
Configuring a TP-Link router for an IPoE connection via Dynamic IP is as easy as pie, since this is the connection option that is initially configured on the device. That is, just reset the router’s settings with the Reset button and you will receive a router already configured to connect to the provider’s network.

If you configure it through the web interface of the router, which many people call “Personal Account” for some reason, then you just need to assign a value to the “WAN connection type” parameter Dynamic IP address and press the button Save.
Setting up VPN L2TP for Beeline
The Internet provider Beeline has the most exotic connection type - Dynamic IP+L2TP. When choosing a connection type, you must select the value L2TP/L2TP Russia:

In the Username and Password fields you must enter data for authentication on the Beeline server. As a rule, the login is a personal account, and the password was given to you upon connection. Below we check the Dynamic IP checkbox. In field Server name you need to enter the address: tp.internet.beeline.ru. All that remains is to check the box Connect automatically and save the configuration settings.
Setting up Wi-Fi on TP-Link routers
To set up a Wi-Fi network on TP-Link routers, you must select the item in the menu Wireless Mode >>> Wireless Mode Settings:

In the Wireless network name field, you can change the name of the Wi-Fi network of your TP-Link router. If you don’t care what it’s called, you can leave the one that was originally there.
On the list Region select Russia. The number of the channel used and its width are left unchanged Auto. It is better to leave the operating mode mixed too - 11bgn.
Save the settings and go to the section Wireless Security:

Security protocol type select WPA/WPA2-Personal
How to set up IPTV on TP-Link for Rostelecom, Dom.ru, Beeline
To connect digital television using an STB set-top box with most providers, you simply need to select one of the LAN ports and switch it to bridge mode. This is done in the section Net >>> IPTV:

This option usually works without problems with TV from Beeline, Dom.ru, TTK and most branches of PJSC Rostelecom. If you need to register a VLAN ID for interactive television to work, you need to select the option in the “Mode” list 802.1Q Tag Vlan:

VLAN TAG for the Internet should be left set to “Disable”. And enter the VID for IPTV in the appropriate field. If the TP-Link router complains about the need to specify the VID value for the Internet, then you will need to use a trick and enter the value in the “VLAN ID for IP telephony” field. All that remains is to set the desired operating mode on the LAN port into which the TV set-top box is connected and click on the “Save” button.