If you have several personal computers, or a computer and a laptop, and you want each of them to be connected to the Internet, then you will need to organize a local area network through which all devices will have access to the global network.
Local network for exit and the global web
To connect to a local network, it is absolutely not necessary to use a desktop computer. It is also possible to connect a laptop to it. The following steps are for Windows XP, but you can do the same for any other system.
To create a home network, first of all, you need special equipment, in particular, a switch and network wires. Below you can see a photo of the necessary equipment. 
Also, network cards must be built into the board in all devices. She is also pictured below. 
And of course, not one local network can do without the modem itself. It is shown below. 
Please note that the network card must be installed in the computer that has direct access to the global network. This computer will continue to serve as a server. The system independently detects new hardware - a network card and installs the necessary drivers.
After that, we connect the modem in the installed network card and set up Internet access.
We connect one end of the network cable to the second network card of the server, and connect the other to the switch. Next, we connect the network cables to the network cards of desktop computers or laptops. The picture below shows what it should look like. 
Now we connect the free ends of the network cables to the switch and connect to the electricity network. You may notice that on all connected screens there are signals that indicate the readiness to connect cables. The photo shows an example of messages. 
We proceed to the establishment of the network itself. First of all, we set up the server. We go to Start, select Settings, then Control Panel, then Network Connections .. Rename the old network card to avoid confusion in the future. Next, you can see the icon of the renamed network card to which the network cable is connected. We look through the network settings. To do this, click on the map icon and select the "properties" menu item. Below you can see what it looks like. 
After that, a new window will open on the screen. the name of the window is “LAN - Properties”, since for example we named our LAN network card. The photo below shows what this window looks like. 
We are looking for the "General" tab and click the inscription "Internet Protocol". Or you can just select this line and click "Properties". You will see a window called "Properties: Internet Protocol (TCP / IP)", it is shown in the photo below. 
Make the entry Use the following IP address:” active and assign an IP address to the server using a modem. It is better to write the following numbers: 192.168.0.1. Save all changes made by clicking OK. Check that everything is the same as in the picture below. 
After that, check the boxes on the last two items. This will allow you to immediately detect the departure of the wire for various reasons. Save everything again by clicking OK. The server setup is now complete. Let's start setting up the rest of the equipment of the local home network.
To do this, first select the "LAN" icon, as shown below. 
After that, click on the next house icon, which is shown below. 
A setup wizard will open in front of you. It will help you quickly and correctly carry out the setup. We press "Next". Below you see an example of a wizard. 
Then a new window will appear, where you also need to click "Next". 
In the window that appears, check the box next to "Other" and click "Next" again. 
Check the box next to "This PC is part of a network that does not have Internet access" and click "Next". A new half-empty window will appear, as shown in the figure below. 
Write the name in capital or small English letters and click "Next". In the new window, specify the working group, as shown below, and click "Next" again. 
On the newly appeared page, we do not change anything, we leave it unchanged. 
And here you will already need to enter all the data that you previously used to set up the local network. If you think that you made a mistake on one of the points, you can always go back and eliminate the mistakes. If you think that everything is in order, go "Next". 
We put a dot in front of the item "End the wizard." 
In the new window, click "Finish" and restart your computer. 
Similarly, we configure the network cards of the remaining computers on your local network that are not servers. The only difference that you will encounter when working is the name of each equipment. NIC names must be different from each other. 
As the figure below shows, we have different data installed on the new hardware. We write everything in the same way as shown below. 
After that, fill in the "Internet Protocol" for the following equipment. We also fill it in accordance with the illustration below. 
As you can see, the data entered is the same. After that, our local network is configured. We configure a network card that has a connection directly to the modem.
Why do we need local networks, and what are they? How to connect several computer devices to one Internet channel at once? What equipment is required to build a home network? You will receive answers to all these and other equally important questions in this material.
Introduction
Before you learn how to independently design and configure home local networks, let's immediately answer the most important question: "Why are they needed?".
By itself, the concept of a local network means combining several computers or computer devices into a single system for exchanging information between them, as well as sharing their computing resources and peripheral equipment. Thus, local networks allow:
Exchange data (movies, music, programs, games, etc.) between network members. At the same time, to watch movies or listen to music, it is absolutely not necessary to record them on your hard drive. The speeds of modern networks allow you to do this directly from a remote computer or multimedia device.
Connect simultaneously several devices to the global Internet through one access channel. This is probably one of the most requested features of local area networks, because today the list of equipment that can use a connection to the World Wide Web is very large. In addition to all kinds of computer equipment and mobile devices, TVs, DVD / Blu-Ray players, multimedia players and even all kinds of household appliances, from refrigerators to coffee makers, have now become full members of the network.
Sharing computer peripherals , such as printers, MFPs, scanners, and network attached storage (NAS).
Sharing the computing power of computers of network participants. When working with programs that require complex calculations, such as 3D visualization, to increase performance and speed up data processing, you can use the free resources of other computers on the network. Thus, having several weak machines connected to a local network, you can use their total performance to perform resource-intensive tasks.
As you can see, creating a local network, even within the same apartment, can bring a lot of benefits. Moreover, the presence of several devices at once at home that require an Internet connection is not uncommon for a long time, and combining them into a common network is an urgent task for most users.
Basic principles of building a local network
Most often, local networks use two main types of data transfer between computers - by wire, such networks are called cable networks and use Ethernet technology, as well as using a radio signal over wireless networks built on the basis of the IEEE 802.11 standard, which is better known to users under the name Wi -Fi.
To date, wired networks still provide the highest throughput, allowing users to exchange information at speeds up to 100 Mbps (12 Mbps) or up to 1 Gbps (128 Mbps) depending on the equipment used (Fast Ethernet or Gigabit Ethernet). And although modern wireless technologies, purely theoretically, can also provide data transfer up to 1.3 Gb / s (Wi-Fi 802.11ac standard), in practice this figure looks much more modest and in most cases does not exceed 150 - 300 Mb / s. The reason for this is the high cost of high-speed Wi-Fi equipment and the low level of its use in current mobile devices.
As a rule, all modern home networks are arranged according to the same principle: user computers (workstations) equipped with network adapters are interconnected through special switching devices, which can be: routers (routers), switches (hubs or switches), points access or modems. We will talk in more detail about their differences and purposes below, but for now just know that without these electronic boxes, it will not work to combine several computers at once into one system. The maximum that can be achieved is to create a mini-network of two PCs by connecting them to each other.
At the very beginning, you need to determine the basic requirements for your future network and its scale. After all, the choice of the necessary equipment will directly depend on the number of devices, their physical placement and possible connection methods. Most often, a home local area network is combined and it can include several types of switching devices at once. For example, stationary computers can be connected to the network using wires, and various mobile devices (laptops, tablets, smartphones) can be connected via Wi-Fi.
For example, consider a diagram of one of the possible options for a home local network. It will involve electronic devices designed for different purposes and tasks, as well as using a different type of connection.

As can be seen from the figure, several desktop computers, laptops, smartphones, set-top boxes (IPTV), tablets and media players and other devices can be combined into a single network at once. Now let's figure out what kind of equipment you need to build your own network.
Network Card
A network card is a device that allows computers to communicate with each other and exchange data on a network. All network adapters by type can be divided into two large groups - wired and wireless. Wired network cards allow you to connect electronic devices to a network using Ethernet technology using a cable, and wireless network adapters use Wi-Fi radio technology.

As a rule, all modern desktop computers are already equipped with Ethernet network cards built into the motherboard, and all mobile devices (smartphones, tablets) are equipped with Wi-Fi network adapters. At the same time, laptops and ultrabooks are mostly equipped with both network interfaces at once.

Despite the fact that in the vast majority of cases, computer devices have built-in network interfaces, sometimes it becomes necessary to purchase additional boards, for example, to equip the system unit with a Wi-Fi wireless communication module.

According to their constructive implementation, individual network cards are divided into two groups - internal and external. Internal cards are designed to be installed in desktop computers using interfaces and their corresponding PCI and PCIe slots. External boards are connected via USB connectors or outdated PCMCIA (laptops only).
Router (Router)
The main and most important component of a home local network is a router or router - a special box that allows you to combine several electronic devices into a single network and connect them to the Internet through a single channel provided by your provider.
.jpg)
A router is a multifunctional device or even a minicomputer with its own built-in operating system that has at least two network interfaces. The first one is LAN (Local Area Network). ) or LAN (Local Area Network) is used to create an internal (home) network, which consists of your computer devices. The second - WAN (Wide Area Network) or WAN (Global Computing Network) is used to connect a local area network (LAN) to other networks and the World Wide Web - the Internet.
The main purpose of devices of this type is to determine the paths (routing) of data packets that the user sends to other, larger networks or requests from them. It is with the help of routers that huge networks are divided into many logical segments (subnets), one of which is the home LAN. Thus, at home, the main function of the router can be called the organization of the transfer of information from the local network to the global network, and vice versa.
Another important task of a router is to restrict access to your home network from the World Wide Web. Surely you are unlikely to be satisfied if anyone can connect to your computers and take or delete from them whatever they want. To prevent this from happening, the data flow intended for devices belonging to a specific subnet must not go beyond its limits. Therefore, the router from the total internal traffic generated by the members of the local network selects and sends to the global network only that information that is intended for other external subnets. This ensures the security of internal data and saves overall network bandwidth.
The main mechanism that allows the router to restrict or prevent access from the public network (outside) to devices on your local network is called NAT (Network Address Translation). It also provides all users of the home network with access to the Internet by converting several internal addresses of devices into one public external address provided by your Internet service provider. All this makes it possible for computers on the home network to easily exchange information with each other and receive it from other networks. At the same time, the data stored in them remains inaccessible to external users, although at any time access to them can be provided at your request.
In general, routers can be divided into two large groups - wired and wireless. Already by the names it is clear that all devices are connected to the first ones only with the help of cables, and to the second ones, both with the help of wires and without them using Wi-Fi technology. Therefore, at home, it is wireless routers that are most often used, which allow providing the Internet and networking computer equipment using various communication technologies.
To connect computer devices using cables, the router has special sockets called ports. In most cases, the router has four LAN ports for connecting your devices and one WAN port for connecting an ISP cable.

In order not to overload the article with redundant information, we will not consider in detail the main technical characteristics of routers in this chapter, I will talk about them in a separate article, visited by choosing a router.
In many cases, the router may be the only component needed to build your own local network, as there will simply be no need for the rest. As we have already said, even the simplest router allows you to connect up to four computer devices using wires. Well, the number of equipment that receives simultaneous access to the network using Wi-Fi technology can even be in the tens, or even hundreds.
If, nevertheless, at some point the number of LAN ports of the router is no longer enough, then to expand the cable network, one or more switches can be connected to the router (we will discuss them below), which act as splitters.
Modem
In modern computer networks, a modem is a device that provides access to the Internet or access to other networks through ordinary wired telephone lines (xDSL class) or using wireless mobile technologies (3G class).

Conventionally, modems can be divided into two groups. The first includes those that connect to the computer via the USB interface and provide access to the network only one specific PC, to which the modem is directly connected. In the second group, LAN and / or Wi-Fi interfaces already familiar to us are used to connect to a computer. Their presence indicates that the modem has a built-in router. Such devices are often called combined, and they should be used to build a local network.

When choosing DSL equipment, users may encounter certain difficulties caused by confusion in its names. The fact is that often in the assortment of computer stores, two very similar classes of devices coexist at once: modems with built-in routers and routers with built-in modems. What is their difference?

There are practically no key differences between these two groups of devices. Manufacturers themselves position a router with a built-in modem as a more advanced option, endowed with a large number of additional functions and with improved performance. But if you are only interested in basic features, such as connecting all computers on a home network to the Internet, then there is not much difference between modem routers and routers where a DSL modem is used as an external network interface.
So, to summarize, a modern modem with which you can build a local network is, in fact, a router with an xDSL or 3G modem acting as an external network interface.
A switch or switch is used to connect various nodes of a computer network and exchange data between them via cables. The role of these nodes can be either separate devices, such as a desktop PC, or entire groups of devices already combined into an independent network segment. Unlike a router, the switch has only one network interface - LAN and is used at home as an auxiliary device, mainly for scaling local networks.

To connect computers using wires, like routers, switches also have special socket-ports. In models focused on home use, their number is usually five or eight. If at some point the number of switch ports is no longer enough to connect all devices, you can connect another switch to it. Thus, you can expand your home network as much as you like.
Switches are divided into two groups: managed and unmanaged. The first, as the name implies, can be controlled from the network using special software. With advanced functionality, they are expensive and not used in the home. Unmanaged switches distribute traffic and regulate the speed of data exchange between all network clients in automatic mode. It is these devices that are ideal solutions for building small and medium-sized local networks, where the number of participants in the exchange of information is small.
Depending on the model, the switches can provide a maximum data transfer rate of either 100 Mbps (Fast Ethernet) or 1000 Mbps (Gigabit Ethernet). Gigabit switches are best used for building home networks in which it is planned to frequently transfer large files between local devices.
Wireless access point
To provide wireless access to the Internet or local network resources, in addition to a wireless router, you can use another device called a wireless access point. Unlike a router, this station does not have an external WAN network interface and is equipped in most cases with only one LAN port for connecting to a router or switch. Thus, you will need an access point if your local network uses a regular router or modem without Wi-Fi support.

The use of additional access points in a network with a wireless router can be justified in cases where a large Wi-Fi coverage area is required. For example, the signal strength of a wireless router alone may not be enough to cover the entire area in a large office or a multi-storey country house.

Access points can also be used to organize wireless bridges that allow you to connect individual devices, network segments or entire networks using a radio signal in places where cabling is undesirable or difficult.
Network cable, connectors, sockets
Despite the rapid development of wireless technologies, many local networks are still built using wires. Such systems have high reliability, excellent throughput and minimize the possibility of unauthorized connections to your network from outside.
To create a wired local area network in home and office environments, Ethernet technology is used, where the signal is transmitted over the so-called "twisted pair" (TP-Twisted Pair) - a cable consisting of four copper twisted pairs of wires with each other (to reduce interference).

When building computer networks, mostly unshielded CAT5 cable is used, and more often its improved version CAT5e. Cables of this category allow you to transmit a signal at a speed of 100 Mbps when using only two pairs (half) of wires, and 1000 Mbps when using all four pairs.
To connect to devices (routers, switches, network cards, and so on), the ends of the twisted pair use 8-pin modular connectors, commonly referred to as RJ-45 (although their correct name is 8P8C).

Depending on your desire, you can either buy ready-made (with crimped connectors) network cables of a certain length, called “patch cords” in any computer store, or separately purchase twisted pair and connectors, and then make cables of the required size yourself in the right amount. How this is done, you will learn from a separate material.
Using cables to connect computers to a network, of course, you can connect them directly from switches or routers to connectors on PC network cards, but there is another option - using network sockets. In this case, one end of the cable is connected to the switch port, and the other to the internal contacts of the socket, in the external connector of which you can later connect computer or network devices.

Power outlets can be built into the wall or mounted outside. The use of sockets instead of protruding cable ends will give a more aesthetic look to your workplace. It is also convenient to use sockets as reference points for various network segments. For example, you can install a switch or router in the hallway of the apartment, and then thoroughly lay cables from it to sockets located in all necessary rooms. Thus, you will get several points located in different parts of the apartment, to which you can connect not only computers, but also any network devices at any time, for example, additional switches to expand your home or office network.
Another little thing that you may need when building a cable network is an extension cable, which can be used to connect two twisted pairs with already crimped RJ-45 connectors.

In addition to their direct purpose, extension cords are convenient to use in cases where the end of the cable ends with not one connector, but two. This option is possible when building networks with a bandwidth of 100 Mbps, where only two pairs of wires are sufficient to transmit a signal.
You can also use a network splitter to connect two computers to one cable at once without using a switch. But again, it is worth remembering that in this case the maximum data exchange rate will be limited to 100 Mbps.

Read more about twisted pair crimping, connecting sockets and the characteristics of network cables in a special material.
Now that we've seen the basic components of a LAN, it's time to talk about topology. In simple terms, a network topology is a diagram that describes the locations and how network devices are connected.
There are three main types of network topology: Bus, Ring, and Star. With a bus topology, all computers on the network are connected to one common cable. To combine PCs into a single network using the "Ring" topology, they are serially connected to each other, while the last computer is connected to the first. With a star topology, each device is connected to the network through a special hub using a separate cable.

Probably, the attentive reader has already guessed that to build a home or small office network, the Star topology is mainly used, where routers and switches are used as hub devices.
Creating a network using the Zvezda topology does not require deep technical knowledge and large financial investments. For example, using a switch that costs 250 rubles, you can network 5 computers in a few minutes, and using a router for a couple of thousand rubles, you can even build a home network, providing several dozen devices with access to the Internet and local resources.
Another undoubted advantage of this topology is good scalability and ease of upgrade. Thus, network branching and scaling is achieved by simply adding additional hubs with the necessary functionality. Also, at any time, you can change the physical location of network devices or swap them in order to achieve more practical use of equipment and reduce the number and length of connecting wires.
Despite the fact that the Zvezda topology allows you to quickly change the network structure, the location of the router, switches and other necessary elements must be thought out in advance, in accordance with the layout of the room, the number of connected devices and how they are connected to the network. This will minimize the risks associated with the purchase of unsuitable or redundant equipment and optimize the amount of your financial costs.
Conclusion
In this material, we examined the general principles of building local networks, the main equipment that is used and its purpose. Now you know that the main element of almost any home network is a router, which allows you to network many devices using both wired (Ethernet) and wireless (Wi-Fi) technologies, while providing all of them with an Internet connection through one single channel.
Switches are used as ancillary equipment to expand the points of connection to the local network using cables, which are essentially splitters. To organize wireless connections, access points are used, which allow using Wi-Fi technology not only to connect all kinds of devices wirelessly to the network, but also in the "bridge" mode to connect entire segments of the local network.
In order to understand exactly how much and what kind of equipment you will need to purchase to create a future home network, be sure to first draw up its topology. Draw a diagram of the location of all network member devices that will need a cable connection. Depending on this, select the optimal location for the router and, if necessary, additional switches. There are no uniform rules here, since the physical location of the router and switches depends on many factors: the number and type of devices, as well as the tasks that will be assigned to them; the layout and size of the room; requirements for the aesthetics of the type of switching nodes; possibilities for laying cables and others.
So, as soon as you have a detailed plan for your future network, you can begin to move on to the selection and purchase of the necessary equipment, its installation and configuration. But we will talk about these topics in our next materials.
Setting up a local home network can be divided into several steps:
1 We register network settings on all computers / laptops / TVs on the home network (this step is used if there is no router in your local network).
2 Checking the name of computers and the working group specified in the properties of computers.
3 Enable Windows Firewall.
4 Check network operation.
We manually write the network settings on all devices on the home network (for networks that do not have a router / router)
Go to Control Panel (" Start - Control Panel”) and choose “ Network and Sharing Center».
After that, press " Change adapter settings». 
In the network connections window, select the connection we are interested in and right-click on it, select " Properties”, in the connection properties window, select “ Internet Protocol Version 4 (TCP/IPv4)» and press the active button « Properties". In the Internet Protocol Version 4 (TCP/IPv4) Properties window, enter the IP address 192.168.1.1
(on other machines we prescribe 192.168.1.2
, 192.168.1.3
etc.) All computers must have a subnet mask 255.255.255.0
. The gateway should not match the IP address of the computer; in the gateway, enter the IP of another computer on the network (if you do not have a gateway specified, you will not be able to specify the network, by default it will be Public, this will be discussed below). 
The first time you connect to a network, you must select a network location. This choice affects the firewall settings and security settings for the type of network you are connecting to. If your computer connects to more than one network (for example, your home network, your local coffee shop, or your work network), choosing a network location ensures that your computer is secure. 
There are four types of network placement.
home network to work in home networks or in networks whose users and devices are known and can be trusted. Home network computers can belong to a homegroup. For home networks, network discovery is turned on, which enables the use of other computers and devices connected to the network, and allows other users to access the computer from the network.
Working network to work in a network of a small office or other workplace. Network discovery, which allows you to use other computers and devices connected to the network, and allows other users to access your computer from the network, is enabled by default, but you cannot create or join a homegroup.
public network for networks in public places (such as cafes and airports). This network location is configured to make the computer "invisible" to other users and increase its protection against malware from the Internet. HomeGroup is not available on public networks and network discovery is disabled. This option should also be selected if you are using a direct Internet connection without a router or a mobile broadband connection.
Domain used for domain networks, such as those used in workplaces in organizations. This type of network location is controlled by the network administrator and cannot be selected or changed.
In practice, I would recommend choosing for a home network Working network, because unlike Home Network, you don't need to enter a password to share resources. Of course, you should not choose a Public network for a local network at home, I generally keep quiet about the domain, because in this case you need to install, configure a domain controller - for a home network - it's not worth it.
Checking the computer name and workgroup.
It is necessary to check that all devices on the home network are included in the same workgroup, while having different names. To do this, we go Start-Control Panel-System". A similar procedure must be performed on all computers / laptops in the network.  In the field Computer name, domain name and workgroup settings, we look at the registered computer name and workgroup.

Checking the operation of the Windows Firewall service.
The next step is to check if the Windows Firewall service is enabled. To do this, we go Start - Control Panel - Administrative Tools» 
In the window that opens, click " Computer management». 
Next go " Services and Applications - Services", find a service there Windows Firewall and see that it is enabled, if it is disabled, you need to run it and check that the Startup type is set to " Automatically”, To do this, double-click on this service and in the window that opens, look, and if necessary, correct the Startup Type. 
Checking network operation.
The last step is to check the operation of the home network, for this we launch the command line on one of the computers. Click " Start» in the search bar write cmd and press the key Enter». 
A command line will open, in it you need to enter the command ping and ip address of another computer on the home network, press the " Enter». 
If everything is done successfully, you should not have any packet loss.
This completes the home network setup, the next step is to configure network printer or do shared folders (network folders) This will be discussed in future articles.
Creating a local network at home is not a whim, but a necessity if you use two or more computers. The main task of such a network is to connect PCs and create an opportunity for the user to conveniently use the resources of each of them, and not switch between computers. In this article, we will look at how to set up a LAN connection between computers.
For example, two devices will be used: a desktop computer based on Windows 7 and a laptop based on Windows 10. The list of instructions that will be in the article can also be used on other Windows operating systems (8, 8.1).
Methods for connecting computers over a local network
Today, you can connect via a local network through a router or directly. The first method is gaining popularity, and the second is already a relic of the past, although the time period has not passed so much. Consider schematically how the connection takes place.
To begin with, consider the first scheme "directly". It only works when computers are connected to each other. Data transfer occurs only in one direction, i.e. either from the first PC to the second, or vice versa. At the same time, if the Internet is supplied to one computer, then it can be configured to be served to the second one, but this is already inconvenient, because. routers appeared.
Desktop computers are connected to the router, and mobile devices can receive data from the router or transmit it to it using a wireless network. Thus, using a router (usually they are immediately with a Wi-Fi access point), you can connect all devices in the house to one network and use the Internet from one access point, without interfering with each other at all.
We will now configure the local network according to the principle “through a router”, because it is more convenient, more practical and more modern, and also not very difficult even for a novice user. How to set up your router? Use the instructions from the manufacturer's website, now they are written very clearly and accessible. When you have configured the router, proceed to configure the local network.
Please note that if you have been using the Internet via a modem for a long time, your desktop computer is connected to it, and the router is connected to the modem, you do not need to make additional settings. It is only important that a laptop or other PC is connected to the router using a Wi-Fi wireless network. Let's start setting up the network.
Setting up a local network on a desktop computer (#1)
To start using the local network, you must follow the instructions below:
- We go "Start" - Control Panel - Network and Sharing Center ";
- Next, on the left side of the screen, select "Change advanced options...";

- In this window, you need to check the boxes next to the items:
"Turn on network discovery"
"Turn on file and printer sharing"
"Turn on sharing so network users can..."
"Use 128-bit encryption..."
"Turn on password protected sharing"
"Let Windows manage homegroup connections"

- Click "Save Changes"(it is important that you are logged in with "Administrator" rights);
- At this step, you need to join a homegroup, but we will create it on a laptop, so scroll through the article to the point, and then return here;
- When the password is received, you need to enter it in the required window. To do this, go to "Conductor", and then "Home Group";
- Click "Join", put a checkmark in front of all the components for which shared access is provided and enter the password that was generated earlier (you should have written it down on a sheet);

- The password will be checked and the connection will begin. Here you need to wait until everything is set up as it should;

- When the join is completed, you will receive a message like in the window below, and if you repeat step 6, you will see the message "This computer is joined to a homegroup".


Setting up a local network on a laptop (#2)
First of all, you need to do the same steps as on computer No. 1, namely points 1-4. Since we have Windows 10, in order to enter the "Control Panel", you must enter the "Search" and enter this request. After that, everything is done in the same way as with the first PC.
Now let's move on to creating a "Homegroup" and further setting up the network:
Now, in order to make sure that everything works as it should, it is necessary to check the performance of the local network we created, which we will now do in the next part of the article.
Network health check
The main task of the local network, as we have already said, is the sharing of resources. Most often, such resources are faxes, scanners, printers, etc., as well as the files themselves on different PCs. We will not test the operation of the printer from different PCs, but this function should definitely become available after the above conditions are met.
Let's check the health of the network using file transfer. To do this, let's create a shared folder on the laptop. Go to "Conductor" and then in "Net":
The computer named "Jenya" is our laptop, and the second computer "Evgeniy1" is a stationary one. With this we checked that the computers are really on the same network. Now go to the Local Disk D and select a folder for public access, let it be, for example, "Synopsis". Select it, press RMB, and then "Properties":
Therefore, you need to press "Access", and then "General access". In the list of users, select the one who logs in to the system on computer No. 1 under such and such a login. After that, you will receive a message that the folder is shared: 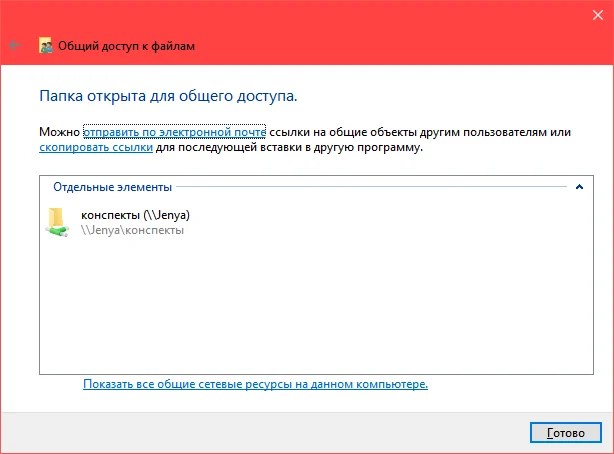
Now we press again "Ready". On computer number 1, enter "My Computer" - "Network", and then select our computer "Jenya". Now in the list of folders our "Abstract" folder has become available. It is important not to immediately go into this folder and check if everything has been transferred - you need to wait about a minute after you closed the "Properties" window for the changes to take effect.
Windows 10 users sometimes get error 651 and the like when connecting. They are called "internet connection errors". This is due to the appearance of a software or hardware network failure.
Hello.
Even 10-15 years ago, having a computer was almost a luxury, but now even having two (or more) computers in the house surprises no one ... Naturally, all the advantages of a PC appear when it is connected to a local network and the Internet, for example: network games, disk space sharing, fast file transfer from one PC to another, etc.
Not so long ago, I was “lucky” to create a home local network between two computers + “share” the Internet from one computer to another. I will tell you how to do this (according to fresh memory) in this post.
1. How to connect computers to each other
The first thing to do when creating a local network is to decide how it will be built. A home local network usually consists of a small number of computers / laptops (2-3 pcs.). Therefore, 2 options are most often used: either computers are connected directly using a special cable; or use a special device - a router. Consider the features of each option.
Direct connection of computers

This option is the simplest and cheapest (in terms of equipment costs). You can connect 2-3 computers (laptops) with each other in this way. At the same time, if at least one PC is connected to the Internet, you can allow access to all other PCs in such a network.
What is needed to create such a connection?
1. Cable (it is also called twisted pair), a little more than the distance between the connected PCs. Even better, if you immediately buy a crimped cable in the store - i.e. already with connectors for connecting to a computer network card (if you crimp it yourself, I recommend that you familiarize yourself :).
By the way, you need to pay attention to the fact that the cable is needed specifically for connecting a computer to a computer (cross connection). If you take a cable to connect a computer to a router - and use it by connecting 2 PCs - such a network will not work!
2. Each computer must have a network card (all modern PCs / laptops have it).
3. Actually, that's all. The costs are minimal, for example, a cable in a store for connecting 2 PCs can be bought for 200-300 rubles; network cards are in every PC.
It remains only to connect the 2 system units with a cable and turn on both computers for further settings. By the way, if one of the PCs is connected to the Internet via a network card, then you will need a second network card - to be used to connect the PC to the local network.
Pros of this option:
Quick creation;
Easy setup;
The reliability of such a network;
High speed when exchanging files.
Minuses:
Extra wires around the apartment;
In order to have access to the Internet, the main PC that is connected to the Internet must always be turned on;
Inability to access the network for mobile devices*.
Creating a home local network using a router
A router is a small box that greatly simplifies the creation of a local network and Internet connection for all devices in the house.
It is enough to configure the router once - and all devices will be able to immediately access the local network and access the Internet. Now in stores you can find a huge number of routers, I recommend that you read the article:
Stationary computers are connected to the router via a cable (usually 1 cable is always included with the router), laptops and mobile devices are connected to the router via Wi-Fi. You can see how to connect a PC to a router (using the D-Link router as an example).
The organization of such a network is described in more detail in this article:

Pros:
Once set up a router, and access to the Internet will be on all devices;
No extra wires;
Flexible Internet access settings for different devices.
Minuses:
Additional costs for the purchase of a router;
Not all routers (especially from a low price category) can provide high speed on a local network;
It is not always so easy for inexperienced users to set up such a device.
2. Setting up a local network in Windows 7 (8)
After the computers are connected to each other by any of the options (whether they are connected to a router or directly to each other), you need to configure Windows for the full operation of the local network. Let's show on the example of Windows 7 (the most popular OS today, in Windows 8 the setting is similar + you can familiarize yourself with).
2.1 When connecting through a router
When connected through a router, the local network, in most cases, is configured automatically. The main task is to configure the router itself. Popular models have already been analyzed on the blog pages earlier, I will give a few links below.
After setting up the router, you can start setting up the OS. So…
1. Setting the workgroup and PC name
The first thing to do is to set a unique name for each computer on the local network and set the same workgroup name.
For example:
1) Computer #1
Working group: WORKGROUP
Name: Comp1
2) Computer #2
Working group: WORKGROUP
Name: Comp2
To change the PC name and workgroup, go to the control panel at the following address: Control Panel\System and Security\System.


Windows 7 System Properties
2. Sharing files and printers
If you do not take this step, then no matter what folders and files you provide for public access, no one will be able to access them.
To enable the option to share printers and folders, go to the control panel and open the " Network and Internet«.


Now click in the column on the left on the item " change advanced sharing options«.

Several profiles 2-3 will appear in front of you (in the screenshot below 2 profiles: “ Home or work" and "General"). In both profiles, you need to enable file and printer sharing + disable password protection. See below.

Sharing settings.

More sharing options
After making the settings, click " save changes" and restart your computer.
3. Sharing folders for public access
Now, in order to use the files of another computer, you need the user to share folders on it (share them).
It is very easy to do this - in 2-3 mouse clicks. Open File Explorer and right-click on the folder you want to open. In the context menu, select " Sharing - HomeGroup (Read)«.

Then it remains to wait about 10-15 seconds and the folder will appear in the public domain. By the way, to see all the computers on your home network - click on the button " Network"In the left column of the explorer (OS Windows 7, 8).

2.2 When connecting directly + sharing Internet access on a second PC
In principle, most of the steps for setting up a local network will be very similar to the previous option (when connected via a router). In order not to repeat, the steps that are repeated, I will mark in brackets.
1. Setting the computer name and workgroup (similarly, see above).
2. Setting up file and printer sharing (similarly, see above).
3. Setting up IP addresses and gateways
The setup will need to be done on two computers.


