So, you want to connect digital television. What needs to be done for this, and what to pay attention to? I will answer all your questions. Let me say right away that we are talking about terrestrial digital TV(set-top box, antenna, air), about cable - this is not here)
How to connect digital TV? It's actually very simple!
I suggest you simple algorithm, following which, you can easily connect and configure 10 or 20 digital channels on your TV. But, since each step has its own nuances, I wrote separate articles on them. Carefully study everything that is written here, and you will be happy - free digital television in your home. All links open in a new window.
So, let's go.
The first three steps when connecting digital TV, or “Where to start”?
- Read this short introduction to the topic written by me. This way you will get a rough idea of the issue in general.
- Watch it using terrestrial digital TV. Maybe you expected more or something different? If you are not satisfied with what is broadcast there, you can close this site and continue with your business)
- Make sure that there is a digital TV nearby that operates in the DVB T2 format, and that you are within the broadcast area of one of them.
If the first three points did not discourage you, then let’s continue. Most likely, further steps will require money, so check the coverage area well and think about whether you are doing all this in vain.
All you need is a TV (I took it for 1100) and (with an amplifier I took 700 rubles). In total, the issue price is 1,800 rubles, which pays for itself in a year of cable TV subscription. And if you don’t buy an antenna, then that’s great. And the TV may well already have a built-in receiver for connecting digital TV.
Further steps to connect the “digital”
- Let's solve the issue with .
- We solve the issue with
- Having everything you need on hand! (hooray!)
- If you have caught more channels than you should (duplicates!), .
- If something didn’t work out and we didn’t catch anything, then don’t despair.
- If nothing helps, then call or write an email to the local customer support center. I wrote, and they actually answered my questions from there. Well done!
Connecting digital television is not launching a ship into space, and I think that it is available to everyone who has such a desire and very little money)
Here is a short manual with a bunch of pitfalls. I hope you found it helpful.
With the advent of content in digital quality, numerous fans of the television product have changed the direction of their aspirations towards digital television. Quite active development of this area has caused the emergence of a large number of amateurs and companies that will connect and set up digital television for an appropriate fee. But there's no need to rush. Not everything is as complicated as it might seem at first glance. It is quite possible to cope with the issue of how to set up digital television on a digital TV on your own.
First, you need to consider in detail the principle of setup as such, and then move on to setting up TVs from different companies. At the moment there is some variety of types of digital television. The proposed options relate directly to cable “digital”.
How to receive digital television?
The process of digital television itself is the transmission of video and audio signals to the TV directly from the broadcaster. In this case, digital modulation and a certain compression of the transmitted data are used.
Where to begin?
To begin with, you should decide on a company that will provide the selected services and conclude an appropriate agreement to connect the required package of channels. Then we purchase the kit necessary to implement our plan. It will include a fiber optic cable and the necessary modification of the set-top box. The number of set-top boxes will depend on the number of connected TVs. it is necessary to crimp and carefully lay, avoiding pinching.

How to connect to TV?
People who are faced with a similar situation for the first time immediately have a certain number of questions that need to be answered: what kind of TV is needed for digital terrestrial television? How to set it up? How much? At that very moment the answer is on the surface. An ordinary TV with a standard set of options is quite suitable: analog input (tulip), S-Video input, scart input and antenna input. There is no need to talk for a long time about how to set it up. Just insert the cable into a special connector on the set-top box, the other end of the cable is inserted into the corresponding connector on the TV.
You need to connect the power and press the “Power” button. Automatic channel search on the TV will select the frequency of the set-top box and stop scanning. The console menu will appear on the screen.
In outline
The order of operations and the differences in tabs differ slightly between different TV models. Therefore, it is worth mentioning how to set up digital television reception regardless of the selected TV model.
We enter the TV menu. Select the “Options” tab in the window that appears. The “Auto Configuration” section is a transition directly to configuration. In the next window - “Selecting a signal source” - we select the “Cable” option. The "Start" button will complete this stage. As a result, from several options for the “Search Mode” item, select the “Full” item. Enter the following data in the blank fields:
- frequency (kHz) - 314,000 (314 MHz);
- modulation - 256 QAM;
- transmission speed - 6875 kS/s.
Some TV models are equipped with the Network Search function. This greatly simplifies the question of how to set up digital television on a digital TV. Simply select the desired mode and continue by pressing the “Search” button.

Setting up on LG TVs
Now let's look at how to set up digital television on an LG digital TV. Considering that different TV models from a given manufacturer may have their own firmware and menu, you should not be immediately disappointed, since all models of one company always have characteristic features. Therefore, it can be figured out quite easily. The step-by-step guide starts with the remote control and the “Menu” button on it. After clicking, select “Options” in the window that opens.
The “Options” tab presents several parameters, the most necessary of which will be the “Country” item. In this paragraph we indicate the country Germany or Finland.
Then you need to return to the “Setup” menu. We use the “Autosearch” item, in which we indicate the connection method “Cable”. Following all instructions in sequence will allow the TV to detect and tune in all available channels.

There is a small nuance that should be taken into account after setting up channels - the presence of a function, when turned on, the existing channel settings are reset and a new search begins. It is advisable to do without using this function. In the “Digital cable settings” tab, disable the option. After reading about what's on LG TVs and being a little careful, it's quite easy to tune the channels yourself.
Setup on Philips TVs
The instructions below will tell you how to properly set up digital television on Philips TVs.
Initially, we find the “Menu” button located on the remote control and enter the TV menu. The next step is to select the “Configuration” tab and enter this section. The window that appears will provide several options, one of which is the “Install” item. By clicking on this item, we call up a secondary menu on the TV screen. The required section is “Channel setup”. In the next submenu that appears, the necessary “Automatic installations” tab is required. As a result of successive correct transitions through the tabs, a message appears about the subsequent update of the list of available channels. Select the “Start” value.
After selecting the “Reinstall channels” item, the “Country” section follows. From the list of countries, as in the case of LG TVs, we select Finland or Germany. When selecting the connection method, select “Cable”.
If you understand how it was not difficult, you can proceed to searching for channels by clicking the “Start” symbol.

Setting up on Samsung TVs
The entire setup process is carried out directly by the remote control. By pressing the “Menu” button we call up the TV menu tab. In the “Channel” section, located under the image, the right side of the screen will open several tabs. In them we find the “Antenna” item and click on it, and in selecting the connection type we designate “Cable”. After going to the “Country” tab, select the “Other” option. As a result of the above actions, a window with the requested pin code will appear. The default pin code value is 0000.
In the “Auto Configuration” tab, the signal source will be “Cable”. After completing the sequential selection of tabs, you must click “Search”. The TV will certainly detect all channels currently available.
Setting up on Toshiba TVs
On Toshiba TVs, the entire setup process is greatly simplified. Go to the TV menu and select Russian. You need to find the “DTV Manual Tuning” tab. After entering the settings, click “Ok” and the determination of available channels begins.

Among other things, digital television is also available on a personal computer.
Digital television has become famous only in the last few years, and therefore many cable television companies have emerged in the Russian telecommunications services market. Digital television in Moscow and St. Petersburg is no longer uncommon. However, not every user knows how to successfully set up digital television. Stores and service centers, in turn, offer their setup services, which will cost you some money.
Instructions
1. Independently, setting up a TV with a tuner to receive digital television, known as DVB-C, is not so difficult. To proceed to the setup, go to the TV menu and select the item called “Auto tuning”. A window will appear in front of you to select the source of the television signal with two alternatives: antenna and cable. Select the 2nd option and click on the Start button on the right.
2. In the further window for selecting a TV broadcast source, select “Digital” and press the “Start” button again. And finally, in the last window, in the “Search mode” item, select the “Full” option and fill in the fields with the following data: - frequency - 354 MHz; - modulation - QAM 256; - transmission speed - 6900 sim/sec. If you want to search for HD quality channels, change the frequency value to 338 MHz.
3. Many TV models support network search, so you don’t have to manually enter all the parameters described above. Simply press the “Search” button immediately after selecting the search mode. On some TVs, you also need to enter the values for the final frequency and scan type. When setting up digital television, select “Fast Scan” and set the final frequency to 418 MHz.
4. As you can see, setting up digital television takes everyone a few minutes and does not require any specialized knowledge. In addition, digital television can also be set up on a personal computer. To do this, you need a built-in or external TV tuner and a small antenna to receive the signal. The settings, in most cases, are mechanical.
Affordable high-speed Internet has made it possible to listen to the radio and watch television programs on computer without installing FM/TV tuners and antennas. The primitive option of watching TV in a browser window is not very comfortable, but there is an alternative method.

Instructions
1. In order to make watching television convenient, you need to download and install on your computer one of the free programs, with the help of which you can watch hundreds of TV channels from all over the world: TV Player Classic, Free Internet TV, JLC’s Internet TV, Online TV Player Basic.
2. You can download programs on the soft portals www.softodrom.ru, www.softportal.com, www.freesoft.ru, or on the official websites of application developers: www.tvplayerclassic.com, www.holersoft.com, www.jlc-software. com, www.onlinetvplayer.com.
3. Before downloading and installing programs, make sure that the speed of your Internet connection is at least 1 Mb/sec - this is the minimum speed that will allow you to watch TV online comfortably and at the same time be able to work on the Internet. You can measure the speed of your Internet channel on the website www.speedtest.net. If your speed is too low, contact your provider and change your Internet access tariff.
4. After installing and launching each of the above programs, you will see a menu for accessing hundreds of channels, to view which you do not need to make additional settings - simply select each of the channels and start watching. The interface of all programs is subconsciously clear and it will not be difficult for even novice users to get used to it.
Video on the topic
Those who use the Internet can perform network scanning. This will make the work more harmless and true. Scanning is carried out with the help of special programs. Let's say The Network Mapper, or Nmap for short, is a good utility for scanning networks. It has several scanning methods.

You will need
- Personal computer, The Network Mapper program
Instructions
1. To specify the hosting to be scanned, specify its name or address on the command line after specifying the options. To scan subnets of IP addresses, enter the parameter “/” after the name or IP address of the host that will be scanned.
2. Go to Start on your computer. Select the "Programs" section. Next, click on “HP”. Select HP LaserJet and the Scan tab. A window will open in which click on the “configure” tab. Next, a window will appear in which you can select the “Change destinations” option that appears on the all-in-one control panel when you press the “Scan to” key. Click on the “Next” button. Check the box next to "Allow scanning» by clicking the Scan To button on your all-in-one. Select destinations by moving them from the Computer window located in the left window to the All-In-One. In the window that appears, enter your name. Then click on the “OK” button. Click on the “Update” tab, and then on the “Close” button.
3. Install the LanScope program on your computer and run it. The interface is clear and easy. Click the “Program Settings” section. Here you can make the settings at your discretion. The panel has a “Scan” section. Indicate there exactly which sources you want to check. Go to the panel called “IP List Creation Wizard”. In the window, select a list creation method and click “Next”. Provide a name for the address list. Click "Next" again. Click on the Search tab. The program will show a list of computers. Once the process is complete, LanScope will suggest next steps.
4. Network scanning can be performed with the support of the HDL Smart-Bus program. Launch scanning you can if you press the “Scan Smart-Bus Net” button. After starting work, a window will appear with a list of found devices. Select the devices you want to import into your plan. Click OK. In the “Device Tree” you will see a list of Smart-Bus devices with available channels.
Video on the topic
Having a digital television in your home means you can watch a range of different digital television programs. Digital TV is delivered to the buyer by connecting to the appropriate cable television. At the same time, you can continue to watch analogue channels in full.

Instructions
1. You should know that to receive a digital signal, you need to install equipment that has the function of receiving and playing standards of the transmitted signal on the TV screen. These can be the following devices. A cable receiver, free-standing, standard DVB-C (when using cable networks) or DVB-T (for regular broadcasting), having a separate control panel. The receiver must be connected to the audio-video inputs of virtually any TV, both analog and digital; A current TV that has a built-in DVB-C and/or DVB-T standard tuner. In this case, easily connect the cable through which you receive the network signal to the antenna socket, and you can receive the signal after setting up the TV. Computer, however, viewing here requires the additional presence of a PC card or an external tuner connected via a USB port.
2. You need to configure the digital tuner to receive digital television in the following sequence. First, connect the digital TV cable to the antenna socket of the tuner. After this, you need to combine the tuner and the audio-video input of the TV, and turn on the TV receiver. Next, in the TV menu, select the appropriate AV input and connect the tuner's power. First wait for the splash screen, and after this the offer from the tuner to set up channels and press the OK button on the remote control. The channels will be mechanically adjusted.
3. If you want to set up a TV that has a built-in digital tuner, you need to follow the instructions for using that particular TV model. First, connect the network cable to the antenna socket of the television receiver. After this, if necessary, in the “Cable search parameters” menu item, set the required parameters for the initial and final frequency and symbol rate, and the “network search (NIT)” item is enabled. Next in the menu, select the search type “mechanical” and the signal source “cable”. You also need to click on the channel type “Digital and analogue”.
Today, more and more countries around the world are switching to digital television. If you have the opportunity to watch digital television today, you are in luck. Your main task is to configure your home TV to receive digital channels. If the TV in the house is non-digital, then when you switch to digital broadcasting, it stops receiving analog signals. If you have a digital TV, you will need to retune it and prefer the latest set of channels. Your favorite cable and satellite channels will not be affected.

You will need
- Cable digital TV tuner with cable, remote control and RCA audio-video connecting cable.
Instructions
1. Setting up your digital TV to receive the appropriate channels involves changing the settings in your TV's digital tuner. The tuner itself is needed to decode digital TV channels for viewing on a TV. There will be a little manipulation, you can handle it.
2. Let's start with the fact that you need to remove the cable TV tuner from the package and check its integrity. Insert a pair of AA batteries into the remote control with the correct polarity. Connect the cable from the antenna: at its end there is a crimp or screw-on F-type connector to RF-in (Ant-in), which must be secured to the input of the patch panel, which is located on the back of the television tuner.
3. Connect the RCA audio-video cable between the TV and the tuner. Connection to the tuner and TV connectors must be carried out in accordance with the color markings. Now you need to turn on the TV and digital tuner, switching the required input, say, to TV/AV.
4. Select the “Menu” block on the TV tuner remote control, then the “Auto search for channels” section and “OK”. Your tuner will immediately begin scanning channels. When the mechanical search ends, you will see a list of detected channels on the screen. Press “OK” on the remote control again. To exit the “Main Menu”, locate the line “Exit” and “OK” with the cursor, or press the “Exit” button on the remote control. The TV tuner will display the channel number on the front panel.
5. You can search for channels manually: select the “Manual channel search” subsection in the “Menu.” The “Reset Channels” function will delete all previous channel settings. You can also sort channels, group lists, or transfer a channel to another number. This is done through the “Sort Channels” option. Confirm any innovation with the “OK” button.
6. If you want to watch Electronic Program Guides (EPG), press the "EPG" button on the remote control. The screen will show 2 lists: at the top - a list of channels, at the bottom - a list of programs for the selected channel. To move through the list, use the “up” and “down” control buttons on the remote control. To exit the “EPG” menu, press “Exit” on the remote control.
Note!
Some TVs do not have an RCA connector, then select the SCART/SCART connector.
TV- tuners They are special devices that allow you to view cable or broadcast television on a personal computer. There are currently many types of TV tuners on sale, but the settings for all of them are virtually identical.

You will need
- - TV tuner;
- – driver;
- – a program for viewing a TV signal.
Instructions
1. Select TV tuner. This stage is perhaps the most important in setting up the device. The fact is that not all TV tuners may be suitable for your computer, unless they have their own video viewing program. There is a device with an internal board, connected through a free Ethernet port on the router and connected to a USB port or IEEE 1394 port on a computer. Determine which type is suitable for your PC or laptop. If necessary, purchase a special adapter.
2. Connect the TV tuner to your computer or laptop. This stage depends on what type of device you purchased. If you doubt your actions, read the operating instructions that should come with the TV tuner. Check that the connectors are connected correctly.
3. Turn on your computer or laptop and insert the driver disk into the drive, the one that was sold with the TV tuner. If there is no such disk, then you can download the necessary files on the Internet on the device manufacturer’s website. If you have the Windows 7 operating system installed, then in some cases it will prompt you to download the required updates.
4. Install software to watch TV channels. It is on the disc sold with the TV tuner. If you don’t have one, you can configure your device for Windows Media Center or download a suitable viewer on the Internet. In the first case, you need to check the compatibility of the TV signal transmitted by the TV tuner and received by Windows Media Center. You can find similar information on the website http://windows.microsoft.com/.
5. Connect the TV tuner to your cable TV or antenna. Launch the program to receive a TV signal and press the channel scan button. If you completed all the previous steps correctly, a list of television channels will appear. Otherwise, check that the TV tuner is connected correctly.
Video on the topic
On computer allowed to view TV all types - cable, satellite, Internet TV. All of these types of TV have their advantages and disadvantages, however, if we talk only about the quality and stability of the video image, then we can arrange them in this order in descending order of collation - cable TV, satellite, Internet TV.

You will need
- - computer;
- - TV tuner;
- – DVB card;
- – satellite equipment;
- – unlimited high-speed Internet connection.
Instructions
1. In order to view on computer cable TV, the house must have a connection to it, i.e. a cable must be installed in the apartment and an agreement must be concluded with the cable television provider for the provision of services. If all this is available, purchase a TV tuner and connect it to your computer via a PCI/PCI-E slot or USB port. Connect the cable to the tuner and watch the cable TV .
2. Watching satellite TV requires more thorough preparation. Before everyone else, determine the channels you want to watch and the satellites from which these channels are broadcast. Do an internet search for this information. The result of the search should be the name of the satellites that broadcast the desired channels.
3. Go to LyngSat.com and view information on these satellites - signal parameters, beam coverage, data on the presence or absence of encryption, etc. If your home falls within the range of the signal and it is not encrypted, purchase equipment that allows you to view satellite TV. The kit includes a satellite dish, a C- or Ku-band converter, a DVB card of S or S-2 format, and an antenna cable. The parameters of the converter and DVB card are determined by the signal parameters - take this into account when purchasing equipment.
4. Mount the satellite equipment, configure it and record the signal with the DVB card tuner program. Information about all the details of the setup is abundantly available on the Internet. After fixing the signal, install on your computer one of the programs that support satellite TV viewing (ProgDvb, etc.), and scan the satellite with its help. The program will complete its work by creating a playlist of the found channels. Click on any of them and view satellite TV .
5. In order to watch Internet TV, it is advisable to have an Internet connection with a speed of at least 1 Mbit/s. Moreover, not only the speed is significant, but also the stability of the connection. If you have a choice, choose a dedicated DSL line or a Wi-Fi router. It is, of course, possible to use a 3G signal - by connecting via a USB modem or mobile phone - however, with this Internet connection, video disturbances are acceptable during peak loads on the communication line.
6. After the Internet connection is established, download one of the programs for watching online television. One of the best is RusTV Player. If you use this program, download the latest version (currently RusTV Player 2.3). Install the program on your computer and turn on any of the countless channels in the program’s playlist.
Note!
Some online television channels that broadcast low-resolution video can be viewed with an Internet connection speed lower than 1 Mbit/s. However, the lower the speed, the worse the image quality and the greater the likelihood of interference during broadcasting.
Special digital television technologies are rapidly progressing every day. There are more and more providers offering similar services. The customer needs to choose the best option from countless offers.

Instructions
1. When comparing the set of services offered by various digital television operators, pay attention to the number and genre variety of channels included in the basic package. An excellent operator is distinguished by a wide selection of channels from different parts of the world and on different topics - educational, news, sports, children's, religious, for movie lovers, etc. The current basic package, which meets the needs of TV viewers, usually contains more than fifty TV channels.
2. Please note that the subscription price for this service should be competitive and acceptable to you. If you think that the prices are unreasonably high, you should look for another provider. Currently, for 50-100 rubles a month you can get up to one hundred television channels, and these prices should be based on.
3. When choosing an operator, you should not think about the quality of the broadcast signal - with digital television it is impeccable, because the transmitted signal is digitized and does not contain interference. But the quality of the channels themselves, that is, their highly professional tier, can vary greatly. Consequently, the presence of a large number of channels in itself does not mean anything; you need to carefully examine their list. Do not forget that federal channels must be present in it, preferably at least ten.
4. When comparing data provided by digital broadcasting operators, consider the presence of additional functions in service packages. Today's cable television makes it possible to use modern interactive services, such as TV menus, video on demand, TV programs, etc.
5. The main part of the digital television market is occupied by cable network operators and satellite broadcasting companies. Recently, they have begun to be replaced by the IP-TV system, or Internet protocol television - this special technology transmits a television signal via the Internet. It is steadily progressing, new solutions are emerging that allow the use of equipment available to customers. Considering that the cost of Internet traffic is continuously falling, and transmission speed is increasing, we can expect a rapid increase in the popularity of this type of television broadcasting.
Video on the topic
Helpful advice
It will also be beneficial for you to know that digital television provides high quality accompaniment and sound design. In addition, terrestrial television makes it possible to transmit a significantly larger number of TV channels. And finally, the last specificity of this type of television is the presence of many related services.
To figure out how to tune channels on a TV, you should know that this process on modern models is divided into two stages. The first is to configure the input source. The second is adjusting the sound and image quality displayed on the screen. You also need to assign numbers to television channels and configure functional parameters. If there is a function to connect your TV to the Internet, you need to connect your digital equipment to the network.
Tuning in to receive TV channels
Many buyers of new models are wondering: “How to set up channels on an LG TV? What does that require?" Receiving and tuning channels on digital equipment is mandatory if new equipment has just been purchased in a store, and also if signal sources have been changed or new television programs have appeared. There may be several sources of signals that the TV receives. Based on their number and type, they configure the channels for watching TV.
Antenna types

For those people who are interested in the question: “How to set up a TV to receive channels?” - you should know that there are several types of antennas for this household appliance:
- The signal received from the over-the-air antenna should be configured on TVs using the remote control.
- Setting up TV channels on a TV that is connected to a satellite dish is done using the remote control from the satellite receiver.
- On a TV that is connected to a cable antenna, you should tune in TV programs using the TV remote control.
Not so long ago, television could only be watched using an over-the-air connection. The signal was then transmitted to the TV from the TV tower. The antenna design in this case had large dimensions; it had to be installed at a height and directed towards the nearest television tower. The signal quality was poor, so the picture displayed on the screen often disappeared and noise appeared. Besides all this, the number of channels was limited. Tuning channels on a TV for high-quality signal reception using an over-the-air antenna in an urban environment is not an easy task.
Fortunately, today more modern cable television is available to most Russians. Using the latest technologies, you can set your TV to show several dozen analogue channels of impeccable quality at once. And also more than 100 digital channels. However, the questions: “How to set up channels on the TV?” - has not become less. The image output is carried out using a cable laid in the apartment. If you use this connection method, no additional equipment is required, such as receivers.
Setting up your TV
But in order. More and more people are asking the question: “How to set up TV channels on a TV? What should be done?" To set up the new TV you just purchased to watch satellite television, you need to find all the channels that are available on the satellite equipment. To perform this operation, you must connect the receiver to the TV using a special cable. Then the digital equipment needs to be switched to monitor mode.
To set up your TV to receive terrestrial, cable, analog or digital channels, you must connect the TV plug to the TV socket. It is usually located on the side or back of the case. Then click on the “enter menu” button. After this, you need to decide how to configure the channels - automatically or manually. In the first mode, the equipment searches for all available channels itself. After completing this operation, a message will appear indicating that you can enjoy watching television. By choosing the second method, you will have to configure each channel independently and separately, which will take more time.
Disadvantages of automatic search

To figure out how to tune channels on a TV, every home appliance user should be aware of the disadvantages of automatic search. These include the fact that the channel numbering is carried out by the TV itself, so you will have to remember at what frequencies this or that program will be broadcast. It is also possible that interference may be accidentally stored.
Screen image
After purchasing a new TV, it’s not enough to know the answer to the question: “How to set up channels on the TV?” Note. Any settings in modern digital technology, be it screen resolution, adjusting the quality of the output image, or adjusting the sound level, are made using the “Service Menu” function. To open it, press the “Menu” button on the equipment control panel.
In addition to answering the question: “How to set up digital channels on a TV?” - It is important to know about image quality. This function is launched by pressing the “Menu” button. Then you should select the “Image” sub-item. This section adjusts the optimal image quality displayed on the digital TV screen. The following parameters are used:
- definition;
- color;
- contrast;
- brightness.
By controlling these parameters, they change the scale value of the required parameter up or down, achieving optimal picture quality that is pleasing to the user’s eyes.
Automatic screen adjustment
Most TV models allow you to adjust the screen automatically, using factory settings optimized for certain programs: bright screen, soft screen, for movies or watching sports, and more.
In some cases, TV owners are faced with a problem related to the geometric proportions of the screen. This becomes noticeable when watching programs and films, when people become very fat or, conversely, thin. The reason for this shortcoming is an incorrect setting of the screen proportions. For modern programs, a ratio of 16 to 9 should be used, but for old films, a ratio of 4 to 3 is suitable.
Adjust the image using the remote control by pressing the appropriate buttons (they are located differently on each TV model) or by pressing the “Menu” button. In order to correctly configure this parameter, it is best to use the corporate logo of the television channel, which is located in a circle. The MIR, EuroNews and TV Center channels have this icon.

Setting up channels on an old TV
In modern TVs, the setup process is almost completely automated. But with the old model of such an electrical device you will have to tinker. For example, to set up a Grundig TV, you will need experience and some knowledge.
Some obsolete CRT TVs still have good image quality. However, in order to display the image on the screen, you will need to search and configure each channel separately, specifying color and sound parameters. There are situations when high-quality channel tuning is only possible if you perform the following operation:
- Preset the TV channel.
- After this, go to the fine-tuning mode, and only after that begin adjusting the image quality on the screen.
This is how older models of Grundig equipment are configured.
Setting up cable TV on Samsung equipment

Cable television is one of the most popular ways to instantly transmit signals from a television tower to an apartment or house. In addition to cable TV, there is also more modern satellite and digital TV. Thanks to such technologies, TV viewers are offered a wide range of channels at an affordable price.
To display channels on the screen of Samsung equipment, you need to configure signal reception. Each channel broadcasts at a specific frequency. The tuning procedure consists of recording information into the TV’s memory about what frequency is needed to display various information to the viewer.
Instructions

Many people ask the question: “How to set up channels on a Samsung TV?” To search for programs on equipment from a given manufacturer, there are two methods:
- Method 1 - automatic setup. The technology itself, without human help, scans the signals available to it, storing in its memory those frequencies where there is broadcasting.
- Method 2 - manual setup. In this case, the user independently searches for frequencies and saves suitable channels into the TV’s memory. It takes, of course, more time.
Knowing how to set up digital channels on a Samsung TV and using your knowledge in practice, you will see that automatic search is much faster.

Step-by-step instructions for searching for programs:
1. Before starting the operation, make sure that the cable is connected to the TV.
2. After this, press the “Menu” button on the remote control.
3. Then you need to select the “Broadcast” item.
4. In this section, you should select the appropriate signal source from the available ones (antenna or cable).
6. Then click on the “Full” tab in the new window.
At this stage the process is almost complete. If you select the automatic channel search function, the equipment itself will search for available frequencies. If manual mode has been selected, you must manually search for suitable TV programs. After setting up all the channels, do not forget to save them in the device memory, and then press the “Exit” button.
In addition, you can change channels by assigning numbers to them. Interesting ones can be moved to the first rows, rarely viewed - to the end of the list.
After completing this series of steps, your Samsung equipment will save all the channels available to you, which you can view at any time.
Digital terrestrial television is slowly but surely replacing analogue television. In Ukraine, from the fall of 2018 to the spring of 2019, they plan to completely turn off analogue television. As far as I know, in Russia they also plan to turn off analogue TV at the beginning of 2019. And despite the fact that many people watch satellite TV, cable, or IPTV, many residents will have to look for alternative options. Otherwise, the TV will simply stop working and receive a signal at one point. And instead of our favorite TV channel, we will see the hiss of the TV.
Of course, instead of analog television, digital terrestrial television has long been working well, which everyone can watch absolutely free (in Russia there seems to be a separate paid package). All popular channels that we watched before are available for free viewing. Moreover, there are more channels, and the picture and sound quality is much better. In connection with the transition to T2, many people have a question about what is needed to receive digital terrestrial television. How to receive a T2 signal and what devices are needed for this? What should a TV be like? Is it necessary to buy a T2 set-top box (tuner)? Which antenna is suitable? There are a lot of such questions. In this article I will try to answer the most popular of them.
Digital terrestrial television - what is it, what are the advantages and what is the difference?
I will try to explain everything in simple words. Terrestrial television is television that is transmitted using a signal that is broadcast using television towers.
Terrestrial television can be divided into:
- Analog. The old format, which is now being actively disabled in many countries. Including in Ukraine and Russia.
- Digital. A new format that allows you to receive and watch channels in the best quality. The digital format is less sensitive to interference. Can broadcast more channels.
Until recently, our televisions received analogue television using a conventional antenna. (maybe they still accept it if it hasn’t been disabled in your country yet). As technology develops, analog television is simply outdated. Therefore, a smooth transition to digital television in the DVB-T2 format began a long time ago.
DVB is a set of digital television standards. DVB-T is an outdated format. DVB-T2 is a new format.
Digital TV has many advantages over analogue. The first and very big plus is signal compression. Due to this, the maximum number of on-air channels that can be broadcast has increased. At the same time, the quality of image and sound has improved, which is simply necessary for modern, large TVs. It also became possible to transmit information about a TV show, information about the following programs, etc.
Depending on the country, channel broadcasts are divided into packages. In Ukraine, for example, you can watch 32 channels in digital quality for free. These are 4 packages (multiplex) of 8 channels. For example, due to a bad signal, I only receive 2 packets (16 channels). In Russia there are two free packages. Each broadcasts 10 channels.
It's like there aren't many options. If we want to watch terrestrial television, then we will have to switch to T2. Or install a satellite dish, connect IPTV, or cable television. In villages and small towns, most likely there are only two options left: satellite TV, or terrestrial T2. Which is better is up to you to decide. Perhaps later I will write an article on this topic.
What is needed to receive a DVB-T2 signal?
Let's return to the topic of the article - the equipment that is necessary to receive digital terrestrial television.
- Or a TV with DVB-T2 support.
- Or a special T2 set-top box (tuner).
- Antenna.
Everything is simple here. If we have an old TV that does not have a built-in tuner that supports the DVB-T2 format, then we need to buy a separate set-top box that will receive the T2 signal, process it and transmit the finished picture to the TV. The set-top box itself can be connected to almost any TV. Even to the "pot-bellied" one.
TV with DVB-T2 support
Your TV may be able to receive a T2 signal. In this case, you do not need to buy a separate set-top box. Or you can connect the antenna directly to the TV, start searching for digital channels and enjoy watching.
In our countries, TVs with DVB-T2 support began to appear sometime after 2012. Therefore, if your TV was purchased before 2012, then it is unlikely to have T2 support. You need to look at the specifications and check. Information about the availability of DVB-T2 support may be indicated on the box or in the documentation. If you didn’t find anything there, then just type your TV model in the search engine, open some popular online store (or better yet, the official website of the manufacturer) and see what digital standards the tuner on your TV supports.
It looks something like this:
We look at the characteristics of the LG TV on the official website (broadcast system):

Or go to the settings of your TV and select channel settings (search) from the menu. He should ask you which channels to look for: digital, or digital and analog. Before doing this, you will most likely need to select the type of antenna: Cable (DVB-C), or Antenna (DVB-T).

Now, if there is something in the settings about searching for digital channels, then most likely there is support for T2.
It seems to me that it is possible that the TV only supports DVB-T, but not DVB-T2. Therefore, it is better to look at the characteristics of a specific model.
T2 set-top box for watching digital terrestrial television
If the TV cannot directly receive the T2 signal, you will have to buy a special set-top box. Many people call it a receiver. This is a small box that connects to the TV. An antenna is connected to the set-top box. Next, we perform a simple setup (search for channels) and watch digital TV.
There are a lot of such consoles. There are even separate online stores that sell only equipment for receiving the T2 signal. They even sell sets for receiving digital television (set-top box + antenna). The choice is very large, as well as the difference in price. And here you probably have a question: what is the difference between these consoles? The difference is in functionality, size, design, operating system, performance, etc.
- All these set-top boxes can receive a T2 signal. This seems to be their main task.
- In most receivers (even in the cheapest ones) There is a USB port into which you can connect a USB drive and watch videos, photos, or listen to music.
- Broadcast TV recording function.
- There are many models that can be connected to the Internet (via LAN or Wi-Fi, usually using a separate USB adapter). This makes it possible to watch videos on YouTube or other services. Watch IPTV, use a browser, etc.
- There are T2 set-top boxes that run on Android. All the functionality of this operating system is already available there. With this device you can turn your regular TV into a Smart TV.
There are a lot of differences. You should always carefully look and study the characteristics of a particular receiver. When I bought the T2 receiver, I didn’t understand all the nuances. Then, when I bought it, it turned out that the TV has a built-in T2 receiver. Well, nothing, later I connected it to another TV. By the way, I have a Strong SRT 8204. It seems to be one of the most budget ones. But nothing, it works.
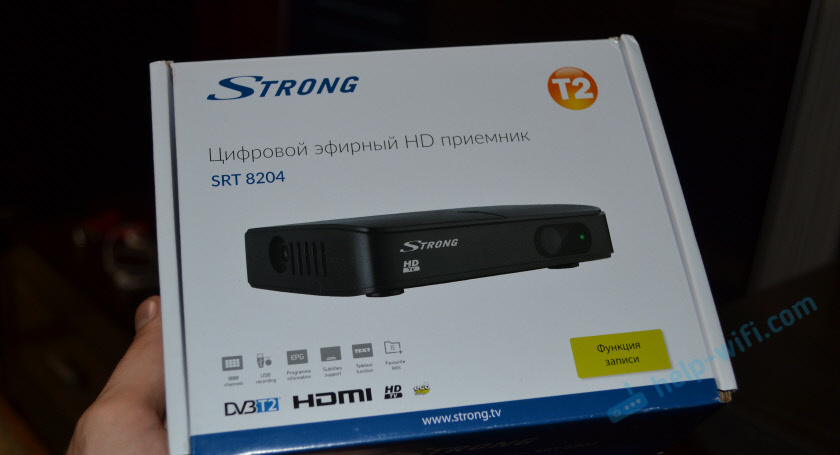
This set-top box can be connected to almost any TV. If you have an old TV, you can connect the set-top box using a triple tulip cable. If your TV has HDMI, then of course you need to use an HDMI cable to connect. The image quality will be much better. An HDMI cable usually needs to be purchased separately.
Antenna for DVB-T2 reception
You can receive digital terrestrial television with almost any antenna. You don't need any special antenna for this. You can easily use the antenna that you have installed, through which you have previously watched analog television. Any decimeter antenna will work without problems. The so-called “Polish antenna” for T2 is also suitable.
Of course, it all depends on how far the tower is from you and what the terrain is like in your area. If you live in a city where a tower is installed, then most likely everything will work even without an antenna. But I think a piece of wire will be needed. In this case, you can use an indoor antenna without an amplifier.

If the tower is far away, then you will need an antenna with an amplifier. Or you will have to install an external decimeter antenna to receive digital terrestrial television. They also come without amplifiers or with amplifiers. If reception is poor, you may need to raise the antenna to a mast.
Please note that if the antenna is powered, a power supply may not be needed as most T2 receivers can supply power to the antenna. Typically, this function is enabled in the receiver settings. You need to look at the specifications or instructions. Your receiver may not have this feature.
The antenna must be correctly connected and directed strictly towards the tower. You can easily find information on the placement of DVB-T2 signal transmitters in your country and region on the Internet.
conclusions
To start watching T2, you usually only need a receiver. Since you most likely already have an antenna. If your TV is not very old (especially if it has Smart TV), then you may not need to buy anything at all. Check if your TV supports DVB-T2. I have already told you how to do this.
If your TV does not have a T2 receiver, you will have to buy a set-top box. There is a large selection, I think you will find something. Well, then we connect the antenna and TV to the set-top box, and in the settings we start searching for channels. If the channels are not found, then check all the contacts on the antenna, point the antenna towards the tower (after looking at the location of the tower before). You may need a more powerful antenna or amplifier.
Be sure to leave comments. Share your experience and ask questions!