Secrets of Productivity on a Computer
Context menu in Windows
The menu is the most important element of the graphical user interface with which you can select the desired program option.
Types of menus in the computer:
by execution - text and graphic
by function - the main menu of the application, pop-up, context and system menus
What is the context menu how to call it
A context menu is a separate type of menu on a computer; list of available commands for working with this file.
Where is the context menu?
It is stored in the Windows registry, which consists of two sections. Some of the programs are stored in the HKEY_CLASSES_ROOT \ * \ shell section, the other in the HKEY_CLASSES_ROOT \ * \ shellex \ ContextMenuHandlers section.
How does the context menu open?
There are different ways of how to invoke the context menu
At the bottom of the keyboard, between the "ALT" key and the "CTRL" key, there is a special button. It shows the additional functions and actions available for this file. It usually has a sign and a mouse pointer on it. This button calls the context menu.
It is used if it is necessary to highlight the shortcuts of the necessary files, as well as inside programs that are already running. When you click on this button, the context menu is called in accordance with the current situation.
Right mouse button on the keyboard is also successfully replaced by this button.
This method is for those who prefer to use the keyboard, while the context menu can also be opened with the mouse.
Hovering the mouse over the required file, select it by clicking the left button. Right-clicking on the selected area will open a context menu. When several items are selected, the context menu will display the actions available for the selected group of files.
How to open the context menu when working on a laptop or netbook? On these devices, the mouse function is transferred to the built-in touchpad. The context menu is invoked by right-clicking on the selected area.
How to customize the right-click context menu
For the right mouse button, configure the context menu using the simple Context Menu Tuner program. It will show you how to customize the Windows 7 context menu.
Let's take a look at how to customize the right mouse button.
Download and run the program
The program interface is made up of two different panels: the left one contains a list of commands supported by the program, the right one includes the OS conductor areas. We set the Russian language in the settings
Add a command. To do this, select it on the left side and "connect" it to the preferred element on the right. Click "Add".
Other commands are added in the same way.
To delete a command, select it and click "Delete"
The right-click context menu is now configured.
The context menu is such a useful invention that its essence should be understood by anyone who wants to learn how to work with a computer quickly and efficiently. Employers don't like it when a new secretary thinks about elementary tasks for a long time and gives the results of simple actions a teaspoon per hour.
In general, successful work is simply unthinkable without exemplary productivity. This means that we will deal with the context menu in detail, but, as always, in simple language.
Menu types
First, let's minimize the confusion that can form in the head of a novice user.
There is a main menu for the entire operating system. In Windows, it expands when you click on the button located on the taskbar. In GNU / Linux, if we talk about the graphical shells KDE, XFCE, LXDE, the differences are only in the logos drawn on the button. Well, in the names of the programs. And the concept is the same.
In GNOME 3, the menu, - Gnome Shell, - takes up the entire screen and appears in front of the bright eyes of the user when you press a button on the top panel or simply move the pointer to the upper left corner of the screen.
Programs have their own menu having a graphical interface. This is such a strip at the top of the window, where there are sections "File", "Edit", "View" and so on. At the end there is traditionally "Help". This is no longer the main menu of the entire operating system, but simply the program menu.
The context menu is universal. It works in the entire operating system, and on panels, and on shortcuts, and in program windows - almost everywhere. Even in a terminal emulator on GNU / Linux. (Granted, the GNOME 3 Shell is no longer universal.)
The essence of the context menu
The essence of the context menu is precisely reflected in its name: in one context or another, certain commands are available for one or another object on the screen.
If you call the context menu in a program such as a file manager, for example, Nautilus in GNU / Linux or Explorer in Windows, then there will be one menu for files, another on the empty space of the window, and a third on the title bar.
Many commands are duplicated. For example, "Copy", "Paste", "Cut", "Delete" - all this is in the menus of many programs, in the "Edit" section, and in the context menu.
However, there is no program menu on the desktop. This is where the versatility of the context menu comes to the rescue: it is called from scratch, on a free area of the desktop, after which you can select the required action. Create folder eg. Or insert, cut, delete something.
Calling the context menu
The context menu is invoked in several ways.
- Right click on the object with which you want to do something.
- Move the pointer over an object (select an object) and press the right button on the touchpad.
- Selecting an object and pressing the "Menu" key, if there is one on your keyboard. (It may indeed have a menu and a pointer to select a command on it. The Win key with the Microsoft logo is not exactly the same, since it includes the full-screen Gnome Shell menu in GNOME 3 on GNU / Linux).
- Selecting and pressing the key combination Ctrl + F10, which are on the keyboard for sure.
After one of the above actions, a list of commands available for the selected object in this situation (in this context) will unfold. We choose the one we need in the usual way, as it is more convenient to whom. A list of methods is attached:
- left click of the mouse;
- left touchpad button;
- a light tap of your fingertip on the touchpad;
- arrow keys and pressing Enter.
So, once again: a right click or an analogue action brings up the context menu for the selected object, but the selection and launch of the command is done, as always, with a left click (or its analogue, of course).
Practice
You can grasp the possibilities provided by the context menu right now. Suppose you are reading this article on a laptop screen while sitting comfortably on the couch. The mouse is not connected. Using the touchpad, hover the pointer over any link - and press the right button (it's at hand, on the same touchpad). A menu appears in which we select "Open in a new tab".
That is, the page with this text will remain open, it will not have to be reloaded if there is a desire to return and continue reading. Conveniently? And then!
Now suppose you are running GNOME 3 and complain about the limited action of the right click (that's taken by the bosses and installed Linux Mint 12 on all machines). But in such a situation, there is no need to panic, not everything is so bad.
Let's, for example, move the window using the context menu. We move the pointer to the window title - to the very top, where the name of the program and the open file is written. Right click (or its analogue in the absence of a mouse) - "Move" command - move with the touchpad - left click (or similar) to fix it in a new place.
The only inconvenience: to work with the touchpad, you will have to give up long nails, overgrown or false ones. However, a secretary with long nails will not accept a job anyway.
Benefits of using
You don't have to memorize a lot of keyboard shortcuts like Ctrl + C for copying, Ctrl + V for pasting, Ctrl + S for saving a web page, and so on. (And in the terminal emulator in GNU / Linux, imagine, pressing Ctrl + C does not copy at all, so you cannot do without calling the context menu.)
Commands for opening files in different programs are added to the menu under discussion.
For example, we installed the GIMP graphic editor - now you can right-click on the file with the picture (or perform an analogue of this action) and select the "Open in GIMP" command.
Or, also, for example, you need to quickly check a file for the presence of malicious code in it - right click on this file - select an antivirus scanner.
The same is true for archiving. If the archiver is installed in the system, then the context menu will allow you to pack the selected files and folders with such ease and grace that the authorities will simply have to raise your salary. Otherwise, such a competent employee may be lured away by competitors.
Conclusion
Forgot how to perform an action? Out of your head? It happens. But you don't have to sit and stare at the screen trying to collect your thoughts! This is bad for your reputation. Immediately make a right click (or, of course, its analogue) on the object being processed. The context menu will contain everything that can be done with this object. That is, everything that is needed in a specific work situation.
Previous publications:
Last edit: 2012-01-24 03:32:31
Material tags:,
Explorer context menu is the menu that appears when you right-click (Right Mouse Button) on an object (file or folder) or just on an empty space in a folder or Desktop. If you have a system recently, then the context menu will be relatively empty. Unless just added from the drivers for the video card, for example:
but if the system has been installed for a long time, then there will be more such items. For example like this:

As you can see, over time, in addition to the standard menu items, more from the installed programs were added. On the one hand, it is convenient. After all, you do not need to launch a shortcut or search for a program, but you can directly perform actions directly from the context menu. But on the other hand, over time, there are a lot of such items, and sometimes the context menu even has to be scrolled up or down in search of the necessary items.
Therefore, sometimes you want to delete these items so as not to interfere. After all, you do not often use all the points.
So how remove an item from the context menu.
In order to remove a program item from the context menu (KM for short), you can use both the standard methods of the Operating System itself, and with the help of the programs themselves or specially designed ones.
The easiest thing to remove is to look for the desired item in the settings of the program (which you want to remove). It is usually located somewhere in Integration or Upload / Add. For example, in order to remove the famous WinRAR item from the CM, you need to uncheck the box from Shell integrations:

Other programs may also have similar settings.
Another thing is when you did not find the necessary settings for deletion, or there are none at all (sometimes it happens). Then you can use the standard method of the systems themselves, namely editing.
I warn you right away that before starting work it would be better to play it safe and make a backup copy of the registry.
So, we start the registry and go to the branch
HKEY_CLASSES_ROOT / * / shellexe / ContextMenuHandlers

and here we see these same items from the context menu.
Now we right-click on the desired item (the item from the CM that you want to delete) and select Delete:

We agree with the following warning:

reboot and check. The item should be gone.
If not missing, then check out the thread
HKEY_CLASSES_ROOT \ AllFileSystemObjects \ ShellEx \ ContextMenuHandlers
and do the same.
On a note:
If you want to delete an item specifically from the CM -> Create

then you need to know the type of file () that is being created. For example, for Microsoft Office Access, the file extension is .accdb, which means that you need to look for it in the HKEY_CLASSES_ROOT registry key, and then delete the ShellNew subkey there

If you want to remove from the CM those items that appear when RMB on folders, then you need to look at the branches:
HKEY_CLASSES_ROOT \ Directory \ shell
HKEY_CLASSES_ROOT \ Directory \ shellex \ ContextMenuHandlers
HKEY_CLASSES_ROOT \ Folder \ shell
HKEY_CLASSES_ROOT \ Folder \ shellex \ ContextMenuHandlers

For the item "Open with ..." there is a branch
HKEY_CLASSES_ROOT \ * \ OpenWithList
For KM Logical drives of the branch:
HKEY_CLASSES_ROOT \ Drive \ shell
HKEY_CLASSES_ROOT \ Drive \ shellex \ ContextMenuHandlers

You can also delete items using special programs. For example using ShellExView

Its principle is simple: select the desired item and click on the red circle at the top of the program. The main thing here is that A type was Context menu

Now a little about how create your own item in the context menu.
The fact is that adding such an item for folders or specific files, as well as on an "empty" place using the registry, will not work. You can only assign it to when it opens with RMB on the Desktop. Therefore, I recommend reading the article and using what is described there.
Well, or use another utility - Ultimate Windows Context Menu Customizer() which has a bunch of possibilities, but in English. And there we just need to select an item and delete it:

If anyone is interested in more details and cannot figure it out, then write in the comments and I will help. There, in the left column, you need to select the item (computer, folder, files, etc.) where the context menu is called, and to the right, select what to delete and click the button at the bottom of Remove Item. If you are friends with English, you will figure it out.
You can guess how to add your program to CM -> Create if you read the entire article carefully, namely, about deleting one of this item. You just need to create a subsection on the contrary and write for the desired extension.
In general, the article turned out to be a little chaotic and more in terms of deletion from the context menu, since I think that this is more relevant, and there is an article about adding. Therefore, if something is not clear - write in the comments. Let's figure it out.
The context menu in Windows 10 is an auxiliary menu that pops up when you right-click the mouse. This menu may differ in different parts of the system. The context menu is invoked with the right mouse button.
For example, on the desktop, when you right-click you will see one menu, another menu in the folder, and if you right-click on any file, you will see the third type of context menu in Windows.
By default, this menu offers the user tools for more flexible and convenient work with the system, for example:
- You can open the program with administrator rights
- Delete a file
- Create folder, etc.
It's not a secret for anyone how to call the context menu. The context menu can be invoked with the right mouse button. The context menu is different in different parts of the system. For example, this is how the desktop menu looks like:
This is what the context menu looks like in Explorer:

The method for invoking the context menu of an object is the same as for opening the context menu in any part of the system (with the right mouse button):

As you can see, the menu is different everywhere, this menu is formed from standard tools, but over time, for example, after installing some programs, the menu can be supplemented with new tools. In this case, you can see the tools for checking the file for viruses using, also, in the file menu there is a button to open the file in Notepad ++.
How to edit Windows context menu:
- Install and run Context Menu Tuner
- Find the required button in the left column
- Highlight an element
- Highlight the Desktop menu
- Click on the "Add" button
- "Add to selected item"

This button will become a child of the desktop:

Now click on the desktop with the right mouse button and check.

A new item has appeared in the context menu.
Editing the Windows context menu with an item that is not in the program list (for example, add the "Open with Scalc" item):

Do the same for the second format, as a result you should get a similar picture:

Now you need to check. Right-click on any file other than the above:

No new item, great! Now right-click on the xls-formatted table.

Using Windows tools to add an item to the Windows 10 context menu is impossible. But the Winaero programmers have developed a very convenient utility for adding commands to the context menu and even adding a program to the context menu. Its name is Context Menu Tuner. You can download it from the official website. With it, it is very easy to change the context menu in Windows.
We are already familiar with the concept of a context menu. It's time to deepen our knowledge about it and consider the topic - How to remove or add commands to the Windows context menu.
The functionality of Windows allows the user to edit the context menu to his liking.
Editing the context menu (a set of "explorer" or "actions" menu commands) is possible in one of two ways:
- Through program parameters;
- Through the Windows registry;
- With the help of additionally installed applications.
Let's see how this is done:
Installed programs often themselves have (by default) the function of integration into a set of context menu (CM) commands. Then such a parameter is present in their settings on the main tabs, or maybe on such as "Integration", "Loading" or "Add", etc. For example, for the WinRAR archiver, it is enough to uncheck the box in the settings:

It is clear that in this way you can both add (install) and remove (remove) a command (s) from the list. They do the same with other applications.
We work with the registry
When working with the Windows Registry, you need to be very careful. To be in the registry, you need to set a search in the "Start" menu by typing "regedit", and run the found executable file "regedit.exe":

Making a copy
Before editing the Registry of any version of Windows (including Windows 7), do not forget to create a backup copy for safety reasons. To do this, in the editor, on the "File" tab, select the "Export" command. Select "Entire Register" at the bottom of the dialog that opens. Assigning a name and specifying the location - "Save":

If something irreparable happens (especially for an inexperienced person), you can return the registry to its previous state by using the "File" / "Restore" command, specifying the previously created backup file.
Clearing a directory set
The registry itself looks like a tree-like block diagram (on the left), each of the branches of which has its own parameters (on the right). The "shell", "Shellex ContextMenuHandlers" and "Folder \ shell" branches of the "HKEY_CLASSES_ROOT \ Directory" directory are responsible for the folder context menu. Having examined these branches in more detail, you can make sure that the "shell" folder contains the upper part of the context set, and the "Shellex ContextMenuHandlers" - the lower one. The folder "Folder \ shell" - repeats the previous one.
Removal of program elements from the set is performed in each of the branches. On the right mouse, the deletion element is highlighted, the "Delete" command is called:

Now for files
The same procedure is used here, but in different branches. Since the “* / shellexContextMenuHandlers” and “* / shell” branches in the “HKEY_CLASSES_ROOT” registry key are responsible for the set of Context Menu commands for files:

The removal procedure is exactly the same. Do not forget to just delete the unnecessary in both branches.
We use third-party applications
It is much easier (and safer for a beginner) to remove or add an item to the context menu of any version of Windows (including Windows 7) using additional utilities.
After installation and launch, in the program window (by the "Type" column) you can see all programs from the Windows context menu (type = Context Menu).
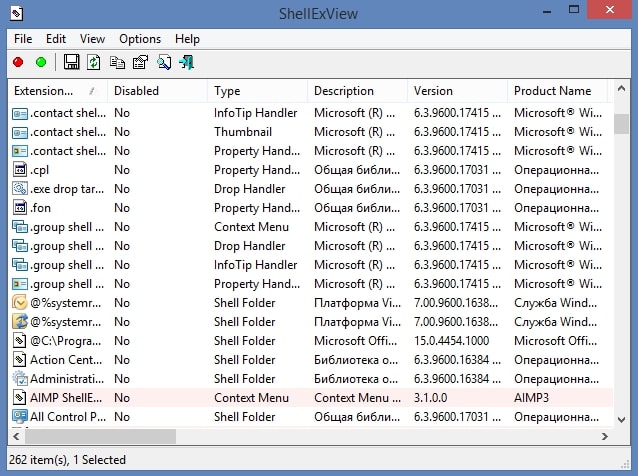
Unnecessary is removed by highlighting and pressing the red circle:
An interesting and useful utility with a self-explanatory name (available in a free version) Ccleaner. It has many useful properties. Website - http://ccleaner.org.ua/. In our case, it clears the registry of unused entries, paths to programs, shortcuts, etc.:

To clear the Context Menu, go to the "Service", in the "Startup" tabs, find the "Context Menu". A list of applications added to the set and their status (included: yes / no) will be displayed here:

To delete - being on a line, the command "Delete" is called with the right mouse. Since a second return (inclusion in the list) is possible only when reinstalling or reconfiguring the application, it is recommended to select the "Disable" option. - Then it will be possible to return it lego ("Enable").
Add with FileMenu Tools
It is very easy to add a new item to the context menu using the FileMenu Tools program.
It offers the user three tabs:
- Left - management of the proposed elements;
- Medium - to configure the "Send" function;
- Right - disables commands added by third-party programs from the list:

You need to add a new element using the "Add Command" command. To indicate its parameters, the lower right part of the window is intended - "Properties". For example, to add the line "Open in Firefox" to the menu list (opening HTM and HTML files):
In the "Menu Text" you need to enter the name, and in the "Extensions" - the options for the extensions:

In "Program Properties" the route to the executable file of the Firefox.exe application is written:

Saving the added item is done by pressing the green element at the top of the window (on the left):
This article helped you understand a variety of ways to edit the context menu. Now you know how to add and remove elements from it not only using Windows tools, but also using other programs.