Probably, everyone who begins to master Photoshop is overwhelmed by a thirst for creativity, and their heads become crowded with incredibly artistic ideas. Therefore, it is possible that, having heard, for example, the words of the song “...snow is swirling over the tent...”, a beginning “Photoshopaholic” will immediately think: “I wonder how to make snow in Photoshop?” If it’s fast, but not very realistic, then it’s done like this.
Create white snow with “black ink”
First, we find a winter composition (don’t throw it in the desert) and load it into the editor. Create a new layer above the background, fill it with black, changing the blending mode of this layer to “Screen”. Outwardly nothing has changed.
We set white as the main color. Open the “Filter Gallery” in the “Filter” menu and, by selecting the “Ink” filter in the “Sketch” folder, select the optimal settings for the selected background (the length of strokes, their direction and tonal balance).
You can also use the effect from the “Imitation” filter folder, where in this case you only need to adjust the brush size, setting the value to no more than 3, so that the “snowfall” is not unnaturally heavy.
Now we will blur the “snow layer” with the “Gaussian Blur” filter so that the “grains” of snow become flakes, and reduce the opacity to our taste.
You probably won't succeed the first time, but if you experiment with the settings, you can achieve decent results.
The next simple way to make a falling one is essentially similar to the first, but is somewhat advanced compared to it.
Snow from "noise"
The initial conditions remain the same, that is, the background is a winter landscape. A new layer is created above it and filled with black, but the blending mode does not change.
Open the “Filter”, go to “Noise”, select the “Add Noise” command and set the effect to about 150-160% (Gaussian distribution, monochrome).
Switch to the “Blur” filter and blur the future snow with the “Blur+” command. This, of course, is not the most effective blurr, but in this case it is what is needed.
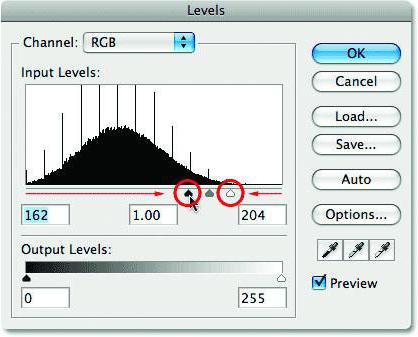
The noise picture now doesn’t look much like snow (to put it mildly), so go to “Image > Corrections > Levels” and on the output values diagram set the white (right) slider to somewhere around 200-208, and the right (black) slider to 160-165. We don't touch the rest.
Now the picture resembles either the Milky Way, or snow in bright moonlight, but no longer noise, but if we change the blend mode to “Screen”, everything will fall into place. The black color will disappear, but the “snowflakes” will appear to be stuck to the image rather than falling from the sky.
To turn white “garbage” into falling snow, Photoshop has a special “Motion Blur” filter, which we get into by going to “Filter > Blur”, and there we set the angle (-60)-(70) degrees, and the offset is 8-10 pixels.

Now it has become more realistic, but still looks somewhat flat. To evoke the feeling of depth of falling snow, you need to add a new layer with larger snowflakes.
Duplicate the snow layer (Ctrl + J), rotate the copy 180 degrees (Edit > Transform > Rotate 180), then go to Filter > Appearance > Crystallize. We leave the cell size at the default (10), since for our case this is just right, but the large snowflakes turned out to be a little angular, so again go to “Filter>Blur” and select “Motion Blur” with the angle there (-60)- (70) degrees and an offset of 15-18 pixels.

If you think the snow is a little pale, you can merge both snow layers and then create a copy of this “tandem”, after which the brightness will increase because both layers were in the Screen blend mode.
Add realistic snow in Photoshop, controlling only the blending parameters
This express method will not cover spring, summer or snow with snow, but the effect of its use may bring to mind poems with the words “winter has come” or paintings with that name.
Choose a landscape whose composition will not suffer much (and maybe even benefit) if it is sprinkled with snow, and load it into Photoshop.

Create a new layer and fill it with white. Then double-click on the layer to open the Blending Option dialog box and in the “Blending If” section at the bottom, divide the black bottom scale slider (“Underlying Layer”) on the left into two parts (with the Alt key) and move them while looking at your picture, which you transform by “adding” snow, frost, frost, and maybe ice to the landscape.

These manipulations will cause the dark pixels on the bottom layer to be replaced with white ones, and the lighter pixels will become pure white.
If there is too much white, you can add a mask to this layer and use a soft black brush to correct it, selecting the appropriate opacity.
Now, to enhance the realism of the inexorable approach of winter, you can add falling snow using the already familiar effects described above.
Falling snow animation
Surely many users are thinking, when creating a snow effect in Photoshop, how to make snowflakes come to life and fall for real? And like this, for example.
Select the background against which the snow will fall, open the image in Photoshop, create a new layer and fill it with white.
Take "Brush" and, by pressing F5, open its settings panel. On the “Brush Mark Shape” tab, select the shape (for snow a round one is suitable, but you can also download snowflake brushes), the size and hardness of the stroke, but the main thing is to set the intervals (for falling snow this will be at least 180-200%).
On the “Shape Dynamics” tab we set up size fluctuations, minimum diameter and shape fluctuations (snow is not uniform).
"Dispersion" should be at least 700% and probably better on both axes.
Now a few sweeping brush strokes on the canvas will give you a “snowfall” suitable for a particular landscape, having solved the first task (how to make snow in Photoshop), and now you need to make it “fall from the sky.”
Before you start creating the animation, make a copy of the snow layer, go to full screen mode (F) and, using Transform (Ctrl + T), drag the duplicate up, off the canvas, positioning it directly above the image. Then, exiting full-screen mode, you need to combine both snow layers.
Now we will make a “movie”. Open the timeline by checking the box in the Window menu.
Expand the list in the center with the triangle on the right and, selecting "Create frame animation", click on the line, thus loading the first frame of the animation onto the timeline.
Duplicate the frame by placing it on the button to the left of the basket and, pressing Shift, using the down arrow on the keyboard, move the snow layer on the second frame, aligning its top edge with the top edge of the background image.
Now, by pressing Ctrl, select both frames, click the “Create intermediate frames” button and add 10-15 frames (just right for snow).
Play the animation to make sure it works, then select all the frames, selecting the first one and Shift-clicking the last one. By right-clicking at the bottom of any frame, set the delay to 0.1-0.2 seconds and in the line with the hint “Selecting cycle parameters” indicate “Constantly”.
"Snow" brushes
At the beginning of the description of the previous method, while figuring out how to make snow in Photoshop, we had to work from scratch to create our own snow brush, but there will be nothing wrong with downloading ready-made brushes of snowflakes, flakes, “various” in all parameters, “cereals” and even whole snow charges, of which there are a great many on the Internet.

In this case, a gorgeous and quite believable snowfall can be made with one brush stroke, choosing the appropriate size and pattern.
The simplicity of this method allows us to add a new expression to the collection of the most popular “folk” comparisons: “It’s as simple as making snow in Photoshop.”
"Superimposed" snow
This method is not far from the previous one in terms of complexity. We are talking about textures of falling snow in PNG or JPEG formats, which are also freely available.
With transparent images everything is simple, and JPEG textures are inserted above the background image on a new layer, for which you just need to change the blending mode to Screen or Soft Light, and then lower the opacity if necessary.
This week, as winter takes hold, Photoshop guru EricTip Squirrel Renno shows us how to create a snowfall effect.
For this example, we will use the photo “Cheerful children sledding in winter”, which we will take.
Adding snow to a photo is quite simple; for this we will use brushes, layers and masks.
Creating a Snow Brush
Select a simple round brush and change the following settings:

Brush imprint shape
I made the brush quite soft from the start, but for your photo you can use a harder brush at first and then apply a blur to it later.
Hardness – 0%
Intervals – 140%
Dynamics of shape
The following settings will allow the brush to change size, but only up to 70% of the original size. We'll also add tilt fluctuations And forms brushes to make the snow flakes more heterogeneous.
Size variation – 100%
Minimum diameter – 70%
Angle variation – 100%
Shape fluctuation – 65%
Minimum form – 1%

Diffusion
Let's add even more randomness to our brush. Let's turn on scattering by both axes(1) so that the brush can be moved both vertically and horizontally, and the slider Diffusion(2) let us establish the magnitude of this displacement. Meaning Counter(3) shows how many “snowflakes” will be added between the scattered points, and the slider Counter dissipation(4) will add more random marks to them.
Dispersion – 1000%
Both axes – enable
Counter – 8
Counter fluctuation – 100%
Broadcast
With this setting, we're asking Photoshop to add some opacity to the edges of our snowflakes to give them a more natural appearance.
Opacity Variation – 70%
Drawing snow
Let's create a new layer and name it Snow B.G..

Select a small brush (the exact size will depend on the resolution of your image) and paint the snow with white.

This will be the background for our future snow effect. Now increase the brush size a little by pressing ] several times, create a new layer Mid and draw the snow again. This way you will add snowflakes that are located closer to the viewer.

And once again create a new layer, make the brush larger and draw even closer snowflakes. Repeat this until you get the desired size of snow flakes. Perhaps, for my example, one more layer will suffice, which I will call Snow FG.
Let's add movement
Transform the layer Snow B.G. to a smart object with the command Filter > Convert for Smart Filters.
Add a little Motion blur to add dynamics to the snowfall:
Repeat these steps for the remaining layers. Keep in mind that you may need to increase the amount of blur for closer layers, since the closer the snowflakes are to the viewer, the faster they move through the frame.
Adding a mask
If, as in my example, you end up with too much snow on the main characters of the photo, add a mask to the layer:

Then select black, return the brush to the standard non-snowy settings and paint over the areas with excess snow. Do this step by step, reducing the opacity of the brush to 10-20%.
Finishing touches
Now all we have to do is add masks to other layers if necessary, as well as select the desired level of transparency of the layers in order to get the most realistic snowfall.

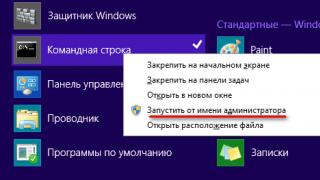
As always, many thanks to Eric for providing this tutorial. Stay with us! And while waiting for the next lesson, you can visit website Erica, his channel is onYouTube , or ask him a question personally at
Sometimes it seems that it is in winter that the magic “Create a masterpiece” button appears on the camera. Especially if it snowed the night before, and the trees in the park are wrapped in beautiful snow caps. Beautiful, isn't it?
Winter photos are mesmerizing. But taking photos during snowfall is not very convenient. And I want the snowball not only to lie around like a soft blanket, but also to swirl in the air. This is where Photoshop comes to the rescue, where you can create realistic falling snow.
Using this image of a girl against a winter background as an example, we will add floating snow to the composition.
How to make snow in Photoshop - flying snowflakes in the photo
So let's get started:
- Let's create a new empty layer in any convenient way. By clicking on the icon for creating a new layer, or using the combination Ctrl+Alt+Shift+N.

- Take a round soft white brush and place random dots on the image. To get the snow effect in Photoshop, you need to change the brush size. Future snowflakes will then not be the same.

- So that the snow in the photo in Photoshop does not seem so unnaturally round, we will blur it and give the snowflakes the effect of movement. Go to the menu: “Filter” - “Blur” - “Motion Blur”. We choose the blur strength and angle of motion, guided by our own taste. Play with the settings and find the settings that best suit your image.

For larger snowflakes that fly close to the camera, create another layer and draw several larger snowflakes in the same way. We repeat the steps as for the first layer, only with different parameters for the strength and direction of the blur.

The next stage is creating the snow texture
For this step, solving the problem of how to make snow in Photoshop, you need to download a picture online with snow on a black background. We transfer it to our working document as a smart object.

- Select: "file/place". The image with snow will appear in our document, now we need to stretch it so that it covers the entire image.
- When transforming, remember to hold down the Alt key as you stretch the image so that the proportions of the snowflakes remain natural and are not deformed.
- Change the blending mode from normal to " Screen».
- Let's hide some of the snowflakes by creating a mask on this layer and using a black brush to remove the snowflakes from the model's lips and chin.
Wondering how to make snow in Photoshop? It's very simple! We created realistic snow in just a few steps.

Method two, how to create snow in Photoshop
In the second method of how to add snow in Photoshop, we will use the same image of a girl and make it more dynamic and attractive with the help of falling snow. Unfortunately, the author who took this photo is unknown. You can use your own photo or download any photo suitable for creating a similar effect from free photo banks.
Using the Noise Tools to Create Snow
So let's get started:
- Open the original image, press Ctrl+O to open it to the entire workspace.
- Let's create a new layer: press the Latin key D to reset the default colors.
- Press Alt+Backspace to fill this layer with black.
- Apply the Noise/Add Noise filter to this layer. We set the Gaussian distribution to approximately 100-120% and check the “Monochrome” checkbox. Click “Ok”.

- Then apply the Faux/Dry Brush filter to this layer. For the Photoshop CS6 version, follow the path "Filter" / "Filter Gallery" / "Imitation" / "Dry Brush". By changing the brush size, we get more or less snowflakes, depending on the brush settings. Let's set the brush size to 2, detail to 0 and texture to 1.
Now, if you enlarge the image, you will get falling snow - realistic snowflakes, just like in nature. You will not find the same ones here, they all differ in size and shape.

Now press Ctrl+J to duplicate this layer. On the first one we will create foreground snowflakes, on the second one we will create the background ones. Let's hide the visibility of the second layer and work with the top one for now.

To get rid of the black background, change the blending mode to “Lighten” or “Screen”. And our black background becomes transparent - invisible.
The snowflakes shouldn't be that sharp, so we'll give them a little Gaussian blur. Let's set the radius to approximately 1-1.5 pixels, depending on the image.
Dynamics of motion - snowflakes flying in different directions
Now our snowflakes need to create some kind of movement dynamics, since in Photoshop you need to make snow realistic and dynamic. If we use the Motion Blur filter, it will blur all the snowflakes at the angle we set. We'll go the other way and create the effect of snowflakes randomly flying in different directions, just like in nature:
- First, let's convert this layer into a smart object so that we can edit it. Go to the menu - “Filter” / “Distortion” / “Wave”.
- “Number of generators” is set to 1, type – “Triangle”. “Repeat boundary pixels” is set by default, but you can play with the “Wavelength”, “Amplitude” and “Scale” settings and select the ones that suit your image.
Now all our snowflakes are scattering in different directions. If you don’t like the result, then double-clicking on the “Wave” line under the “smart object” layer will again open the dialog box for this filter, which can be edited.

Getting rid of unwanted artifacts in the image
If you pay attention, unnatural stripes will appear along the edges of the image after applying this filter; you can get rid of them by simply stretching the layer with snowflakes beyond the edges of the main image. To do this, press the keyboard shortcut Ctrl + T to call the free transform tool, and while holding down the Alt key, stretch the image so that the stripes along the edges go beyond its borders. When a warning window appears indicating that smart filters will be temporarily disabled, confirm the action.

We make an adjustment layer “Levels” - create a starting mask for it and, by moving the middle and left sliders, adjust the number and brightness of the snowflakes.

Let's go to the second, for now hidden, layer, make it visible, repeat all the steps as for the first, only with the difference that the background snowflakes should be smaller and blurry.
Then you need to create a layer mask on this layer and use a soft round brush of black color to hide the snowflakes from the model so that it looks as natural as possible. And also reduce the layer opacity to 60-70%.

Now you know how to make snow in Photoshop. This is what we got. I wish you creative success - try it, practice!
Falling snow in Photoshop can be done in different ways, both rather stupid and dull, as well as advanced and spectacular. I will show you a fairly simple and effective method that will not take much time and will not require violence against even a fragile brain.
The final product of the implementation of this effect will, naturally, be .
Falling snow in Photoshop - procedure:
1. Create a new layer above the main image.
2. Fill the created layer with 50% gray - press F5+Shift and select the appropriate item in the drop-down menu.

3. Add noise to the gray layer.


4. Add blur over the noise.


5. Adjust the grouping and size of the snow flakes by adjusting the levels on the noise layer.


In the end this layer should look something like this

6. Apply the “shift” filter and remove the junction line on the layer with snow.


Using the “stamp” tool, we remove the joint line: with Alt held down, click around and without Alt on the line, until it disappears.

7. Create a pattern from the resulting layer


8. Turn off or delete the snow layer. Create another layer filled with 50% gray as at the very beginning. Double-click on the layer to enable the styles of this layer and customize them.


In the end it should look something like this

9. And now the animation. Turn on the time scale. And we set up all the snow movement on it.
In the snow layer, select a layer style and move the blue slider 4 seconds to the right.

10. Double-click on the snow layer styles and move the snow from the very top to the very bottom 3 times (or another number of times, the speed of snow falling depends on this).

11. Drag the remaining layers on the timeline to 4 seconds.

12. So we made falling snow in Photoshop. Save the animated looping GIF file and look at the falling snow.
P.S. I don’t know why I was telling all this here, when there is a wonderful video tutorial, watch it, it also talks about how to make snow with swirls when falling.
Those who do not leave a comment or like, or do not share on social networks will be forever blocked from accessing all Photoshop video tutorials in the world.
Falling snowflakes are a great way to make your winter photos more interesting. Sometimes the weather is not in our favor, however, you must seek the help of Photoshop to complete the task. In this tutorial, I'll show you how to create a realistic falling snow effect in Photoshop, and I'll also show you how to apply the effect to photos.
Final result
Source materials:
You will need the following source image to complete this tutorial. If you do not want to purchase this image, then you can use any other alternative image.
Translator's note: the original image does not have to be of a girl balancing on the rails, it could be a winter landscape or a bird on a branch.
1. Changing the sky
Step 1
Open the Model stock image in Photoshop. In the first step before starting work, you should create a backup copy of the original image, this way you can always return to the original material if something happens. To do this, double-click on the original layer to unlock it. Name this layer ‘Backup’.
Next, duplicate the layer by pressing the keys (Ctrl + J) (or go Layer - Duplicate Layer(Layer > Duplicate Layer). Name the duplicate layer 'Background'. Finally, add a fill layer, for this we go Layer - New Layer - Fill(Layer > New Fill Layer). Select a dark gray shade and place the fill layer between the two layers.

Step2
The problem with photographs taken in winter is that they often show a dull gray sky. To get a more interesting result and make our snow more visible, to do this we must replace our existing sky. You can skip this step if you are working from your original image, which already has an interesting sky visually.
First, select a tool Magic wand(Magic Wand Tool (W) and, while holding down the (Shift) key, create a rough selection around the sky image. Click on different parts of the sky to select the sky. Next, let's go Layer - Layer Mask - Hide Selection(Layer > Layer Mask > Hide Selection) to add a layer mask.

While on the layer with the girl, go to the bookmark Properties(Properties) in the layers palette and select the option Edge of the mask(Mask Edge) (note that this tab is available in Photoshop, version CS6 or higher). Using the option Specify mask(Refine Mask), you can paint over the selected image to refine the edges of the mask. Before you get started, you'll need to select your brush size in the top brush settings bar. You can also choose View Mode(View Mode) and set the color to black, so it will be easier for you to view the processing area.

Next, brush over the trees and horizon to soften and define the edges of the mask. Once you've done this, play with the settings to find the appropriate value to refine your mask.
Finally, you can reduce the brush size, then zoom in and carefully paint over the edges of your selection to hide the white bits.

Step3
Once you are done with the mask, we can add a new sky to the background. In this case, we're using a gradient to create a clean sky, but if you want, you can always use stock photos of the sky. First we need to create a layer with Gradient Fill(Gradient Fill).
Go to the fill layer with a dark gray fill, and then through the bottom toolbar, select the option Gradient(Gradient). When the Gradient Fill settings window appears, set the gradient angle to 90°. Next, double-click on the gradient so that the window appears Gradient editor(gradient editor). Set the gradient colors as shown in the screenshot below, click OK.
Next, we'll add a few layers to blend the new sky into the background. First, create a new layer (Ctrl + Shift + N). Select a tool Brush(Brush Tool (B), set a dark blue color (#303850). Paint over the trees. Name this layer Color tone(Hue), Change the blending mode for this layer to Color tone(Hue), reduce the layer opacity to 35%.

Next, to further blend the trees with the sky, we will add a slight haze. Create a new layer, select a tool Brush(Brush Tool (B), hold down the Shift key, draw a straight line along the horizon line. Duplicate the layer twice, press the keys (Ctrl + T) to activate the tool Free Transformation(Free Transform), increase the vertical scale of the duplicate layers.
Reduce the opacity of all three layers to 20%. Call them 'Haze'.
Translator's note:
The layers can be named ‘Haze’, ‘Haze 1’ and ‘Haze 2’ respectively.

Because the haze is located in the background, it should not cover the girl’s legs. To fix this, select the Hue and Haze layers, and then press Ctrl + G to group them into one group. Next, add a layer mask to the created group, for this we go Layer - Layer mask - Show all(Layer > Layer Mask > Reveal All). Next, use a hard black brush to paint over the girl's image to hide the haze.
Translator's note: Don't forget to go to the layer mask of the layer with the group.

2. Create Snowflakes
Step1
The standard method for creating snow is to combine a filter Add noise(Add Noise) and filter Gaussian blur(Gaussian Blur). Let's start by creating a new layer (Ctrl + Shift + N), then fill this layer with black (press (D) and then (Alt + Backspace), then go Filter - Noise - Add Noise(Filter > Noise > Add Noise). Next, let's go Filter - Blur - Gaussian Blur(Filter > Blur > Gaussian Blur). Note that the higher you set the blur radius, the larger the snowflakes will be.


Now you can adjust the contrast to make the effect look like snow. To do this, drag the left anchor point to the bottom left point of the pyramid, and the right anchor point to the middle. Next, click in the middle of the curve to add a new anchor point, and then drag the new anchor point down. You should get the following effect.
Name the snow effect layer 'Snow'. Change the blending mode of the snow layer to Lightening(Screen) to align with the entire scene.

Next, depending on the size of your working image you're working with, you can resize the snow layer to make the snowflakes fit your scene. In my case, I doubled the scale of the snow layer using the Free Transformation(Free Transform) (Ctrl + T).

To make the snowflakes look more realistic, we will add a small Motion blur(Motion Blur). For this we go Layer - Blur - Motion Blur(Layer > Blur > Motion Blur). Apply the settings shown in the screenshot below. Be careful not to overdo it or set the value too high Offsets(distance), otherwise the snow will look like rain.

The result should be like the screenshot below.

Step2
So, we could end the tutorial at this point, but the result looks a little boring and unrealistic. This is because all our snowflakes are the same size and move in the same direction, which never happens in real life.
In fact, the key to making a painting more interesting and lively is randomness. To do this, we will repeat the effect we just created, each time we will vary the radius Gaussian Blur(Gaussian Blur), and also change the scale of the layer with snowflakes.
It is also very important to use different filter settings Motion blur(Motion Blur) for layers with snowflakes. As you can see, in my case, I reduced Corner(Angle) and increased Bias(Distance) pixels.

In the screenshot below, you can see the 4 different snow effect layers I created, as well as the resulting result that was obtained by merging all 4 layers.

Step3
The problem when combining a large number of layers can be the result of a lot of snow. If you are planning to create a snowstorm, then this is great, otherwise, you will have to tone down the effect a little. To do this, add a layer mask to the snow layer. Make sure the layer mask is active, then move on Filter - Rendering - Clouds(Filter > Render > Clouds). Press the keys (Ctrl + M) to activate the correction Curves(Curves), set the curve to an S-shape to enhance the contrast.
Another advantage of using masks is that you get a more arbitrary result when you apply them to a large number of layers.

You can also manually hide certain areas of the image using a layer mask. In our case, there are very small snowflakes on one of the layers. This means that they look like they are falling somewhere in the distance, so they should not be in front of the girl.
I fixed this with a black brush, painting over the appropriate area on the layer mask. This action is also very useful if, for example, individual large snowflakes cover important details of your picture, such as a person’s eyes, and spoil the view.

Step4
We can also create a Bokeh effect to simulate snowflakes that have fallen on a camera lens, or simply to add a Bokeh style to our scene. To do this, create a new layer, then draw a really big white spot in the middle of the scene. Select a tool Moving( Move Tool (V), moving this spot to the corner of the picture, and also positioning it so that it does not hide the object of your picture.

Repeat the entire process several times until you are satisfied with the result. Next, add soft to each layer Gaussian blur(Gaussian Blur), set the opacity of the Bokeh layers to 10%.
Translator's note: Try varying the opacity value for each Bokeh effect layer, including the Gaussian Blur.
Name these layers 'Bokeh'. Place all these layers inside a new 'Snow' group.
Translator's note: Select all layers with snow and bokeh effects, and then press the keys (Ctrl+G) to group all selected layers into one group. Name the new group 'Snow'.

3. Color correction
Step1
Once we've finished creating the snow, we can make color adjustments to make our painting more interesting, as well as to bring all the elements of the composition together. In the first step we will add a blue tint to create a cool atmosphere. Add a new adjustment layer Gradient Map(Gradient Map) on top of all other layers through the bottom toolbar. In the Gradient Editor window, set the tint to dark blue and light blue, click OK.

Duplicate the adjustment layer twice Gradient Map(Gradient Map). Change the blending mode for each adjustment layer to Color tone(Hue) Chroma(Color) and Soft light(Soft Light) respectively. Set the opacity for all layers to 10% plus or minus.

You can also add a new adjustment layer Curves(Curves) to increase the contrast a little.

Step2
In this step we will add a vignette effect to highlight our main character a little. First create a new layer. Select a tool Rectangular area(Rectangular Marquee Tool (M), create a rectangular selection in the center of the image. Next, press the keys (Ctrl + Shift + I) to invert the active selection, and then go Editing - Fill(Edit > Fill) and fill the active selection with a dark blue tint (#222838). Next, apply a large radius Gaussian blur(Gaussian Blur), and also play with the layer scale until you are happy with the result.

Name the layer with the vignette ‘Vignette’, change the blending mode for the layer with the vignette to Multiplication(Multiply), layer opacity 50%.

Step3
While working with this photo, I also added a new adjustment layer. Hue/Saturation(Hue/Saturation) and played a little with shades of red so that the leaves on the ground create a very nice contrast with the blue tint of the whole picture. Go to the layer mask of the adjustment layer Hue/Saturation(Hue/Saturation) and using a soft black brush, hide the correction effect on the girl’s hair and skin.
Finally, group all the adjustment layers into one group. Name the new group ‘Adjustments’.

Step4
Our image is ready, but we can add some details to make the picture more expressive. First, if you have Photoshop version CS6 or higher, you can add the effect Iris blur(Iris Blur). To do this, you first need to select all the layers, press the keys (Ctrl + J) to duplicate them, and then go Layer - Merge Visible(Layer > Merge Layers) to merge duplicate layers into one layer. Next, let's go Filter - Blur - Iris Blur(Filter > Blur > Iris Blur) and play with the settings to get a nice blur effect.

While on the same layer, we can apply a filter Sharpness(Sharpen), that's why we're going Filter - sharpening - Smart sharpening(Filter > Sharpen > Smart Sharpen). Because I am working with large image sizes, then I used a 4px radius, but you should reduce the radius value if you are working with small image sizes. The main idea here is sophistication.

If you missed something in the lesson, then in the screenshot below you can see what the layers palette should look like.

You can go back to the backup and compare with your final result to see the difference.

Conclusion
In this tutorial I showed you how to add realistic falling snow to a photo using the Noise(Noise) and Gaussian Blur(Gaussian Blur). I hope you learned something new today and can use this technique to add realistic snow to your photos.