A large number of novice users dream of mastering one of the most popular photo editors - Adobe Photoshop. Often, in order to work with an image more conveniently, you need to reduce or increase the number of pixels in height and width. And at this stage, beginners have a question about how to change the resolution of the picture. In fact, it is quite easy to do, it is enough to know the correct procedure. But first you need to understand what pixels are and what effect they have.
What are pixels
Almost all raster images are made up of small particles called pixels. These are peculiar blocks containing certain colors and shades. With a large number of them, they merge into a whole image, providing a smooth transition of colors. To see how the picture will break up into such particles, just zoom in on the image. The quantity that measures the number of pixels in height and width is called resolution. Many factors depend on it.
What does image resolution affect?
The number of pixels is an important value for an image. First of all, it affects its quality. As the resolution increases, so does the clarity. However, in addition to the positive side, there is also a negative one. Very high resolution pictures will take up much more space on the media. Therefore, before changing the number of pixels, you need to think about what is more important in this situation - quality or size.
Maximum Allowed Permissions

If you think theoretically, then the resolution of a photo or picture can be absolutely any. Thanks to modern technology, cameras are being born that can create images containing 24 megapixels or more. For some models, even 36-megapixel images are available. In the photo editor, you can combine two pictures with a large number of pixels, which will allow you to create a picture with a resolution of about 100 megapixels. However, formats set boundaries. So, for example, before changing the resolution of a jpg image, it is worth remembering that this format allows you to save only objects with a pixel count of no more than 65535 x 65535.
Useful Features of the Image Size Dialog Box
A dialog box in Adobe Photoshop called "Image Size" not only helps to decide how to change the resolution of an image, but also allows you to control its other parameters, as well as find out the size. To get information about how much memory a particular graphic file with a certain resolution will take, just open a window and look at the “Dimension” item.
When changing the number of pixels in height and width, the image may stretch or shrink, to avoid this, at the bottom of this dialog box there is an item "Keep aspect ratio". If you put a tick in front of it, then you can no longer worry that the picture will lose its shape.

The checkbox next to the "Scale Styles" item will determine whether the scale of the layers is preserved when the resolution is changed. It is recommended to always select this option so that there is no situation when the superimposed layer becomes larger than the image itself. If this still happens, then further work in the photo editor with this file will be difficult. Therefore, it is recommended to take care of the settings in advance.
The "Interpolation" function affects the quality of the picture. The image will be much worse if you leave a checkmark in this item. "Interpolation" itself determines where to remove pixels and where to add. As a result, the arrangement of colors and quality will change significantly.
How to change image resolution
Changing the number of pixels in an image is easy. The whole system consists of only three steps that are easy to remember and then implement.
Step #1. In the "File" menu, select the "Open ..." item and find the image whose resolution we will change.

Step #2. In the "Image" menu, select the "Image Size" item. After these steps, a dialog box should appear, which can be divided into two parts: "Dimension" and "Print size". In this situation, we will work with "Dimension". There are two indicators in this part: "Width" and "Height". In order to change the resolution of an image in Photoshop, just enter the required values. There is also a very useful function here - determining the size of the image. You can see the space that the file will occupy, to the right of the “Width”. After the required number of pixels is indicated in the field, you can safely click "OK" and wait for the photo editor to adjust the picture according to your parameters.
Step #3. This completes all the steps to change permissions. Now it remains only to save the resulting image in the required format.
Thanks to three simple steps, there will be no more questions about how to change the image resolution. In practice, all actions will be performed much faster.
Who needs to change permission

Owners of digital cameras, as well as the creators of their own sites, web designers and other users who often work on adding images, are often interested in how to change the resolution of an image. So, for example, to create a suitable image for a website or for any social network, it will be quite difficult to do without this option. Therefore, it is better to learn how to use photo editors in advance so that such problems do not arise in the future.
With the advent of photography in the first half of the 19th century, there was a natural desire to enlarge the image to the size of an artistic canvas. One of the real and most effective methods, which is still used today, was redrawing by cells, but today such advice is rarely given, because it is quite obvious that those who want to enlarge an image are interested in how to increase the size of photos on a computer.
Image size on PC monitor
Since we are talking about a PC, let's say that on the monitor the size of images is reduced/increased by the Ctrl (-/+) key combination or the mouse wheel with the same pressed Ctrl key. And if you're on the Web, you can change the size of the image by changing the scale in the "View" tab in the browser menu. No one is forbidden resolution) by calling this command by right-clicking directly on the desktop.
Now, if you follow the principle "from simple to complex", you need to figure out how to increase the size of photos in Paint, because, firstly, this is a standard graphic editor (Start > All Programs > Accessories), which comes with the Windows operating system, and secondly, many are unaware of some of its abilities, including the "Resize" button on the "Home" tab.
Stretching an image in Paint
In the Resize and Skew dialog box, you usually check the "Keep aspect ratio" checkbox and specify either a percentage or a specific value in pixels. In the second case, it is enough to specify only the desired image width (change horizontally) so that the second parameter changes automatically.

Some versions of Paint also have a Points option that allows you to enter specific image dimensions. If everything is OK, tell the editor so.
When figuring out how to enlarge most users probably don't even consider it necessary to add that without losing quality, believing it goes without saying. However, this silent condition is not so easy to fulfill, because the image in a rough approximation can be compared to a mosaic of multi-colored pixels. It is easy to imagine how the picture will look like if it is simply stretched, because the number of informative pixels will remain the same, but the physical size will increase.
In order to somehow preserve the quality to a certain extent, you need to fill in the "voids" taking into account the content of the surrounding pixels. Unfortunately, good old Paint is far from the best at this, but there are many programs that, using various algorithms for interpolating data between stretched pixels (resample / resample methods), can increase images with very decent quality. Most of these services, among which the paid PhotoZoom Pro is especially popular, are functionally similar and easy to use, but if you simply recommend them to those who want to learn how to increase the size of photos in Photoshop, this will be an evasive answer.
The ability of "Photoshop" in resizing photos
If you are going to enlarge an image, you should keep in mind that the result directly depends on the quality and size of the source material. After loading the photo into "Photoshop" in the "Image" menu, select the "Image Size" command, thereby opening the window of the same name, in which they conduct a dialogue with the program.

If you completely trust the program, you can only specify the width and height in the fields of the Document Size block, and leave the rest of the parameters selected by default, including the Resample Image function and the Bicubic automatic resampling method (Bicubic), which is generally preferred over the other five algorithms. Then open the "Automatic resolution selection" window with the "Auto ..." (Auto) button, select the desired quality (the default is "Good") and click OK.
Note: Resample is a function to control the amount of data in images that are resized or resized.
Little tricks
Perhaps not everyone is aware of some well-known recommendations on how to increase the size of photos with minimal quality loss using any image editor with correction and resampling functions, but it does not have to be Photoshop.
First, you need to prepare the original image by slightly increasing its scale and carefully examining the presence of noise, blurry areas (where they should not be), various spots and other possible defects. All shortcomings must be eliminated (corrected) and only then proceed to resizing.
Next, you need to enlarge the photo twice as much as planned, work with sharpness, contrast, saturation, then return to the desired size and make sure that the quality remains at the proper level. Here's a little trick, but that's not all.
What people can think of in search of an original solution to how to increase the size of photos.
It turns out that if you increase the image size by 10%, there will be no visual deterioration in quality. This leads to an obvious conclusion: by repeatedly increasing the size by 10%, you can ... well, then - who has some imagination. But this method is not universal, and its indiscriminate use for all photographs in a row will not necessarily lead to good results, which largely depend on various image quality parameters, including the format. Black and white photography, for example, manage to stretch up to 50%.
These "secret" techniques are acceptable only in those cases when there are no other options for some reason, and, most likely, "cunning products" will require very serious post-processing in Photoshop.
Specialized programs

If you need an answer to the question of how to increase the size of photos with minimal headache, use one of the specialized programs that have more interpolation algorithms than Photoshop and have their own original technologies. In addition to the previously mentioned PhotoZoom Pro program, these services are: Perfect Resiz, Reshade Image Enlarger, OnOne Genuine Fractals Pro v6.0, Akvis Magnifier v3.0 and others.
How often, when looking at photos on a computer, we threw out cool shots because they were too small in size and of poor quality. But with the help of special programs, you can save almost any image!
Improving image quality is a very broad topic. To improve the quality of a photo in Photoshop, color correction, sharpening, retouching, and many other operations can be applied. All of them require certain skills and possession of special techniques.
But there are also less complicated ways, when you just need to increase the image without losing quality. Below we will look at an example of how to improve the quality of a photo if you need to enlarge a photo without losing quality.
How to enlarge a photo without losing quality
Everyone had to deal with an image of a small size of low quality. In such images, when magnified, pixels, dots, from which a raster image is built, are clearly visible.

Zooming in on an image by stretching it with Free Transform will only make matters worse.
In this tutorial, the work will be carried out in Photoshop CC 2017. But first, we will look at the method for other, older versions of Photoshop. And then we'll show you how Photoshop CC 2017 can do the whole procedure automatically.
Open the image in Photoshop. Now we will gradually increase it in several passes. It should be noted right away that you can enlarge the photo and raise the quality, but with a limitation in size.
Pressing a keyboard shortcut Alt+Ctrl+I. We will open a window "Image Size". It is necessary that between "Width" / Width And "Height" / Height staple was pressed. Then the width and height will change proportionally.

Enlarge the image twice, each time by 20%. To do this, in the drop-down list opposite "Widths" change the pixels to percentages (Pixel / Percent), and the numerical value from 100% to 120% and press OK. Then we call the image size window again ( Alt+Ctrl+I) and increase by 20%.

We increased the image size from 950x632 pixels to 1368x910 pixels.

For a visual comparison, let's zoom in on the original image (950x632 pixels) and the resulting one (1368x910 pixels).

We enlarged the image by almost one and a half times and even improved the quality. As you can see, the pixelation is less noticeable if you zoom in on the image.
It remains to refine the result. Apply filter "Smart Sharpen" to the resulting image.
We go: Filters/Sharpening/Smart Sharpening/Filter/Sharpen/Smart Sharpen. By moving the sliders, we select the appropriate sharpness. If you click and hold the left mouse button on the image in the small preview window, you can see the image before applying the effect. The difference is palpable. Particularly noticeable is the smooth transition of color (without cubes) on the lenses of the glasses. We completely removed the noise by moving the slider all the way to the right. The radius of sharpness was taken as 0.3 pixels, the effect was applied at 79%.

Let's compare the results again.
On the left - the original image, in the center - after resizing, on the right - after applying "Smart Sharpness".

After application "Smart Sharpness" Noise has been removed from the photo, the image has become cleaner.
Here is our result.

And now let's enlarge the photo and improve its quality using the automatic tools of Photoshop 2017.
Open the image in Photoshop, press the keyboard shortcut Alt+Ctrl+I. We will open a window Image Size. Pay attention to paragraph "Fit to"/Dimensions. Expand this list. In it you will see blank options for increasing / decreasing the image without losing quality. Let's use automatic selection (the second item in the list). In the window that opens, select the item "Good" and click OK. You should not choose the best one, because the original image is of too low quality, and it makes no sense to increase it so much.

Please note that if we managed to increase the image from 950x632 pixels and a resolution of 96 pixels/inch to 1368x910 pixels with the same resolution by selection, then the program enlarged it to 1969x1310 pixels with a resolution of 199 pixels/inch.

Apply Smart Sharpen.

Now you have seen for yourself that you can enlarge the picture without losing quality, and at the same time even improve the quality of the photo.
It is worth noting that this method can be useful not only for enlarging and enhancing small photos. For example, you need to provide a photo for an online resource or for printing in a publishing house. At the same time, your photo is of excellent quality and large size, but the publisher needs an even larger size. By applying the described method of enlarging the image and improving its quality, you will get an excellent result. After all, photos of large sizes with good quality will go through this procedure much easier.
The procedure is extremely simple. Do not give up on small pictures. Give them a second chance.
The desire to change the size of the photo appears with unsuccessful shots (when unnecessary and superfluous details are captured), placing an avatar (on a personal page on a social network, in a forum on a website, in an online store), creating various photo portfolios and under other circumstances. There are special tools for this.
There are three ways to resize a photo - using standard programs of the Windows operating system, using third-party programs and online via the Internet. Let's consider each method in more detail.
Three Easy Ways to Resize a Photo
How to resize a photo in paint
All versions of Windows have Paint. Run it and press the menu button in the upper left corner. Select "Open" and find the photo you want to edit. We load it into the working area. Further, if you need to crop it, select the appropriate item in the top panel of the program. With the help of the cursor, we determine the area of the photo that needs to be left. Crop and save the result.
The second option - select the "Select" function. Select the desired area of the photo and press the key combination Ctrl + X (cut). Next, open the Paint program again. In it, the working area is empty, move the cursor there and press the key combination Ctrl + V. The photo fragment is inserted into a new Paint document. If the white background of the working area is larger than the inserted photo, it can be reduced using the same cursor. The result is successfully saved.
There is a third option - when you need to reduce the photo to certain pixels. Select "Resize" at the top of the program.

Windows 7 has a Picture Manager program. It is very similar to Paint. Run it and select "File" in the upper left corner. Click on "Find Image". We find a photo. Next, select the “Picture” item, there are two processing options - “Crop” and “Resize”. You need to use them in the same way as with the functions of the Paint program. We change the image and safely save it on the computer.
How to resize photos using software
There are many quality programs from third-party developers. Especially worth highlighting:
— Image Resizer,
- Movavi photo editor,
— Adobe Photoshop CC,
— PIXresizer,
— Fotosizer,
— BImage Studio and others.
Most of them are free and freely available on the Internet. The download and installation process will take from 5 to 30 minutes. As an example, consider the Image Resizer program.
We find it using a search engine, download it, install it on a computer, and launch it. A program window opens in which you need to click on the Add Files menu. Then select the desired photo and go to the Settings section.
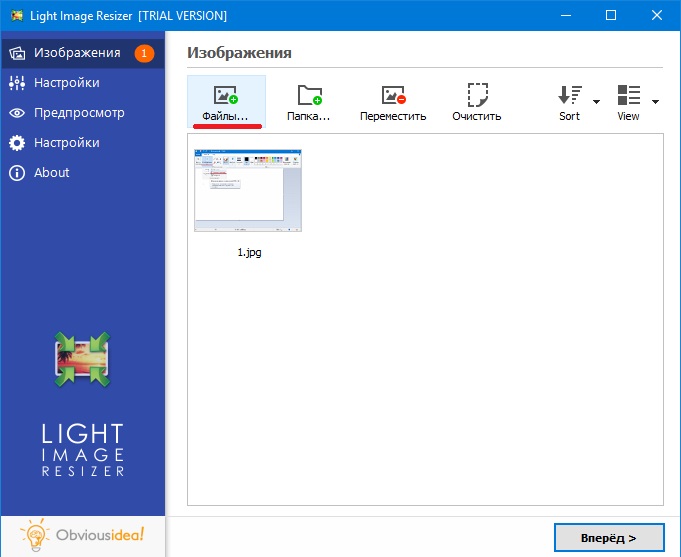
In the settings, enter the desired size and click Run. The photo with the new dimensions is saved to the desktop in a folder specially created by the program. Ready!

Download Image Resizer— https://light-image-resizer.ru.uptodown.com/windows
How to resize photos online
As well as third-party programs, there are many online services on the Internet that offer to crop a photo or resize it using pixel input. The most popular and frequently used of them are:
— imgonline.com.ua,
resizepiconline.com
— cropper.ru,
resizenow.com
— inettools.net,
— optimizilla.com.ru,
reduction-image.com
pichold.ru
Let's take a closer look at the imgonline.com.ua service. Go to the site and click on the Resize tab.

Next, click the "Select File" button. We find a photo on the computer, upload it. Next, enter the desired width and height in pixels. Select the type of resizing. If necessary, we make additional settings, select the format of the future image and click "OK".

A new page will open with information about the photo. There are two options - either open the photo for viewing (if you don't like something, you can "Go back"), or download it. Ready! The photo has been resized.

In general, the use of these methods is very simple. The main thing is to follow the prompts and enter data in the required fields. The output is always a high-quality image with the desired pixel parameters.
You can increase the size of a photo online on the IMGonline website. How to increase the size of a photo (image, picture or drawing) online without losing quality:
- Go to website
- Click "Select File"
- Just below, specify how many times you want to increase the size of the photo
- Below, select the output image format and click "OK"
Enlargement of the picture or drawing will begin. This process will take a few seconds, after which you can download the photo to your computer.
If you have a lot of different images in the cloud or on your PC, then at some point you will need to learn how to resize a photo, image, drawing, picture. There are several ways to do this without losing quality:
- Resize a picture or image in Photoshop
- Resize photo online:
- With Optimizilla
- With TinyJPG
- Via IMGonline
On the site imgonline.com.ua you can find out what size the image is. How to find out the size of a photo, picture:
- Go to website
- Click on the "Select file" button and then "OK" to determine the size of the image (photo, drawing or picture)
As a result, you will see the size of your file in pixels, megapixels and megabytes. And also, a funny bonus from the site is the total number of pixels.

If you are interested in resizing an image, and want to know exactly what characteristics of the image you will get as an output, then IMGonline is the service for you. That is, you do not need a program to resize the image, you can use a third-party site.
Resizing a photo, picture, image, drawing:
- Go to the IMGonline website
- Select the mode of operation (the site can resize in centimeters, megapixels, percentages, pixels and megabytes, pixels are selected by default)
- Choose your image
- Enter the desired image dimensions, change additional settings if necessary
- Click OK
- Click "Open Processed Image" to check the correctness of the operation performed
- If everything suits you, click "Download selected image" and save your thumbnail
Now you know how to avoid warping when resizing an image. As you can see, reducing the size of a picture online is not at all difficult and all operations take about a minute.
To reduce the size of a photo, image, picture or drawing without losing quality, use the Optimizilla website. How can I scale down an image, photo or picture on this site? You need to either click on the "Upload" button and specify the desired images, or simply drag and drop them onto the gray background below the buttons.


Once images are uploaded, they will be automatically compressed, compression details can be seen below.

As you can see, the original weighed 204 Kb, after compression the picture began to weigh 60 Kb, the picture was compressed by 71%, and the quality of the picture remained at the same level! To save a compressed image to your computer:
- Click on the "Download" button below the image
- Specify the save path

Did you manage to resize the photo?
To compress photos online, use the site TinyPNG (aka TinyJPG). To compress a photo image, picture, drawing online without quality loss, just drag the pictures (.png or .jpg) to the top zone and wait for the site to compress them.
By default, you can upload up to 20 5MB images at a time.

There is no quality setting for the finished image on this site. It remains only to download. To do this, click Download and select a folder to save.
TinyPNG has its own WordPress plugin that can compress photos online without losing quality while uploading to the server.


