It's very easy to set line spacing in CSS. There is a special property for this. But, of course, there are many other options that are universal and can be applied to text.
If no settings are made, the default values are set. You can change this distance if you wish. The value can be either in percentage or in pixels.
Line height
In CSS, line spacing can be shown with the following figure.
The image above shows the parameters with the corresponding distances. The text is in font-size space. Note that the line of text does not start at the base, but slightly higher. The space below is provided for letters that have elements below (g, y, and so on).
Note that the space between the font-size blocks is called leading. In HTML and CSS, this property does not appear in any way, but it is in other graphic and text editors. For example, in Adobe Photoshop.

The figure above shows where in Photoshop you can specify leading. And next to it is the font-size parameter.

Examples of using line-height
In CSS, line spacing can be set to percentages. An illustrative example is shown below.

In the case of a small value, it will be inconvenient for the user of your site to read.
The distance can be changed and the font size. If the difference between the main parameters differs greatly in numbers, then this difference is compensated by an increase in leading.
Design subtleties
In CSS, the spacing between lines can be further adjusted with various indents. Consider an example in the figure.

In the "Element" field in our case there will be text. Padding is the padding inside the object and margin is the padding behind the object. Border is a frame. It can be 0 pixels or it can be 100.
The following image shows all the padding, border, and line-height of text at once.

If your text is small, just one line, or each line is in a separate paragraph, then the distance can be adjusted by indenting between these paragraphs. That is, maring and padding between lines in the same element have no effect. They only create padding around the edges of the object. The object is the entire paragraph, not the lines in it. It is important not to get confused here.
In cases where there are many lines, and all this is located in one object, it is recommended to change the font with the main parameters.
How to increase spacing between CSS lines
The distance between HTML lines can be assigned to some class or for all paragraphs in the text. If you specify like this: p ( line-height:20px; ), then absolutely all paragraphs on the page will be with lines of 20 pixels in size. If you need different sizes in different places, it is recommended to do as follows.
We write styles.
Class1 ( line-height:20px; )
Class2 ( line-height:16px; )
Class3 ( line-height:12px; )
For clarity, let's add a frame so that you can see that this works. In the future, it must be removed.

Please note that in the third case, the strip ran over the text. All due to the fact that it is greater than the line height. Therefore, it is important to ensure that there are no such contradictions. If you make the line height small, reduce the font accordingly.
It is not recommended to make text too small and small spacing between lines. Since no user can safely read all this. His eyes will quickly get tired. Search engines also say that the text should be user friendly.
Moreover, there has recently been a great emphasis on convenience for mobile users. There, the guidelines always say that the font size should be normal, not small. This is especially true for links. With their small size, it will be difficult for the user to use site navigation.
The Google search engine has a special tool that helps in this analysis. It is very handy for webmasters.
Here is an example of the results that might be.

Basics of working with tools of the Text group in Photoshop: control panel, settings, functions and capabilities.
There is a group on the toolbar under the button with the letter "T". We open it in any way:
- by clicking on the black lower right corner of the icon;
- by clicking on the icon with the right mouse button
You can activate Text by pressing the T (Russian E) key on your keyboard. And it doesn't matter what keyboard layout is at the moment. While holding down the Shift key, pressing the "T" key several times will alternately activate all four tools of this group.
Fig.1. Text tool group
Everything is intuitive here.
- Horizontal - to create a familiar record in a horizontal position.
- Vertical - Positions the label from top to bottom.
- and 4. Create quick masks with horizontal and vertical selection.
Most often, the horizontal direction is used.
Toolbar Control Panel Text
When the tool is active, the top control panel looks like this:
Fig.2. Top control toolbar Text
Photoshop CS6 introduced the Font menu, which contains several options for settings. This will be in another article. Now let's look at the settings of the top control panel.
Attention! It is better to set all the settings of the top panel for the Text tools in Photoshop before typing the inscription. But it will be possible to make changes later, by first selecting the text or part of it that needs to be changed.
- Above number 1 Fig.2 – saving parameters. A very handy feature to save the settings (font name, size, etc.) if you have to return to them periodically or before rasterizing the text layer.
Click on the small arrow to open the window. Select "New set of options for the tool. A second window opens where you can specify a name for the parameter. We press OK. The editor remembers the settings.

Fig.3. Saving text options in Photoshop
A new line appears in the list. For clarity, in the previous step, the name "Example of a new save" was introduced.

Fig.4. Saved Settings
Now, in order to set on the panel all the values that were when saving, you need to click on this line.
To delete a line, right-click on it and select delete.
- Above number 2 Fig. 2 - change text orientation. Pressing the button with the letter T and arrows - the direction of the inscription changes from horizontal to vertical and vice versa. Don't forget that this text layer must be active in the layers palette.
- Above number 3 Fig. 2 - typeface. Clicking on the button with an arrow opens the entire list of fonts available on the computer. You can select the desired one from the list or enter it manually into the box, then press Enter.
- Above the number 4 Fig. 2 - font style. The arrow button opens a list of styles supported by the selected font. If the button is disabled, then the selected font only supports one suggested style.
- Above the button 5 Fig. 2 - font size aka Kegl. The dropdown list offers options from 6 to 72 pixels. Any value can be entered into the box manually, then press Enter. It is enough to enter only numbers, and the editor will put the letters "pt" automatically.
You can select the size as follows: move the cursor to the left of the window when it takes the form of a finger with arrows, hold down with the left mouse and drag to the right to increase the size or to the left to decrease it. In the window, the numerical value will change. As soon as you release the mouse, the text size will change.
- Above the number 6 Fig. 2 - font style. Clicking this button opens a list of styles that the selected font supports: italic, bold, bold… Not all fonts support a complete list of styles, so there may be a different number of options. If the button is not active, then the selected font supports only one suggested style.
- Above the number 7 Fig. 2 - text alignment on one side or in the center. Buttons work the same as in a Word Document. The settings are in the Paragraph panel. Read about it below.
- Above the number 8 Fig. 2 - color selection. The box shows the color that will be applied to the text. You can change it by clicking on this box and select any other one in the palette that opens. If the text is already entered, then it must first be selected.
- Above the number 9 Fig. 2 - text warping. Click on this button, then open the styles and before us are various deformation options. Experiment.

Fig.5. Text Warping
- Above the number 10 Fig. 2 - opens / closes panels Character, Paragraph. More about this.
Panels Character, Paragraph
Open the Character and Paragraph panels in Photoshop with a button on the top control panel or on the right panel. If they were not on the right panel, turn on the Window menu path - select Symbol or Paragraph. The corresponding icons appear on the right panel. If both of them are selected, two icons of the same group will appear, but when you open any of them, there will be two tabs in the window for easy switching between these panels.
Attention! The Character panel, when working with tools in the Text group, takes precedence over the Paragraph panel.

Fig.6. Panels Character, Paragraph
Panel Symbol
Some of the settings on this tab duplicate the functions of the top control panel and have already been discussed. We will not repeat. The values in them will be set to the same ones that you set in the top panel - the font, its size, etc.
The rest are indicated in Figure 6 above:
- Line spacing. Specifies the spacing between lines.
- Kerning to correct the spacing between two characters. For example, out of the entire text, only two characters need to be moved closer or further away from each other. We put the cursor between them, open the list and select the desired option, or enter it into the box manually.
- Intercharacter spacing to set the spacing between text characters.
- The vertical scale for increasing/decreasing the height of characters is set as a percentage. The number is entered into the box manually. The % sign can be omitted, Photoshop will put it automatically as soon as you press Enter.
- Scale horizontally expands/compresses the line. As well as the previous parameter is entered as a percentage.
- Baseline offset. A handy feature when entering mathematical formulas and other notation with superindex and subindex. It allows you to raise / lower part of a line or word. This part needs to be highlighted first. The value is entered into the box manually. Similar possibilities are given by the next line - pseudo-parameters.
- Pseudo parameters. The font settings in this line are clearly visible - bold, italic, capital text, etc.
- Ligatures, that is, characters that are obtained by merging several letters or characters, that is, combining them into one character. Used very rarely. Only those supported by the selected font will be active.
- Opens the list of languages for spell checking.
Paragraph panel
Set paragraph options such as indentation, hyphenation, etc.

Fig.7. Paragraph panel
In the first line, the first three buttons are duplicated from the top control panel. They have already been mentioned. The rest of the buttons will most likely be inactive. The next three buttons of this line are for aligning the bottom line of text, and the last one is for full-width alignment.
In the second block, there are three windows where you can set the indents from the right or left edges and the indent of the first line in pixels.
In the third block, indents are indicated before or after the paragraph
In the next block, automatic line break placement is enabled / disabled.
Palette Symbol(Character) allows you to set such font parameters as line spacing, character spacing, etc. (Table 6.2). You can also make text italic or bold, capitalize or index text. On the palette Paragraph(Paragraph) there are controls that set the parameters of paragraphs of the text (red line indent, margin width, spacing between paragraphs, etc.). These palettes are used to fine-tune text. Below is a description of some of the controls located on them.
Table 6.2. Some controls on the Character panel
| Control element |
Function |
| |
Sets the font size |
| Specifies line spacing |
|
| |
Allows you to change the distance between two adjacent characters. To change this parameter, you need to place the cursor between two characters and select the desired value from the list. The distance between characters can be both reduced and increased |
| |
Designed to set an additional intercharacter spacing within the selected text area. As with the spacing between adjacent characters, the spacing between characters in a group can be increased or decreased |
| Allows you to adjust the height and width of characters |
|
| Used to adjust the baseline shift of the font. This can be useful for writing indexes or drop caps (oversized letters that start a paragraph) |
|
| Displays the text color. Allows you to change it using the standard Photoshop color selection dialog |
|
| Additional customization of text formatting. By clicking on the characters, you can change the font style and design (underlining, subscripts, etc.) |
|
| |
Language selection for automatic spell checking. This feature was first introduced in Photoshop |
| Selecting the mode for smoothing character borders. In most cases it is sufficient to use the default value |
NOTE. The distance between two characters is called kerning (from the English word kerning - inter-character spacing). The additional distance added between all characters of the selected sequence is called tracking (from the English word tracking - setting inter-character distances).
Microsoft's office suite is widely used, and its DOC format has practically become the standard for text documents. Unfortunately, most users end their acquaintance with this word processor by learning how to change the font family and mastering its alignment on the page.
Meanwhile, in many organizations there are rules for working with text documents, which prescribe certain options their design. They usually define the type font The default and the required line spacing in the document.
Change intercharacter distance also called kerning, is required mainly to give the formatted text a more harmonious and aesthetically finished look. Its main area of application is typography, or artistic layout.
How to change and adjust line spacing
There are several ways to change line spacing in Word. ways:
The last item is called by clicking right mouse button and allows you to adjust the line spacing manually in a wide range of values.
Line spacing values
Line spacing is distance between hypothetical lines passing through the middle of letters in lines and by default is equal to the font size. Standard sizes, available in Word, are 1, 1.15, 1.5, 2, and 3 values of this distance. 
Drop-down list, in paragraph " Paragraph”, allows you to apply line spacing options in the text that are different from those specified. In addition to the standard set of single, one and a half and double, you can also find the following here:

Changing letter spacing
Each character, in any font, is allocated a certain space, but, depending on the style, the letters can fill it in different ways. To fine-tune the space they occupy and use kerning. In Word, it can be set in three different ways. In addition to the standard, available sparse and compacted.
Adjustment is carried out in increments of 0.1 points. This parameter can be accessed in two ways:

To give the text an aesthetically finished look, it is sometimes necessary to apply a visual separation between paragraphs. Keystroke Enter, which is normally used for this operation, has no such effect, as it simply advances the cursor to the next line. Enter edit menu can be done in two ways: 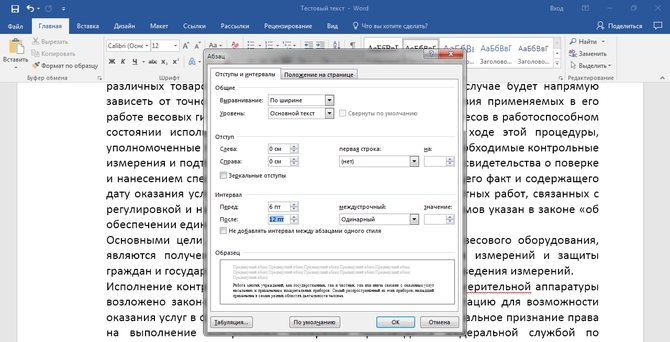
- Using the context menu Paragraph»caused by pressing the right mouse button;
- Using the command group " Paragraph» tab « home»Word.
In both cases, an additional window opens, in which, using the sector " Interval» you can set the indent before and after paragraph. Adjustment, regardless of the typeface selected, is performed in fixed increments of 6 points.
Line spacing (leading) is the distance between the current line of text and the line above it. Each character can have its own line spacing; the largest value will determine the line spacing for the given line.
Rice. 17.20. Line spacing selection

Rice. 17.21. Paragraphs with the same size but different line spacing
Advice
The default line spacing is calculated proportionally to the font size. Their relationship is indicated in the dialog box. Justification(Alignment), which is accessed using the palette menu paragraph(Paragraph). The default spacing is 120% of the point size. For example, the line spacing for a size of 30 points is 36 by default..
Advice
To set the inter-character spacing in text that is located vertically, select the desired characters and change the tracking value in the palette character(Font). You will see that the text will change after that..
Therefore, if you set different line spacing values for the lines of a paragraph and then edit the text to change its line spacing, the line spacing may change.
It's impossible to say that the text you create will be remarkable in every way, but using the optimal line spacing will make it much easier to read, even if it takes up a lot of space on the page. Don't bore the reader before he has read all your clever thoughts.
Advice
The text formatting above applies only to Photoshop. If you are using other applications, the procedure for choosing a font may be different. When creating texts for the Internet, it is better to turn to a program designed for Web design..
- In the palette Layers(Layers) select the desired layer.
- Optional. Select one or more lines in which you will change the line spacing. If the text was entered in line-by-line mode, then the entire line must be selected. If you do not select lines, then the changes will occur in the entire text.
- Select or enter a line spacing value in the palette character(Font) - see fig. 17.20, 17.21.


