Before installing the system, you need to understand that how to burn a windows 7 image to a flash drive, then set up your computer to install Windows 7, and begin the installation process. If you have visited this page, then you are having difficulty creating a bootable USB flash drive or disk. Here you will find answers to all questions.
To write a Windows 7 image to a USB flash drive, you will need specialized tools. There are quite a few of them, but we will describe them all. As an example, we will talk about UltraISO, USB / DVD Download Tool and many others.
Step 1: What You Need to Capture a Windows 7 Image
Any operating system image or programs is a common format that most utilities recognize. The most popular image format is ISO. It can be written to flash drives, hard drives, CD-DVD media. The format is somewhat similar to ZIP or RAR archives. In general, this is an optical disc image and is a single file or archive containing any other type of file. To work with the format, modern operating systems already have built-in tools. You can also use third-party software: UltraISO, DAEMON Tools, Alcohol 120%, PowerISO, ImgBurn, ISO Master and many others.
Before choosing an OS image, you need to figure out in advance the bit depth and volume that it will occupy on the media. There are 32-bit systems (86x) and 64-bit systems (64x). Here you can find out about the differences in these bit depths. The volume of the systems is also different. Below is a table of all editions of Windows 7 with system requirements:
| Editorial | RAM | Processors | NucleiCPU | ||
| 32x | 64x | 32x | 64x | ||
| Windows 7 Ultimate |
4 GB |
192GB |
|||
| Windows 7 Professional | |||||
| Windows 7 Enterprise | |||||
| Windows 7 Home Premium |
16 GB |
1 | |||
| Windows 7 Home Basic |
8GB |
||||
| Windows 7 Starter |
2GB |
||||
Using these characteristics, you can choose the system for yourself. In this article, we will consider two programs using which it is possible to burn a Windows 7 image to a USB flash drive: UltraISO, USB / DVD Download Tool.
You can download tools from virus-free resources from here:
- USB/DVD Download Tool .
- UltraISO.
- Command line.
Step 2: How to burn a Windows 7 image to a flash drive using UltraISO
Download the program from the link above or from your source and install. Using the trial version of UltraISO, you can complete the intended task, so it is not necessary to look for a version with a key. After downloading and installing, perform the following steps (I also advise you to read the article if you work with optical media:)
- We start the program. If it is not complete, then use the trial period.
- Insert a 4 or 8 GB flash drive into the USB port, preferably more.
- In the program, click with the mouse on the tab "File" — "Open" and select the image file Windows 7 Ultimate (Maximum) or any other version.
- The files will automatically be loaded into the program window, which are displayed in the right section. Now you need to click on the "Boot" tab and select the option "Burn Hard Disk Image".
- In the next step, select the flash drive (Disk Drive), the image file that is already registered, the recording method USB HDD+. It is worth noting that the files that are already on the flash drive will be destroyed.
- Click on the button "Record".

- A message will appear stating that the information on the disc will be erased. We agree with the "Yes" button.

- Preparation for recording begins, and then the process itself, which does not take much time.

- The end of the operation is accompanied by a message "Record completed!".
The finished flash drive can now be used for its intended purpose.
Step 3: How to Burn Windows 7 Image Using USB/DVD Download Tool
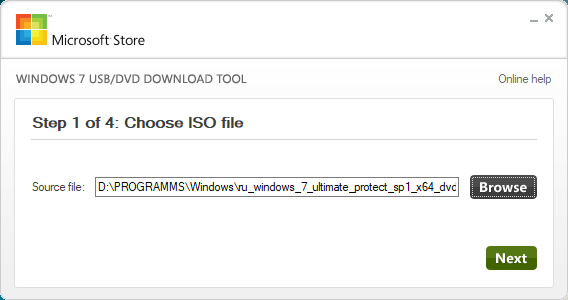
- We launch the program from the desktop. A window will open with four steps to complete. The first step is to select an ISO image of the operating system. Click the Next button.
- Next, select the media type, in our case USB Device.

- Select the media and click "Begin Copy".

- Next, formatting the flash drive and copying files will begin.

After copying, the flash drive is ready to install Windows 7. It is worth noting that using the USB / DVD Download Tool, you can burn the image to a DVD or Blu-Ray disc.
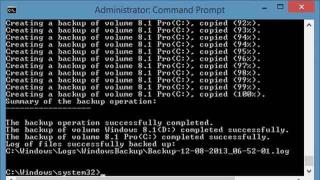
Step 4: How to burn a Windows 7 image to a flash drive using the command line
If the Windows operating system is at hand, using its capabilities, you can create a bootable USB flash drive. We will use the command line. Run this tool as an administrator and follow these steps:
- In the command line (CMD), enter the command to work with disks: diskpart. Using it, we will format the media and write ISO image files to it.
- After entering the command above, the user will be in the disk utility, which characterizes the line "DISKPART>".
- The next step involves displaying all drives connected to the computer. For this there is a command list disk.
- You need to select the media that will be used as bootable. Here we focus on volume. For example, now a 30 Gb flash drive is connected here, in the "Size" column, this volume is just indicated. To select this disk, you need to register select diskN(your media number). When choosing, be very careful, because it is very easy to make a mistake here.
- Let's move on to copying files to a USB flash drive. We mount the system image (so that it is displayed in the My Computer directory) and at the command line go to the created image disk.
- With the help of commands, go to the boot directory and execute the command bootsect /nt60 N. Where N is the letter of the flash drive intended for installing Windows
- Copy the image files to a flash drive.
- Installing Windows 7.
Some users will find it a little difficult to use the command line, as there are a lot of commands to type. The probability of making a mistake here increases many times over. Therefore, it is recommended to use UltraISO or USB/DVD Download Tool. Other utilities will be discussed in the following articles:
Using all these tools, the user will figure out in no time how to write a Windows 7 image to a USB flash drive. In this material, third-party and standard tools for creating such a media were analyzed. The following material will be about how to create a bootable Windows 7 DVD. This use case is losing popularity every year, as DVD drives are built into computer systems less and less, and flash media is replacing optical discs.
If you want to install or reinstall an operating system on a computer or laptop, then it is quite natural that you have a question: how to create a bootable USB flash drive with Windows. In this article, we will look at three ways that will help us with this.
Using the first and second, you can make a bootable Windows 7, Windows 8 or Windows 10 USB flash drive. Using the command line or the WinSetupFromUSB program, you can make a Windows XP bootable USB flash drive.
Choose a flash drive that has more memory than the operating system image you have on your computer. Save all the information on it to a hard drive or other external media, as the flash drive will be formatted, respectively, all data from it will be deleted.
Through the command line
To create a bootable USB flash drive using the command line, you do not need to install any third-party applications on your computer. To launch the command line, press the key combination Win + R, the Run window will open. In the "Open" field, write cmd and click "OK".

Display a list of all devices - enter list disk .

In this case, two devices Disk 0 and Disk 1 are connected to the laptop. From them, you need to select a USB flash drive, which we will make bootable. I took a 4 GB flash drive, so we look at the column "Size", it corresponds to Disk 1 - 3.9 GB. We enter the following command - select disk 1. If another device corresponds to your flash drive, for example, Disk 2, enter the select disk 2 command - only the number at the end changes.

Enter the clean command.

Let's create a primary partition using the create partition primary command.

Select it - select partition 1.

We make it active - active .

Format the flash drive in NTFS format - format fs=NTFS. Wait for the process to complete.

After that, select a letter for the section, for example R - enter assign letter=R .

Exit the diskpart program - type exit . To close the command prompt, type exit again.

The bootable flash drive has been created. Now you need to copy the files to install Windows on it. If you have them stored in an archive or in an image, extract all the files from them to a USB flash drive.

To install Windows from a flash drive, we change the boot priority in the BIOS, we need to boot from the created flash drive. Detailed articles about the installation can be read by clicking on the links at the bottom of the article.
With Rufus
This program does not require installation on a computer, takes up very little space, is free and easy to use. Download the Rufus program by clicking on the link.
Let's run it on the computer. In the "Device" field, select the desired flash drive. See if there is a check mark in the box "Create Boot Disk". Then click on the floppy disk to select the operating system image.

Through Explorer, we look for an image on the computer and click "Open".

A line will appear at the bottom "Using an Image". Press "Start". The program will warn that all data from the flash drive will be destroyed, click OK.

Wait until the flash drive is formatted and the files of the ISO image are copied to it. Then click "Close".

A bootable USB flash drive with the Windows operating system has been created. We change the boot priority in the BIOS and install a new OS on the computer.
Using the program WinSetupFromUSB
To get started, download the WinSetupFromUSB program, for this you can follow the link. We insert the USB flash drive, which will be bootable, into a computer or laptop and run the program.
In the region of USB disk selection and format select the desired flash drive and press the button "Bootice".

In the next window, in the "Destination Disk" field, select the USB flash drive from the list again. Here you can navigate by the amount of memory. I took a 4 GB flash drive, respectively, USB 3.9 GB suits me. Click "Perform Format".


In the "File System" field, select the NTFS file system and click "OK".

In the following windows there will be warnings that the flash drive will be formatted, all data will be deleted, and so on. Press "OK". In the last window, click "Yes" and wait for the process to complete.

A window will appear that the bootable USB flash drive has been created and you can write the necessary files to it. Close the "BOOTICE" window by clicking on the red cross.
In the main program window, in the "Add to USB disk" area, check the box "Windows 2000/XP/2003 Setup". Click on the rectangle opposite the field and select the folder where you store files with the operating system.
If the files for installing Windows are stored on the computer in an archive or in an image, they must first be extracted.
Press "GO" and wait for the files to be written to the USB flash drive.

Using the WinSetupFromUSB program, you can easily make a bootable USB flash drive with the Windows XP operating system.
Since almost no one uses CDs and DVDs anymore, it makes sense that the Windows image for further installation is best written to a USB drive. This approach is indeed much more convenient, because the flash drive itself is much smaller and it is very convenient to store it in your pocket. Therefore, we will analyze all the most workable methods for creating bootable media for further installing Windows.
For reference: creating bootable media implies that an image of the operating system is written to it. From this drive itself, the OS is installed on the computer in the future. Previously, during the reinstallation of the system, we inserted a disk into the computer and installed it from it. Now you can use a regular USB drive for this.
To do this, you can use proprietary Microsoft software, the already installed operating system itself, or other programs. In any case, the creation process is quite simple. Even a novice user can handle it.
All the methods described below assume that you already have a downloaded ISO image of the operating system on your computer, which you will write to a USB flash drive. So, if you haven't downloaded the OS yet, do it. You must also have suitable removable media. Its volume should be sufficient for the image you downloaded to fit on it. At the same time, some files may still be stored on the drive, it is not necessary to delete them. All the same, during the recording process, all information will be irretrievably erased.
Method 1: Use UltraISO
Our website has a detailed description of this program, so we will not describe how to use it. There is also a link where you can download it. To create a bootable USB flash drive using Ultra ISO, do the following:

If there are any problems during the recording, errors appear, most likely the problem is in a damaged image. But if you downloaded the program from the official site, no difficulties should arise.
Method 2: Rufus
Another very handy program that allows you to create bootable media very quickly. To use it, follow these steps:

It is worth saying that there are other settings and recording options in Rufus, but they can be left as they are initially. You can check the box if you wish. "Check for bad blocks" and specify the number of passes. Thanks to this, after burning, the installation flash drive will be checked for damaged parts. If such are found, the system will automatically correct them.
If you understand what MBR and GPT are, you can also indicate this feature of the future image under the inscription "Partition scheme and system interface type". But doing all this is completely optional.
Method 3: Windows USB/DVD Download Tool
After the release of Windows 7, developers from Microsoft decided to create a special tool that allows you to make a bootable USB flash drive with an image of this operating system. Thus, a program called . Over time, the management decided that this utility could well record other operating systems. To date, this utility allows you to record Windows 7, Vista and XP. Therefore, for those who want to make media with Linux or another system other than Windows, this tool will not work.
To use it, follow these steps:

Method 4: Windows Installation Media Creation Tool
Also, Microsoft specialists have created a special tool that allows you to install on your computer or create a bootable USB flash drive with Windows 7, 8 and 10. The Windows Installation Media Creation Tool is most convenient for those who decide to burn an image of one of these systems. To use the program, do the following:

In the same tool, but for Windows 10, this process will look a little different. First check the box next to the label "Create installation media for another computer". Click "Further".
But then everything is exactly the same as in the Windows Installation Media Creation Tool for version 8.1. As for the seventh version, the process there is no different from the one shown above for 8.1.
Method 5: UNetbootin
This tool is intended for those who need to create a bootable Linux USB flash drive from under Windows. To use it, do this:

Method 6: Universal USB Installer
Universal USB Installer allows you to write images of Windows, Linux and other operating systems to drives. But it is best to use this tool for Ubuntu and other similar operating systems. To use this program, do the following:

In this article, we will take a closer look at how to make a bootable Windows 7 flash drive. I have repeatedly received questions about creating a bootable Windows 7 flash drive, but just words are not enough to convey information, because there are some nuances that you need to know.
Now let's figure out when you need to create a flash drive with Windows 7. Sometimes in the process of working on a personal computer, laptop or netbook, there is a need to boot from some external device. This may be necessary to recover from any failures, to eliminate the consequences of a virus infection, or simply when reinstalling the operating system.
On desktop computers, this problem is usually solved using CD / DVD media, but for other devices, such as netbooks that do not have a disk drive, using a bootable USB flash drive is often much easier than looking for an external DVD-ROM. I have it, but for ordinary users who need to install windows 7 from a USB flash drive, it is not necessary to buy it. Since they will not do this procedure often.
This is what the external drive looks like:

I also want to note that those users who recently bought a computer, laptop or netbook that has USB 2.0 and USB 3.0 ports should connect a Windows 7 USB flash drive to USB 2.0. Because Windows 7 does not support USB 3.0. Identifying a USB 3.0 port is easy, they are usually colored blue. Look at the photo below:

In any case, you will understand this when an error appears and further installation of Windows 7 will be impossible. Below in the photo you can see how it will look on your monitor 😉 : 
I recommend that you read the first method about the program Windows 7 USB / DVD Download Tool, because they are the most reliable options for creating an installation USB flash drive with Windows 7. The first method is good because you will not need to use any programs, all you need - do this procedure in the already installed Windows 7. Of course, if it is not at hand, then proceed to method number two.
What you need to know before creating a flash drive
Before starting the process, you need to check that some conditions are met:
- The presence of a Windows 7 installation disk or an image with the Windows 7 operating system;
- The presence of a "clean" flash drive with a size of at least 4 GB. If there is information on it, it must be copied somewhere, because during the work the USB drive will be formatted and all its contents will be destroyed;
- Support boot/select from flash drive in BIOS.
With the first two conditions, I hope there are no difficulties, but about the third I will say a few words. Actually, installing an operating system is a topic for a separate article, but in a nutshell, it's done like this. At the time of booting the computer, we enter the BIOS settings (on most computers, for this, immediately after turning on the power, press or hold the DELETE key). For one of the most popular BIOS versions, the initial menu looks something like this:

Next, go to the menu "Advanced BIOS Features" and there we find the item "Boot Sequence". It specifies the sequence of devices from which the BIOS will attempt to boot the computer. After that, we look at all possible choices in the "First Boot Device" item. If there is anything related to USB, then booting from a flash drive is possible.

After any changes in the BIOS, remember to save with the "F10" key.
So, if all the conditions are met, then you can proceed to the topic of the article, how to make a bootable Windows 7 flash drive. In this article, we will talk about four methods that are the most popular.
Why am I talking about more than one way? Each user has pre-installed programs, and one of the programs may already be on your computer. Why install other programs, because you can use those that are.
By the way, there is an article on the blog about how to install Windows 7 when your computer has a drive: "". It will also be useful when you create a bootable USB flash drive and start installing Windows 7.
The procedure for creating a flash drive via the command line
As I said above, this method is one of the most proven, which is why I want to talk about it at the very beginning of the article.
In the following three methods, you will learn how to make a bootable USB flash drive with Windows 7 using specially created programs with a user-friendly graphical interface. But the Windows 7 operating system has a built-in feature that does not require downloading any utilities, but it makes you work hard by typing a lot of letters on the keyboard.
If any of the readers found those times when all the work on the computer was carried out by typing various commands in the DOS system (white letters on a black screen, English commands and no multitasking!), Then he will probably experience some nostalgia for the old days.
And for those who believe that Windows has always been graphical, they are deeply mistaken.
All work is carried out in the so-called Windows command mode. To go there, click the "Start" - "Run" button.

Enter "cmd" in the field and click "OK".

A black screen appears, in which we type commands, each of which is completed by pressing the "Enter" key.

To make everything clear, I will give screenshots after each command. This way you will know that you are doing everything right.
Diskpart - enter disk management mode. You may need to confirm the launch as an administrator - enter the administrator password, click "Yes".

List disk - displays a list of all disks, serial numbers, starting from zero.

Be especially careful here: all disks are displayed, including HDD partitions. So correctly determine the desired flash drive. It's easy: it is listed after all hard drives and has a size you know.

Let's say that the flash drive turned out to be number 3. We type select disk 3. For example, if you have it in 4th place, then type select disk 4 accordingly.
Attention! I remind you, in order not to be mistaken, you can calculate your flash drive by size (look in the "Size" column).

After that, an inscription will appear on the screen confirming that you have selected some kind of media. It says "Disk 3 selected."

Now, if there is 100% certainty that the correct media number is selected, enter the "Clean" command. This command completely removes all files. I hope that you have already copied all the data from the flash drive, I talked about this at the very beginning of the article.

We type the command "Create partition primary" and press "Enter". For those who want to know what will happen now - the creation of a primary partition on the disk.

Your section has been created.

Now we enter "Select partition 1".

Enter the command "active" to mark it as active and, as always, press "Enter".

Enter "Format fs=NTFS". We format our flash drive under the NTFS file system. This operation will take several minutes.

We are waiting for the formatting to finish.

After formatting the flash drive, a corresponding inscription will appear.

Enter the Assign command. As a result of executing this command, the utility will automatically create a new disk, for example, H: and display an information window with a message about this event.

All necessary actions were performed with a flash drive. Enter Exit. Finally exiting command mode.

Now we have an empty but bootable flash drive. It remains only to copy the files from the Window 7 distribution kit to it and you can proceed with the installation. Making a bootable Windows 7 USB flash drive through the command line is easy, the main thing is to remember all the steps.
UltraISO Program
UltraISO is an extremely useful utility for working with disk images. It will be useful not only for our current purposes, and therefore I recommend that you familiarize yourself with its capabilities. The program is not free, but it has a trial version with quite suitable functionality for our task. Download the program here:, and click on the link "Free Trial".

We choose a language from a long list (among others, Russian is also available). Click on any arrow in the line "Russian" (these are links to download from different mirrors of the site).

After downloading the program, run it to install.

In the next window, read the text of the license (optional) and select the item "I accept the terms of the agreement" and click "Next" again. Friends, who reads software licenses? I personally don't ;).

Now you need to specify the location on the disk where the necessary files will be copied. Leave the default and click "Next".

We receive a proposal to create a shortcut to launch in the Start menu. We agree by clicking the "Next" button again.

If you want to add a program shortcut to the desktop, click on the first checkmark.

We are ready to install the program, click the "Install" button.

When the copying of files is completed, click "Finish".

If everything is correct, click on "Trial period ..." and go to the initial screen of the program.


Insert the flash drive into your computer, laptop or netbook.
Then go to the "Boot" menu and select "Burn hard disk image".

After that, click "Format".

Set the file system to NTFS, FAT32 is selected on the screenshot:


After formatting, click "Write".

We choose "Yes".

We are waiting for the creation of a bootable Windows 7 flash drive to finish.

Now you can install Windows 7.

Utility from Microsoft
Using a special program from Microsoft allows you to make a bootable Windows 7 flash drive in many ways similar to the previous case, except that the utility is free and you can use it as much as you like. It is called Windows 7 USB / DVD Download Tool, download the program using .
To work with the program, you must install Microsoft .NET Framework 2.0. To download it, follow the link.
After downloading the program, run and click "Next".

The next window displays information that everything is ready for installation. We confirm by clicking on the "Install" button that we agree to install this program.

In this article, I will tell you how to burn an image to a USB flash drive (in this case, a Windows image) for subsequent installation of the system on a computer. Nowadays, many people have laptops and netbooks where there is simply no optical drive, or there is no way to install windows from a disk, and here the creation of a bootable windows 7 flash drive comes to the rescue. First of all, this article is focused on these tasks.
We will write the image to a USB flash drive in two ways. The first method will be implemented using a very good ultra iso program, and the second using WinSetup From USB. We will start by considering the steps for working with ultra iso, since this method is less labor-intensive and the process of creating a bootable windows 7 flash drive will be quite fast. The second method will remain for those who, for some reason, “did not work out” with the first option.
Method number 1
So let's go. To get started, download the program Ultra ISO. After the program has been downloaded, installed and launched (we press the trial period if there is no desire to buy), you can start a fairly simple process of writing Windows to a USB flash drive:
1. You must specify the path to the image that should be placed on your hard drive:
Click "File" => Open (Fig. 1)
Fig.1

Rice. 2

Rice. 3
Method number 2
This method will also tell you how to write windows to a USB flash drive. What you need for this option:
1. A little free time;
2. Computer (with iron, which supports booting from a USB flash drive);
3. Program for preparing a flash drive ( download);
4. Actually the flash drive itself (even an SD card will do);
5. An image of the operating system we want to install.
For example, I will show how we will write an image of the operating system to a 4GB SD cardMicrosoft Windows 7Home Premium 64-bit. Immediately I want to draw your attention to the choice of operating system. If your computer has less than 4GB of RAM (RAM), then you should install the 32-bit (x86) version of the operating system, since the 64-bit one will simply clutter up the RAM with unnecessary processes.
We insert the USB flash drive into the USB port and format it in FAT32 or NTFS using Windows tools. To do this, go to My Computer, find the flash drive there and right-click on its icon. In the context menu, select the "Format ..." item. In the format window, select the FAT32 or NTFS file system (the latter will be better if the flash drive is larger than 4GB), and also select the cluster size "Standard cluster size" and click the "Start" button. Everything is shown in the picture:

Next, we download a small program in which we will do all the operations we need. There are several programs of this type, but I chose WinSetupFromUSB because it does not require installation, it almost does not take up space on disk and easy to use.
We start the program. First, we need to select the device on which we will write the image. This is done in the drop-down menu at the top (if the flash drive is not displayed in this menu, click on the Refresh button). Next, we need to prepare the flash drive for burning the image, because if we just copy the image, it will be impossible to enter the system installer, because there is no boot sector. To create it, click on the Bootice button.

In the Bootice utility window that opens, press the Process MBR button, then see if Grub4Dos is checked (if not, check it) and press the Install / Config button. In the Config Grub for DOS window, click on the "Save to disk" button, the program will display a window that the boot record has been successfully written to the drive.

We return again to the Bootice utility window, where we press the “Process PBR” button and do the same, without changing anything in the last window, click OK.

Everything, now we just have to write the image to a USB flash drive, this is done in the main program window, which we saw immediately upon startup. It is necessary to put the necessary checkmark in it - if you are going to install Windows XP, then this is the first checkbox, if Vista or Seven - the second. Next, click on the “…” button on the other side of the checkmark and set the path where our unpacked image is stored on the hard drive, or simply mounted into a virtual drive using DaemonTools or Alcohol. Click on the "GO" button and wait until the process is completed.

At the end of the program will display the message "Job Done!". All, dear friends, you can reboot and start installing the operating system.
Also, I advise you to read the article on