Most people have old, broken laptops lying around that they don't need at all. Some manage to fix them, and some do not.
And today, especially for those who have an old laptop lying around, I will tell you about 5 ways to give a second life to an old or broken laptop.
1. Additional Wi-Fi hotspot
If your house does not catch Wi-FI in some places, then you can make your old laptop an additional Wi-Fi access point. This method is good, because sometimes there are cases when you urgently need the Internet in the far corner of the apartment.
2. External Monitor
If the laptop does not work at all, and the external monitor is yes, then you can simply separate the case from the screen and use the latter as an external monitor.
An external monitor from a laptop can be used as a secondary monitor for your main PC.

3. Spare parts
Another way (if your laptop is too bad) is to disassemble the old laptop for parts. But that's not all, the hard drive, thanks to the solid case, can be turned into an external drive.

4. Laptop on the wall
If you want to use your broken laptop for its intended purpose, you can hang it on the wall as a kitchen PC or an entertainment board for the gym. This option is good for those with a broken keyboard or CD drive.

5. Short throw projector
If you like large screens, then this method is for you. The symbiosis of an old laptop and a homemade projector will give you different movies, clips, etc. It will also be possible to make presentations.
With the help of simple tricks, you will be able to configure and retrofit your laptop, after which it can be used as a server for creating and storing data backups, a 24x7 torrent client and a network video recorder.
Streaming data: the video is stored on the server and played via the local network on a smartphone or tablet. And it's all very simple! You just need to turn your old laptop into a server, following our simple tips. Don't rush to send your old laptop to a landfill: it can be useful as a home server. Using some simple techniques, you will be able to adapt your computer to continuous operation and install the appropriate software that surpasses the functionality of a NAS.
Older laptops in most cases lack processing power, but for server tasks it is more than enough. More important is a high-speed interface such as eSATA, FireWire, or Gigabit Ethernet. Laptops equipped with rather "power hungry" desktop processors or USB 1.0 devices (manufactured before 2002) are not suitable for this.
The laptop can be installed in any cool ventilated place, since the server can be controlled from a distance. The fastest and most reliable way to connect your laptop to your router is with a network cable. If you plan to use a printer on your network, you must connect it directly. To use it as a digital video recorder, your notebook needs a DVB-T digital receiver or antenna connector.
Increasing disk space
One of the most important conditions for a home server is sufficient disk space. But on older laptops, it is often quite limited. This means that you need to add a reliable storage device to your laptop. You can, of course, replace the old hard drive with a new one with a capacity of up to 750 GB. But this entails the need to reinstall the operating system and programs. Therefore, we recommend connecting an external hard drive.
DRIVE: 2.5 INCH OR 3.5 INCH?
The advantage of 2.5-inch hard drives is their compactness and noiselessness, as well as the absence of a power supply unit. When the home server goes into standby mode, they shut down and do not consume power. However, their storage capacity is no more than 1 TB and they are relatively expensive. The larger 3.5-inch models offer more capacity at similar prices, but require a power supply that consumes power even in standby mode. In short, for those who need a drive with a capacity of at least 1 TB for permanent use, we recommend choosing a 3.5-inch hard drive, otherwise a 2.5-inch model is sufficient. When buying, you also need to pay attention to the interface used, since there are significant differences between them in terms of speed indicators.
WHICH INTERFACE IS BETTER?
Any laptop suitable for server use is equipped with USB 2.0 ports. But this old standard, with a bandwidth of about 25 Mbps, will prove to be a bottleneck for an external hard drive, whose data transfer rate is four times faster. However, depending on the type of home network, USB 2.0 speeds may be sufficient. For example, if your router or laptop is not connected over Gigabit Ethernet, they can only communicate at 12 Mbps. The speed of information exchange between computers united in a wireless local area network is also low - up to 20 Mbps. However, if you do not have to regularly "drive" a lot of files over the network several gigabytes in size, these figures are quite acceptable.
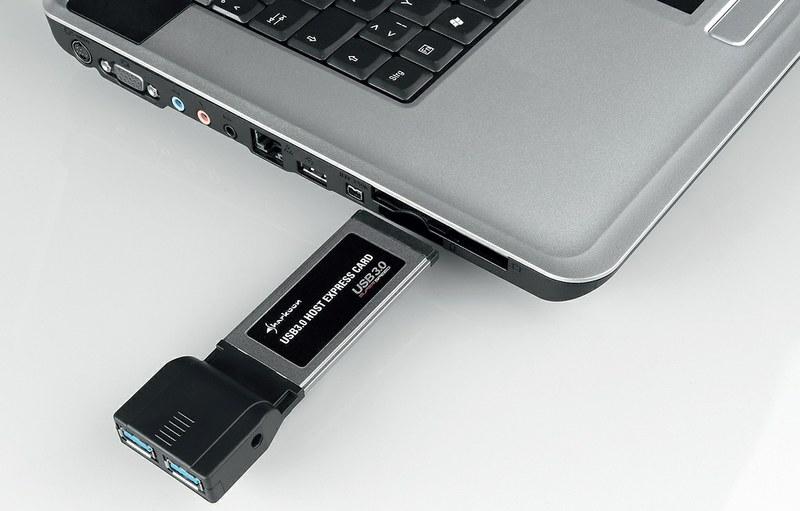
If your laptop has an ExpressCard slot, you can connect a controller with USB 3.0 ports. Although your laptop has USB 2.0 ports, you should select the USB 3.0 model when purchasing a hard drive. It can be quickly filled with data from a modern PC, and then connected to a laptop that acts as a server. If you work with a gigabit network and plan to store high-definition video on your home server, USB 2.0 will not suit you due to its low bandwidth. Therefore, if possible, use an eSATA or FireWire hard drive if your laptop has one of these interfaces. If you have an ExpressCard slot, you can connect a controller with two USB 3.0 ports, and to it a hard drive supporting a high-speed standard.
CONNECTING AN EXTERNAL SATA HARD DRIVE
As a last resort, you can try to replace the unnecessary optical drive with an additional hard drive. Some manufacturers (such as Dell, Lenovo, and HP) offer a chassis for installing hard drives in the DVD drive bay. If the optical drive is connected via SATA, then if you have certain skills, you can lead the SATA / eSATA cable through the open compartment.
Do you remember your first laptop? Where is he now?
Most outdated or broken, but repaired, laptop computers "refer" to mothers (grandmothers) to lay out the "Klondike" and sit on social networks.
But in the right hands, a laptop can get a second life. Below is a selection of some ideas for repurposing your laptop.
Back in the ranks
Let's start with the obvious - get the laptop working again. You may have to replace some components, clean it inside and out and, of course, reinstall the software.
Flickr.com
If after all these manipulations, the laptop still "slows down" and does not meet your requirements, try installing a lightweight operating system on it (for example, Lubuntu or Chromium OS).
Laptop on the wall

If you do not plan to use your old laptop for its intended purpose, then hang it on the wall and use it as a digital photo frame, kitchen PC for recipes or an entertainment board for the gym. These options are good for laptops with a broken keyboard, touchpad, or CD drive.
Additional Wi-Fi hotspot
 flickr.com
 If there are places in your home where Wi-Fi does not catch (for example, an attic or a terrace), expand your coverage using an additional hotspot from your old laptop. It's pretty easy to do on both Windows and Mac. This method is good when the Internet in the far corner of the apartment is needed at a time and urgently.
Hidden media center
What is a media center for? We have already answered this question once. But what about making a media center out of an old laptop? It can be not only effective but also aesthetically pleasing. The laptop is thin, which means it can be hidden behind the TV by attaching it to the sliding rail.
Short throw projector
Do you like big screens? The symbiosis of an old laptop and a home-made projector will help you watch movies and photos on the big screen (however, don't expect super-quality) and make presentations.
Desktop PC or Quiet Server

If your laptop is in poor condition, but the insides are still alive, then you can make a desktop PC or a quiet home server.
Tablet

Turn your laptop into a touchscreen tablet. Sounds incredible? Not at all! In fact, there are several ways to do this. Here is just one of them.
External monitor

If the laptop itself is to be written off, but the monitor is still nothing, then separate the case from the display and use the latter as an external monitor. For example, as an additional monitor of the main PC.
Spare parts
 flickr.com
 Another option (when the laptop is sooo bad) is to disassemble it for parts. For example, a hard drive can be turned into an external storage device using a solid case.
Sale
 flickr.com
 Let's end with the obvious - sell your old laptop, even if it's broken. As you can see from the previous examples, the world is full of wizards for whom modding and reworking computers is not just a hobby, but something akin to a sport or lifestyle. You never know what they are up to and why they need your battered laptop. Just remember to format your hard drive before listing your laptop on eBay.
lifehacker.ru
What can you do with an old laptop? 10 practical ideas
An outdated and unproductive laptop lying idle? Will not work! Find out what you can do with your old laptop and how to get the most out of it!
1. Old, but smart: giving your laptop a second life
Let's start with the most obvious: before you make something out of a laptop, you need to try to turn it on. Not all old laptops will pass this test. Even if a year ago, when you plunged the laptop into the depths of the mezzanine, the machine worked properly, this does not mean that it will work now. Failure to start the laptop will entail repair or replacement of individual parts. However, you do not have to bother with this and do otherwise. How exactly - read on.

If you still managed to start the laptop, then the first thing that it will need with a 99% probability is cleaning the internal iron from dust and replacing the thermal paste. Depending on how fast you want your laptop to perform, you will need to install an operating system that conserves the computing power of the machine. For example, Lubuntu or Chromium OS. As a last resort, Windows XP will do.
Well, now you have a working laptop that can be used for its intended purpose or turned into something less functional.
2. Using an old laptop: TV, kitchen computer, arcade machine
If the laptop is so old that it can't handle games and other modern tasks, then it can be turned into a highly specialized device aimed at tasks that do not require high performance. For example, an outdated laptop will make a good alternative to a small wall-mounted TV, and you can do it yourself:
If you or your beloved woman love to cook, then make a kitchen computer for her, which will store recipes. It's good if the device still has Internet access. Also, do not forget about the program in which the timers are set. Here's an example of such a homemade car:
If you are an avid old-school gamer who remembers the era of 8-bit games, then why not build an arcade machine yourself?
Or just use your old laptop as a digital photo frame hanging on the wall:
3. Making an emergency hotspot out of an ancient laptop
Even if you bought a router and set up Wi-Fi, this does not mean that wireless Internet is available in all corners of your home. Sometimes thick walls and concrete floors, as well as the distance to the Wi-Fi distribution point, interfere with the signal. So why not turn your old laptop into a hotspot instead of spending money on a signal booster?
Here's how it's done:
4. Turning a weak laptop into a media center
Do you like watching movies? Then, having an old laptop, a couple of free hours and a little patience, you can turn an outdated car into a completely modern media center that can be connected to any TV. A training video will help you with this:
5. A short throw projector from an old laptop
If you don't have a TV at hand, then you can do without it by arranging watching movies right on the wall! It is very easy to make a projector from a laptop. This will require a plastic lens, some tools, and straight arms. All this will cost you only $ 5! Detailed instructions on how to turn a laptop into a projector are here:
You can even do without a cardboard box:
6. Old laptop as cloud server and PC
Indeed, why not use a legacy machine as a server? Moreover, to create your own server, you do not need to have system administrator skills. It is done like this:
And if a laptop lacks computing power, then why not build a PC on its basis using a motherboard and other hardware?
7. How to make a tablet from an old laptop
Even if your laptop does not have a touch screen, it is possible to turn it into a tablet. To do this, you can use a purchased frame to turn a regular monitor into a touchscreen one like the Zmartframe. As a result, you will get something like the following device:
And if you don't want to spend $ 100 on a frame, then from the available tools, collect a stylus for the laptop screen:
8. Making a monitor out of an old laptop
If the hardware of your ancient laptop is broken or outdated so much that even the simplest programs slow down on it, why not use the laptop display as an additional monitor for a stationary computer? True, to turn the display into a beautiful monitor, you have to tinker a little:
Don't need a second monitor? Then convert your old laptop screen into a full-fledged desktop TV:
9. Power bank from a broken laptop
If your old laptop turned out to be unusable, then take it apart. Some laptop components can be adapted to upgrade your PC. For example, install a hard drive from a laptop into the PC system unit.
And from the battery you can make an excellent portable charger (Power bank). Perhaps this power bank will not be as compact as the purchased one, but in terms of battery capacity (and, therefore, in the number of charges for your smartphone or tablet), it is in no way inferior.
And here's how to make a power bank from a laptop battery (you need a soldering iron and some knowledge of electronics!):
Don't feel like soldering and assembling things from an outdated laptop? Then there is only one thing left ...
10. If nothing can be done, then the old laptop should be sold
Why should an unnecessary laptop sit in dust, waiting for better times that never come? Instead of keeping extra junk around the house, sell it! And it doesn't matter how: in whole or in detail. You will be surprised, but your old laptop will be bought very quickly.
And if the offered price seems low or you have some memories associated with this laptop, then leave it with you for 50 years: exactly then your old laptop will receive the status of antiques and it will be possible to sell it at a high price. Just sell it not as a laptop, but as a nutcracker for nuts:

digistream.ru
How to make a few useful things out of a broken laptop

If you have a non-working laptop lying around somewhere, do not rush to throw it away or sell it to buyers for a penny. Almost any laptop can do a few useful things that will still come in handy. Earlier we wrote how to get an LCD matrix out of a laptop and make a monitor with a TV function out of it, and today we will tell you how to use other valuable components - a hard drive and a disk drive.
 If your laptop's hard drive is working properly, you can make a portable drive out of it, which connects to any computer via a USB port and does not require additional power. To do this, you need to purchase a special case or adapter. The most important thing is to choose the right box. Look at which interface the hard drive is connected to - SATA (on the left in the photo) or IDE (on the right) - and select the case with the same connector. In the case of a SATA connection, you still need to decide what speed you need - medium via USB 2.0 or high via USB 3.0. The connection standard is specified in the specifications of the box, but some sellers (for example, on AliExpress) can lie, so it is better to clarify this point with them separately. Empty boxes for hard drives are sold in computer stores and on the Internet. In China, they cost from 150 rubles with free shipping.
Assembling a portable hard drive is very simple: disassemble the box, insert the hard drive into it and connect it to the computer with a regular USB cable. If the disk is detected, then everything is fine, you can use it. In the event that the disc is not recognized, you need to make sure that it is working properly (the first sign is that it makes a little noise, and you can hear the plates spinning inside). You may have to use a special disk program and format it. If all else fails, then either the disc itself or the box is faulty.  In the same way, an external "cutter" can be made from a laptop CD or DVD drive, for this, again, an external box is required. As in the case of a hard drive, the drive can be connected via the IDE or SATA interface, and the choice of box will depend on this. A case for an external disk drive is a rather exotic product, you will hardly find it in local computer stores, but on Ebay, AliExpress and other similar sites they are presented by many sellers and are relatively cheap.

The rest of the laptop components (case, motherboard, RAM, battery, fan, keyboard, cables, connectors) are unlikely to be useful to you, they can be thrown away or sold, even if they are cheap. It is better to leave the power supply unit, it is expensive and can fit another laptop or be useful to you in the future.
www.iguides.ru
5 Ways to Give a Second Life to an Old Laptop - Themes, Hardware
 Most people have old, broken laptops lying around that they don't need at all. Some manage to fix them, and some do not. And today, especially for those who have an old laptop lying around, I will tell you about 5 ways to give a second life to an old or broken laptop.
 1. Additional Wi-Fi hotspot
If your house does not catch Wi-FI in some places, then you can make your old laptop an additional Wi-Fi access point. This method is good, because sometimes there are cases when you urgently need the Internet in the far corner of the apartment.  2. External Monitor If the laptop does not work at all, and the external monitor is yes, then you can simply separate the case from the screen and use the latter as an external monitor. An external monitor from a laptop can be used as a secondary monitor for your main PC.
  3. Spare parts Another way (if your laptop is too bad) is to disassemble the old laptop for parts. But that's not all, the hard drive, thanks to the solid case, can be turned into an external drive.
  4. Laptop on the Wall If you want to use your broken laptop for its intended purpose, you can hang it on the wall as a kitchen PC or an entertainment board for the gym. This option is good for those with a broken keyboard or CD drive.
  5. Short Throw Projector If you like large screens, then this method is for you. The symbiosis of an old laptop and a homemade projector will give you different movies, clips, etc. It will also be possible to make presentations.
  Thanks to user Ivon for the title picture.
trashbox.ru
Plywood monitor from an old laptop
Probably, many hackers are faced with the fact that computer hardware is accumulating at home. Something is kept in reserve, something for future experiments, something for details. So for 4 years I had a disassembled laptop from HP, which died in an unequal struggle with temperature and careless repairmen. But sooner or later, cleaning comes to the mezzanine, where useless iron is stored. Most of the obsolete, broken and simply useless hardware is sent to another box, which says proudly "FOR RECYCLING". However, the saved matrix of the laptop made me remember a long-standing idea - to turn it into a fully working monitor.

Then, 4 years ago, I didn’t know what to do with it, and my acquaintances in electronics kept saying that it’s cheaper to buy a new monitor, and not bother with finding the right board. In the end, it turned out that way, but, heck, ordering a new monitor will not replace the pleasure of the design and assembly process. However, more on that below. A short run on Google didn't give me much results. This is now, and articles on Habré about it are found, and useful links have appeared on the forums, and then on most forums such questions, to put it mildly, were helpless. Yes, I even managed to find a circuit for soldering the necessary board with my own hands, but it was not for me. And only in one article, forgotten by all, I found the answer and went to Ebay. A short search, a choice of a seller and prices and a sea of doubts. These Chinese controllers seem to be universal, but it was scary to order a joke from the other side of the planet for 50 bucks, and therefore I wrote a letter to the seller, to which I attached images of the matrix and its serial number. And the cherished package hit the road. She quickly crossed the border and disappeared ... The parcel went on for more than two months - not a record, but at that time she survived the termination of reception at customs, a fire at the warehouse of the Russian Post, visited Samara, returned to Moscow and finally came to me. Naturally, you should definitely try the new thing. However, I apologize to the readers for the quality of some of the photographs that you will see below. The structure connected to one of the inhabitants of the mezzanine:

The resulting image:

So, it's time to come up with a corpus. At that time, and this was a little less than a year ago, there was an old 19 "4: 3 monitor on my desk (I did not plan to replace it with a matrix monitor, after all, the viewing angles leave much to be desired), so I was inspired by it. And this meant a frame framing the monitor, a thick case, a stand (although even then there were thoughts of a bracket). The frame was also needed to hide some of the metal parts of the matrix itself. Now about the choice of the material itself. While I was waiting for the controller, I I looked through DIY posts on Habré.There were plastic and even cardboard painted products, but there were also works of art made of wood and brass, made and painted with love and skill. a simple reason - a wardrobe, a table, a shelf, platbands and even a window sill were made from it in my room.2 semesters of engineering and computer graphics were enough for me to draw a drawing in 2 projections from size without any problems mi. The drawing depicted only the front frame, where the matrix itself was placed. Then there was a drawing of the bottom, with cutouts for ports and buttons. The side walls were cut from blanks and glued only later, and the back cover was just a rectangle of the required size. How the side walls were glued (the lower part is also visible here):

To be honest, this whole project took about a year. Sometimes we had to wait for parcels, sometimes there was simply no time or desire, which made unfinished workpieces and a box with "iron" and wires gather dust on the table, sometimes it took time to make new plywood workpieces or polish them. All the plywood blanks and the grinding of the finished product were helped by my father, who is closer to working with wood than to me (furniture in my room: an individual project, factory production, manual assembly). Reading Habr, I came across a post about the workplace of hangers and there, in the comments, I first learned what "touch screen overlay" is. "Who doesn't want to poke a finger at the monitor for a reason?" - I thought. And again went to Ebay. What I saw did not please me, and I did not want to wait. I was ready to give up this venture, I did not want to take risks and order rather fragile glass through the delivery by the Russian Post halfway around the world. But then I came across an online store touchbaza (not an advertisement), where I found a touch panel of the size I needed. Here and delivery by a forwarding company, and a 13 "panel in a box from under the monitor between the foam pads. By the way, this is how the matrix looks on the back, inside the monitor, and the tail on the side of the touch panel:

The rest was simple, first we place the boards, fixing them on aluminum strips screwed from the inside:

On the matrix side, pads like the ones that are glued to the furniture underneath are glued to the strips to prevent damage to the flooring.


Then came the choice of the bracket. A stand was originally planned, but I wanted the monitor to be movable. However, the wall brackets were surprised by the lack of mobility, which, however, is quite logical. The price for more or less mobile ones seemed prohibitively high. Desktop, for the most part, are fastened with a clamp, which was unacceptable due to the design of the table. Finally, I opted for the Kromax office-7 bracket, which met all my requirements and had the ability to mount through the tabletop, for which I had to drill an additional hole in it.

 So, the monitor is on a bracket, it turns, moves, goes down and up, tilts. We connect 3 wires: power, VGA and USB cable from the touch panel. By the way, you need an application for it that allows you to select the monitor where it is connected and adjust the positioning accuracy, although the application itself is clearly not too fresh and has obvious signs of translation, no problems were noticed when installing and using it on Windows 8.1. (The app is downloaded from the store page and has versions for MacOs and Linux as well.) That could end the story, but there is one more point worth mentioning. In addition to my main monitor, a projector is connected to the computer (it is very convenient to watch movies while lounging on the couch). However, when I tried to use both monitors and a projector at the same time, I came across the fact that on my video card, despite the presence of 3 outputs, only 2 output devices can be used at the same time. A kind of hello from nvidea with a slight smell of capitalism. At the same time, I had to carry out an unscheduled upgrade of the computer. Latest monitor photos:
 Small conclusion. It turned out that using a second, albeit small, monitor is quite convenient: the design of some applications is adapted for "pointing fingers", in portrait mode it is very convenient to open text files, and it is much more convenient to watch a movie while doing something else along the way on a small monitor than turning towards a huge screen. Of course, some imperfections remained: I still have not varnished the monitor, and the experience of use suggests that it was possible to come up with a slightly better shape of the case, besides, I still have to use a pencil to press the buttons - no I have not come up with an additional mechanism for this.
 And sometimes I look thoughtfully at another whole, but for 3-4 years as a deceased laptop, with a 16:10 format matrix (I thought it was 4: 3, thanks to DodgeViper. China has not run out of controllers yet, and touch panels of the right size I saw it on the site.
If you have an old laptop and an ownerless monitor lying around at home, then by adding a few more computer parts, you can get a full-fledged computer in the form of a monoblock. More details on how to do this will be described in this article, but for now we will consider the list of materials and parts necessary for assembling the monoblock.
Materials, parts and tools:
-old laptop, the author used Lenovo r60
- plexiglass sheet
-monitor stand, in this case from Samsung
-hot glue
-screws, several pieces
-screwdriver
-drill
Characteristics of the received computer
- Intel dual-core processor with a frequency of 1.83 GHz;
-512 MB of RAM;
-old 160 GB hard drive;
-recordable DVD-rom;
15.4-inch screen

Description of the monoblock assembly.
Strangely enough, the author decided to start assembling the monoblock pc by disassembling the laptop. The laptop screen has been completely retracted, the disassembly method only depends on your laptop model. On the back of the screen were marked the places in which the holes should and will be located, intended for the inputs and outputs of connected peripheral devices, as well as the internal parts of the disassembled laptop. Then holes were drilled for each mount.

In order to secure the main parts of the laptop, including its motherboard, the author used screws. He advises everyone who will try to repeat this to be extremely careful and careful when fastening so as not to damage the board and other parts. For convenience, it was decided to place the connector for the computer power cable at the bottom of the monoblock structure.

Then the screen was installed back into the monitor holder, which is made of plastic.

The author purchased 2 mm plexiglass. A sheet of plexiglass was cut in such a way that the resulting piece was the size of the monitor. It was also fixed with screws to the plastic case of the monitor, this is clearly seen in the photographs.


Another important nuance is that it is necessary to leave a gap between the plexiglass and the motherboard. This is necessary so that the air circulates freely inside the structure and the computer boards do not overheat. Plastic parts were used to create the gap.


The result is a monitor, on the back of which the filling of the computer is fixed. The author installed a kind of candy bar on a Samsung monitor stand. The stand was also fixed with screws to the plexiglass sheet.

In the future, the author plans to make some modifications and modernizations of the monoblock.

Development and installation of a push-button system for turning on and off the computer. Initially, this was hampered by the peculiarities of the scheme of this Lenovo laptop model, so the author preferred to postpone the solution of the problem until later. Naturally, the computer can be turned on and off, but this is done using the keyboard.

For a more pleasant appearance, you can make a backlight around the rear wall of plexiglass, but for this the author needs more knowledge in electronics and practice of soldering skills. Other work on the design and stylization of the monoblock structure is also planned.
If you have a non-working laptop lying around somewhere, do not rush to throw it away or sell it to buyers for a penny. Almost any laptop can do a few useful things that will still come in handy. Earlier we are how to get an LCD matrix out of a laptop and make a monitor with a TV function out of it, and today we will tell you how to use other valuable components - a hard drive and a disk drive.
Winchester

If your laptop's hard drive is working properly, you can make a portable drive out of it, which connects to any computer via a USB port and does not require additional power. To do this, you need to purchase a special case or adapter. The most important thing is to choose the right box. Look at which interface the hard drive is connected to - SATA (on the left in the photo) or IDE (on the right) - and select the case with the same connector. In the case of a SATA connection, you still need to decide what speed you need - medium via USB 2.0 or high via USB 3.0. The connection standard is specified in the specifications of the box, but some sellers (for example, on AliExpress) can lie, so it is better to clarify this point with them separately. Empty boxes for hard drives are sold in computer stores and on the Internet. In China, they cost from 150 rubles with free shipping.

Assembling a portable hard drive is very simple: disassemble the box, insert the hard drive into it and connect it to the computer with a regular USB cable. If the disk is detected, then everything is fine, you can use it. In the event that the disc is not recognized, you need to make sure that it is working properly (the first sign is that it makes a little noise, and you can hear the plates spinning inside). You may have to use a special disk program and format it. If all else fails, then either the disc itself or the box is faulty.
Disk drive

In the same way, an external "cutter" can be made from a laptop CD or DVD drive, for this, again, an external box is required. As in the case of a hard drive, the drive can be connected via the IDE or SATA interface, and the choice of box will depend on this.
A case for an external disk drive is a rather exotic product, you will hardly find it in local computer stores, but on Ebay, AliExpress and other similar sites they are presented by many sellers and are relatively cheap.

The rest of the laptop components (case, motherboard, RAM, battery, fan, keyboard, cables, connectors) are unlikely to be useful to you, they can be thrown away or sold, even if they are cheap. It is better to leave the power supply unit, it is expensive and can fit another laptop or be useful to you in the future.


