Select the image that you would like to "screen", and simultaneously press the buttons " Home"(Centered below the screen) and" Power "(located on the upper edge of the case). Then release them immediately.
You will hear a characteristic sound comparable to a shutter release on a camera. The screenshot on the iPhone will be saved in standard application"Photo" - you can find him in the gallery last in the queue. Image format - png.
Pay attention to these aspects:
- Do not hold down the "Home" and "Power" buttons, otherwise you risk making a "hard" restart of the smartphone.
- By taking a screen in this way, you are photographing the whole the screen, not any part of it. If you need to "capture" part of the screen, it is better to use special utility or the built-in photo editor.
The described method of creating screenshots is relevant for everyone iPhone models, except for the very first one, as well as for iPad and iPod.
How to make a screen if the button “ Power»?
You can make a screen on an iPhone without using mechanical keys- for this you need to use the function " Assistive touch "(Which many users, alas, do not even know about). Proceed like this:
Step 1... On the device, follow the path " Settings» — « The main» — « Universal access"And in the block" Physiology and motor skills"Find" Assistive touch».

Step 2... Activate the toggle switch opposite " Assistive Touch " and you will see a transparent round button appear on the screen.
Step 3... Click on the transparent button - the following menu will appear:

Step 4... Select " Apparatus", And in the next submenu -" More", And you will find yourself here:

Step 4... Click " Screenshot", And the screen will be made. However, the program menu " Assistive touch"You will not see in this image.
What if you only need to take a photo of a part of the screen?
In this situation, there is a way out: you can make a screenshot of the entire screen and then crop it using the built-in photo editor. This is done like this:
Step 1. Find the picture you want in the photo gallery. For example, this one will do:

Step 2... Click the " Change" in the upper right corner.

This will take you to the photo editor mode.
Step 3... In photo editor mode, select the last tool in the bottom panel. Unfortunately, it will not be possible to illustrate this process - the iPhone will not "screen" the photo editor options.
Step 4... Crop the picture and click “ Save"- the corrected image will appear in the gallery. From the initial picture, according to our example, we got this:

Conclusion
The presence of the function " Assistive touch"And the built-in photo editor - another confirmation of how attentive the developers are to the problems of users. For situations where Android cannot do without installation third-party software(for example, if you need to cut out an image), the iPhone will cope with integrated software solutions.
Instructions
To extract from random access memory, follow these steps: "Start - Programs - Accessories - Paint". Entering the processing program Image Paint, click Paste, or hold down the Ctrl key while clicking the V button.
After committing necessary operations v graphics program a screenshot will appear on the worksheet as. Select the command "File - Save As" and in the corresponding field enter the name of the file using english letters or numbers.
Find the "Attach files" button directly under the text you wrote. Click on it and in the general list of files select the saved screenshot... Click Open. And using the "Send" button send the picture to the right address.
For processing and saving screenshot You don't have to use Paint alone. The necessary actions can be performed in absolutely any graphics program installed on your computer.
Sources:
- Solo on the keyboard

Instructions
Make sure the desktop displays exactly what you want to capture: background picture with shortcuts, a specific folder, dialog box or desired web page, press the PrintScreen button on your keyboard. The desktop picture will be copied to the clipboard - a kind of temporary storage of information. Now you need to place it in separate file.
For this, it is better to use graphic editors. If you do not plan to further edit the image, you do not need to use professional programs like Adobe photoshop or CorelDraw, will suffice simple application Paint.
Run the appropriate graphics editor and create a new canvas by choosing New from the File menu. If you know the resolution of your monitor, immediately specify desired parameters canvas in the "Height" and "Width" boxes. In some applications, a blank canvas is created automatically.
Paste your image from the clipboard. To do this, select the "Paste" command from the "Edit" menu or use the Ctrl + V (Shift + Insert) keys on the keyboard. If a request window appears asking you to increase the canvas size to fit the screenshot, answer in the affirmative.
Save the file in one of the graphic formats: .jpg, .jpeg, png, .gif and the like. To do this, press the combination Ctrl keys+ S or choose Save from the File menu. A new dialog box will open. Select in it suitable extension for the file, give it a name and specify the directory to save. Click the "Save" button.
There are also special programs for capturing images from the monitor screen, such as Quick Screen Capture or Fraps. Install the application on your computer, run it and use hotkey specified in the program in order to take a screenshot of the desktop. Advantage similar applications lies in the fact that all screenshots are immediately saved in the format of graphic files in a folder you specified in advance.
Related Videos
note
If you do not have a graphical editor, you can also paste a screenshot from the clipboard into Excel workbook, and in Word document... However, in this format, they cannot be edited or uploaded to photo hosting sites.

How to take a screenshot on iPad
So, you want to do with a funny correspondence, an interesting frame from a clip, a funny character from a game, or just important information... Everything is very simple.
You need to hold in your hands and press two buttons at the same time. The first button is the one you click on when minimizing applications. She is the only one that is located on the front. The second button is the one that turns off the device. It is located on the other side of the first button, opposite the socket and next to the camera.
By pressing these two buttons at the same time, you will hear a characteristic click, and ipad screen turns white for a split second. This will mean that you are ready, and you can use it. If you want a movie or video recording, it is better to pause it, having previously caught the frame you want. In this case, you are guaranteed to receive a pre-planned image.
Finished shot screen will be stored in your photo album along with the photos saved and taken with your tablet's camera. To access it, you need to click on the "Photo" icon, which by default is located in the bottom row of the screen iPad tablets.
Taking screenshots on iPads is much easier than on computers.
Editing a screenshot on iPad
You can edit the finished screenshots before sending or publishing. For example, you need this frame to get extra details out of it. You can do this right in your photo album. To do this, you need to press the "Change" button, select the "Crop" item and then select the one you need, and then save the resulting image.
It should be borne in mind that the photo being cropped is not irrevocable. If you want, you can restore the original screenshot. If the trimmed part contains some secret information, it is better to use third party program to edit images. There are a lot of such applications in App Store.
Also in iOS 7, you can apply filters to images, including screenshots, right in the album. Photo enhancement and red-eye function are also available. Of course, you can also rotate the photo there.
Directly from the album, you can send a screenshot by e-mail(if you have configured mail client), via iMessage, Facebook and Twitter.
To expose the image additional editing(for example, underline, circle, or apply additional filters), you should use an imaging application. The App Store offers a variety of both paid and free apps.
For example, you can use the Aviary application, which allows you to perform many operations with images - from cropping and applying frames, to applying filters and creating memes.
It is possible to take and edit a screenshot using the combination of 2 keys and the built-in graphic Paint editor... Press Ctrl + PrintScreen to copy the screenshot to the clipboard and launch Paint. Create new file command "New" from the "File" menu and press Ctrl + V to insert a snapshot.
In Paint, you can edit the screenshot. Using the selection tools, mark the selected area of the image and click inside the selected area right click mice. V context menu indicate required action... If you want to save a piece of an image as graphic file, choose "Copy to file". In the new window, specify the path to the folder where the file will be stored (by default, "My Pictures"), and its name.
If you use the "Copy" command, the fragment will be loaded to the clipboard. It can be used to insert into a new image. The Cut command also loads the selected portion of the picture into the clipboard, but removes it from the original image. A white background remains in place of the cut-out fragment.
Individual parts of the screenshot can be marked to attract attention with the Rectangle and Ellipse tools. Choose the highlight color on the palette. In addition, Paint provides painting tools such as brush, pen, and spray. With their help, you can draw shapes like an arrow and more complex ones, if you have experience with this graphic editor.
You can add a caption to the screenshot. To do this, click the letter "A" on the toolbar, select the appropriate color on the palette, font type and size on the property bar, and enter the text.
Lightshot program
Very easy to create and adjust screenshots free program Lightshot. Download it from the manufacturer's website and install. After that, it will start automatically when you turn on the computer. Its icon is in the tray.
When you need to take a screenshot, press the PrintScreen key and circle with the mouse desired area on the screen.
A toolbar appears along the vertical side of the frame, with which you can mark the details inside the selection with a marker or a colored rectangle; draw something with a pencil; put a pointer in the form of an arrow; make an inscription. You can undo actions by clicking on the arrow.
To resize the selection, drag the side and corner handles on the frame. The selection can be moved to another place by holding it with the mouse.
Along the horizontal side of the frame appears command bar... Using the buttons located on it, the selected fragment can be loaded into the clipboard, saved as a graphic file, printed, found similar images on the internet, etc. It is not difficult to understand the purpose of the buttons, since when you hover the cursor, a tooltip appears.
So the screenshot iPhone screen easy enough to do. This manual is suitable for those who have Iphone 6 / 6s, Iphone 5 / 5s, Iphone 4, as well as the latest Apple version Iphone. First, of course, you need to turn on the phone. Next, find on your phone what you want to screen.
On the front panel of your "apple" phone is the main round button called "Home". When the device is turned on, a toggle switch is used (button with right side top). Now click on "Home", hold it for a few seconds together with the power / lock button (top right). If you did everything correctly, then you will hear a characteristic sound - click, you will see White screen... This means that you have successfully taken a screenshot of the screen!
Where can we find this screenshot now? It's simple: open main screen, then go to "Photos", click on the "Camera photos" section (for example, for Iphone 6 / 6s this section has a different name - "Recently added").
Going into the folder with photos, you can find the Iphone print screen at the very bottom. During syncing, you can share the screenshot so it is inside your tablet or desktop.
To each iPhone user, maybe at some point you will need the opportunity to take a screenshot of the screen of your smartphone. However, not everyone knows how this can be done. This article will present several ways with which you can not only take a screenshot, but also record a video from an iPhone.
The iOS operating system, which the iPhones run on, has a built-in function for creating and saving screenshots taken from a smartphone. Moreover, this function is available not only on all iPhone models, but also on iPad and iPod touch. So, installing special programs for taking a picture is completely optional. The process of taking a snapshot without using additional programs, as follows:
- Choose what you are going to photograph.
- Press the "Home" buttons and the lock button (you must press two buttons at the same time).
- If you did everything correctly, a white frame will appear on the phone, which will disappear in a second, and a characteristic sound will also occur.
- The screenshot taken will immediately be saved in the appropriate folder.
How to make a screenshot of a video on an iPhone - too interest Ask... To begin with, many users don't see action buttons at all for this purpose. Also on iPhone you can
What to do if the required buttons do not work?
If you have damaged one or both of the buttons that are required to take a picture, you can configure the function of creating screenshots without pressing any buttons. This feature is also available on all iOS devices and does not require additional software to be installed. To enable the presented function, you must perform the following steps:
- Open the settings.
- Find and open the "General" item.
- Next, go to " Universal access».
- Find the "AssistiveTouch" function.
- Turn on the specified function.
- After that, a small button will appear on the iPhone screen that moves to any place.
- By clicking on the indicated button, you will open the menu.
- In the menu that opens, go to "Apparatus", then "More" and click "Screenshot".
Thus, using this method, you can easily take a screenshot without pressing additional buttons.
How to make a screenshot video from the iOS screen
 The video capture capability, which allows you to record video directly from the iPhone screen, is also automatically built into the smartphone. However, access to such a function appears only starting with iOS 11. To take a screen video using the built-in function, you need to do the following:
- Go to settings.
- Next, open Control Center.
- Here find and open the "Customize Controls" section.
- Select "Screen Recorder" from the displayed list.
- Close Settings and go to Control Center.
- A video recording icon will appear here.
- By clicking on it, a three-second countdown will begin, after which the recording will go.
If you did everything correctly, then during the video recording process, status line will turn red. To end video recording, you must click on the corresponding button, which is located in the control center. When you finish recording, the video will be saved in the Photos folder. Any user of the gadget should understand how to make a screen on an iPhone.
iPhone Screen Recorder
The presented program also allows you to take screenshots and record videos. However, this program is not built-in and must be downloaded and installed separately. Download iPhone Screen Recorder is available on the official website.
Step-by-step instruction video recording using the presented application:
- The first step is to install the iPhone. Screen Recorder on computer.
- After installation, open and activate the program.
- Now you need to connect your iPhone to your computer.
- To connect, open the control point on your iPhone and launch "AirPlay".
- Now you need to enable mirror reflection smartphone on the computer. To do this, in the menu that opens, click on the "Mirrors" button.
- After a while, the iPhone will connect to the computer.
- Now on the computer it will be possible to set certain settings video recording.
- After completing all the settings, start recording video.
Recording video and taking pictures using the presented application is possible only if both devices are connected to the same network.
Scrolling Screenshot - iPhone Apps
Often it is impossible to take a high-quality screenshot, since all the necessary information does not fit on the screen. However, solving this problem on an iPhone is not difficult at all, you just need to create long shot... This action is performed using special programs:
Tailor
Free and convenient application, which can be installed in the App Store. This program allows you to create and combine multiple images at once. With Tailor, you can easily screen long articles and correspondence, later combining them into one image.

Stitch & Share
One more free app for iPhones, with which you can take scrolling screenshots. You can install the presented program in the App Store. Combining several images into one, is performed in automatic mode... And also with this application you can hide a certain part snapshot.
Any user should understand how to make a screen on an iPhone. This function allows you to share correspondence or prove the presence of incoming / outgoing calls.
How to make frames for screenshots through the program - "Screenshot - Frame Maker"
The presented application is necessary for processing screenshots made on an iPhone. It allows you to adjust the image to a certain size. To do this, you just need to download desired screenshot into the application and specify the required permission.
Also, thanks to this application, you can immediately set the display location of the picture on the smartphone screen. Among the disadvantages of the application, it can be noted that maximum resolution images are limited by the screen size of the smartphone used.
Video "How to make screenshot on iPhone"
Today, in continuation of the topic, we'll talk about how to take a screenshot on an iPhone, iPad and iPod under the control of different iOS versions... Consider options for all occasions.
Universal way
This method is called universal because it works on the vast majority of Apple devices: iPhone 7, iPhone 6, iPhone 5, 5s, 4, 4s, 3, iPad, iPad mini and iPod Touch... The exceptions are first-generation iPhones, as well as iPod players Classic and Nano.
To "take a picture" of the screen of the "apple", it is enough to press the combination of buttons "Lock" plus "Home" on it, hold it for a second and release it.
On devices with touch button“Home” (iPhone 7 and iPhone 7 Plus), press down on the latter with moderate force. A weak touch will most likely not be recognized by the phone, and the screenshot will not work.
While taking a screenshot, the device emits a sound reminiscent of a camera shutter and "winks" with the screen (to be more precise, the screen turns white for a second - it simulates a flash). The finished photo is saved in the same folder with the photos taken by the camera.
Software alternatives
If universal method seems inconvenient to you or one of the buttons does not work on the device, you can take a screenshot in other ways: using the tool operating system- AssistiveTouch, or third party applications.
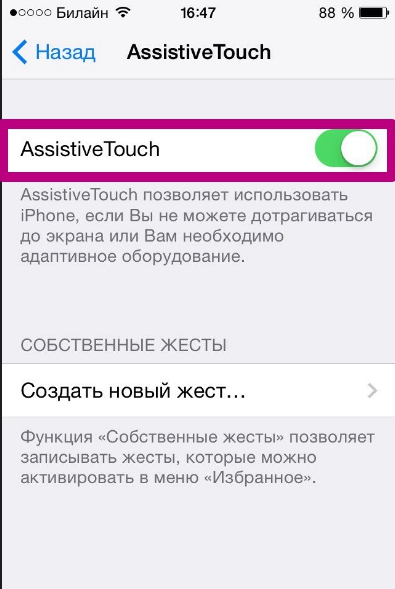
How to take a screenshot with AssistiveTouch
AssistiveTouch is standard function iOS, designed to control the device using gestures. It is inactive by default.
To enable AssistiveTouch, go to the settings of your iPhone or iPad, open the "General" section and then - "Accessibility". Next to "AssistiveTouch" (under "Physiology and motor skills"), check "Enabled".
When you do this, a floating AssistiveTouch button appears on the display (you can position it anywhere on the screen and move freely around it). Touching this button opens the menu. available actions, among which there is a command "Take a screenshot".

- it free extension mobile web Safari browser... With its help, you can take pictures of the entire page of the site opened in the browser, or only its visible part.

After installation, the program icon will not appear on the desktop - it will be hidden in the "Actions" section of the Safari browser. To activate the function of creating screenshots, go to the specified section and move the "Screenshot" slider to the "On" position.
As soon as the picture is ready, it will be immediately sent to the mini-editor built into the program. With this editor you can crop the edges of the image, mark the right places arrows and add text labels to the picture.
Awesome Screenshot is officially supported by devices that run under iOS control 8: iPhone 4s, iPhone 5, iPhone 5s, iPad, iPad Air and Air2, iPad mini, iPod Touch and others. IOS support 9, 10 and more early versions not declared by the manufacturer.
Activator from Cydia (for jailbroken iPhones)
Activator is another free app, or rather a jailbreak tweak for iPhone that allows you to take screenshots without the lock button. Rather, the creation of screens is not its main function: it simply gives the user the opportunity to assign this action, for example, to the "Home" button. And when "photographing" the screen, press only it. By the way, instead of buttons, this operation can be assigned to any gesture (swiping the screen, pinching, stretching, etc.) or movement (shaking the phone).
Activator officially supports iOS 9 (iPhone 6s) and earlier releases of the system. Support for iOS 10 has yet to be announced, but will likely be implemented soon.
How to take a screenshot on iPhone via computer
You already know that there are applications that are capable of capturing a picture of the display of a mobile device and displaying it on a computer screen. In the last article, you met with such an application for Android. Today is the queue apple gadgets, and the program about which there will be a speech is called Reflector.

Reflector uses the standard Apple technology- AirPlay, which provides wireless streaming multimedia from one device to another. For example, from an "apple" or "apple tablet" to the PC screen. It simply emulates an AirPlay receiver, even on devices that do not support this technology.
The function that allows us to get a screenshot from an iPhone or iPad is called "video replay" - a dynamic repetition of everything that happens on the display of the gadget in a separate window on the PC.
So, to "screenshot" the iPhone via Reflector, do the following:
- Install the application on your computer.
- Make sure that mobile device and the PC are connected to the same Wi-Fi network.
- On the iPhone (iPad), go to the "Control Center", open the "AirPlay" section and select the computer as the signal receiver. Activate video replay here (slide the slider to the “On” position).
- After these manipulations, a window will open on the PC screen in iPhone form or iPad, inside of which everything that happens on the display of the gadget will be displayed.
- Reflector has a built-in function for recording video from a mobile device (the "Start recording" command in the context menu), and to take a screenshot, you just need to freeze the frame and use any tool that is on your PC (for example, the Scissors application in Windows or the Alt + PrintScreen).
Reflector is compatible with all iOS releases starting from the fifth (these are iPhone 3GS, iPhone 4 and 4c, iPad first generation, third generation iPod Touch and more recent devices).
The Reflector installer comes in four flavors - for Mac OS X, iOS, Windows, and Android. The app is paid but inexpensive. The cost of one license is $ 14.99 (for PC) and about 500 rubles for mobile devices... Free of charge trial version works for 7 days, but even in this short period it will not be possible to use it. When recording video from the screen, the program displays its logo on its background, which cannot be removed without activation. Therefore, those who are determined to use it face some expenses or searches for old versions, where such an outrage has not yet happened.
Operating iOS systems, available on all iPhones without exception. You press a certain key combination, and everything that happens on the display instantly turns into a picture in your photo gallery. It is worth noting that screen capture works in all phone states (even in shooting or calling mode), except for off and sleep modes. This feature is one of the most useful and essential features of an iOS smartphone.
We choose desired image and instantly get a screenshot by pressing a couple of buttons
A screen (screenshot) on an iPhone may be needed for literally everything. To capture system error, then to send a message to the support service, save interesting moment from a game or video, to film what is happening during a video call, to save correspondence with friends or another web page - all this can be done using a screen. Unfortunately, not all owners Apple products know what a screenshot is and how to take it.
How to make a screen?

If you own an iPhone, then follow the instructions:
- select what you want to capture and remember that you can only make a screen from the entire screen, and you cannot select any specific area (there are special utilities for this);
- get ready to press two buttons at the same time: HOME (the round button in the middle, at the bottom of the front of the iPhone) and the on / off button (located on the top);
- press the buttons and release immediately.
It is important that the buttons are pressed simultaneously, otherwise the picture will not be taken. Do not hold the buttons - they should be released immediately, otherwise the system will kindly offer you to turn off the power instead of making a screen. If you followed all the steps correctly, the iPhone will emit a camera click sound and the display will momentarily glow with white light. If this does not happen, then try again.
Where can I find the saved image?
Screenshots are saved in the photo gallery by default. Select the main menu and go to the image gallery. The screenshot you saved will be at the very end of the list. Screenshots are saved in .png format.


