An email profile consists of email accounts, data files, and information about which email is stored.
What is an email profile?
Email Profiles - Use Outlook will be used to remember the email accounts with which and where the data for each account is stored. Each Outlook profile provides the following information:
What account information you need to use This information includes the username, display name, e-mail server name, and the password for the service account of your ISP.
Where email data is delivered and where is it stored In Outlook, deliver and store data either on an email server or a PST file to a file on your computer. This data includes rules, messages, contacts, calendars, notes, tasks, journals, search folders, and other options.
Outlook email profiles are stored in the Windows registry. When Outlook starts, it retrieves profile information from the registry.
Note: The icon " mail»In the control panel to access options for configuring e-mail for Outlook profiles. Icon mail will not be displayed if Outlook is installed and run the program at least once.
When you start Outlook for the first time, the Initial Configuration Wizard will guide you through the process of creating a new profile. The profile that is created in this way is started every time you start Outlook. Most people maintain only one profile, but sometimes it is useful to have several. For example, you might want to use one of the business mail merge profiles and the second profile for personal mail. Additionally, if the same computer can be done by other users, their accounts and settings may be stored in separate profiles that have different names.
You cannot use passwords to protect Outlook profiles. To protect your Outlook data from other users, you should use a password-protected Windows user account.
Important: You can't navigate with a profile to one email message in another running Outlook.
A baseline profile consists of one or more email accounts and file storage. An individual might have an Internet e-mail account, such as a POP3 account, and employees in an organization might have a Microsoft Exchange account. Accounts from other types (including IMAP4 and HTTP accounts) can be added to any profile and you can add additional file storage (for example, store old messages in the Archive.pst file). Sometimes additional services, such as fax and address book directories, may be included in the meeting.
Note: Although a profile can contain multiple IP type accounts, it can only contain one Exchange account.
Using one profile
Most people only need one profile. When Outlook is running for the first time, the first profile is created automatically and named "Outlook". Each time you start Outlook, this default profile is automatically executed. When you add or change email accounts, or include an additional PST file to use, you change your profile. You can change your profile at any time, but after it is first created it is impossible to change the name of the profile.
Profile change
Using multiple profiles
More than one profile is required in one of the following cases.
If you are using Outlook on the same computer, you can share access to other people you trust
For example, if you and your spouse have email accounts, each of you may also have a separate profile, each with corresponding accounts and settings.
If you are maintaining multiple Exchange accounts
If you need more than one profile, you can create an additional profile at any time and add the accounts and settings you want. When you switch from one profile to another, configure the email accounts and options that are available to you during your Outlook session.
In 2015, Microsoft presented the tenth version of Windows. It is fully compatible with a wide variety of devices: laptops, tablets, Xbox One consoles, smartphones, etc. It combines and improves the positive aspects of previous versions.
Windows 10 is, as always, user-friendly and has some common features with Windows 7. For example, the Start menu of these two versions is almost identical. Windows 10 starts instantly and reboots quickly. A big plus of the "tens" is the built-in security functions, which are much more than in previous versions. Another plus is the compatibility of the new Windows with a wide range of different software.
Windows 10 makes it easy to customize any email application and program.
Outlook
This email client has worked well with email. It is also a full-fledged organizer that provides calendar, notepad, task planner, contact manager functions.
Windows 10 supports all non-legacy versions of Outlook.
Today it is:
Outlook 2013 / Office 365
Outlook 2010+
Outlook 2007
Microsoft Outlook is familiar to many, but not everyone actively uses its full potential and functions. As a rule, office workers are only interested in some of its components. For some, this application helps to plan work and leisure, for others it is just a convenient calendar, and for others it is a functional database of business contacts. However, most people still use Outlook as their email client.
How to customize Outlook
In the main menu of the application, you need to find Account setup... An alternative option is to use Windows Control Panel... First we press the button Start(located in the lower left corner of the screen next to the taskbar), then select Control Panel... In the list that appears, click Mail. As a result, a window will open Mail setup - Outlook.
Then click on the button Accounts and get a list of current accounts. To add another one click on Create...

The next window helps us add our account. We do not change anything in it, leaving the "yes" radio button selected by default. Now we press Further. 
If you have already used the program, the main one will appear. working window. Select the option in the main menu File... Next, click the button for adding an account (next to it there is a green cross).

We indicate the following data:
-In the top box Your name- enter your first and last name
-In field Email address- the address of our mailbox
-In field Password- personal password to the mailbox. Next, we confirm it in Password verification.
 Another option is to automatically set up an account. In this case, we simply methodically press the button. Further, and the application will do everything for us, independently defining the necessary parameters for working with mail. After that, a window will appear informing you that the configuration was completed successfully. Click on the button Ready and we start working with the mailbox.
Manual tuning is of course also available. Just put the switch on Manual configuration or additional server types and press Further.

Now a window appears Service selection... In it, put the switch on POP or IMAP protocol.

In the next window, specify the parameters of the mail server for your account.
Important! Check the box Safe Password Verification (SPA) in no case should it, since otherwise it will become impossible to receive correspondence.


Now go to the tab Additionally and check the port numbers.
 Click OK and finish working with additional settings.
Also, users have the opportunity to verify their account. This is done by the function Checking your account setup... If your account is of the IMAP type, and you are using the correct domain, then when you check it, a warning window will appear, in which you should click on the yes button. Then we wait a bit while the settings are checked. If everything is in order with them, a corresponding message will appear.

However, errors may be found during the verification process. In this case, you will have to carefully check all the settings, since somewhere inaccuracy has been made.

If there are no errors, then the next window will display information that the account has been created. Now all you have to do is press the button ready and feel free to start working with your mailbox.

True, this same "last" window is at the same time the starting point for adding another account, which is eloquently evidenced by the corresponding option. If you need another account - then go ahead ...
The Bat!
The Bat! provides email correspondence. It compares favorably with other similar applications with good functionality and a user-friendly interface. Thanks to its merits, TheBat! has gained popularity in all corners of the world, and Russia is no exception.
This program is a practical solution to many problems that arise in the process of working with e-mail. It will greatly simplify the processing of e-mail.
The Bat! can work with a large number of mailboxes, and the number of letters that it can save is generally unlimited. This application has an excellent system for sorting and filtering emails and does an excellent job of dealing with spam. Its function of backup copies ensures the safety of letters. The built-in filter system of this application independently sorts and puts all letters into separate folders. The user can customize the sorting principles himself.
TheBat! has a built-in text editor for spell checker. In addition, this program works with templates.
The Bat! allows you to use different languages without restarting the program. To change the language interface of this program, you do not need to download its foreign language version or install a special plugin. Almost all languages of the world are built into it from the very beginning.
How to set up The Bat!
After we download and run the program, a dialog box like this will pop up

In windows under the general name Create a new mailbox we enter the requested information about incoming and outgoing mail and account information.


Then the main dialog box will open.

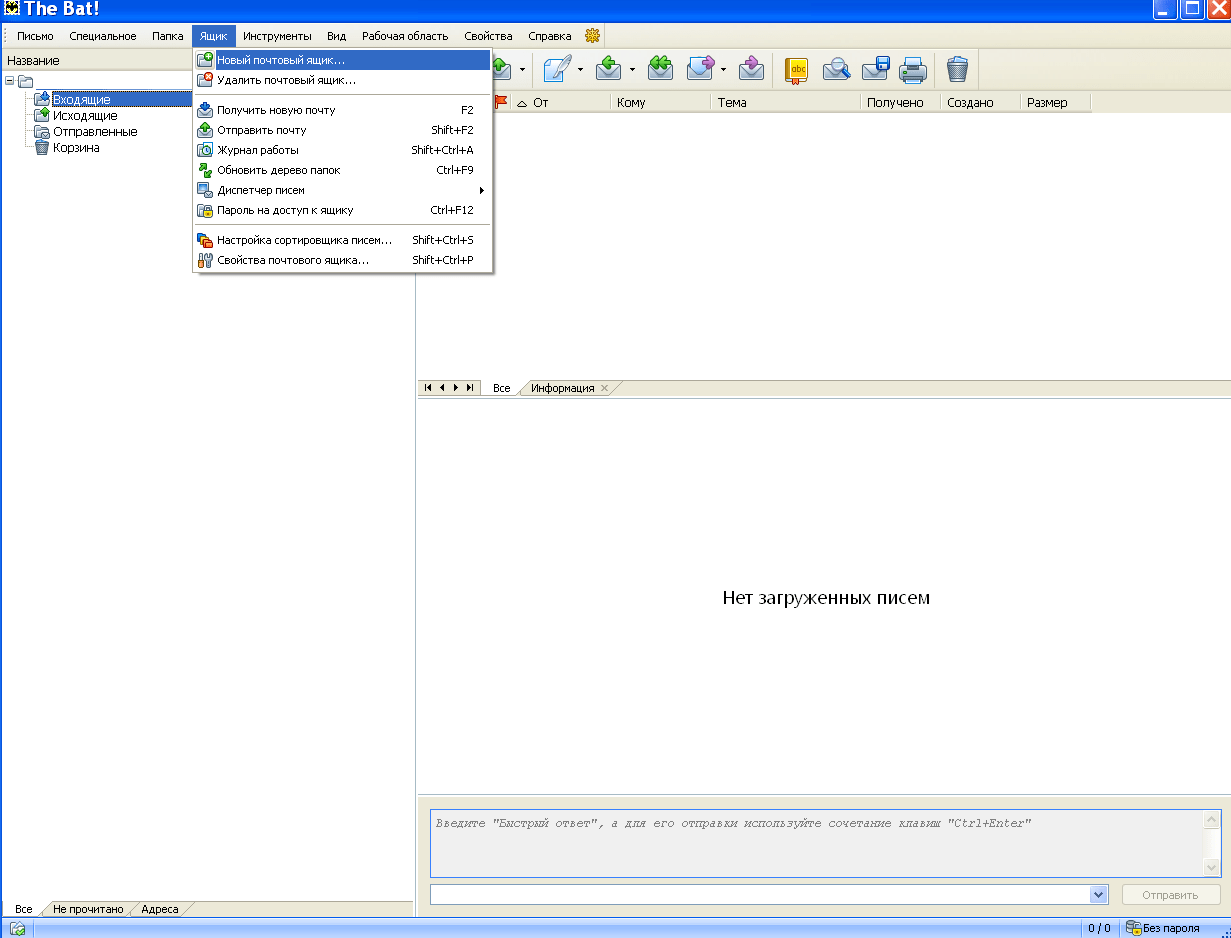
If you have multiple email addresses, you need to configure the appropriate number of mailboxes. The mailbox names should, of course, be different. In the top menu of the dialog box, select the option Box, then in the drop-down menu click on New mailbox.
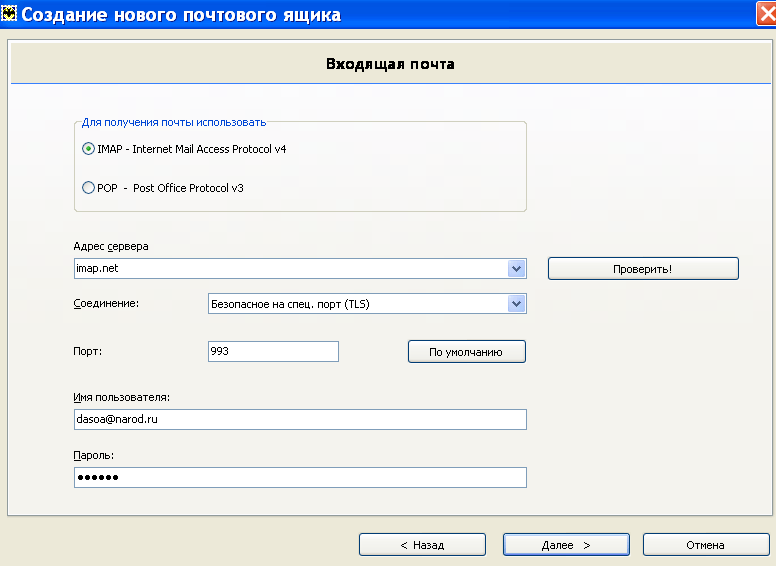
In the window for creating a new mailbox, follow the steps described earlier. Here you can select the protocol for posting mail.


Check the box next to the option My serverSMTPneeds authentication... Click further.
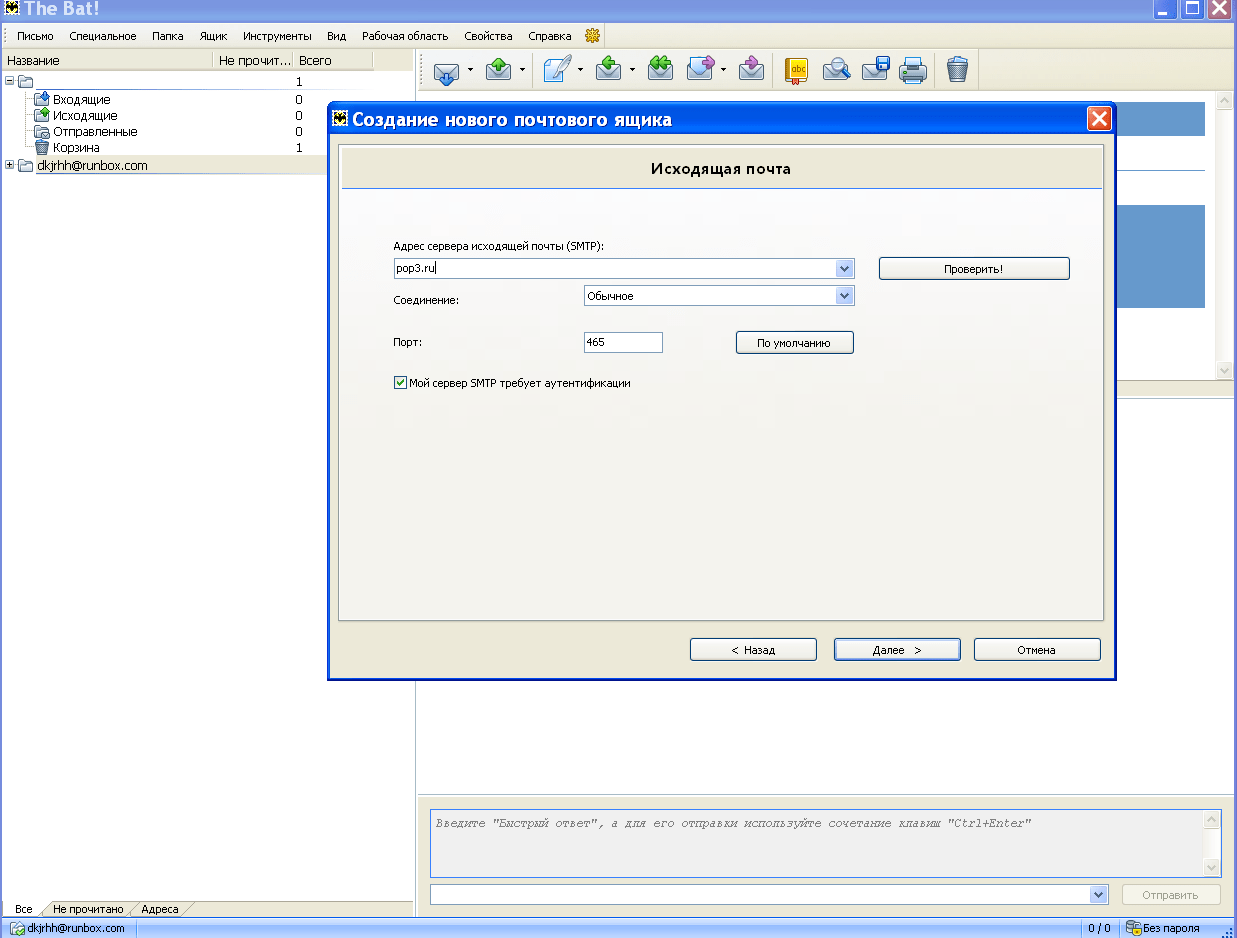
We press Ready.

In the window Mailbox properties on the left in the explorer select Transport and click on the button Authentication.

In the window that appears, put the switch on using the options below(i.e. username and password).

Now The Bat! got the necessary settings and is ready to go.
If you need to change the settings of an already created e-mail box, select the option in the menu Box, and then in the drop-down list, click on Mailbox properties.

Now we fill in all the fields of this window:
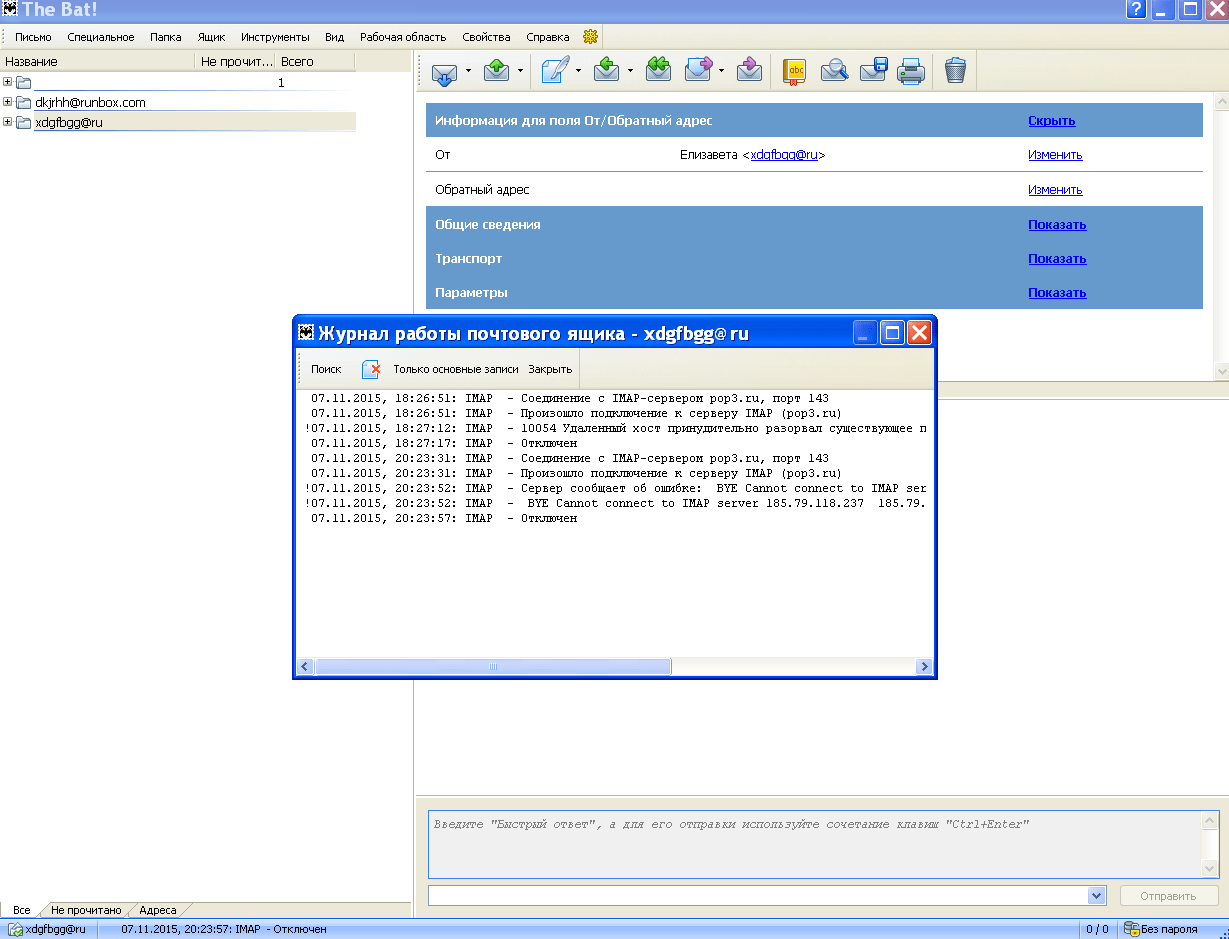
If you have any problems with receiving or sending mail, then you need to click at the top in the menu Box, then select from the drop-down list Work log.

If it is impossible to independently figure out what is the cause of the difficulties, then you will have to contact the technical support service.
Mozilla thunderbird
Mozilla Thunderbird is a modern program designed to work with electronic mail resources and various newsgroups.
It is an easy-to-use, highly functional, popular email client. It has many advantages and capabilities, so Mozilla Thunderbird can turn into an indispensable assistant for working with e-mail and newsgroups.
The program was created in 2004, and since that time it has been constantly modernized and improved. Her upgrade is regular and very creative. Over the years of its presence on the market, Mozilla Thunderbird has gained a loyal following, the number of which is constantly growing.
All the necessary tools and functions are built into this program, which make it possible to turn the work with mail into a comfortable and fruitful activity.
Mozilla Thunderbird's interface is fairly simple and highly customizable. It is very convenient to work with buttons - they can be easily added or removed. The configuration and appearance of the windows are also easy to change.
The application's spam filtering and detection system is also effective. All messages are sorted into specially created folders. The distribution criteria are date, subject and sender.
The HTML editor of this application allows you to reduce the size of the sent message several times. Moreover, the compression algorithms of this editor are an order of magnitude better and more reliable in comparison with the editors of similar mail programs. In addition, all letters received by the addressee are automatically converted into text with the font installed on his computer for easy and comfortable reading.
There are no problems with encodings, since the program supports all their varieties. Thanks to this, the display of letters from all other mail clients is absolutely correct. At the same time, emails created in Mozilla Thunderbird are fully compatible with other email programs. They can be read freely without resorting to any special steps.
The program can be expanded, since it has the ability to embed additional modules. Mozilla Thunderbird also supports theme changing.
How to set up Mozilla Thunderbird
The installation of the program is quite common.
The dialog box of the installed program looks like this:
You can go to local folders

And import from Outlook:

There are also Blogs and news feeds:

How do I set up an account?
In order to be able to receive messages, you first need to create an account. To do this, open the option in the menu Tools

In the drop-down tab, select Account settings.

Enter in the appropriate field account name.
We press Account Actions and in the drop-down list select Add mail account.

We enter in the appropriate fields all the necessary information (name, mail address, password) and click Continue.

Mozilla Thunderbird will try to determine account settings based on the portion of the email address that is behind @.
To stop searching, click Stop.
In the required fields, you must enter the appropriate name, a specific mail address and your access password. The e-mail account setup wizard will independently find the necessary settings by sending a request to the database.
If no problem occurs (that is, all emails are received and sent, and old emails are saved), but an IMAP account was accidentally created , then you need to delete it. To do this, Open Ying With Trumy - Account parameters. In the dropped out Account Actions select the action to delete the account. The problem has been resolved.

You can experiment with different arrangement of the control panel elements. For example, you can return the current settings to the "default" level by clicking on Restore in the window Toolbar settings.
Conclusion
All the applications described are equipped with a huge number of possibilities. As a rule, the average user is not familiar with most of them. And he loses a lot from this. Studying a program thoroughly is a very useful thing. Then working with it on Windows 10 will bring not only great practical benefits, but also instill in the user self-confidence. Having mastered one program well, in the future he will be less afraid of the numerous options and functions of various applications.
Instructions
How to set up all e-software default? Mail programs allow you to collect and store mail from all at the same time. There are many mail programs, for a start, learn the simplest ones built into Microsoft Windows. The Microsoft Office suite includes the Outlook Office utility.
So, start this email program on your computer. Select the "Start" menu, then "All Programs", find the line "Windows Mail". Create a new account, select "Accounts". A window will open in which select the "Add" button. Next, a window will appear where you need to select the type of new record, click "Email Account". Then enter the name that will be displayed in all sent letters, click "Next". In the next window, enter your email address, click "Next".
Take the following settings with care. Set up sending and receiving mail correctly. Enter the server names that you want to match incoming and outgoing mail.
For the server of incoming messages, specify pop3.mail.ru (if your mailbox is registered at mail.ru), add the same data to the smtp server. Add the name of any other mailboxes the same way. Check the box next to "Authentication", click the "Next" button.
In the next window, enter the mailbox name and password, check the "Remember password" box, so you don't have to enter it every time you open the program, click "Next". The next window with settings assumes setting parameters by default... If you do not want the program to download all messages from the server every time, select the appropriate checkbox. Do not waste extra traffic if there are a lot of letters in your inbox, configure the program to receive only new letters. Pay attention to the setting of the program parameters.
Select the "General" tab, set the most convenient settings. For example, the frequency of checking for new messages, the output of sound signals when messages are received. In the "Sending" tab, configure the format of your messages - HTML, or plain text. Reading tab settings for read messages, check automatic options. The "Remote" tab allows you to configure your Internet connection.
note
You can use any email program instead of Outlook Office.
Useful advice
After completing all the settings at your discretion, you can set the default mail, which simplifies the work with all mailboxes.
Sources:
- http://students.uni-vologda.ac.ru/pages/pm96/tal/d88.html
Despite the emergence of more and more ways of Internet communication, e-mail still does not lose its popularity. Even those users who do not have a constant need to enter into correspondence cannot do without an e-mail box, using it to register on sites, read newsletters and track the status of their network accounts. In short, Internet mail is an integral part of online life. If you have not yet managed to get a personal e-mail, it's time to find out where and how this can be done.
Instructions
It all starts with a mailing service. The largest providers of postal services today are the portals mail.ru, yandex.ru, rambler.ru and gmail.com. Internet is a virtual user, his account on one (or several at the same time) of such mail services. To get yourself, it is enough to fill out the registration form, the link to which is usually located in a prominent place, near the input fields of the "login-password" pair. To register, you will need to create a password and specify the desired account name - the part of the address that will stand before the "@" symbol. The official name of this symbol is English "at", but in everyday communication it is "doggy". Registered mail will look like your name @ portal name. Almost all portals provide owners with a lot of additional resources.
Everything is ready to use. But you can use virtual correspondence in different ways. The simplest thing is to access the mailbox directly through the web interface, that is, go to the selected portal, enter the username and password, and manage
6. Configure Mail settings on the Control Panel.
In this section, the author wants to consider one feature of the Microsoft Office suite. This package is so integrated into the Microsoft Windows operating system that even some of its settings become available only through standard Microsoft Windows services. In particular, many of the settings for Microsoft Outlook mail client accounts are available not in the "Tools" system menu, but on the "Mail" control ("folders") in the Microsoft Windows Control Panel. Below we will consider examples for an office suite Microsoft Office 2003 running under the operating system Microsoft Windows XP.
6.1. A description of the Mail control panel item.
The "Mail" control is available from the Microsoft Windows Control Panel (select from the "Start" menu -> "Control Panel" -> "Mail", see). If you did not find this icon on the control panel, then there are only two options: you either do not have the mail client installed (and then everything written below does not apply to you), or you need to switch to the classic view of the window in the control panel.
Rice. App003.07. The classic look of the Microsoft Windows XP control panel.
After selecting the "Mail" item in the Microsoft Windows control panel, the following window will appear (see). The following types of settings can be distinguished on it:
- setting up email accounts in the current configuration;
- setting for files used to store e-mail messages (for the current configuration);
- configuring email account configurations;

Rice. App003.08. Mail control dialog box in Microsoft Windows XP.
6.2. Customizing the "Configuration" control.
If you use several configurations ("profiles") of e-mail (for example, for work, for home, for entertainment), then you need to create and configure them. Each configuration stores information about the e-mail accounts and e-mail storage files connected to it.
Creation of a new configuration.
To create a new email configuration, you must:

Rice. App003.09. Configuration Dialog Box for Email Accounts.

Rice. App003.10. Dialog box for creating a new email configuration.
To create a copy of the account (with the previous settings), select the "Copy" button (see).
Choosing a default configuration.
By default, the current configuration is the configuration created first on this computer. If no other configuration is specified, it is this configuration that is loaded when you open the Microsoft Outlook mail client. You can change the default configuration by selecting the appropriate configuration in the "use configuration" combo box (see), or you can refuse the default configuration altogether. In this case, when you open the Microsoft Outlook 2003 mail client, you will be prompted for the required configuration.
Editing the configuration.
To edit an existing account, select the "Properties ..." button in the "Mail configuration" window that opens (see). The Mail Settings dialog box appears.<конфигурация>"(Where the field<конфигурация>- the name of the selected configuration, for example, Home), in which you can edit accounts and data files (see).

Rice. App003.11. The Mail Settings dialog box for the selected configuration.
6.3. Customizing the Accounts control.
In the "Mail Settings" dialog box, you can see two groups of settings for the "Mail" control: "Accounts" and "Data Files" (see). We'll look at the first one first.
When you select the "Accounts" button, the screen shown on the screen will appear.

Rice. App003.12. The Accounts dialog box in the Mail management tool.
Creating a new account.
To create a new account, you must select the first value of the radio button. This will launch the new connection setup wizard. First, the wizard will display the window shown in
Rice. App003.13. The first window of the New Account Wizard.
Using this window, you can select the following email servers:
- Microsoft Exchange;
- POP3;
- IMAP;
- HTTP;
- Additional types of servers (such as Microsoft Mail, etc.).
In your practice, you most often have to meet with the second and third types of servers. After setting the switch to the appropriate position, select the "Next>" button, and go to the window shown

Rice. App003.14. Window for entering e-mail parameters.
In this dialog box, you must enter all the parameters of the e-mail account, which were mentioned in section 4. You must enter all the parameters of the account, including the purpose of protocols and proxy servers (see the "Advanced ..." box).
After completing all the parameters, click the "Account Check" button. A dialog box appears showing the progress of checking the account status. If everything went well, green check marks will appear in front of all the items, and a test message will appear in your e-mail box.
Then click Finish to complete the wizard.
Editing account fields.
To make changes (edit) existing e-mail accounts, you must select the second value of the radio button: "view or change existing accounts". This will launch the Change Accounts Wizard. A view of its first window is presented.

Rice. App003.15. Window for viewing and modifying existing accounts.
In this window, you can do the following:
- Selecting a data file where your correspondence will be stored by default. To do this, select one of the mail database files from the "Place new mail in folder:" combo box.
- Change the order (using the "Up" and "Down" buttons) in which the e-mail boxes will be checked.
- Select the account on behalf of which all e-mails will be sent (button "Default").
- Finally, you can view and edit your existing email accounts.
To edit email data, you must:

Rice. App003.16. The main window for editing an email account.

Rice. App003.17. General tab.

Rice. App003.18. Outgoing mail server tab.

Rice. App003.19. Connection tab.

Rice. App003.20. The "Advanced" tab of the account editing window.
After that, you can again select the button "Account verification ..." to verify the changes made.
To exit the wizard, select the "Finish" button.
6.4. Customizing the Data Files Control
Creation of a new file with Outlook data;
To create a new file with the e-mail database, select the "Create Outlook data file ..." button in the account settings wizard (see). Then follow the instructions of the wizard.
To add a new file with mail data to the existing configuration, you must:

Rice. App003.21. Data Files Dialog Box.
Editing the properties of the data file;
To edit the parameters of a file with postal data, you must first select the desired file, and then - the "Parameters" button.

Rice. App003.22. Dialog box with parameters of the mail database file.
A dialog box will appear (see). In it you can change:
- the name of the data file under which it will be displayed in accounts;
- adding a comment to this file;
- password protection and data compression capabilities.
After changing these parameters, you can select the “Ok” button to accept the parameter changes.
Changing the default data file.
The change of the data file, where new e-mail goes by default, is carried out from the "Accounts" dialog box (see). To do this, select one of the mail database files from the "Place new mail in folder:" combo box.
Note. It is impossible to delete the mail data file, which is selected by default (the delivery location field is marked)! To remove this file from the database, you must first make another file with mail data the "Place of delivery".
The Microsoft Windows operating system comes with email capabilities available through Outlook Express as an email client. When and if Microsoft Office Productivity Suite is installed, Microsoft Outlook (full version) replaces Outlook Express in Windows. Outlook and Outlook Express enable users to send, receive, and manage messages, provide calendar features, and make it possible to keep track of contacts and tasks on a Windows computer. Whether you are using Outlook or Outlook Express, you can configure your email client and set options in the Mail preferences in the Windows Control Panel.
Instructions
- 1 Click the Windows Start button and launch the Control Panel.
- 2 Click on the "Mail" option. The Mail Settings dialog box appears.
- 3 Click the Email Accounts button. The Email Accounts interface will allow the user to create, edit and delete email profiles. The email profile includes the POP3 and SMTP server addresses for sending and receiving email messages, as well as a user ID (and password if confirmed).
- 4 Click the "Create New Account" button in the Email Accounts interface to create a new email profile.
- 5 Select an e-mail service by clicking the radio button next to the option. The first option will usually be selected. It includes Microsoft Exchange servers, IMAP and Internet mail. Click "Next."
- 6 Enter the Full Username of the account in the first field.
- 7 Enter the email address for the account in the second field.
- 8 Enter the password twice for confirmation, and then click the "Next" button. The Outlook client will try to connect to the server using the domain name in the email address and password. A notification about a successful connection attempt will appear if a connection is established. The email will be received on your computer and available through Outlook (or Outlook Express). Click "Finish" to exit the installation wizard.
- 9 Click the Send / Receive Mail button on the top navigation menu of the Outlook interface to send and download mail from the server.


