The "Mail" (or "Mail") program is a regular application of the iOS system and does not require additional installation from the App Store. However, to work with the mail client, you must first carry out the “Mail” setup procedure. This article will cover all possible steps for setting up an email client using the native Mail application as an example.
Default Mail setting on iPhone/iPad
To configure the mail client, go to "Settings" -\u003e "Mail, addresses, calendars". Here the user is given a choice of services, such as Google, Yahoo, iCloud, Outlook, and so on. To connect an account for a service that is not included in the general list, you need to tap on the “Other” button, however, in this case, the procedure for connecting an account may differ from the standard one.
Having chosen a service in which you already have an account, you need to tap on its logo, and then specify the main data of your account: name, e-mail, password. After checking the information, if there are no errors, the Mail application will be ready to go. But do not rush to leave the "Mail, Addresses, Calendars" section. Here you can also customize some of the design styles, notifications, signature and other little things.
By the way, if necessary, it is possible to add several accounts of various mail services at once.

Adding an account Tut.by, Rambler, Yandex, etc. to the Mail app on iPhone/iPad
You can add a Tut.by or Rambler account to the regular iOS mail client "Mail" only by linking the server address. To do this, in the service selection window, click the “Other” item. In the menu that appears, enter your name, email and password.
- Mail.ru - pop.mail.ru
- Yandex - pop.yandex.ru
- Rambler - pop.rambler.ru
- Tut.by - pop.gmail.com
- Mail.ru - smtp.mail.ru:25
- Yandex-smtp.yandex.ru
- Rambler - smtp.rambler.ru
- Tut.by - smtp.gmail.com
If you encounter the error "The server rejected the recipient because. it does not allow relaying" or "Relay error" in the mail client, check that the information is filled in correctly.
As a final step, in the last settings menu that appears, specify those sections that we want to synchronize with the mail service (contacts, calendars, etc.), save all the settings made and check the mail. If an error occurs in the operation of the mail service, try to repeat the entire procedure again. Perhaps you just missed something at one of the stages.

Also check that in the settings of your mail account, in the "outgoing mail" section, in the "primary server" item, the use of SSL is activated. If this does not help and mail continues to not work on your iPhone or iPad, then, in the same section, change the numerical value of the server port to 465 or 25.
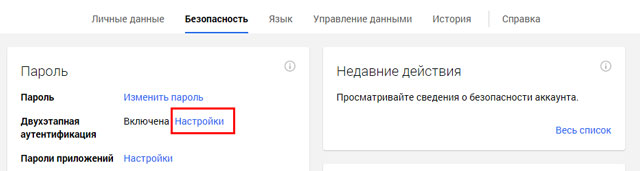
Google 2-Step Verification: Set up mail on iPhone or iPad
Often, Gmail users turn on the 2-Step Verification feature to increase the security of their Google account. From the moment it is enabled, the active mail account on the iPhone and iPad stops working, giving an error "The username or password you entered is incorrect". In this case, re-entering the password or checking the username (just in case) does not bring any benefit.In this case, you must do the following:
Step 1. We go through the browser to your Google account and go to the section "Security".
Step 2. We are looking for the line "Two-step authentication" and go to "Settings".
Step 3. You will be prompted to enter a password for your Google account, after which you will be taken to the settings for this function. We need the second tab "Application passwords". Click on the "Manage application passwords" button and enter the password again.

Step 4. We open a list of all applications that have access to your Google account and mail, including. Here you can give access to the Mail application on your iPhone and iPad. To do this, by clicking on the "Applications" menu, select "Mail", and on the right, by clicking on the "Device" menu, select the iPhone or iPad and click the "Create" button.

Step 5. After all the manipulations, an instruction containing a new password for setting up an account on your device will immediately open.

Follow the instructions to go to "Settings" -> "Mail, Addresses, Calendars", select your Gmail account from the list, and change the password to the one specified in the instructions. Ready!
Email clients from the App Store
Despite the presence of quite a high-quality full-time on iOS, good alternatives can be: Mailbox, myMail, Boxer (lite version is available) and standard clients from Google, Yandex, Yahoo, and so on. Each of the applications has a unique design and boasts interesting features that make working with emails much easier and more convenient. The choice is yours.If you did not find an answer to your question or something did not work out for you, and there is no suitable solution in the comment below, ask a question through our . It's fast, simple, convenient and doesn't require registration. You will find answers to your and other questions in the section.
Setting up email on an iPhone or other iOS device is not at all difficult. Especially if the email is registered on resources such as Google, iCloud, Yahoo, and other equally popular ones. The whole procedure takes no more than a minute, and includes filling in several form fields.
But if you don't want to create an email, but rather set it up, the situation changes slightly. Not every user knows how to do this.
The instructions below will tell you how to set up standard and non-standard mail services for Apple gadgets.
But you should remember one thing - to set up a mailbox in a smartphone, you will need an Internet connection. Moreover, even a 3G network is suitable, but it is better to use a high-speed Wi-Fi connection. However, the connection is not required at all, everything can be done offline. I made a reservation that it would be possible to register a mailbox in this way, but its activation will become possible only after connecting the device to the network - after identifying the name of the registered and the password he created.
For companies that provide e-mail services, setting up mail for an Apple gadget is a simple and understandable procedure for any user. This applies not only to Google, but also to such large services as Outlook, Exchange and many others. These email clients will automatically reveal the data of the servers of incoming and outgoing messages, but the user will have to fill in 4 points with information, namely:
1 Own name, so that the recipient of the letter can find out from whom he received the e-mail. 2 -mail, that is, the address of the electronic mailbox. 3 Password from the mailbox. 4 Description - a label displayed in the "Mail, Addresses, Calendars" menu. It is recommended to enter your e-mail here, especially if the user has multiple mailboxes. In this case, it will be much easier to identify the necessary record. 5 The user will have to connect to the Internet (we are talking about connecting a mobile device, not a computer). 6 Then you need to go to the settings menu, to the mail section, and add an account. If account information is not configured on a particular device, it can be added during the first launch of the regular iOS mail service. 7 Fill in the required fields and click the continue button. 8 The system will check the e-mail address and prompt the user to synchronize mail between the smartphone and Gmail. 9 If the user does not want to synchronize other data besides mail, for example, a calendar, this should be noted and saved.Adding an account will be carried out automatically, and it will become available in the mail settings. That's it, now you can read any letter on your iPhone and send letters to friends, changing recipients and messages. The procedure can be performed on iPhone 4, iPhone 5, 5S, iPhone 6, iPhone 7 and other devices from Apple.
Why is it so easy to set up a mailbox? Yes, because creating, modifying or configuring a mailbox for mailers is a long-established, automated process, because every day users can add thousands of new e-mails. They also often try to add a mailbox to an Apple device in order to send emails from the iPhone, as well as receive them on the iPhone. Sending letters after mail settings on the iPhone is carried out in a matter of seconds, as well as receiving them. The file sent from the gadget via Google mail immediately gets to the addressee.
But sometimes it happens that after making the settings, the system does not work, and the letter is not sent. In this case, you probably need to change something, clean the configured device, change settings, and update the system. Better yet, do not rush to update and clear the device's memory, but contact the mail service administrator directly. He will surely tell you how to change the settings, if necessary, and how to configure the created box so that it works.
The user can change the initial account settings in the Google mail service, as well as the synchronization settings, whenever he wants. To do this, he will have to click on the name of the account in the menu "Mail address calendars".
Setting up Yandex mail on an iOS device
Above it was discussed how to install and configure the work of standard mail services. Everything is easy there - operations are carried out fully automatically. But with other mail service providers, such as Yandex, Mail.ru, Rambler, you will have to tinker a bit.
Apple smartphone mail settings on these services, you need to do the following steps:
1 Go to mail settings, add an account, click on the "Other" section.
If after the steps above, something went wrong, the iPhone operating system may need to be updated. You may need to clear the memory of unnecessary files. How to clean the RAM from unnecessary garbage, you can read on many forums on the Internet, this is a simple procedure.
How to find mail settings for iPhone?
To do this, you need to perform the following set of actions in sequence:
- Go to the Mail search settings page.
- Enter your e-mail address, for which the account will be set up, into the appropriate line, press enter.
- The request will be processed by the system and on the same screen that the user sees in front of him, all the necessary information will appear to configure a particular mail service.
Thus, you can easily set up e-mail for popular mailers - Yandex, Rambler, Mail.ru. However, for lesser-known mail services such as Ukr.net, this approach does not work. The settings for them will be completely different, and you need to look for them separately.
Advanced e-mail settings on iPhone
Above, we discussed the main ways to configure mail services on an iPhone, depending on the features of a particular mailer. But this procedure can be easier and more flexible. In the advanced settings of the mailbox, the user can perform a number of actions to effectively configure the mail, namely:
- Mailbox behavior. What does this indicator imply? And nothing more than an indication of the correspondence of all categories of messages on the device and mailbox. For example, you can add automatic mail forwarding from a specific folder, or from all folders. After that, letters will automatically be sent from the mail server directly to the iPhone.
- The place where messages unclaimed by the user will be deleted. They can be permanently deleted to the trash, or sent to the archive if they may be needed in the future.
- Deleted messages. Here, the device owner can specify the period after which the messages sent to the trash will be deleted from the server's memory forever. It will not be possible to recover such messages in the future.
- Set up incoming messages. Here the user can choose between a wide variety of settings. For example, it can enable a secure protocol, authentication, standards for data encryption, and so on.

How to delete a mailer account from an iPhone?
Uninstalling is as simple as setting up and includes the following steps:
- Go to the mail settings, click on the name of the account you want to change.

- Click on the account deletion section, then confirm your decision. The account will be automatically deleted.
Attention! If a user, when creating and setting up an account, synchronized mail with a calendar, notes, etc., upon deletion, this data will also be erased.
After these 2 steps, everything will be permanently deleted. Restoration is possible, but only if a backup was previously made.
As you can see from the instructions above, there is nothing complicated in the mail settings on iPhones and iOS devices. True, when it comes to outdated mail services, you will have to work a little. However, it is unlikely that a large number of people use them today.
Note that you will need to make the settings only once, and then, by creating a backup copy through the iTunes utility, you can restore the account any number of times from the backup. This copy will be required, for example, when flashing the gadget or if the credentials are lost in some situation. By the way, you can make a backup through iCloud storage.
Adding a mailbox registered with Google (Gmail), AOL or Yahoo to an “apple” gadget is a simple matter. However, when it becomes necessary to add a Russian-language mail service account - for example, Rambler- the user of a mobile device has to break his head. The difficulty lies in the fact that when setting up mail on an iPhone, it is not enough to enter a username and password - the application " Mail» requires you to provide information that is usually not known to the average user. Where to get such information and how to successfully set up mail on iPhone, you will learn from this article.
If you are the owner of the now popular " googlemail”, you can consider that you are lucky - in iPhone, the settings of this mail client are “driven in” by default, so you can do without “dancing with a tambourine”.
Adding a box from Google goes like this:
Step 1. Enter the program Mail» on the gadget.
Step 2. From the options select " Google».

Step 3. Fill in the fields " Name», « Email», « Password". In field " Description» the note « gmail". You can change the text in this field yourself.

Step 4. After entering all the data, click " Further” - this is how you start the information verification procedure.
Step 5. At the next stage, the system will offer to synchronize contacts, calendars and notes between the mobile device and the mail client. Move all the sliders to the active position and click " Save».

After that, the Google mailbox on the iPhone will be added. Application " Mail" will immediately notify you of an incoming letter, which indicates that you have entered Google mail from an iOS device.

How to set up Yandex.Mail or another Russian-language mail service?
Adding Yandex.Mail is easier than other Russian-language services. The setting is made as follows:
Step 1. Go to " Mail” and click on the option “ Other».

Step 2. Proceed to the section " New account».

Step 3. Fill in the same fields as during installation gmail.

Step 4. Set up synchronization of mail and notes - activate two toggle switches. Then click " Save».

You do not need to specify anything else - the Yandex mailbox will be added.
With clients Rambler and Mail.ru everything is more complicated: after filling in the required fields, the application " Mail» asks for the details of the mail servers.

Where can you get such information?
How to find out mail settings through the Apple website?
Get server data to clients Mail.ru You can through the service on the official website of Apple. The service is called Finding Mail Settings” and is located at the link https://www.apple.com/ru/support/mail-settings-lookup/ .
All that is required from the user is to “drive in” the email address in the field (the only one) and click the blue arrow button.

Pay attention to the note printed in small print at the bottom. According to this note, Apple may use the information you provide to Apple to improve your experience. In fact, this means that the email address you enter will be stored in the company's database.
After a second wait, the service will return all the data about the client.

Which of the data is really useful?
- In the block " Incoming mail server" in field " Node name» you need to transfer the server hostname ( imap.mail.ru). In field " Username» Please enter your email address again. The password must be re-registered - this is an important point.
- In the block " Outgoing mail server» you can fill in only one field - « Node name". Copy the hostname of the server here ( smtp.mail.ru). The rest of the fields do not need to be filled in.
Once you've entered your server settings, click " Further". At the final stage, you need to switch the toggle switches for synchronizing notes and mail and click on " Save».

The described method will give a result if the Mail.ru mailbox is configured - but with Rambler it is more difficult. Service " Finding Mail Settings"on the Apple website will not show information about the Rambler-mail servers.

When setting up mail Rambler you need to act like this:
- In the block " Incoming mail server" in field " Node name» should be entered pop.rambler.ru, into the fields " Username" and " Password"- respectively the email address and password from it.
- In the block " Outgoing mail server" in field " Node name» must be written smtp.rambler.ru. Other fields in this block can be left blank.
How to adjust email on iPhone?
"Apple" device leaves the possibility to customize e-mail to the needs of the user. What options are available to the iPhone owner, it is easy to find out by following the path " Settings» — « Mail, addresses, calendars» and clicking on the name of the mailbox.

At the very bottom of the section Account» there will be a subsection « Additionally"- you need to follow it there.

In the subsection " Additionally» has the following mail settings blocks:
Box behavior. Through the block Box behavior»A correspondence is configured between mailboxes on the iPhone and on the server. For example, with such a configuration, which is shown in the figure below, letters sent to " shopping cart” from iPhone will be saved in the folder “ outgoing" on server.

Place to move unwanted messages. If you put in this block " Archival box", but not " Remote”, letters erased via iPhone will be transferred to the archive on the server - just in case.
Deleted messages. In this block, you can set the period of time after which messages will be deleted from the mailbox irrevocably. There is an option " Never» is for the most cautious users.

Inbox setup. This block contains several parameters:

- Use SSL. If the slider is activated, letters are sent via a secure channel - as a result, there is no need to worry about confidentiality.
- Authentication. You can set up the iPhone so that the user is authorized in the mail not by entering a username and password, but in other ways - say, through MD5 Challenge-response. It’s better not to go into the authentication settings: entering a password is the easiest way to access your mail.
- s/mime. Option S/Mime allows you to send encrypted messages. We note right away that in order to use S/Mime, you need to have a digital certificate.
In the fields "IMAP path prefix" and "Server port" do not change anything. The first field does not need to be filled in at all, in the second field the value is entered automatically when the user adds a mailbox.
How to log out of mail on iPhone?
You need to delete an account from an iPhone as follows:
Step 1. Go to " Settings" and find the section " Mail, addresses, calendars».

Step 2. In the block " Accounts»Find the box you want to delete and click on it.

Step 3. On the next screen, click the " Delete your account».

Step 4. Confirm your intention to delete your account - click on " Delete from iPhone».

When you delete an account from a mobile device, all information that was synchronized with the account will also be lost. Therefore, before deleting your account, take care to transfer valuable information to a reliable medium.
Conclusion
Application " Mail» on iPhone allows add existing mailbox - and here register a new using the built-in program will not work. However, this does not mean that creating an account on an Apple mobile device is unrealistic. Any of the popular email clients has its own application in the AppStore. By downloading and installing a third-party program, you can manage your email accounts without any hassle and create new accounts right on your iPhone. Problems arise, as usual, only with Rambler / Mail: the application of this client makes high demands on the "OS" of the mobile device - the iPhone must have iOS version 9.0 or higher.
The advent of smart technology obliges owners to use all its capabilities to the maximum. The variety of all kinds of applications allow you to do not only without paper media (for example, a diary), but even exclude the possibility of using a browser. Setting up mail on the iPhone is a simple matter, but requires care.
Automatic mail setup on iPhone
Synchronizing mail for gmail, yahoo, outlook, aol, exchange mailboxes for an iPhone user is an easy procedure, since they are all used by their own or friendly resources. A mail client is already built into the phone's operating system, which will allow you not to use manual entry of settings, but will automatically pull up all the necessary data.

Already when you open the settings, you can see that the mailers listed above are highlighted separately.
Setting up any mailbox on iPhone, including setting up gmail mail on iPhone, starts with "Settings" => "Mail" => "Accounts" . Need to click "Add account" and select the desired mailbox At this stage, you will need a username, entering an email address, a password from it and a description of the mailbox.

After all the data has been entered, press "Further"
, the mailbox will connect automatically. Setting up Russian-language mail servers is done in a similar way.
Automatic mail setup on iPad
To synchronize an email box in automatic mode on other devices, the scenario is different from the previous one.
If the email is synchronized on the iPad, then the next step will require you to enter a phone number for this gadget. The phone must support 3G. You will also need the number of the cellular data system. You can find it out by going to the section "Settings" your postal service. The information will be in the tab " General" => "Detailed" => "Cellular Data System Number" .
Then you need to select a communication service provider. If the communication provider is not indicated in the list, you will need to send a link to your email box, which is linked to the phone number.
After that, you need to enter a password for the email account. Then the inscription appears "Confirmed" , and you can press "Ready" .
Additional mail settings
To use the e-mail box as comfortably as possible, after installation, you can continue to configure the program. Using the "Box Behavior" section, you can configure the correspondence of the folders in the box on the iPhone with the folders on the server. The "Place to move junk messages" section will allow you to create a move to the "Trash" or "Archive" folder. In order not to litter the e-mail box with deleted messages, you can ensure their complete destruction after a selected period of time.
It is best that messages are transmitted over a secure protocol. This will require enabling SSL. In addition to password authentication, you can also use NTLM, MD5 Challenge Response, HTTP MD5 Digest.
Additionally, you can synchronize the server port, path prefix, and encryption standard. After providing the last parameter, all messages will be sent encrypted, so the recipient must have a digital certificate.
How to delete an email account
To delete email from your phone, you need to use the same algorithm as with mailbox synchronization. That is, to enter through "Settings" => "Mail" => "Accounts" . After selecting the entry you want to delete, you need to click on it. Click on the next window "Delete Account" => "Delete from iPhone" .
After confirmation is received, the entry will be deleted from the phone, messages will stop coming.
How often do you use mail? For some people, including myself, this is an indispensable tool. At least several times a day you need to look there. But it is not always possible to carry a laptop with you and run around the Internet cafe. The answer is very simple - set up mail on your iPhone and you can use all the advantages of emails anywhere where there is a Wi-fi zone. This article will help you set up mail from Yandex on iPhone.
Setting up / installing Yandex mail on iPhone
1. To set up Yandex mail, you need to find the icon " Settings"
2. In the menu " Settings"scroll down the items until we see a line" Mail, addresses, calendars"and let's go into it.

3. In this menu we see the inscription " Accounts"and below it click on the button" Add..."


5. After clicking on the "Other" button, we see a window at the top of which says "Mail" and below the inscription we press " New account"

6. Fill in 4 available fields, then click the " Forward"
- Name- you need to come up with a name for your account
- Address- here you need to enter the address of the yandex.ru postal service registered by you
- Password- enter the password from your personal e-mail box
- Description- enter a description for your account


- Node name- enter exactly what is in the picture: imap.yandex.ru
- Username- enter the name of your registered e-mail ( without @yandex.ru)
- Password - this is the password for your email

9. For the outgoing mail server, you only need to enter the hostname (as you can see from the picture):
- Node name- enter smtp.yandex.ru
- Username- leave empty
- Password- leave empty
Have you filled out all the fields? Then feel free to press the button Forward"


11. In the window that appears IMAP just press " Save"and voila!


Conclusion:
Please accept my congratulations, you were able to set up Yandex mail on your iPhone on your own. If you still have questions, you can ask them on our website.


