Parted Magic is a mini operating system that contains a set of necessary utilities for full-fledged work With hard drive, has a built-in explorer, browser, connection manager and much more. If Windows stops loading, you can use it to transfer data to other media, copy a disc, burn discs, format or resize hard drive, and even for full Internet access with Flash support(including supported and WiFi Drivers most devices).
Parted Magic can be installed on a disk or flash drive, making them bootable. Having created bootable flash drive Parted Magic you will receive a pocket operating system that you can carry with you, and if necessary, boot any computer from under it.
This is what it looks like workspace Parted Magic:
And this is not full list features:
- PDF Viewer
- TruCrypt
- Zip/Rar
- Adobe Flash
- image viewer
- ISO Master (to work with ISO image ami)
- clonezilla
- Disk Eraser
- Partition Editor (similar to Partition Magic - for working with a hard drive)
- FireFox Browser (full browser with Flash support)
- gFTP (FTP client)
- Remote Desktop Client (RDC)
- VNC Viewer
- Xfburn (CD and DVD burning application)
How to create a bootable Parted Magic flash drive
1. Download Parted Magic ISO image.
2. Install the flash drive into your computer or laptop.
3. Download and run UNetbootin (download) (this program is required to create a bootable disk from an ISO image)
4. In the main window, set the selection to "Disk Image" (1). Specify the location of the ISO image of Parted Pagic (2). Select “Type” - USB stick (3). Click OK (4). See screenshot: 
5. Wait for the installation to complete and click “Exit”: 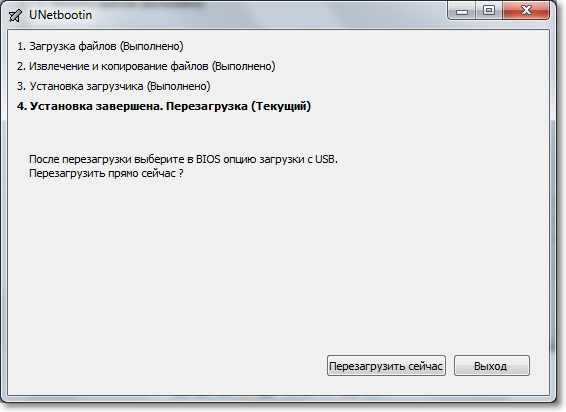
6. The bootable flash drive is ready, and now you can try to boot from it.
Restart your computer and at the time of loading press F10 (depending on the computer / laptop model, the keyboard shortcut to call boot menu may be different), choose to boot from a flash drive, press “Enter” and wait for the Parted Magic menu to load.
7. Select “Default settings” and press “Enter”, see screenshot: 
8. Boot the "operating system" Parted Magic.
To edit hard disk partitions, run the “Partition Editor” program, you will find the program shortcut on the desktop, see screenshot: 
To launch other programs, use the menu, which is very similar to Windows Start: 
Good luck! Don't forget to subscribe for updates!
Many people understand that CDs and DVDs as storage media have a lot of drawbacks. The three most important drawbacks are their poor reliability (this is especially true for CDs: the disc lay on the shelf for a year or two, and then it turns out that it stopped being read. The reason for this is simple - there was a detachment of the working layer and holes formed, which are clearly visible in the light), low speed and the need to change disks in the drive when installing the software.
In the conditions of a service center, the last 2 points are especially relevant.
So today we are going to create multiboot USB drive, from which it will be possible to install operating systems or load a Live CD assembly.
We will need:
1. USB drive (flash drive with a capacity of 8-16 GB or an external HDD of any size);
2. Installer images operating systems and Live CD;
3. WinSetupFromUSB program(The latest version 1.0 beta 8 can be downloaded from .
If we create a bootable flash drive, then next section can be skipped.
The hard drive must be prepared in a special way:
zero, that is, the first in a row;
- boot partition it should be main;
- The boot partition must be active;
- The boot partition must be formatted to FAT32.
I shared mine external hard 500 GB disk as follows:
After preparing the disk, you need to unpack the images from which we will assemble the multiboot module.
- For Windows XP, specify the source where the i386 folder is located;
- For Windows 7, specify the source where the BOOT and SOURCES folders are located;
- For Live builds CD indicate the source where the i386 folder is located;
- For adding finished image boot disk (for example, DOS, Linux, or some other multi boot disk) you must specify the appropriate ISO image. ATTENTION! Downloading from ISO can be large random access memory(depending on image size)!
- For Linux, specify the source where the SYSLINUX folder is located. 
Now that everything is ready, you can start creating a multiboot disk.
ATTENTION!!! BEFORE CREATING A BOOT DISK, YOU NEED TO MAKE SURE THAT THE MEDIA DOES NOT HAVE IMPORTANT DATA! OTHERWISE THEY WILL BE PERMANENTLY LOST!
Run WinSetupFromUSB... 
First of all, let's create boot sector using the built-in Bootice utility.
To do this, select the prepared partition and press the Bootice button in the main program window.
The following window will open: 
Next, open Parts Manage: 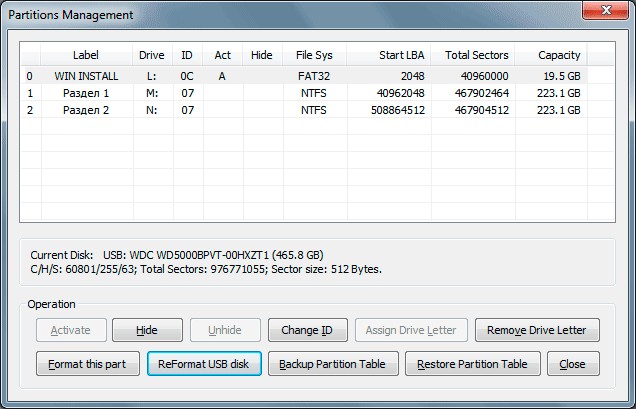
If this procedure previously performed, reformatting can be skipped.
Choose desired section or USB flash drive, click Reformat USB Disk.

For a flash drive or for a hard drive with one partition, select USB-HDD Mode (Single Partition). If the disk is supposed to have 2 or more partitions, select USB-HDD Mode (Multi-Partitions).
Partition Alignment set Align To Cylinder.
Click Next.
Set partition sizes and file systems: 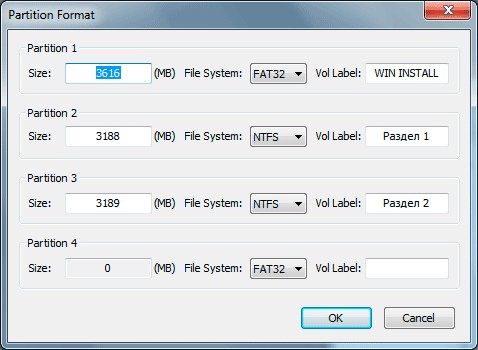
Click OK, we agree that the disk will be formatted and the data will be lost.
Formatting is complete.
The Process MBR button becomes available in the main Bootice window. Let's press it. 
Here we leave everything as it is (GRUB4DOS), click Install / Config.
In the GRUB4DOS settings window, do not touch anything, just click Save To Disk: 
The Master Boot Record (MBR - Master Boot Record) has been created.
Now you need to create boot record partition (PBR - Partition Boot Record).
In the main Bootice window, click Process PBR.
A window for creating a boot entry will open: 
Select GRUB4DOS, click Install / Config, then OK (do not change anything).
A Partition Boot Record (PBR) has been created.
No matter how difficult the installation of the OS is, and my opinion is that it is enough to be friends with the computer and have two more hands besides the head - one right and the other left. To install an OS on a computer, you need or.
But what if there is neither one nor the other, it does not work optical drive, or do you have a netbook? After a little thought, I remembered that I have an external usb-pocket for the HDD and a free old HDD 2.5ʺ is also there. In general, if there is HDD-pocket, respectively, it can be made bootable.
For this purpose, there are utilities with which you can do this, but I decided to use standard means Windows.
There are a lot of descriptions and videos on the network, but, unfortunately, there is one problematic point that the authors for some reason omit. Well, okay, I'll start in order.
Preparing an external HDD
Before working with the disc, be sure to transfer and save necessary information from this disc to another media.
All settings will be carried out as standard Windows tools 8.1. Perhaps there are some differences from Windows previous issues, but if there is, then not significant.
First of all, I want to note that to make an external HDD bootable, more comfortable. I divided the disk into two partitions, one contains the Windows distribution, the other partition is for my needs.
1. Connect usb-pocket and go to Disk Management.
Attention! All data on the disk will be destroyed!
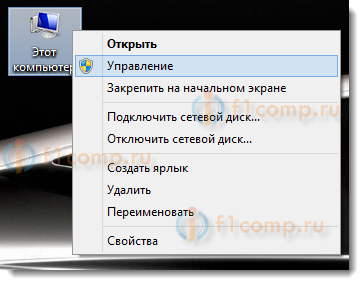
If you have Windows 8 installed on your PC,1 click right click mice: Start / Disk Management;
If Windows is over early versions, open the Computer Management console: Start / Control Panel / Administrative Tools / Computer Management / expand Storage Devices / left click Disk Management.
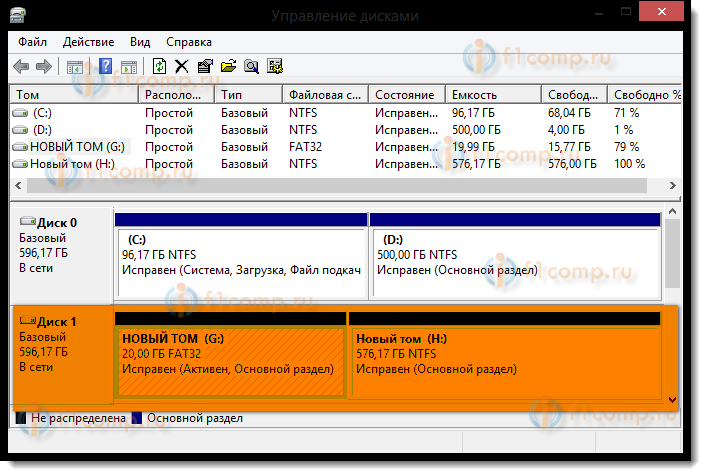
See screenshot:


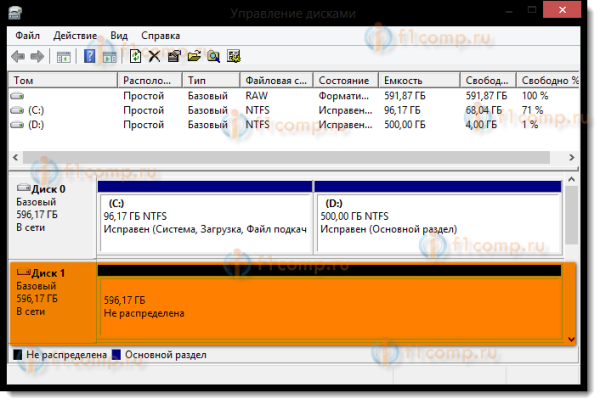
2. Choose an external HDD disk. Be extremely careful, if you choose another disk by mistake, all information will be destroyed.
In my case, this is Disk 1. As you can see in the screenshot, the disk is divided into two volumes (partitions):
3. Delete disk partitions:


4. Create new disk partitions. One for the distribution, the second will remain for your needs:
Right-click on a free space on the disk context menu choose a team Create a simple volume:

5. In the Create Wizard window that appears simple volume, press the button Further:
Specify the volume size of 4404 megabytes and click Next. Please note that the size is indicated in megabytes. And since 1 gigabyte is equal to 1024 megabytes, then 1024 × 4.3 = 4403.2 megabytes is obtained under the distribution section (the weight of mine is 4.18 GB for example);


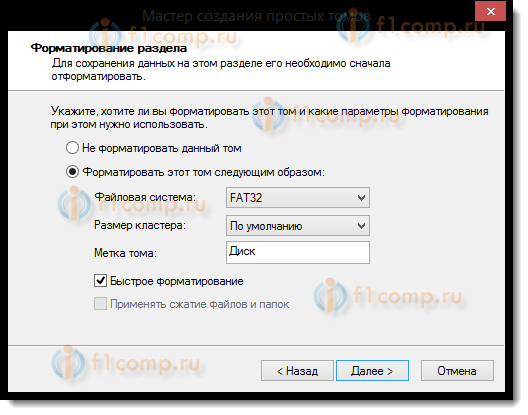
In this dialog, you need to format new section(FAT 32), click Further then Ready:

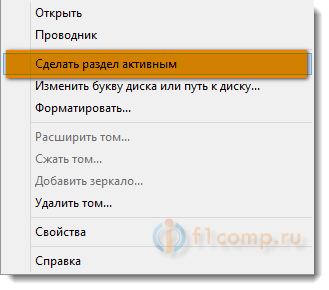
6. After that, you need to make the created partition active. (don't forget, because the computer will boot from this partition), for this:
Right mouse click, select the command in the context menu Make section active.
To the request for confirmation, we answer YES.

External HDD looks like this:

7. In the same order, we format the second partition on the disk, preferably in NTFS, but do not make it active.
Copying Windows to the active partition of an external HDD
copying Windows distribution to a bootable external HDD is quite simple and easy.
From bootable DVD:
Open in Explorer installation DVD, select all folders and files, and copy to the active partition external HDD;
From the ISO image:
By by and large An ISO image is a kind of archive. So you can open it with any archiver. You can also open the ISO image via Total Commander or Daemon Tools. Well, if you have Windows 8 or 8.1 installed on your PC, then open it with Explorer. Select all folders and files, and copy to the active partition of the external HDD;
That's it, your external HDD can act as bootable media. Just reboot and set USB HDD as boot priority in BIOS (depending on BIOS type).
- When you turn on your laptop, press F2, to ;
- Go to tab Boot;
- V Boot Priority order install USB HDD;
- Click F10, and then OK.
If not, then check out the article.
Save your changes and get started.
As you can see from the text, preparing an external HDD for Windows installation, is pretty simple. And my description will not be complete if I do not talk about one problem, which for some reason is rarely written about on the net.
Making a hard disk partition active
When I divided the hard disk into two volumes, for some reason unknown to me, none of the disk partitions could be made active. This function was not available in the context menu.
The partition from which the computer boots is called active.
There are two ways to make a partition active:
- Using the Computer Management console. We have already considered this method, but, unfortunately, for a number of reasons, the Make Partition Active command is not available. The solution to this problem is also not difficult. Remember how to prepare a bootable flash drive from the Command Prompt.
- Using the Command line, through the utility diskpart. The second way is a little more complicated, but more effective. You just need to do all the operations carefully and slowly.
Installation active partition using the command line
1. Connect external USB HDD;
2. Click Start/All Programs/Accessories/ Command line . Click right key mouse and choose Run as administrator.
 3.
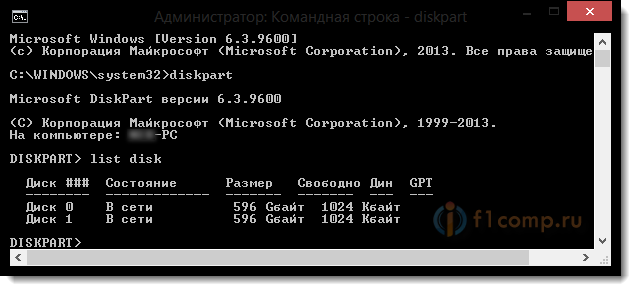
In the window that opens, write the command diskpart and press the button Enter. A prompt for working with the utility will appear - DISKPART>;
3.
In the window that opens, write the command diskpart and press the button Enter. A prompt for working with the utility will appear - DISKPART>;
 4.
Enter command list disk and press the button Enter. You will see all disks installed on your computer;
4.
Enter command list disk and press the button Enter. You will see all disks installed on your computer;
 5.
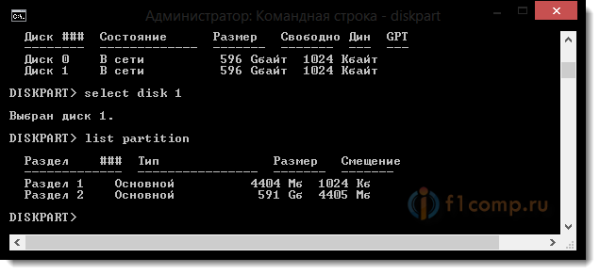
Select the disk with which we will work. To do this, enter the command select disk 0, where "0" is the disk number in the list, i.e. for my external drive there will be a team select disk 1. Click the button Enter, the message Disk 1 selected;
5.
Select the disk with which we will work. To do this, enter the command select disk 0, where "0" is the disk number in the list, i.e. for my external drive there will be a team select disk 1. Click the button Enter, the message Disk 1 selected;
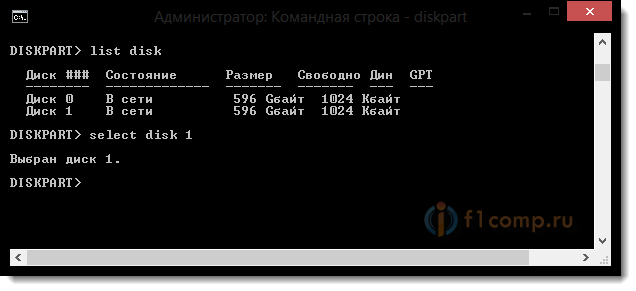 6.
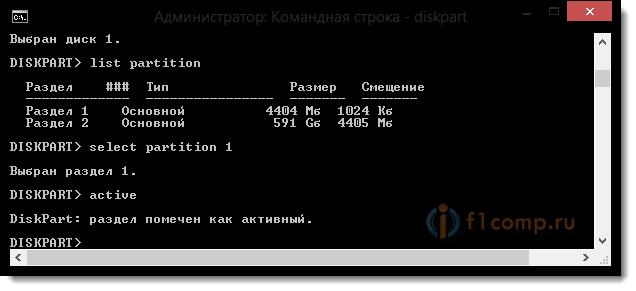
Next, you need to find all partitions on the selected disk. Enter command list partition and press the button Enter.
6.
Next, you need to find all partitions on the selected disk. Enter command list partition and press the button Enter.
 7.
Select the section with which we will work. We enter the command select partition 1, where 1 is the section number in the list, i.e. for the section that we make active. Click Enter, a message will appear Section 1 selected.
7.
Select the section with which we will work. We enter the command select partition 1, where 1 is the section number in the list, i.e. for the section that we make active. Click Enter, a message will appear Section 1 selected.
 8.
We mark the selected partition as active, to do this, enter the command active. Click the button Enter, a message will appear DiskPart: partition marked as active.
8.
We mark the selected partition as active, to do this, enter the command active. Click the button Enter, a message will appear DiskPart: partition marked as active.
 That's all. Good luck.
No matter how difficult the installation of the OS is, and my opinion is that it is enough to be friends with the computer and have two more hands besides the head - one right and the other left. To install the OS on a computer, you need a boot disk or a bootable USB flash drive.
But what if there is neither one nor the other, the optical drive does not work, or you have a netbook? After some thought, I remembered that I have an external usb-pocket for the HDD and a free old HDD 2.5\'\' too. In general, if there is a pocket hard drive, it can be made bootable accordingly.
For this purpose, there are utilities with which you can do this, but I decided to use the standard Windows tools.
There are a lot of descriptions and videos on the network, but, unfortunately, there is one problematic point that the authors for some reason omit. Well, okay, I'll start in order.
Before working with a disc, be sure to transfer and save the necessary information from this disc to another medium.
All settings will be carried out using standard Windows 8.1 tools. There may be some differences from previous releases of Windows, but if there are, they are not significant.
First of all, I want to note that making an external HDD bootable is much more convenient. I divided the disk into two partitions, one contains the Windows distribution, the other partition is for my needs.
1. Connect usb-pocket and go to Disk Management.
Attention! All data on the disk will be destroyed!
If you have Windows 8.1 installed on your PC, right-click: Start / Disk Management;
If Windows is older, open the Computer Management console: Start / Control Panel / Administrative Tools / Computer Management / expand Storage Devices / left click Disk Management.
See screenshot:

2. Choose an external HDD. Be extremely careful, if you choose another disk by mistake, all information will be destroyed.
In my case, this is Disk 1. As you can see in the screenshot, the disk is divided into two volumes (partitions):

3. Delete disk partitions:

4. Create new disk partitions. One for the distribution, the second will remain for your needs:
Right-click on the free space of the disk, select the command in the context menu Create a simple volume:

5. In the New Simple Volume Wizard window that appears, click the button Further:
Specify the volume size of 4404 megabytes and click Next. Please note that the size is indicated in megabytes. And since 1 gigabyte is equal to 1024 megabytes, then 1024 × 4.3 = 4403.2 megabytes is obtained under the distribution kit section (my weight is 4.18 GB, for example);


In this dialog, you need to format the new partition (FAT 32), click Further then Ready:
6. After that, you need to make the created partition active (do not forget, because the computer will boot from this partition), for this:
Right mouse click, select the command in the context menu Make section active.
To the request for confirmation, we answer YES.
External HDD looks like this:

7. In the same order, we format the second partition on the disk, preferably in NTFS, but do not make it active.
Copying Windows to the active partition of an external HDD
Copying a Windows distribution to a bootable external HDD is quite simple and easy.
From bootable DVD:
Open the installation DVD in Explorer, select all folders and files, and copy to the active partition of the external HDD;
From the ISO image:
By and large, an ISO image is a kind of archive. So you can open it with any archiver. You can also open the ISO image through Total Commander or Daemon Tools. Well, if you have Windows 8 or 8.1 installed on your PC, then open it with Explorer. Select all folders and files, and copy to the active partition of the external HDD;
That's it, your external HDD can act as bootable media. It is enough to reboot and set the USB HDD as the boot priority in the BIOS (depending on the type of BIOS).
- When you turn on your laptop, press F2 to enter the BIOS;
- Go to tab Boot;
- V Boot priority order install USB HDD;
- Click F10, and then OK.
If not, then check out this article.
Save your changes and start installing Windows.
As you can see from the text, preparing an external HDD for installing Windows is quite simple. And my description will not be complete if I do not talk about one problem, which for some reason is rarely written about on the net.
Making a hard disk partition active
When I divided the hard disk into two volumes, for some reason unknown to me, none of the disk partitions could be made active. This function was not available in the context menu.
The partition from which the computer boots is called active.
There are two ways to make a partition active:
- Using the Computer Management console. We have already considered this method, but, unfortunately, for a number of reasons, the Make Partition Active command is not available. The solution to this problem is also not difficult. Remember how to prepare a bootable flash drive from the Command Prompt.
- Using the Command line, through the utility diskpart. The second way is a little more complicated, but more effective. You just need to do all the operations carefully and slowly.
Setting the active partition using the command line
1. Connect an external USB HDD;
2. Click Start/All Programs/Accessories/ Command Prompt. Press the right mouse button and select Run as administrator.

3.
In the window that opens, write the command diskpart and press the button Enter. A prompt for working with the utility will appear - DISKPART>;

4.
Enter command list disk and press the button Enter. You will see all disks installed on your computer;

5.
Select the disk with which we will work. To do this, enter the command select disk 0, where "0" is the disk number in the list, i.e. for my external drive there will be a command select disk 1. Click the button Enter, the message Disk 1 selected;

6.
Next, you need to find all partitions on the selected disk. Enter command list partition and press the button Enter.
7.
Select the section with which we will work. We enter the command select partition 1, where 1 is the section number in the list, i.e. for the section that we make active. Click Enter, a message will appear Section 1 selected.

8.
We mark the selected partition as active, to do this, enter the command active. Click the button Enter, a message will appear DiskPart: partition marked as active.
![]()
That's all. Good luck.