Errors random access memory Is one of the most serious problems that can arise when working with a computer. First of all, they can stop the work of the system, causing the so-called "blue screen of death", which puts many users into a stupor. In order not to run into such a nuisance, you need to constantly be aware of the operation of the RAM, therefore in this article we will talk about how to properly carry out the test of the operational Windows memory 7 64 bit.
How to recognize errors
As mentioned above, the most typical system signal about a RAM malfunction is a periodically appearing blue screen with various errors... If you ignore the warning system, this problem will occur more and more often - and this is just visual presentation... The operation of the system itself will be less efficient, some programs will stop running or start crashing during operation, which is why it is required to test Windows 7 64 bit RAM from time to time.
A more advanced way of recognizing errors is to decrypt a memory dump. V general outline it looks like this: logs are dumped during operation a specific program, then decoding and analysis. If you want us to tell you more about this, be sure to write in the comments!
The error was recognized, what's next?
And then you need to diagnose it! Of course, the system itself is background performs a test of Windows 7 64 bit RAM and the computer does not externally notify the user about this in any way, but a critical error may occur that will require immediate intervention.
You don't have to do anything manually, and this is a big plus. The program (or the system) will do everything on its own. There are 2 most popular ways error diagnostics, we will talk about working with them below.
Windows standard tools
The developers have provided an opportunity to deal with the error with the capabilities of the operating system itself. This is convenient, but not always effective. The error can affect the performance of this service, and then you will need to resort to other methods. Let's consider how to test Windows 7 64 bit RAM on a laptop or stationary PC.
First, stop everyone's work running services, save important documents to third-party media... Can be done system backup if its settings and data are of particular value.
Next, we start the service responsible for the correct operation of the RAM. This is done in several ways:
1. Open Start, enter "RAM" in the search bar, then select "Diagnose RAM problems" from the list;
2. Open Start, in the line enter mdsched, then run the appeared application as administrator.
In the window that appears, 2 options for the development of events are offered: either check with reboot, or check in the background. In fact, the quality of diagnostics does not depend on the method, except that it will take longer with a reboot, although it is not recommended to perform any actions with the system in the background. 
If everything is in order, the system will notify you with the message “No memory errors detected”. Otherwise, she will report the fault codes. I note right away that the main trouble with such problems is that they are not cured. programmatic methods... Those. you will have to go to the store where the memory was purchased and change it to another. Standard tools do not always give a complete picture, so let's consider another way to test Windows 7 64 bit RAM.
Memtest86 Program
You can download it on the official website. Localization is present - an excellent option for those who want to test Windows 7 64 bit RAM in Russian. 
I must say right away that to work with this program you need either a disk or a flash drive. verification is done in this way. So, let's look at the sequence of our actions. 
1. The program downloaded from the official website is an image, so installation on a USB flash drive is reduced to a simple copy, and you need to mount it on a disk (it is convenient to do when Ultra help ISO);
2. At startup, enter BIOS (as a rule, F1, F2, or Ctrl + Alt + Esc or Ctrl + Alt + Del combinations) and select the boot from disk / flash drive mode from the menu;
3. Next, install the disk / flash drive into your computer;
4. Reboot the machine.
Note! Such a check will take an infinitely long time, so there is no need to wait for its completion, just a couple of passes will be enough. Watch what the system writes. We can say that this is an online test of Windows 7 64 bit RAM :) 
After completing the test, turn off the computer and new boot select normal boot in BIOS.
A little about solving errors
As mentioned above, small malfunctions that do not concern the hardware, the system wins on the sly. But gross violations in the operation of RAM are most often associated with problems on the memory side. Therefore, feel free to go to the store and ask for a replacement, and when buying, ask the consultant to perform a test on their computer with you. This will keep you safe from further problems.
In conclusion
I hope I was able to tell you enough about how to correctly test the Windows 7 64 bit RAM. If you still have questions, ask them in the comments and subscribe to site updates. Until next time!
2016-04-27”I described the tools available in the System Recovery Options menu and promised to tell you more about them in the following articles. I recently had to use the Windows Memory Diagnostics tool ( Windows Memory Diagnostic), so I decided to start with it.
So, if you encounter application and operating system crashes or STOP errors, the reason may be defective RAM. The Windows Memory Diagnostic Tool allows you to check RAM modules for faults. In this article, I will show you how to start and use it.
Running Windows Memory Diagnostics
You can run the Windows Memory Diagnostic Tool different ways, depending on the specific situation. As I mentioned in the previous article, it can be invoked from the System Recovery Options menu. But if operating system loads fine, and problems arise only occasionally, then everything is much simpler.
Click the Start button, open the Control Panel and click the System and Security icon ( System and Security). In the window that opens, select the "Administrative Tools" item and click on the "Windows Memory Diagnostics" icon. Or you can simply open the Start menu, type “memory” in the search bar, and select “Diagnose computer memory problems” from the results (Windows Memory Diagnostic).
The Windows Memory Diagnostic (Figure A) window appears. Select the Restart Now and Check for Problems option. The dialog box will close and the system will automatically reboot.
Figure A. To run memory diagnostics, select the "Reboot and check" option.
Running and checking memory
Regardless of the startup method you choose, after restarting, the Windows Memory Diagnostic screen appears and the test begins. The progress of the operation is indicated as a percentage and is indicated by a progress bar (Figure B). During the diagnostic process, the utility repeatedly writes certain values to memory, and then reads them out to make sure that the data has not changed.

Figure B. Verification starts immediately after the appearance of blue and white screen Windows memory diagnostic tools.
By default, the Standard test is used, but two other options are available. To select one of them, press the button to open the Options screen, shown in Fig. C.
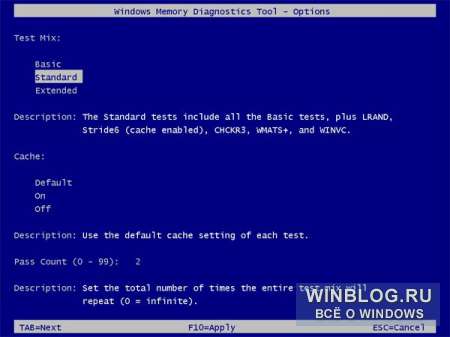
Figure C. In the Windows Memory Diagnostic options, you can select Basic or Extended test.
In the Test Mix section, you can select the Basic test, which includes a limited set of tests, or the Broad test, which offers an expanded range of tests — so advanced that a test can take eight hours or more.
Each test suite has default cache settings that are optimal for this option checks. But you can use the key to go to the "Cache" section and set own settings... Under the cache in in this case refers to the microprocessor's cache, which is used to store data received from memory modules. Some tests use the cache, others, on the contrary, disable it in order to force the processor to access memory modules directly.
Each test is run twice by default. But you can use the key to go to the Pass Count section and specify how many times the test should be repeated. After changing the settings, click to save the settings and start testing.
As it progresses, the Status section displays information about the detected faults. But it is not at all necessary to constantly monitor the process, since the Windows memory diagnostic tool is able to identify the problem sector of the chip and exclude it from use. This will allow Windows 7 to start normally without crashing.
After Windows boot and logging into the system, a message about the results of the scan will appear in the notification area (Fig. D).

Figure D. The report on the verification results can be viewed in the pop-up notification.
The report can also be viewed using the Event Viewer. Open the System log and find MemoryDiagnostics-Results in the Source list. The Event ID should read 1201 (Figure E).
If neither Startup recovery nor System Restore and even less so System image recovery failed to restore your computer to working order - consider the possibility that the computer has problems with random access memory (RAM).
The cause of many critical errors, such as - occurrence " blue screens death "(BSOD) and subsequent reboots, frequent freezes, other malfunctions is faulty RAM.
Since you are in the environment Windows recovery- it is obvious that there are problems with the computer, so click the Restart and check (recommended) link.
The computer will restart and start checking the RAM with the standard parameters set by default. The usual two-pass tests will be performed.
On the screen, you will see the progress of the check - the number of passes, the state of the check in% and the errors found in the Status line. if they will.

At any time, you can refer to the Memory Diagnostics configuration settings and apply other parameters for testing. To do this, press the key F1.
The tool has three test suites. You will immediately be taken to the set Usual since it is set by default. This suite includes 8 tests in two passes. The memory check in this set can take about an hour.

Using the cursor keys (arrow keys), you can move up or down to select a different set.
Kit Base... Includes three tests, the memory test will take a few minutes. Used for quick check.
Kit Wide... Includes 17 tests, memory test can take several hours. Select this option for a thorough check.
Press the key to set the next parameters. Tab.
Cache... The parameter has three settings and is intended to determine different types mistakes.
When you disable the cache Memory Diagnostic Tool accesses RAM directly, this provides the most accurate testing of the modules themselves. But in this case, the computer will respond to keystrokes with some delay.

Press the key Tab to go to the next configurable parameter.
The next configurable parameter is Number of passes... By default, the Windows 7 Memory Checker runs all assigned tests twice (2 passes). You can change the number of passes. By increasing the number of passes (from 0 to 99), you thereby increase the likelihood of detecting memory defects. By setting 0, you will make the check infinite, which you can stop by pressing the key Esc.

After making changes in the settings, press the key F10 to apply settings and run diagnostics.
You can stop the diagnostics at any time by pressing the key Esc.
After completing testing, the computer will automatically restart.
First of all, you need to remember that it cannot diagnose ALL malfunctions of the RAM.
If during testing errors were revealed or the tests did not pass at all, then one or more RAM modules are most likely damaged.
If you have multiple RAM modules, test them one at a time.
If you have multiple memory modules and Windows 7 Memory Diagnostic Tool detects a fault in each of them, it may be damaged motherboard... To verify this, try inserting a module that you are completely sure of working and run again. Windows 7 Memory Diagnostic Tool... If errors are found, then the problem is most likely in the motherboard.
Advice
Windows 7 Memory Diagnostic Tool can also be started from running Windows. To do this, type in address bar Conductor mdsched and press ENTER


