TP-Link routers and modems are well-deservedly popular for their reliability, low cost and ease of management. The instruction is given on the example of the TD-W8960N model.
Before switching on
The main function of the router is to create a local wireless network that connects computers, laptops and mobile gadgets within the home/office. The second, no less important task is to connect this network to the Internet. Therefore, before turning on the router for the first time, it is advisable to have the connection settings with the provider at hand. They are usually spelled out in a contract or separate instruction from the provider. If there are no settings, then when connecting, you need to call technical support and ask for this information.
Before switching on, you need to look at lower part Chassis: In TP-Link models, the following information is required to configure the router:
IP address: usually 192.168.1.1
Login: admin
Password: admin
If the values in your model are different, it is better to rewrite or remember them in advance.
Turning on the wireless modem for the first time
1. Connect the data cable of the Internet provider to the router. Usually this telephone cable(ADSL connection, “leased line”), or Ethernet wire (“fiber”, LAN). If the connection source is a 3G/4G modem, then you should connect it to the router's USB port.
2. Connect the router to the mains: TP-Link supplies a power cable in the kit.
Connecting to a router
If everything is in order, then after 20-60 seconds the router is completely ready for work. This time is needed to download the firmware. Indicators - LEDs on the front panel will help you find out about its performance. By the way, for TP Link routers, these “bulbs” glow with a soft, pleasant light, not annoying even in the dark. Indicators are equipped with icons or inscriptions. From left to right:
· Power indicator: should always be on when the device is turned on.
· Internet: shows the health of the Internet connection. Doesn't work when first turned on in online mode flickers or stays on.
ADSL or LAN; 3G, 4G for Beeline and others mobile operators: depending on the type of provider, indicates the presence of a signal from it. When you first turn it on, it may blink, or it may be off.
· WLAN (WiFi / Wireless): Access point indicator. Flickers or glows already at the first connection.
· WDS: not present on all models, responsible for expanding the coverage of the wireless network.
Other "light bulbs" may be present - USB port, fast connection QSS, 2-6 local network ports, etc. It is normal if these indicators are not lit yet. If the device is used as a repeater, then the light signaling may be different.
Connecting a PC to a wireless network
For settings TP-Link modem a smartphone / tablet is also suitable, but we will consider the good old connection from a PC or laptop. If the router is working, then it is already “distributing” the wireless network (or expanding its coverage area using WDS technology). It is called standard and boring - like TP-Link_15616, and is visible from any device. It works without a password and this needs to be changed as soon as possible.
Connecting the computer to new network Wi-Fi. Wireless icon in tray windows will be crossed out with a cross (or another icon of the missing Internet).
You can configure the TP-Link router through a browser. Enter 192.168.1.1 (without www) in its address bar: this is the router control panel. Remember - the IP address, plus - the login with the password are printed on the bottom of the case? So, instant authorization - and we are in the depths of the access point. If the ability to change the language is supported, then in the case of TP-Link, this can be done safely: the company is famous for its decent translation of its firmware.
All about wireless router settings
Step-by-step instructions - connecting to the Internet, setting a network password, advanced options: WDS, MAC addresses, connection encryption algorithms.
TP-Link control panel main page
On the home page(Device Info) nothing can be changed - this is a purely informational section. At the top, information about the firmware and version of the model, below - the current indicators of the access point and connection with the provider, as well as the date and time.
Attention! When the router is fully configured, all values in the Device Info table must be non-zero. If there are zeros somewhere (or values like 0.0.0.0) - something is wrong with the connection. True, the repeater-mode allows zero values.
How to connect a router to the Internet
Connecting and setting up the Internet occurs in the Quick Setup section (quick setup of the TP-Link router) of the side menu on the left. On other models, this section may be called WAN Settings / WAN Configurations ( WAN settings).
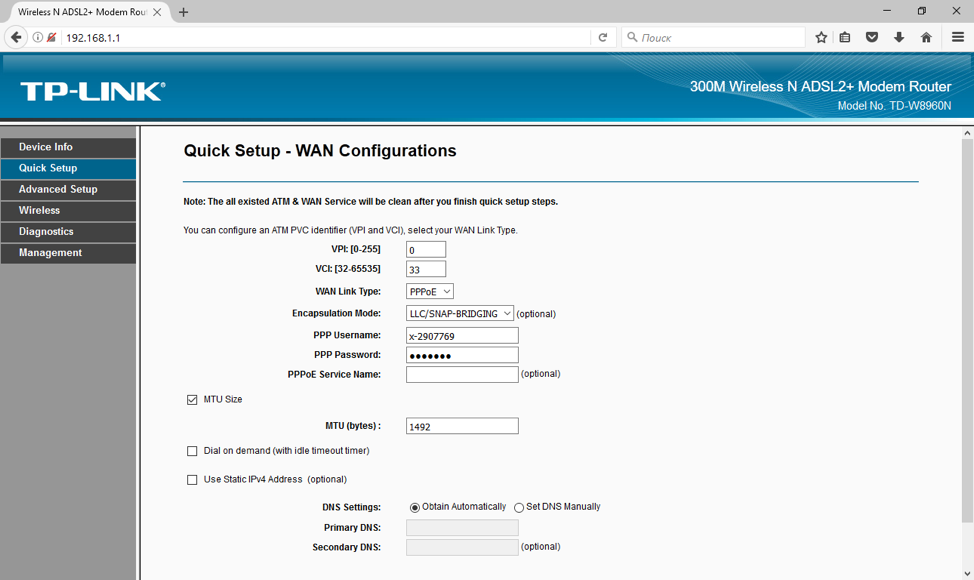
How to connect a TP-Link router to the Internet: WAN and ADSL settings
In this section, it all comes down to driving in 2-5 connection parameters that are provided by the provider. In our example, this is:
connection method (WAN Link Type): PPPoE mode;
VPI/VCI values set to 0 and 33;
Login (PPP Username) and password (PPP Password) for authorization with the provider (not to be confused with the login-password of your personal wireless network!).
Each provider has its own settings: for Beeline they are one, for MTS they are different. Although they differ slightly, you should find them out with your Internet operator. In any case, to connect the router to the Internet, you will need to enter no more than a few values. When the router works as a repeater, it should not be configured to connect to the Internet. These parameters are needed only for the access point.
How to set up a wireless network
In the left side menu there is a Wireless section (“Wireless network”, Wi-Fi and other names). Us there.
Basic wireless settings section
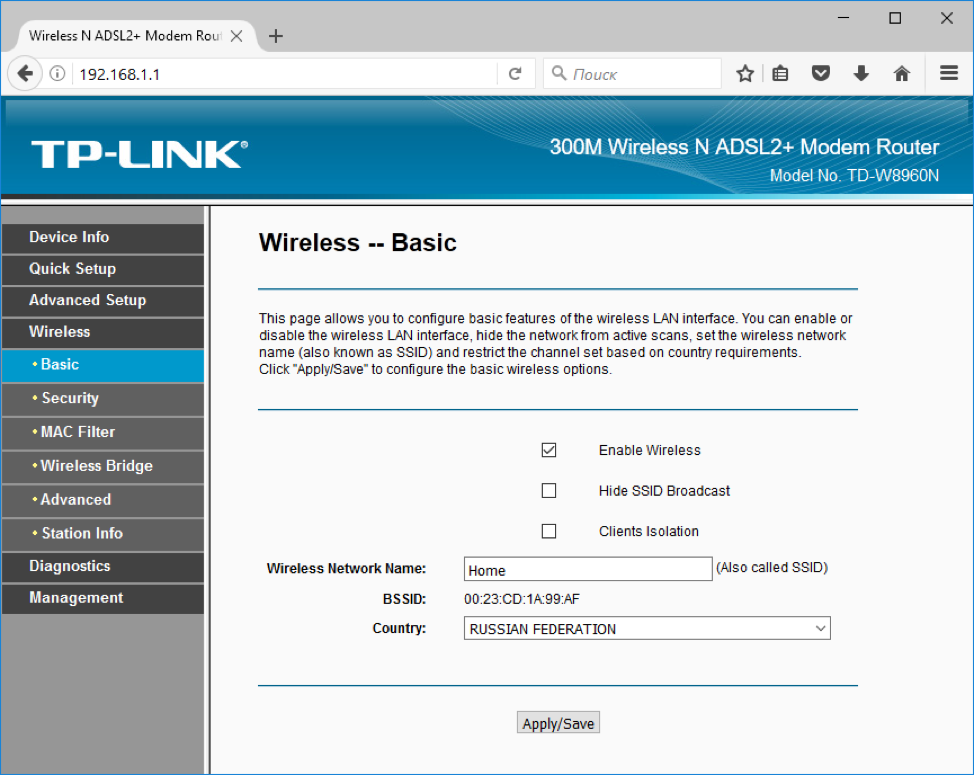
Basic wireless options router TP-Link
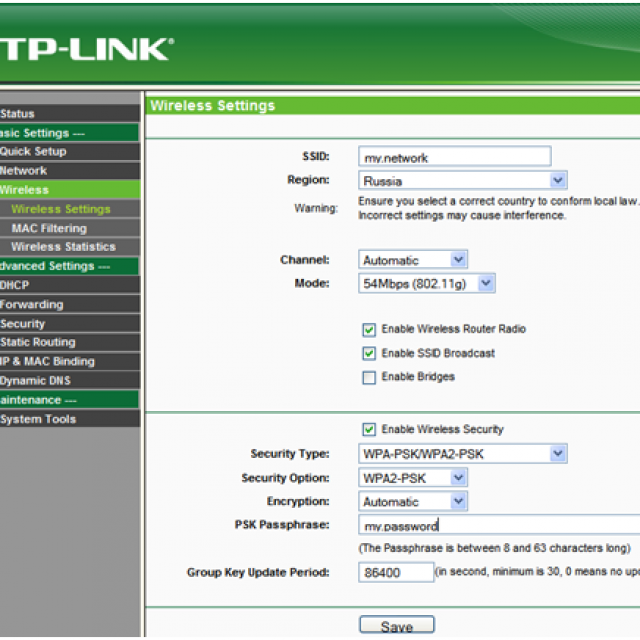
Basic wireless parameters of the TP-Link router:
· Enable Wireless: Enable the wireless network. There must be a checkmark.
· Hide SSID Broadcast: hide the network name from the air. The unofficial name of the option is “paranoid mode”. With a correct password like 463sltjHe, it is impossible to hack the network, regardless of whether the repeater transmits its name or not.
· Wireless network name: The name of the wireless network. It’s better to use something personal to immediately distinguish your own network from your neighbors: The-Best-Wi-Fi, Aleksey’s Network, etc. Allowed English letters, numbers, spaces, but no Cyrillic.
Country (country): optional parameter. For the router to work TP link setting country is not required. You can choose your region, you can forget.
The Apply / Save button (Apply and save) is standard for all sections - it must be pressed after configuration, before going to next section. Attention! Before changing the network name, encryption type, password, WDS mode, etc., keep in mind: the computer's Wi-Fi connection will be disconnected. You just need to re-click on the connection icon in Windows and select the newly created network (enter New password) for each device on the network. They don't connect on their own.
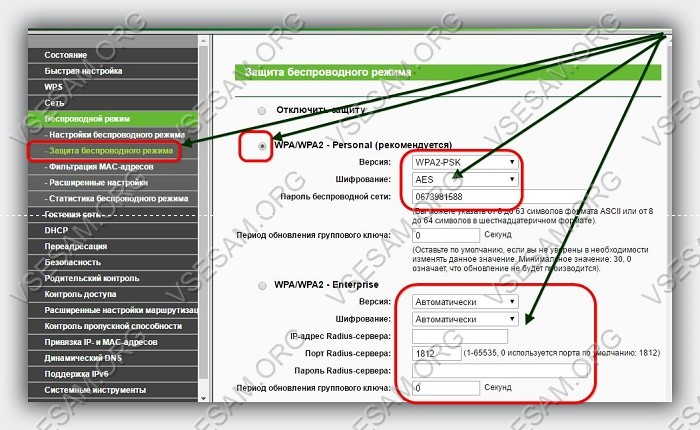
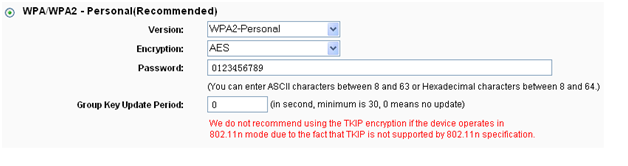
Security section - Wi-Fi security and password
Perhaps the most important section of the settings. The QSS parameter (for other routers it is often called WPS) is responsible for quick connection new devices to your network at the touch of a button, without entering passwords. If we set up the network outside the home (in the office), then it is better to turn it off (disable).
![]()
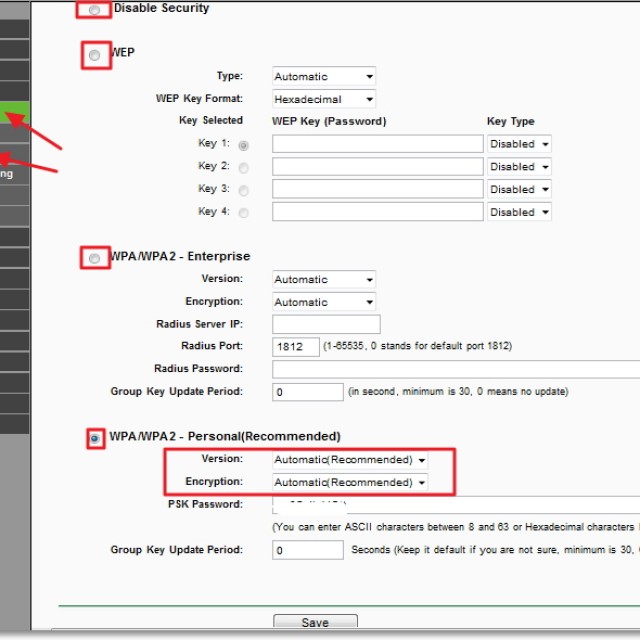
· Network Authentication: protection type. Remember the word WEP - and never use it at all. Exclusively WPA, or WPA2 - no other values are suitable for a secure connection. Permissible varieties WPA type(Home or Enterprise) are also allowed. However, there is an ancient belief: a person who does not encrypt his wireless network goes to heaven.
· Setting Open in network encryption means that outsiders random people can use your Internet, while they can have access to computers on the network. Use it only when you know exactly what you are doing. Even public networks WiFi with free access for a cafe / gym, it is now customary to protect with a password.
· Wireless network Key: enter password from own network. Do not confuse it with the password to connect to the provider. It is this password that will allow other devices to connect to the network. If the device is used as a repeater, then you do not need to set a password. Passwords like 111111, qwerty, Andrey, etc. sooner or later they will definitely be picked up by neighbors. Pick up complex password, with letters, numbers and special characters, at least 10-15 characters.
Old joke: best password computer scientist - the nickname of his pet. After all, a professional IT specialist always has a dog named like [email protected]!kw.
· Encryption algorithm (WPA Encryption). Both AES and AES-TKIP are equally good, there is no fundamental difference.
Advanced settings section (Advanced)

Advanced Wi-Fi settings. Helpful advances.
As a rule, advanced settings are not required for TP Link modems. Everything should work in default values.
2. Mode (mode): b / g / n / ac or their variations - bgn, bg, etc. In fact, generations Wi-Fi standard. You should choose the most fresh mode connections in the settings, setting bgn, or, if present, bgn + ac. The rest are needed only for rare cases of device incompatibility.
· Ancient and slow a and b-modes were hardly seen even by venerable specialists. Left for compatibility, they should not be used.
· Old regime"g": can be used if older devices categorically refuse to work with other modes.
· modern standard"n": the most common for most devices.
· Cutting-edge “ac” standard: not supported by all devices.
Rarely used settings
Other wireless sections of the TP-Link control panel are required only in special occasions- for example, to connect to VPN, so let's go over them briefly.
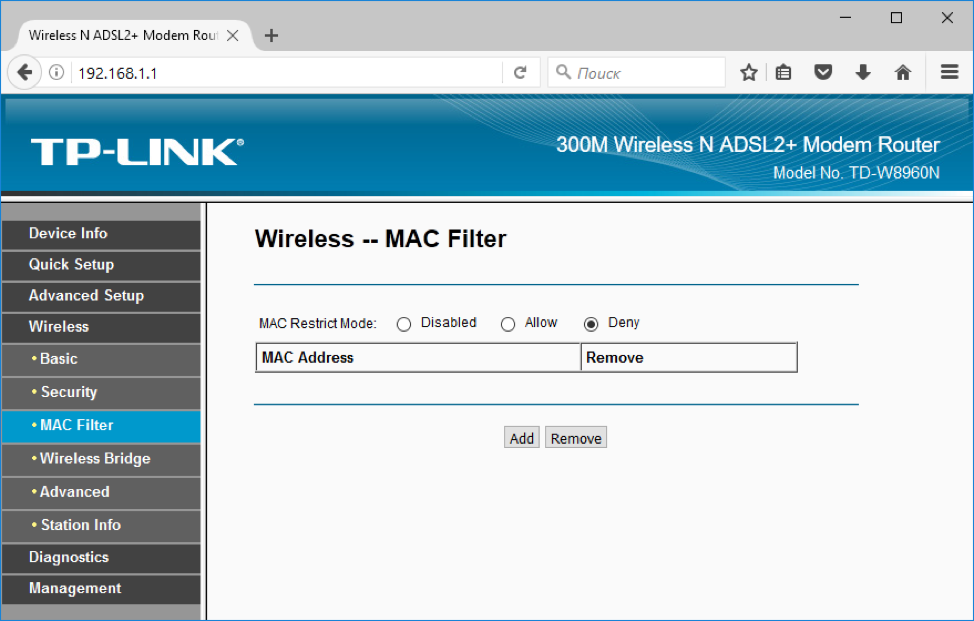
MAC Filter - filtering by MAC address. Allows only manually configured devices to connect to the network, and even then after entering a password. No outsiders. Not recommended for either home use, nor for a small office where everyone is their own.
Setting up a VPN on a router: not possible on all models. This is a more advanced feature.

Wireless Bridge (WDS): the ability to use a Wi-Fi router as a “repeater” - a repeater of an existing one wifi signal. It is used to "extend" the range of another working and configured router. In other cases, you need to use the already configured AP mode (Access Point - access point mode).
Conclusion
Setting up a router is an easy task even for non-specialists, and very, very necessary. Having figured out the parameters once, you will no longer call the masters and tuners - the question is only 2-3 minutes of time.
There is no single instruction for configuring wireless network settings, but general principles the same for all models. Only small details differ: some devices use the terms Wireless, others Wi-Fi; latest models work with the “ac” communication standard, the older ones with b / g / n-networks. Point setup example access TP-Link suitable for ASUS devices, and D-Link, and others - only little things differ. Direct analogy: microwave ovens - the principle is the same, but the buttons are slightly different.
Modern society can no longer imagine life without a computer, mobile phone and, of course, the Internet, which allows you to communicate with friends at any distance, find absolutely any information and entertainment multimedia.
The use of a router allows you to connect heterogeneous networks of heterogeneous structures and architectures that decide to send data between different parts of the network based on type information network connection and rules set by the administrator.
For stable and uninterrupted operation of the router, it must first be configured, but if, after successfully completed steps, the router still knocks down the settings, you need to check again that the devices are connected correctly.
Most of the Wi-Fi equipment settings that are required for normal operation and access to wireless internet, include setting up a connection by local network, updating outdated firmware, setting the IP address and DNS.
Connecting a router
Routers connect differently depending on the make and model of the device. It is also necessary to take into account that every year manufacturers update the web interface.
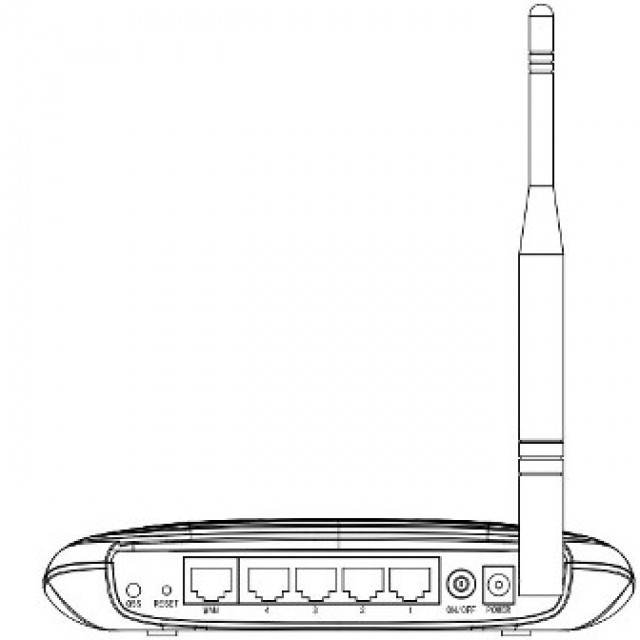
The appearance of devices of all models has a similar design and equipment: cardboard box, inside which is a router, network cable and power adapter. The front of the device displays indicators that report the behavior of the router and the operation of its interfaces.
Network connectors are usually located on the rear panel, the number of which varies depending on the manufacturer and model.
To connect a computer to a router, you must:
- insert the network JACK into the router and the other end network cable insert into the network connector on the computer;
- then connect power to the router by inserting the power adapter into the appropriate slot;
- then you need to turn on the computer and go to the control and administration panel.
Admin panel login
After turning on the computer, you must wait until the power indicator on the router stops flashing.
Then perform a series of operations:
- open any browser, enter 192.168.0.1 in the address field;
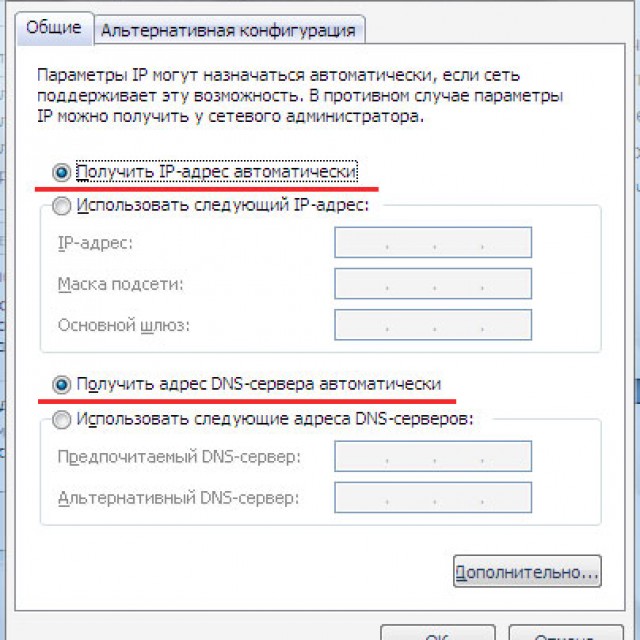
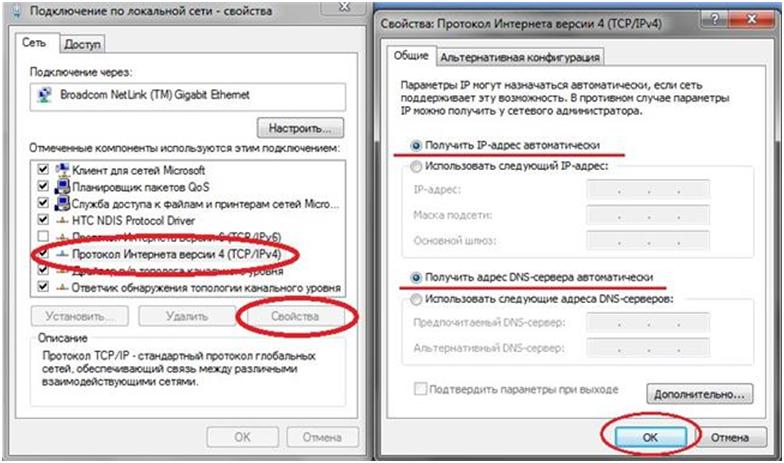
- when failed attempt(the registration window did not open) it is recommended to automatically assign the IP address and DNS server;
- after a successful operation, the admin panel will appear.
Full customizationwi— fiequipment includes three stages:
- changing the parameters of the local network;
- wifi setup;
- creating an Internet connection.
A detailed description of the settings for these sections will be presented in the sections below.
Video: setting up a TP-Link TL-WR743ND router
What to do if the router settings are lost
During normal operation of the router, the settings of the router remain the same. Lost computer settings and network card.
In order to save Internet users from headaches when making software settings wireless connection to the Internet in case of frequent failures (for example, a power outage), then the button in the "Systemsetup" administrator panel will come to the rescue, and then go to "Setting Management".

Photo: Setting-Management tab from ASUS WL-500G
The "Setting Management" menu item allows you to export normally adjusted settings for your router, and then, if various errors, malfunctions and conflicts occur, import the settings. The function is quite useful, since many fans of "digging" in the computer settings can accidentally reset the router settings to factory settings.
Factory reset and firmware update
Before setting the router parameters, you must complete the installation latest version firmware, this will avoid malfunctions.
For this you need:
- perform a factory reset. This step performed by pressing the RESET paper clip on the router for 15 seconds;
- connect a personal computer to a wired network;
- make sure that the connection between devices is not interrupted during installation;
- update firmware via web interface:

After installing the latest firmware version for the router, you should configure it again, based on the instructions for initial installation router. Also, if the settings were exported, then you can import them.
Configuring Internet settings
In order to make a setting local connection over the network, you need to perform the following operations:

MAC address
The router address is divided into two parts:
- MAC address of the router;
- IP address.
The MAC address is the address of the router, which is indicated on the box of purchased equipment or on the bottom cover of the router itself. The address is indicated on any device that can connect to the Internet.
![]()
Internet users will need to use the MAC address to change it to the address assigned by the administrators of the service provider when connecting.
WAN
WAN-Wide Area Network, represents connections for functioning critically important functions, made in the form of a connector on the router case, into which the cable laid by the provider is inserted.
Typically, such a connector is signed on the case and painted in blue color. To configure WAN in routers on TP-LINK models, the item is simply called "Internet".
WAN is responsible for the parameters that provide routers with the ability to connect to the Internet.
Dynamic IP
Provision by the provider dynamic IP address allows you to perform the simplest and most hassle-free router configuration, tk. when turning on the PC, the user does not need to additionally configure VPN and PPPoE.
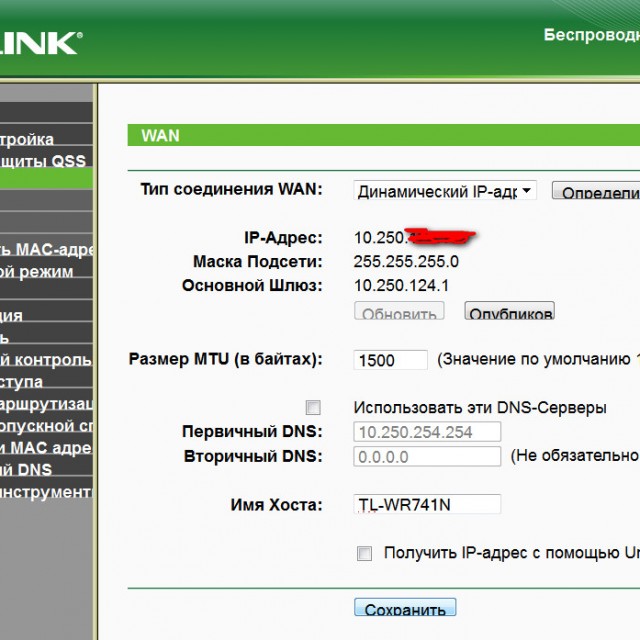
Photo: WAN tab setting IP address
PPPoE connection
Mandatory high-speed setting PPPoE connections is necessary if the provider has attached a static IP address to the user's computer.
To set up a high-speed connection>PPPoE on TPLink routers, you need:
- select PPPoE;
- enter the username and password assigned by the provider (usually specified in the contract);
- to establish an inseparable connection, check the box "Automatic connection";
- be sure to save the settings;
- wait for the "Connected" mark.

VPN connection
If, after turning off the router, the settings are lost, then the problem definitely lies in wrong settings VPN connections or incorrect addresses.
For VPN settings on TP_LINK routers (on most models of routers, the settings differ slightly) Go to the administration panel in the browser, then open "Network", then find "MACclone".
To create an L2TP connection with a dynamically generated IP address on a bidirectional VPN router, select "L2TP/RussiaL2TP". This will allow access to the resources of the Internet provider.
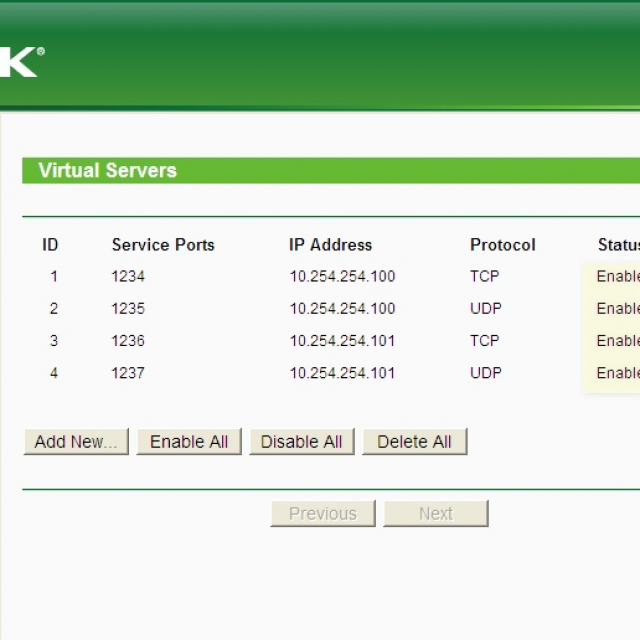
Photo: tab - virtual server
LAN setup
To do this, you need to follow a few simple steps in the control panel:
If, under a concluded agreement, customers are provided with a static IP address, then enter the addresses specified in the agreement in the fields IP address, subnet mask, default gateway.
Wireless network and its security
With the development of IT technologies and the Internet, there is a need for additional protection networks. It is generally accepted that the security of wireless networks is threatened by: network intrusion, traffic eavesdropping, as well as violation of the physical integrity of the network.
Wireless network security will enhance:
Personal data of Internet users can often become available to third parties in an illegally intercepted network signal. Such actions may also lead to identity theft and other intentional activities.
For creating WEP encryption, you need to go to the control panel, and select the item:
This topic provides an overview of the most frequent settings to provide access personal computer to the Internet using a router.
When persistent problems when connected to the Internet, a malfunction is also possible not only with the settings of the router, but also with failures network adapter or router.
On many routers, the settings go astray after disconnecting it from the network. Follow the settings specified in the article, and with a probability of 90% the router should work.
In our homes there are more and more more devices who have access to the internet.
Computers, laptops, tablets, smartphones, WiFi printers, and even televisions, but in order to take full advantage of their capabilities, they must have access to the Internet.
For this reason, in most homes, it is necessary to install a router to provide wireless communication for the internet.
One of the most popular manufacturers of such equipment is the TP-LINK router.
There are a lot of such routers on sale today. Here are the most popular ones today:
Tp link tl wr841n, wr740n, tp link td 786, wr741nd, wr840n, wr940n, w8901n, wr841nd, tp link wr842nd, w8151n, mr3420, wr941nd, w8951nd, tp link td w8961n, w8960n, tp link archer c20, w8968, wr741nd, mr3220, wr842n, wr340gd, mr3020, tp link stork, wr1045nd, w8950n, mr3420, wr743nd, ac750, wr1042nd, tp link archer c2, wa701nd, wr1043nd, wa801nd, wr942n, td854w, wa801nd, wr340g, w9970, adsl2, n150, n600 , w8951, dir 615, wa901nd, dir 320, w8101g, n750, dsl 2740u, wn722n.
As you can see, there are many of them, but the settings are almost the same. Therefore, I will not stop, but will write a step-by-step instruction common to everyone, so that you can independently, correctly connect and configure your tp link router on a computer or laptop.
NOTE: from windows version: windows 7, windows 8, windows 8, windows 10, windows 8.1 does not depend on anything, as well as on the operator (except if password protection, name and others are provided), whether for Rostelecom, Beeline Kyivstar, Ukrtelecom, Dom ru , Ufanet, Luganet, Will and so on.
It’s easiest to set up the router mode yourself or yourself if a disk is attached, but you can do it without a disk manually and even without the Internet, only if there is no Internet, then you won’t need a router, because its task is to distribute the Internet via wifi.
Usually you only need to set up a new one, but there are times when you get lost, then you need to set up wifi in a new way, and in some cases, reflash it.
I will use the configuration of the cheapest and most popular TP-LINK routers on the CIS market.
Instructions step by step in Russian how to set up a TP-LINK router to distribute wifi
Turn on the adapter first alternating current supplied with the router and connect the power.
Press the big black button - some LEDs on the router panel should light up.
You will also need two cables: one for the internet (connected to the router) and the other must be connected to the computer/laptop.
These cables (commonly referred to as " twisted pair”) end with a characteristic connector and are visible in the picture.

Connect the cable connected to the computer to the blue connector on the back of the router.
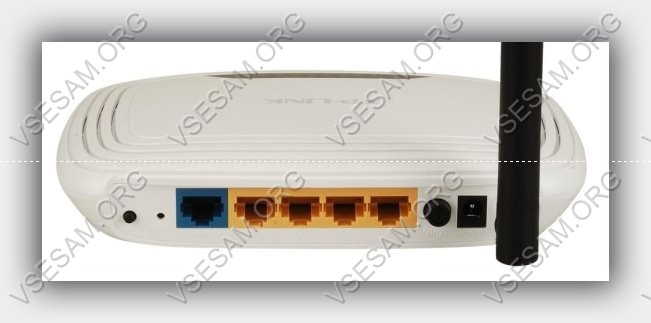
Connect one end of the cable that comes with the router to the yellow socket with number 1 on the router, and the other end is connected to the computer instead of the disconnected cable Internet.
Step two in setting up a TP-LINK router via cable
Launch a browser (for example, Internet Explorer, Google Chrome, Mozilla Firefox etc.) and in address bar type: 192.168.0.1, and then press the ENTER key.
You should see a window asking you to enter your username and password. Enter "admin" in both fields and click "OK".

You should see the router's configuration page. By clicking LMB on the option " Quick Setup"(You can quickly set it up this way, and if yours is not in Russian, then click - Quick Setup).

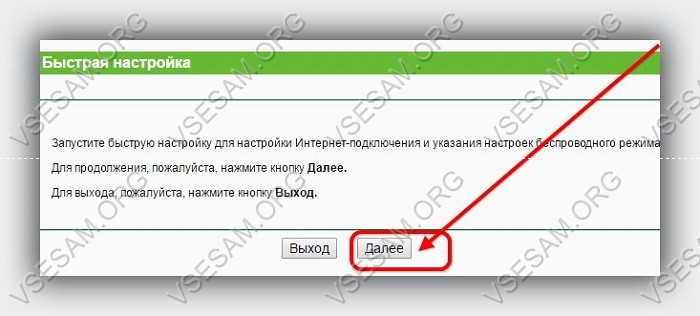
The tab will change. Choose your location and provider. If you do not find your Internet provider in the list, put a bird in front of the line: “I did not find suitable settings” and click “Next”.

Step three in setting up a TP-LINK router without a disk
Here you may need a provider to find out which item to choose. If the settings are automatic, select the first item and click next.
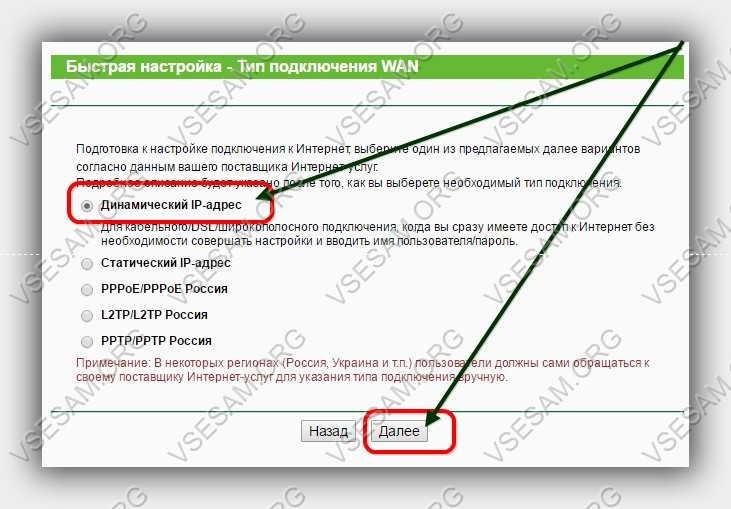
All these settings can only be obtained from the Internet provider (for example, I choose the first item).
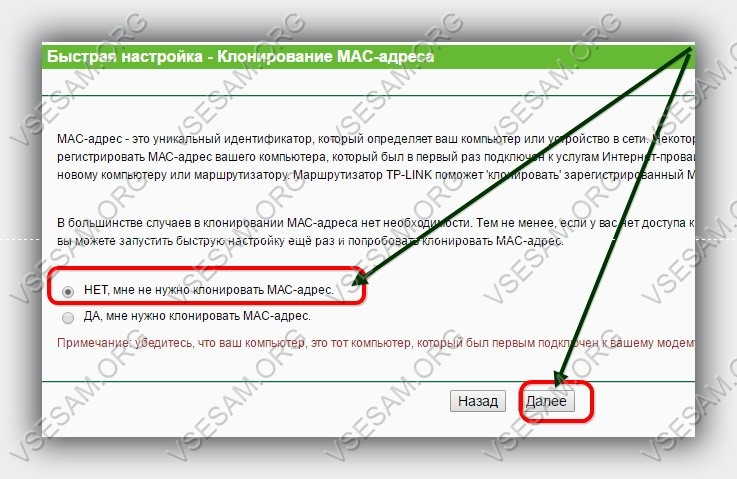
Now you have to specify or not specify the mac address, which also depends on the provider. In general, the mas address is unnecessary, it is assigned only to prohibit unauthorized access to the Internet.
If you need to specify a provider, they will tell you which one. Write it down and click next again. I don't provide an example.
Step Four in Configuring a TP-LINK Router to Distribute WIFI
Click on the menu on the left on the line: "Wireless mode", enter the name of the network (any) and wifi mode(see picture).

The first time you connect the device to the wifi network in your home, you will need to enter this password (it will be stored in the device later on and you will not need to enter it).
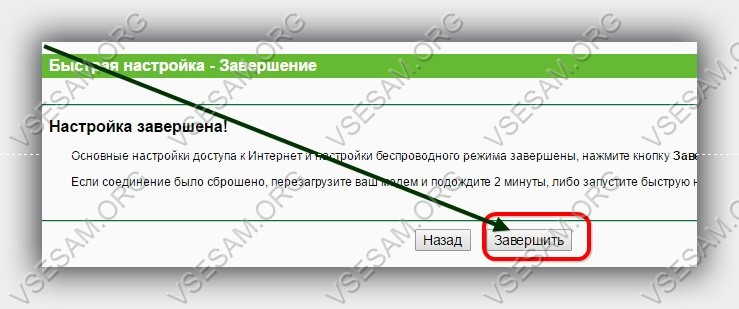
The password must be at least 8 characters long. After pressing the button "Next" will appear last mode quick settings window.
After pressing the "reboot" button, the router will reboot - wait until the page refreshes itself.
After the reboot, the device is ready to go - check that the Internet is working - to do this, open any web page.
Of course, only general settings are provided here, we can say the most common settings (basic).
Sometimes you need to specify a few more settings, but they are known only to the ISP.
If you can’t set up your TP-LINK router on your own, then in the comments I can only suggest basic settings e.g. speed, ports and so on, but some ISPs (especially well-known ones) set powerful protection so that their Internet is not "stealed".
These data are known only to them. Then call and ask. Usually they will guide you through all the settings, even over the phone, and I say goodbye and wish you success.
In this article, I will show you how to do initial setup Tp link routers. The advantage of this company in terms of settings is that almost all Tp-link routers are configured in almost the same way.
In addition, they have an intuitive color scheme ports. And even inexperienced user You don't have to think about where to connect which cable.
We will configure the router in 3 stages:
- Internet connection setup
- Setting up Wi-Fi on the router
So let's get started.
Preparing the router for configuration
We turn on the router in the network. We connect the provider's cable to the blue port on the router.
If you do not have this cable. then you can connect to the router via Wi-fi from any device. More details on how to do this can be found here.
We launch any browser and go to the site http://196.168.0.1
If the site does not open, then read this article: The router settings page does not open.
In the authorization window, enter the login "admin" and the password "admin"
If this data is not suitable, then you can reset the settings on the router. To do this, press the Reset button and hold for 10 seconds. All indicators on the router should blink. After that, we wait about a minute until the router boots up and try to log in again.
After authorization, it should open TP link page-a.
Setting up an Internet connection on a Tp Link router
To set up a connection, we will need data from your provider. They should have been given to you when you connected. If this information is not available. then you will need to call the support service and clarify how to get them. It will also be possible to clarify the protocol by which you connect to the Internet (PPPoE, PPtP, L2TP, etc.) We will configure PPPoE with you, because. This is the most commonly used protocol for connecting to the Internet.
- On the left menu, select the Network section (Netwotk)
- Next, select the protocol by which you are connecting (PPPoE, PPtp, L2Tp, etc.)
- We collect the login and password issued by the provider. (if you have a PPtP connection, you also need to specify the server address)
- Secondary connection put an end to Dynamic IP
- Mode WAN connections put a dot on Connect automatically
- Click the Save button and wait for the page to refresh.
After the page has been refreshed, open new tab. If you did everything right, then the Internet should already work. It remains to set up WiFi.
Setting up Wifi on a Tp Link router
Tune WiFi is easier simple. If you have dual band router, then Wifi is configured separately for each 2.4GHz and 5GHz band!
- On the left, select the section Wireless network (Wireless)
- In the Network name (SSID) field, specify the name of the new Wifi network with Latin letters
- Mode: 11bgn Mixed Channel: Auto
- Click Save. If the router offers to reboot, then it's too early.
Now set a password for wifi network:
- On the left, select the Protection section wireless mode(Wireless Security)
- We choose protection WPA / WPA2 - Personal or WPA-PSK / WPA2-PSK
- We select the version WPA2-PSK, and AES encryption
- Click Save
If the router prompts you to reboot the router (a red line appears), then we reboot. After the reboot, we check the WiFi connection, everything should work. Happy using!
Basic TP router setup Link any models - is not particularly difficult, mainly because the interface of the same type is used here. We will look at how to set up an Internet connection and a wireless network using the following device model as an example: TL-WR743ND. Moreover, the revision that you can buy now is “V2”. Let's get started.
Router TL-WR743ND
By appearance devices, you can understand: only one antenna is installed, which means that the speed of the wireless network is limited to 150 Mbps. But this is theoretical (the practical limit is 3.5-4 times lower). Actually, the router is one of the younger models in the line. universal devices TP Link. Nevertheless, the products of this brand are valued, and most importantly, for their reliability. It even claims support for IGMP Proxy (for IPTV applications, that is, multicast broadcasts), however, it was not possible to find any settings for this option.
However, in general, we can conclude that the TP-Link router of the model in question will be a good choice for users who need reliability. And the affordability of prices only confirms the correctness of the choice. By the way, many TP-Link are classified as companies from the USA, while Wikipedia tells us about a different origin of this company.
Nevertheless, let's answer the question of how to set up a TP Link router for IPTV ( we are talking specifically about "TL-WR743ND"). If it is supposed to be viewed through a computer, then you won’t have to configure anything (either it will work right away, or it won’t). If it still works, then in the wireless network settings you can additionally increase the “DTIM interval”, but you won’t be able to find other “specific” settings here.
Sequence of steps before setting
Hardware connection of the router
The values of all router parameters can be set via the web interface. To open the latter, you must be connected to a computer. And before setting up the TP Link router, the “LAN” port in it is connected to the computer’s network card:

Cable connection diagram
The sequence of actions is as follows:
- Connect the provider's cord connector to the "Internet" port; LAN port must be connected to a PC via a patch cord; then connect the power supply without pressing "On / Off"
- On the computer - check the correct settings of the network card
Setting up a wired connection
- At the last stage - turn on the power of the router, the computer is sent to reboot
Important to know: if the router was purchased after setting up, you must perform " hard reset". After turning on the power, you need to wait a minute, then press the reset button and hold for 5 seconds (until the indicator “quickly flashes”, installed next to with "power" light. The power of the device can then be turned off.
Go to the graphical interface
Setting up the TP Link router and any parameter in it begins with the transition to the web interface. On the computer, you need to launch any browser, and open the address: 192.168.0.1.
For those who don't like to memorize numbers, TP Link prudently flashed the domain address into the routers: tplinklogin.net. Open it, and as a login with a password, set the word "admin"
![]()
Authorization in the interface
After clicking OK, the user is prompted to automatic tuning router
![]()
Interface start screen
Here, without hesitation, you must click "Exit". And then, without fail, on the "Operation Mode" tab - set the "AP Router" mode, click "Save".

Operating mode: "router"
Basic functions of the router
Connection setup (under DHCP)
First, before configuring, you need to find out if the Internet service provider checks the value of the subscriber's MAC address. If yes, when connecting the router, do one of the following:
- Warn the provider about changing equipment (and, accordingly, the MAC address)
- Even the youngest model, the TP Link TL WR743ND router, allows you to easily “change” the value of your MAC
To perform any of the options, go to the "Network" -> "MAC Clone" tab:
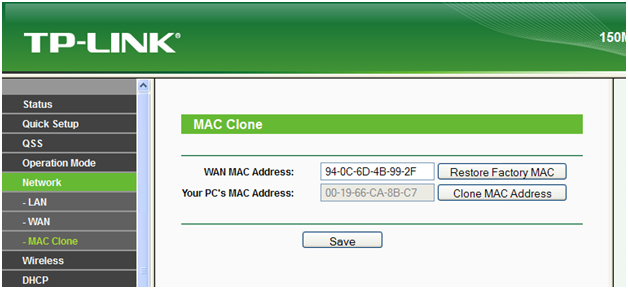
MAC spoofing
Top line - contains the present MAC value. To replace it (more precisely, copy it from the computer's network card) - press the "Clone MAC Address" button, and then "Save".
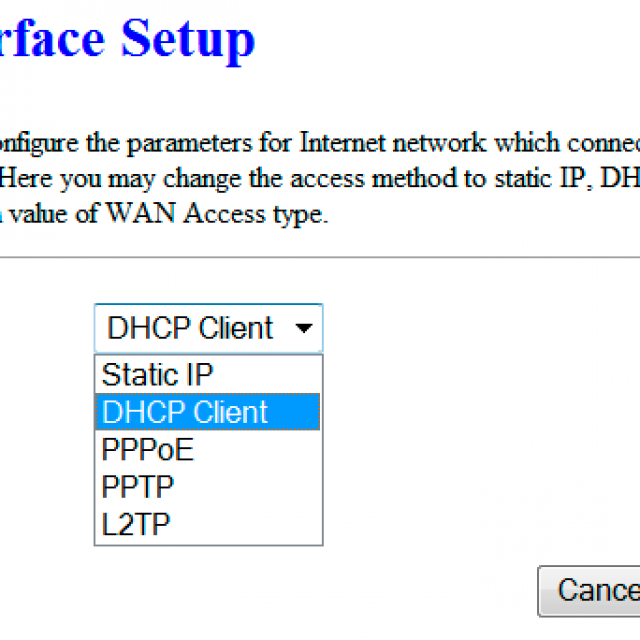
After a few seconds, you can go to the "WAN" tab and configure the connection (by setting in top list"Dynamic IP" value):

Configuring a DHCP connection
Actually, except for the type of connection, you don’t have to configure anything. It remains only to click "Save", and wait for the connection to connect.
The “WAN” block of the “Status” tab after connecting to the provider contains IP addresses and the netmask value:
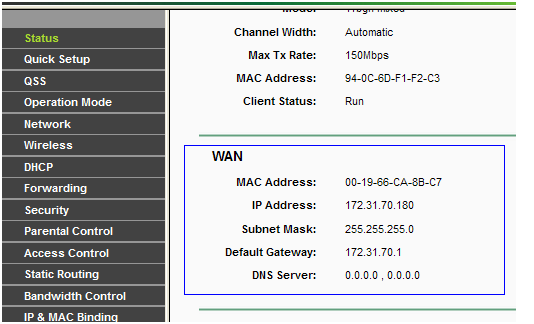
Device status tab
Successful setup!
Connection setup (under PPPoE)
Under the provider Rostelecom, setting up a TP Link router allows two options. Or the device is connected to a modem configured in the "router" mode (and the connection is configured "under DHCP"). Or, the modem is configured as a “bridge”, and the router is “under PPPoE”.
To configure the "PPPoE" connection, go to the "Network" -> "WAN" tab and set the parameter values

Setting up a PPPoE connection
Connection type - must be "Russian PPPoE". If the subscriber is not assigned a static IP address, set the switch to "Dynamic IP", enter the subscriber's data (login and password).
Turn on the wireless network
The wireless network in the router is configured on the “Wireless” -> “Wireless Settings” tab. But before setting up - go to the "QSS" tab, disable the option with the "Disable" button, click "Save". Tab for wifi settings as follows

Wi-Fi settings tab
Here you need:
- Select network name (SSID)
- Next, be sure to switch the value of the region (in Russia)
- The number and width of the radio channel - leave in "Auto"
- Mode - set the value to "mixed". But this setting wifi router and TP Link allows the use of the value "11n only" (set it if all subscriber devices WiFi support "802.11N" protocol)
- If you want to work "on a hidden name" - then you need to uncheck "Enable SSID ..."
Finally, click "Save". notice, that wireless network will become active after the device is rebooted (use the reset button or the “System Tools” -> “Reboot” tab). Happy routing!
Wi-Fi traffic encryption
If you need to enter the Wi-Fi network using a password, and wireless traffic must be encrypted, you need to go to the "Wireless Security" tab

WPA/WPA2 PSK Setting Box
You need to configure the TP Link WiFi router either to "WPA" or to "WPA2" (the value is set in the top list). The second one is for Windows XP SP3 or higher.
Setting up an L2TP connection