For some reason, many people think that it is very important to use the "Safely Remove Hardware" feature before removing flash drives from a USB port. When working with older operating systems, this is required in order to avoid damage to the flash memory. However, operating systems have evolved, and the Safely Remove Hardware feature has remained a mere formality.
In fact, there is nothing wrong with disconnecting the flash drive without using the aforementioned dialog box, although you should not do this during a data transfer. Modern operating systems even allow you to activate the option to quickly remove USB devices. In this article, I will tell you how to do it.
Step 1: Open Device Manager by typing "Device Manager" into the search box on the Start menu.

Step 2: Once the Device Manager window opens, select and expand Disk Drives from the list. This will allow you to see all internal and external drives. USB devices will always have the word "USB" in their names.

Step 3: Select the device for which you want to disable the need for safe removal. Double-click on it and go to the "Policy" tab, where you will be presented with two options - quick removal and optimize for performance. In the second case, you will have to use the "Safely Remove Hardware" option.

However, do not think that by disabling optimization, your flash drive will run slower. Testing showed that in both cases the performance is almost identical. Select "Quick Remove" and click OK.
You should now be able to unplug your flash drive without having to perform a secure removal process.
Have a great day!
It's safe to just turn off the tablet and then pull out the flash drive, I always do this. But if there is a function - to remove the USB flash drive, then you can not turn it off, but click on it and stick it out. It's like this function is written on the computer at the very bottom.
For this procedure, you need to go to settings our android, then in the menu you need to select from all the options provided - Memoryquot ;, then just click on the next step Disable memory card .
In order to safely remove a flash drive from an Android tablet, you need to click on the flash drive icon in the lower right corner and select safely remove the devicequot ;. Or this can be done through the menu: you need to go to the settings, select the menu item Memory and press turn off memory cardquot ;. Or you can simply pull the flash drive out of the tablet, the main thing is that at this time there is no copying, that is, data transfer, since information may be lost.
If the questioner: how to safely eject flash drive from android pla nsheta ?, I meant a flash memory card, then it is very simple to do it, just like on any other tablet and the operating system has nothing to do with it. You just need to first, that is, before removing the card itself from the tablet, go to the settings and turn off the memory card. Then it can be safely pulled out and all data on it will be saved.
It is considered safe to remove a flash drive at the moment when there is no data exchange, it is then that you can pull it out with a smooth and uniform, not sharp movement of your hand, even if the tablet is still on. But if you want complete security, then in this case you can simply turn off the device and remove the USB flash drive, which will be the most correct way to eat, but this will take more time, since you need to wait until everything turns off.
We go to settings our android device, select the menu Memoryquot ;, click on Disable memory card and now we can safely remove our memory card from the slot.
On a tablet, I rarely remove the flash drive, as I use a usb cable to transfer files. But if you need to remove a flash card from an android tablet, then I do not use any safe extraction. As far as I know, there is no such function on the android tablet. However, I have heard that it is safest to remove the flash drive from the switched off tablet.
And if you just pull out the flash drive, nothing bad will happen, all the information on it will remain safe and sound.
In different tablets, this can be done in its own way.
The easiest and most reliable way, suitable for all tablets, is to simply turn it off and then pull out the USB flash drive. Another way is to go to Settingsquot ;, then Memory and Disable memory card (this is the flash drive). Or maybe so - Settingsquot ;, also Memoryquot ;, after that item USB and Extractquot ;.
The most important thing is to wait for the operation, which is associated with the transfer of data or requests to a USB flash drive (from a USB flash drive) in the tablet, otherwise you can not spoil or lose all the data.
How to safely eject a flash drive from an android tablet?
In order to safely remove the flash drive from the android tablet, you just need to turn off the tablet and remove the flash drive while it is turned off, if this is not done, there may be consequences, for example: everything can be deleted from the flash drive, the tablet may no longer read the flash drive, it may burn out.
Connecting a flash drive to a smartphone is easy. To do this, you only need support for a special protocol and several programs.
Definition of OTG support
Read also: TOP 12 Best USB flash drives for all occasions: for music, movies and data backup
To connect an external drive to a mobile device, you must first make sure that your smartphone supports OTG (On-The-Go) technology, which allows you to supply power to an external device via a USB port.
It is worth noting that this function is implemented only in Android systems, starting from version 3.1.
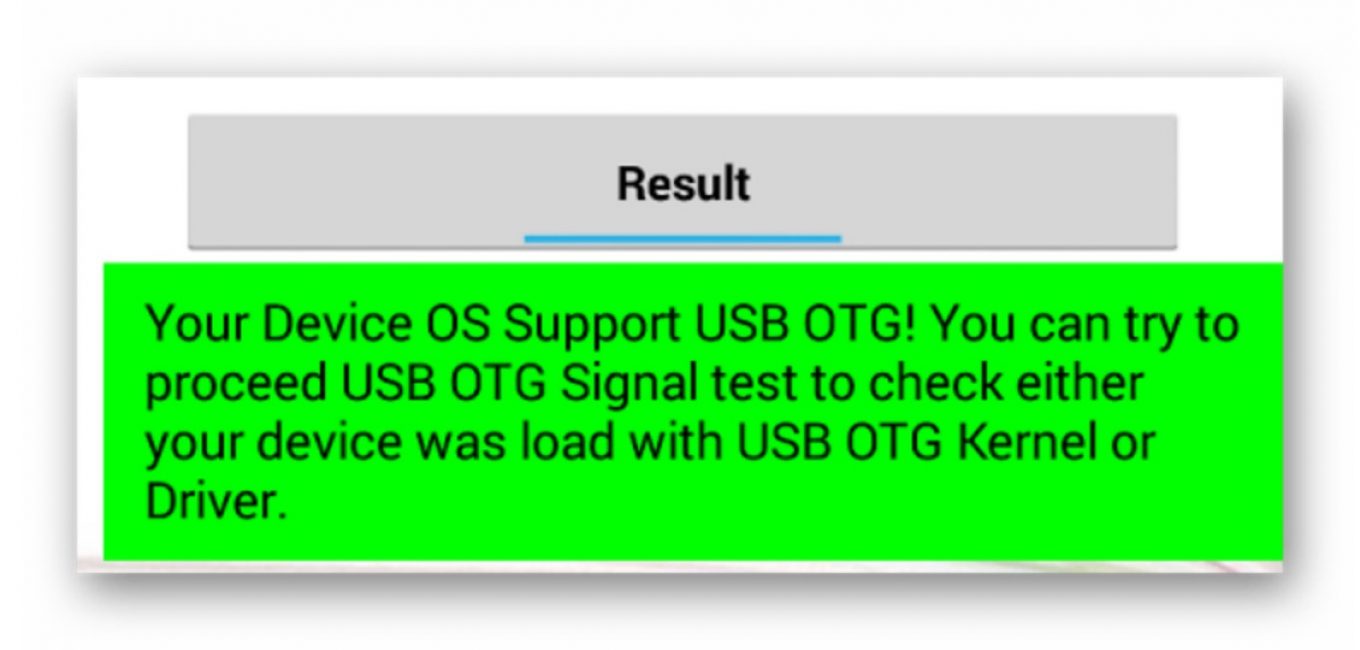
In order to make sure whether your mobile device supports the OTG function or not, you can use a small program called USB OTG Checker.

After the program tests your smartphone, it will display one of two messages.
First- in case of a positive result, implying that the device supports OTG technology.
In this case, you will see the following message on the monitor screen:
If your mobile device does not support the OTG function, you will see the following information window:

In the variant with a positive result, you need to purchase a special adapter in the distribution network that allows you to connect an external drive (flash drive) to the Micro USB socket of your mobile device.
Some manufacturers took care of this in advance and equipped their smartphones with a branded OTG cable.
If you want to connect several external drives or other devices to your smartphone at once, you will have to use the USB HUB.

Nowadays, it is quite possible to find a flash drive on sale that has both a USB and a Micro USB plug. It is quite convenient, as it allows you to refuse to use an OTG cable.

Connecting a flash drive in OTG mode
Read also: TOP 12 Best Memory Cards for Smartphones, Cameras and DVRs | Overview of popular models + Reviews
It is impossible not to talk about such a useful technology as connecting a flash drive in OTG mode. Among its advantages is the fact that it is supported by most devices.
So the user does not have to suffer for a long time trying to connect an external flash drive to the gadget.
With one small cable, you can easily synchronize your existing devices for fast data transfer.
Such an adapter is inexpensive, so that everyone can easily purchase and try it. Here are two ways to check for OTG mode:
- Check out the specifications provided by the manufacturer.
- Having bought a suitable device, check its performance in practice.
If the gadget is not able to see the flash drive, we can say that the manufacturer, for his own reasons, deprived the device of such an ability.
VIDEO: How to connect a flash drive (disk) to NTFS via OTG on Android
How to connect a flash drive (disk) to NTFS via OTG on Android
Connecting a flash drive to a smartphone: Four ways (plus a bonus)
Connecting a flash drive using USB
Read also:Simka and memory card - How to install in one slot?
Many modern devices running the Android OS have a standard micro-USB connector. So connecting a flash drive to a smartphone is very simple.
The flash drive will work on the device if the On-The-Go technology is loaded. Manufacturers have been implementing a similar function in the gadget since the latest version.
Usually, modern mobile devices have a micro USB connector, so the user cannot do without a USB cable and an adapter for a flash drive.
Most manufacturers include adapters for flash drives. If it is not there, you will have to purchase it at a digital technology store.
If you cannot find a micro connector on the device, then most likely you will need to purchase not only a cable, but also a special adapter.
Of course, this will be quite inconvenient, since you will have to use several cables to successfully connect an additional device. However, this is the only way to connect a USB flash drive in this case.
It is also worth mentioning the opening of an additional device. You can cope with this task by downloading one of the file managers.
Often it is already installed by the manufacturer along with a certain set of programs. If the file manager is missing, it will have to be installed.
As for Android smartphones, the most common are Total Commander and FX File Explorer. The user can choose the application he likes.

Connecting a flash drive to an Android device using StickMount
Read also:MicroSD formatting, write protection and how to remove it - All methods
If the user has access to a mobile device, then he can automatically install a USB flash drive with access to it from any file manager.
You can use the free app for this. stick mount(if you wish, you can use the paid Pro version, which is also available on Google Play).
DownloadAfter connecting the gadget, open stick mount and give this application superuser rights.
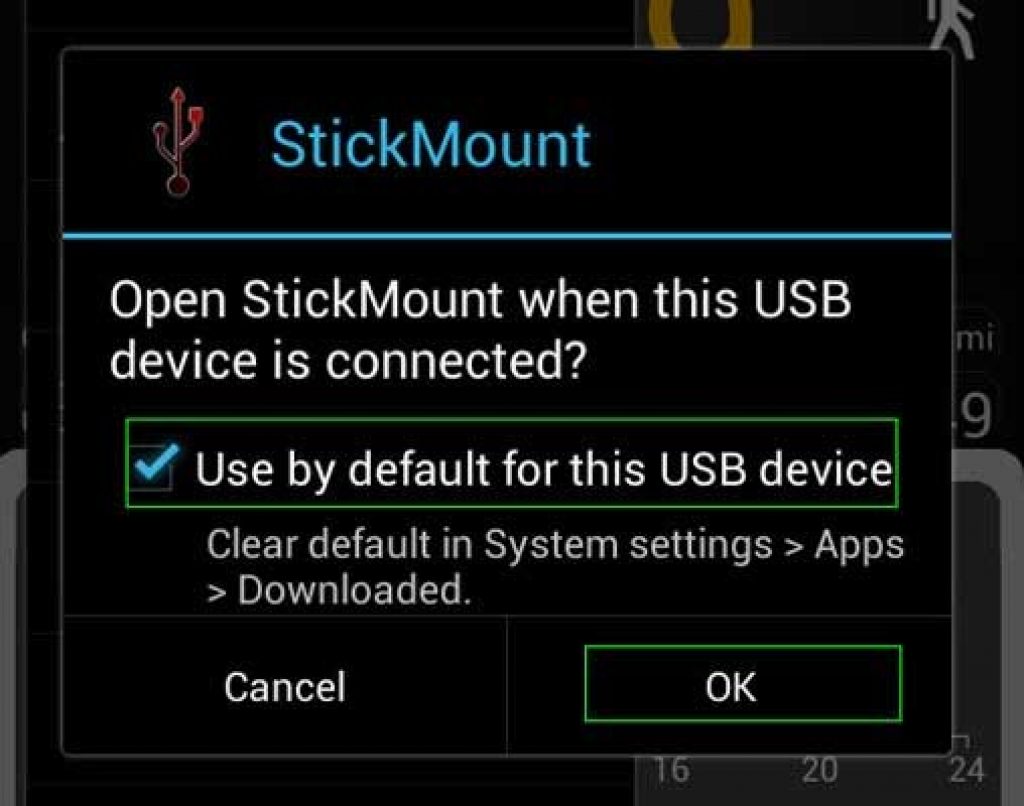
After these steps, the user will have access to the files downloaded to the USB flash drive, which will be located in the appropriate folder in the file manager.
Support for a variety of file systems is affected by the device and its firmware. Most often this is fat or etxt2.
Quite often different file systems from Linux are used. Be sure to take this into account when connecting a flash drive.
To work with them, you do not need root rights on the device. That's just downloading them for a fee. Further, they will be discussed in more detail.
USB Media Explorer
Read also:How to remove write protection from a usb flash drive - Solving basic problems
Among the main features of USB Media Explorer (formerly Nexus Media Importer) is the fact that free memory for user information is limited.
But it is able to quickly stream the content of any flash drives that are connected to the USB cable to the device in use in the form of conductors.
Please note that this may cause possible problems in the process of applying the add-on on Android 3.x.
For this device to work properly, you need the following:
- A gadget controlled by the Android O system. The corrupted lists of such devices include Google Nexus 5 and Moto X. It also consists of Galaxy Nexus and Motorola Xoom. Try the free Nexus Motorolla Xoom first if your device is not on this list and is not supported due to hardware limitations.
- You can't do without a USB cable, which costs about $10.
- You will also need a card reader with a built-in memory card. Before connecting an external hard drive or other device, be sure to go to the official website and read the instructions.
Please activate the license before using NMI without internet connection.
To do this, when the Internet is connected, you just need to run the installed application.

Read also:How to connect a modem to an Android tablet (Android) The easiest ways in 2018
Using the Nexus USB OTG File Manager application, you can easily copy files to a storage device that is equipped with the FAT 32 file system. To do this, you need to use the USB port.
As a result, the user will be able to work with documents, not only in the internal memory, but also on the USB gadget.
He will be able to edit the names of various files, as well as add and remove the necessary folders.
A similar application was developed by the creators of Nexus products equipped with an On-The-Go port. An example is the Nexus 5 and 7.
However, this program is able to work with any other devices, including different versions of Android.
Also, this add-on has a large number of new features. So, it can open the necessary files directly from USB and does not transfer data to the Internet.
Thanks to Advanced More, the user gets access to all documents from his device.
Advanced users will surely appreciate this feature. Such application is the property of Google.
Also, with the help of this application, the user can easily download various modern games for android. They can be downloaded from sites that specialize in games.
Working with this program is a real pleasure and satisfies the needs of the user.

Instruction
If extracting the flash map, you just pull it out of the USB, you are doing a serious . At first, you may not notice any negative consequences, however, with a systematic extraction from a PC in this way, you will observe the loss of files written to the device, as well as incorrect work with them. In order not to harm those recorded on the flash map documents, it must be extracted properly.
Before you pull out the flash map from the USB port, make sure none of the files written to the device are in use by the system. If you are listening, close the player; if you are working on certain files, exit applications that use flash card resources. However, do not rush to pull it out immediately after it will be with all the files and applications. During its activity, the flash card creates certain processes that cannot be terminated by closing any program window. Their correct completion and subsequent must be done as follows.
Find the device shortcut on the taskbar, which should be next to the time display window. Right-click on the shortcut and wait for the menu to appear. In the window that opens, click on "Remove Device". After waiting for the flash card to be removed from the computer, you can safely pull it out of the USB port. By removing the flash drive in this way, you save its working life much longer than by simply disconnecting the card from the PC.
Sources:
- Convert movies and videos for Nokia 5800, 5530, N97, 5230
Map memory, or a flash card, a disk drive - a storage medium for a set amount (from 32 MB to 64 GB and more). Cards differ memory for phones, cameras, computers and other items of electronics and technology. take out map memory in each case, one of the proposed algorithms can be used.
Instruction
Extract map memory from you can, after disabling it on, in the panel at the bottom of the desktop. Locate the icon for a removable device, right-click, then click Disable from the menu. Wait for the message about disconnecting the device and pull out map from the USB port.
Related videos
Incorrect ejection of a flash drive can harm the information stored on it, destroying some files. Based on this, the extraction of the device must be performed in the correct way.

You will need
- Computer, flash card.
Instruction
Before pulling out the flash drive from the USB port, it must first be correctly inserted and opened. It is possible that when you start, you will download a lot of malware to your PC. This can affect the operation of the entire system as a whole, as well as harm components.
Correct flash activation. After inserting it into a free USB port, and after waiting for it to be detected by the system, do not rush to open documents stored on the device. First, you need to check its contents for malware using antivirus software. You can do this in the interface of the antivirus software by checking the flash card, or through the properties of the flash drive (by clicking on the device label with the left mouse button, select the “Check for”).
Proper removal of the device. As many users think, to stop working with a flash drive, it is enough to pull it out of the USB port. No, it's not. The first step is to safely remove the device. For this operation, the corresponding label is responsible, which appears on the flash card when it is turned on. Right-click on it and select the "Safely Remove Hardware" option. As soon as the operation is completed, a notification will appear about the possibility of removing the USB flash drive from the USB port.
Related videos
The Windows operating system has a standard mechanism for injecting arbitrary data into dynamic libraries and executable modules, as well as an API for working with them. Images, string tables, dialog templates, toolbars, menus, and other information are added to PE modules as resources. Sometimes, for various purposes, it is required to pull resources from a compiled module.

You will need
- is a free Resource Hacker program available for download at rpi.net.au/~ajohnson/resourcehacker.
Instruction
Upload the PE module file to Resource Hacker. In the main menu of the application, sequentially click on the File and Open items or press the Ctrl + O key combination on the keyboard. A file open dialog will be displayed. Change to the directory where the target file is located. Highlight the PE module in the catalog listing. Click the "Open" button.
Determine the list of resources to be pulled. After loading the PE file, a tree structure will be displayed on the left side of the Resource Hacker main window. It is a list of all module resources grouped by type. So, for example, dialog resources are placed in the Dialog section, cursor resources - in the Cursor and Cursor Group sections, icons - in the Icon and Icon Group sections.
The nodes of the second level of the hierarchy contained in each section are numeric or symbolic resource identifiers. Expand them and select nested elements. This will render the corresponding resources. Icons, cursors, bitmaps will be displayed as images in the right pane of the main application window. For string tables, accelerators, version information, dialog templates, menus, toolbars, code will be built and displayed in a format suitable for use with the RCC compiler. In addition, dialog templates are rendered in a separate floating window.
Start the process of saving the resources found in the previous step. Highlight the desired item in the tree structure on the left. Open the Action section of the application's main menu. Select the item corresponding to the save operation of the most suitable type.
Select "Save resource as a binary file ..." if you want to save the resource as a binary data fragment identical to that contained in the PE module.
Select "Save resource as a *.res file ..." to get a file containing a compiled version of the selected resource. Such a file is suitable for linking with an application or library.
Click on the item with text like "Save [Section name: subsection name: resource name] ..." to pull out the resources in their original form. This menu item should be used to extract files of icons, cursors and images.
Pull out resources. In the dialog titled "Save resource to...", specify the name and directory of the file to be saved. Click the "Save" button.
Different models of Nokia phones use a different organization for adding additional memory modules. In some cases, a slot is used under the battery, and in some cases, the card is installed in the side wall of the case.

You will need
- - flat screwdriver.
Instruction
Press the button to turn off the Nokia 5230 mobile phone without holding it, and then in the menu that opens, find the item to stop operations with the card for its subsequent removal. Confirm the shutdown of applications, wait until they stop working completely and remove the card from the mobile phone by pulling it towards you.
When removing the card, it is best to use tweezers or pry it with a non-sharp flathead screwdriver or similar object. Do not use sharp knives or scissors, you may damage the card or phone connector. If there are traces of interference in the design of a mobile phone, you may lose the warranty obligations of the seller and manufacturer.
If you have difficulty removing the drive from your Nokia mobile device, use the instructions on the first pages of the user manual that comes with the package, which contains a detailed diagram for removing the memory card, SIM card, battery and phone cover. If for some reason you do not have a user manual, you can download it from the Internet, while paying attention to its compliance with your mobile device model.
If you are having trouble removing the memory card or other mobile phone add-on modules, contact your device dealer for assistance, it is possible that this is a physical defect. In this case, do not try to fix it yourself, but contact the service centers of your city for repair.
Please note that physical damage is often not repaired under warranty, since it does not cover external defects discovered after purchase and issue of a warranty card.
Sources:
- how to remove flash drive from phone
Often, car owners are faced with such a problem as fluid leakage from the cooling system. One of the reasons may be rusted plugs in the engine block of a car. To fix the problem, just pull them out and put new ones.

You will need
- - chisel or beard;
- - hammer;
- - pliers;
- - screwdriver;
- - a pointer with a magnet;
- - new plug;
- - skin;
- - sealant.
Instruction
Unscrew the "negative" terminal and remove it from the battery. Drain the coolant from the radiator and cylinder block. Evaluate the possibility of access to the cylinder block plugs. Remove the block head if necessary. To do this, disconnect the muffler pipe from the exhaust manifold. Remove the coolant pump feed pipe bracket.
Remove the air filter by first disconnecting the ventilation hoses from the cylinder head cover and from the carburetor. Close the carburetor with a special cap.
Disconnect the wires from the spark plugs and the ignition distributor sensor, from other sensors and the carburetor. Remove the ignition distribution sensor, disconnect the fuel supply hose from the fuel pump, the fuel drain hose from the carburetor, disconnect the vacuum brake booster hose and hoses from the outlet pipe of the engine cooling jacket.
Disconnect the carburetor throttle and choke cables from the engine, remove the toothed belt cover and the cylinder head cover. Unscrew the nut securing the tension roller and remove the roller with the axle and spacer ring, and then the belt from the camshaft pulley.
Unscrew the mounting bolt and remove the pulley with the key, unscrew the nut securing the toothed belt to the cylinder head. Remove the mounting bolts and remove the cylinder head.
Take a chisel or barb in one hand and a hammer in the other. Place a chisel on the edge of the plug. Gently tap the chisel with a hammer. The plug should turn. Pry it up and pull it out with pliers. If the plug is so rusted that it does not turn, drill a hole in it, screw a knob into it and remove it.
Use a pointer with a magnet if you need to pull out a plug that has fallen in. Such a pointer should be in the tool kit, if necessary, it can always be purchased at any car dealer. Pulling the fallen plug to the hole, pull it out with pliers.
Remove rust from the edges of the hole with sandpaper. To improve tightness, before installation, you can smear the edges of the new plug with sealant. Place a plug in the hole. Press it in using a suitable mandrel and a hammer.
Reinstall the cylinder head. Fill the cooling system with antifreeze or water. Connect the "negative" wire to the battery. Check the operation of the car's engine.
note
Cylinder block plugs are used to protect the block from damage in the event of water freezing in the cooling system. When water freezes, these plugs are squeezed out, and the block remains intact.
Sources:
- Assembly and disassembly of the cylinder head Lada Priora
- block plug replacement
Sometimes in the Windows operating system with window some program, a strange thing happens - in a minimized and maximized state, its behavior is normal, and in a medium-sized window, the application disappears outside the visible area of \u200b\u200bthe screen. There are ways to get a window rolled off the desktop, and they are not that complicated.

You will need
- Windows OS.
Instruction
The first way to extract an object from the invisible area is to entrust all manual operations for its positioning to the operating system itself. To do this, in addition to the problematic window, open at least one more that belongs to any application - for example, launch "Explorer". Then right-click on free space on the taskbar to bring up the context menu. Instruct the OS to arrange open windows in one of the ways listed in the menu - "Cascade windows", "Display windows in a stack" or "Display windows side by side". After that, the behavior of the lost window will return to normal.
Another way is to use keyboard controls to position the window. After turning it on, there will be no need to reach the window title with the mouse pointer in order to be able to move it. To enable this mode, press the combination of "hot keys" Alt + "Space" + "P". Then use the arrow keys to move the hidden window to the visible area of the desktop. To turn off the keyboard positioning mode, click anywhere with the left mouse button.
The third way is to expand the available desktop space. You can do this by increasing the screen resolution. If you are using the latest versions of Windows 7 or Vista, right-click the background image on the desktop and select the item that is named “Screen Resolution” from the pop-up context menu. The OS will launch one of the "Control Panel" applets, where you need to open the "Resolution" drop-down list and move the slider up, preferably to the very top mark. After that, click the "Apply" button. The applet will change the resolution and start a timer, after which the change will be canceled. In the allotted time, you need to press the confirmation button of the operation. Having done this, find the missing window, move it to the center of the desktop and return the screen resolution to its previous value.
Nobody is immune from accidents. For example, they accidentally formatted a flash drive, deleted some personal files, photos on the camera, or the annual chief accountant on the last evening before submitting the report. But there is no need to despair. All is not yet lost.

You will need
- Zero Assumption Recovery Program
Instruction
First, and most importantly, that the hard drive is detected in the BIOS and is physically intact. It is clear that if the hard drive fell from the 5th floor and shattered into pieces, then there is nothing to help it.
After starting the program, press the Proceed button to continue working.
![]()
Let's analyze two ways to safely remove memory cards (microSD and the like), commonly referred to as "flash drives". Nothing complicated, information for absolutely newbies.
The first way to safely remove a microSD flash drive from a tablet is through the system settings. To do this, go to the settings in the "Memory" section.

Graphs will open with information about the free and occupied space in the internal memory of the tablet and on the flash drive. Scroll to the bottom and select "Eject SD card".

After clicking, you will receive a notification that some applications may stop working. This is due to the fact that applications often load some of their data onto a memory card in order to take up less free space in the device’s memory. Agree with the warning by clicking "OK".

It will take a few seconds before the card is unmounted. The tablet will disable running applications that take files from the flash drive for their work, and then notify you that the flash drive can be removed. 
The second way. There are times when, for some reason, the tablet does not have an item responsible for safely removing the flash drive. This is not a big deal, as you can simply turn off the tablet with the power button, after which the flash drive can be safely removed. By the way, sometimes there are cases when a flash drive cannot be unmounted in the standard way for a very long time. No need to freak out and take out the flash drive - there are sad cases of data loss. So it's better in this case, either wait or turn off the tablet if you're tired of waiting, and then remove the flash drive.


