Manually editing the Windows registry to remove Error 11 keys that contain errors is not recommended unless you are a PC service professional. Mistakes made when editing the registry can render your PC inoperable and cause irreparable damage to your operating system. In fact, even one comma placed in the wrong place can prevent your computer from booting!
Because of this risk, we highly recommend using a trusted registry cleaner such as WinThruster [Download] (developed by Microsoft Gold Certified Partner) to scan and repair any Error 11-related issues. Using Registry Cleaner [Download] you can automate the process of finding corrupted registry entries, missing file references (such as those causing the %%error_name% error), and broken links within the registry. Before each scan, a backup copy is automatically created, allowing you to undo any changes with one click and protecting you from possible damage to your computer. The best part is that fixing registry errors [Download] can dramatically improve system speed and performance.
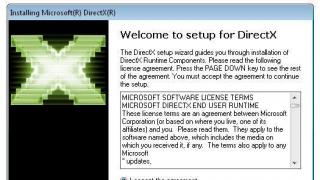
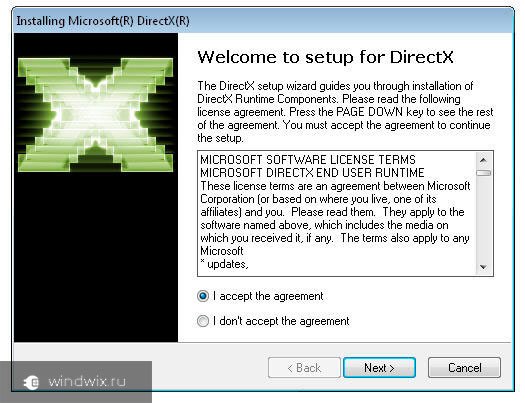
Warning: Unless you are an experienced PC user, we DO NOT recommend manually editing the Windows Registry. Using Registry Editor incorrectly may cause serious problems that may require you to reinstall Windows. We do not guarantee that problems resulting from incorrect use of Registry Editor can be corrected. You use Registry Editor at your own risk.
Before you manually repair the Windows registry, you need to create a backup by exporting the part of the registry related to Error 11 (for example, DirectX):
- Click on the button Begin.
- Enter " command" V search bar... DON'T CLICK YET ENTER!
- While holding down the keys CTRL-Shift on your keyboard, press ENTER.
- A dialog box for access will be displayed.
- Click Yes.
- The black box opens with a blinking cursor.
- Enter " regedit" and press ENTER.
- In the Registry Editor, select the Error 11-related key (for example, DirectX) that you want to back up.
- On the menu File select Export.
- On the list Save to Select the folder where you want to save the backup DirectX key.
- In field File name Enter a name for the backup file, for example "DirectX backup".
- Make sure the field Export range value selected Selected branch.
- Click Save.
- The file will be saved with extension .reg.
- You now have a backup of your DirectX-related registry entry.
The following steps for manually editing the registry will not be described in this article, as they are likely to damage your system. If you would like more information about editing the registry manually, please check out the links below.
Some Call of Duty fanatics often encounter DirectX error when launching COD. At the same time, the game does not start and displays the message “DіrесtХ encountered an unrecoverable error”. This kind of trouble happens not only when turning on COD, but also when launching other gaming applications. The article below provides ways to resolve this error.
1. Check system requirements
Most of the latest games require DirectX software versions 11 or 12. If you have other versions installed, it will be problematic to run newer games.
To check the DirectX version for the game, do the following:
- Open the game's page on Steam. Find DirectX requirements.
- Press the key combination Win + R. In the dialog box that opens, enter “dxdiag”. Click OK.
- A window will appear with information about whether your hardware meets the requirements of the game, as well as the installed version of DirectX.
We would like to warn you that DX 12 is only available for Windows 10, and DX 11 is for OSes starting from Windows 7. When updating the OS to the latest version, the directory is installed automatically on all systems.
2. Reinstall the video card driver
- Open the device manager (Win+R), enter devmgmt.msc in the text field.
- We find the video adapter.
- We write down the manufacturer and model of the video card.
- We go to the manufacturer’s website, look for the Drivers and support option.
- You will see two options for installing the software:
- manual;
- auto;
- Select manual installation and fill in the fields:
- product type (we need a graphics adapter driver);
- graphics adapter type;
- series of your video card;
- Windows version.
- Click Display Results.
- In the window that appears, click the “supported products” tab and look for your model.
- Go to the “Features” section and download the largest file. We remember the location of the downloaded installation file. (Other manufacturers' product downloads may vary.)
- In the device manager, right-click on the video adapter, from the drop-down list select “Properties” -> “Driver” tab -> “Remove device”. We confirm.
- We find the installer for the downloaded software for the video card and launch it, following the instructions of the installation wizard. When finished, reboot the PC.
3. Display scaling setting
In Windows 10, right-click on an empty area of the desktop, and from the drop-down list, select Display options->Custom scaling". Enter your own DPI scale value.
- The current DPI scale value should be 100 units. Set the parameter, apply the action.
- Then click Sign Out. (In Windows 8, drag the DPI scaling bar slider all the way to the left.)
4. Edit the registry
Correcting registry entries may help resolve the error.
Greetings, dear readers.
Often, users of computers with Microsoft operating systems encounter a problem when a DirectX error appears during installation. This program is a set of active libraries that are needed to create programs. Most often used in game development. And accordingly, to launch the application, this solution must also be on the device. But what to do if you don’t have the necessary utility and problems arise when installing it? In the following article I will try to consider the main causes of the disease and solutions.
When an error occurs, the program itself prompts users to go view the files and directx.log in the Windows folder. It’s worth clarifying right away that simply reading the information does not pose any threat to your computer. True, if you are not very well versed in this area, most likely the data will seem like just a set of characters, especially in .
Installation file( )
The first thing to do is try using a different installer. It is possible that the file was not downloaded completely and is infected with malicious code. You can confidently try the application that is offered on .
Bit depth( )
Before you start downloading DirectX to your computer, make sure that you have selected the appropriate bit size for Windows 10 or any other version.
It's easy to find out the version you need. To do this, call the context menu on the icon " Computer" and select " Properties" A new window will open where you need to pay attention to “”.

After the appropriate version has been downloaded, we begin the installation. To do this, simply click LMB twice on the corresponding icon.
Antivirus( )
Often the cause of problems with an application is the antivirus software you are using. Usually the illness is accompanied by the following message: “ Cab file is not trusted».
The solution is to disable the corresponding element during installation. It’s better to do this before you start downloading. After all, he can block even before the process begins. This is usually accompanied by a message that the installer was unable to load the file or individual component.
Cleaning( )
Sometimes on Windows 7 the problem described above occurs as a result of a “clogged” operating system. To solve this, you need to use a special program that allows you to configure many aspects of the OS in detail, including complete cleaning.
It is considered one of the most popular. It is worth installing the application and performing all the necessary movements using the prompts.

The solution allows you to say goodbye to unnecessary items in the recycle bin, the system registry, unused context attribute values and other “garbage” without any complications.
After that, we restart the device and try to install it again.
Rights( )
In some cases, users may simply not have access.
To get out of the situation, call the context menu on the installation file. And then select “ Run as administrator».

Installation ban( )
Windows 8 and any other versions of Microsoft operating systems provide the ability to create multiple accounts. Moreover, for each of them you can prescribe certain conditions according to which users will act.
Sometimes the main problem is the ban on installing anything at all on the computer under the account you are using. The problem is solved as follows:

You can also create a new user with the appropriate capabilities from the start.
Internet installer( )
Another solution to the internal system error is to use a web installer. To do this, you need to perform several steps:

As a result, the installer should start and place all the necessary elements.
Driver( )
Sometimes the reason for failure to install the required assembly components into the system is the use of an incorrect driver for the video card. This usually appears after launching a game that requires certain resources for the picture. These are: the latest versions of GTA, DeusEx, NFS and most modern projects.
Solving the problem is simple - go to the official website of the creator of your part and download the required installer. If you have a laptop, you can contact the manufacturer’s main online resource, where you will find the appropriate software.
Well, as you can see, there can be many problems affecting placement in the DirextX system. If none of the points helped you, you might want to think about reinstalling the operating system.
If you suddenly don’t understand something, there is always the option of watching a video on this topic:
I hope this article helped you cope with your illness. Subscribe and tell your friends!
Some games may experience component errors when running some games on a Windows computer. This is due to a number of factors that we will discuss in this article. In addition, we will look at options for solving such problems.
The most common problem with DX components is users trying to run an old game on modern hardware and OS. Some new projects may also throw errors. Let's look at two examples.
Warcraft 3
“DirectX could not be initialized” is the most common problem encountered by fans of this masterpiece from Blizzard. When launched, the launcher displays a warning window.

If you press the button OK, then the game requires you to insert a CD, which is most likely out of stock, into the CD-ROM.

This failure occurs due to incompatibility of the game engine or any of its other components with the installed hardware or DX libraries. The project is quite old and written for DirectX 8.1, hence the problems.

GTA 5
Grand Theft Auto 5 also suffers from a similar problem, and before the error appeared, everything worked correctly. When I try to start the game, the following message suddenly appears: “DirectX cannot be initialized.”

The problem here lies in the . In most cases, updating followed by a reboot helps. Also, if you close Steam and launch the game using the shortcut on the Desktop, the error will probably disappear. If this is the case, then reinstall the client and try playing normally.
In discussions and forums, many questions appeared such as: The game crashes DIrectX Error in The Walking Dead: A New Frontier. In this article we will tell you what to do with the DIrectX Error.
Fixing DIrectX Error in The Walking Dead
The fact is that the game The Walking Dead: A New Frontier cannot start without an update, which you can download from the official Microsoft website, here is the link: click!
DirectX Windows 10 error in The Walking Dead: A New Frontier
This method only works on Windows 10, but there is a possibility that for some it will work on Windows 8 and 7... So it’s not torture to try...
Solution
First you need to download this file:
https:+//yadi.+sk/d/wzCN+IlsL34Qun8
(Remove all the pluses)
Next, go to this file and click the EditList button. Next, click on the three dots and select the EXE file of the game (It can be found in the game folder), click ADD and OK.
Next, check the box for ForceWarp, accept it and press ok. That's all!! Launch the game
What to do if it doesn’t help
Thus, The Walking Dead: A New Frontier will no longer crash due to a DIrectX Error. If, when downloading an update, “The update is not possible on this computer” appears, then you need to download the 500 MB update, and only then the 11 MB update. Also update Directx if necessary.