Naturally, in order to make it convenient to work at the desktop, everything you need should be placed on it in the order that is most suitable for a particular user. Therefore, it is very important to properly organize your workplace before starting work, and in our case, set up the desktop and all the tools on it.
Desktop customization
First of all, it is worth placing shortcuts to all programs and files that may be useful in your work on your desktop. Most programs automatically create a shortcut on the desktop during installation, and if not, you can create one by accessing the Start menu, which we will talk about later. If some shortcut seems superfluous to you, you can easily remove it from the desktop, and if necessary, restore it using the same Start menu. You can place shortcuts in the order convenient for you simply by dragging them around the screen while holding down the left mouse button.


But just placing shortcuts doesn't end desktop customization. In order to make the work as comfortable as possible, it makes sense to use the settings menu. To call it, just right-click anywhere on the desktop.
Using the settings menu, you can increase or decrease the size of icons on the desktop, as well as change the size of text and other elements. In addition, using the "Personalization" section, you can change the desktop design, screen saver and "wallpaper", the appearance of menus and folders. In a word, the desktop can be made not only functional, but also as attractive as possible.
At the bottom of the desktop is the so-called "Taskbar". It consists of several tools, each of which we will consider in more detail.


Start menu customization
In the left corner of the Taskbar is the "Start" button, when clicked, a menu of the same name opens. Its use simplifies access to frequently used programs, the Internet, e-mail, and so on. In addition, the Start menu gives you access to the computer control panel, in which you can configure all of its components. Just like the desktop, the Start menu can be "customized". To do this, right-click on the "Start" button and select the "Properties" section in the window that opens. Using the "Customize" button, you can change the size of the icons in this menu, set the number of programs displayed in it (from 3 to 30), select your preferred Internet browser and mail client, and also "pin" frequently used programs to the menu. After making changes, click on the "Apply" button.
Customizing the taskbar
The taskbar displays all open programs and files, as well as the icons of programs pinned to the panel for quick access to them (one click of the left mouse button). To customize the taskbar, just like to customize the Start menu, you need to right-click on it. Using the menu that opens, you can pin or remove programs from the taskbar (more on this in the next paragraph), determine the location of the taskbar on the computer screen, hide the panel in automatic mode, change the size and layout of icons, and so on.
Customizing the Quick Launch
As already mentioned, on the taskbar there is a “quick access panel”, with which you can launch the program you need as quickly as possible.In order for the quick launch bar to be displayed, you must check the box next to the corresponding item in the taskbar settings menu. To change its size (by default, 3 icons are placed in the quick launch bar), as well as to add and remove programs, the checkmark in the "Lock the taskbar" section must be unchecked. After that, the width of the panel can be changed simply by moving the limiter with the mouse, adding programs by simply dragging and dropping, and deleting them by right-clicking on their shortcut and selecting "Delete".

Clock panel customization
There is a clock in the right corner of the taskbar. To configure them, you can use the "Control Panel", which opens from the "Start" menu, or right-click on the clock and select "Set date / time". Using the menu that opens, you can set the time and date, select the time zone, and so on.
Language selection panel
Next to the clock on the taskbar is the language bar. It displays the current text input language (the first two letters). To configure the language bar, again use the right mouse button. The menu that opens will allow you to expand the language bar (it will be displayed at the top of the screen), make it transparent, change the location of the bar from horizontal to vertical. By clicking on the "Options" tab, you can select the "default" input language, add or remove languages, and also select a keyboard shortcut to change them. Naturally, after making all the changes, you must save them by clicking on the "Apply" button.
notification area
The notification area is located on the right side of the taskbar, and contains icons that inform about the current state of the computer, Internet connection, antivirus work, receiving email, and so on. Some notification icons are located in the "default" panel, others can be added (some programs do this automatically) or, if not needed, removed. To do this, as in previous cases, just click on the unnecessary symbol with the right mouse button and select the appropriate item in the menu that opens.We hope that our tips will help you make your desktop beautiful and organized, and work at your computer pleasant and comfortable.
(picture), a set of sounds, icons and other elements used to customize the look of the desktop table but with one click. Hover over the theme you like, click on it with the left mouse button and after clicking on the "Apply" button, the option you have chosen will immediately be displayed on your desktop table e.
Tab « Worker table» makes it possible to change the background image (picture, wallpaper) in a given topic. It can be selected from the proposed set, or you can click on the "Browse" button to access your own files. Choose the picture you want. After the name of your object appears in the "File name" field, click "Open". In the "Location" option, set the location by choosing one of the options offered to you: center, tile, stretch. If you love a "clean" worker table, then select "None" in the list of themes and in the "Color" option select a color for the desktop background table a.
without leaving the tab Worker table”, click “Desktop Settings” table a". You will see the Work Items window. table a". Select the General tab. Here you can turn system icons on and off by checking the appropriate checkboxes. If desired, you can change the graphic image of the icons using the "Change Icon" button. In the lower part of the window, you can configure the automatic management of cleaning the desktop. table but from unused elements. If you do not need this, then simply do not check the box for managing the option.
If instead of a wallpaper you want to see on your desktop table e page from the Internet, then go to the "Web" tab. To prevent editing and moving work items table and put a tick in the control field of the option "Pin the elements of the working table a". Save the changes with the OK button. Window "Elements of the work table a" closes. Complete the work in this tab by clicking the "Apply" button.
Using the "Screensaver" tab, you can configure the so-called "Screen Saver". This feature was needed when it consisted of a cathode ray tube to prevent fading. Modern monitors do not need such protection, but to protect confidential information from curious or intruders, this feature is useful. To do this, select a suitable screensaver from the proposed set, program the time interval after which it will turn on automatically if you do not manipulate and , and set password protection.
To change the settings, click on the "Power" button. The Power Options Properties window opens, allowing you to manage sleep mode and the UPS. Save the settings and close the window with the OK button. Before leaving the tab, click the "Apply" button.
The next tab "Design" offers a choice of styles for opening windows and buttons, colors and font size. Using the Effects and More buttons, you can assign additional options to the selected design style in the form of shadows for menus, screen font smoothing, large icons, and more.
In the last tab "Options", use the slider to set the screen resolution options. For a monitor, the optimal resolution is 1024x768, 19 - 1280x1024 or 1400x1050. In the lower right corner of the window, click on the "Advanced" button and select the "Monitor" tab. Set the maximum frequency. Save with the OK button. Click on the "Apply" button.
So, you have finished setting the screen properties. Now close the "Properties: Display" window by clicking on the cross in the upper right corner of the window.
Return to the context menu again by right-clicking on an empty space on the desktop table a.
The Arrange Icons option will help you arrange the icons on your desktop. table just the way it works for you.
The "Paste" option will give you the opportunity to place the previously copied file on the desktop. table e.
With the "New" option you will be able to create a new document file or a new working folder.
note
All operations for selecting specific options are performed with the left mouse button.
When working with the context menu:
- options can be enabled or disabled; to enable an option, you need to check the box next to it;
- if an option is grayed out, it is inactive in this configuration and cannot be influenced.
Helpful advice
It is better to place program shortcuts on the desktop. A shortcut is not the program itself, but only a link to it. If you accidentally delete a shortcut icon, the program will remain unaffected and you can then create a new shortcut for it. It is also needed in order to avoid overloading the local disk on which the operating system of your computer is located. Those. you can store all programs and work files on other local drives, and manage them through shortcuts located on your desktop.
To create a shortcut, right-click on the desired folder or program, select "Create Shortcut" from the menu that opens, and left-click. Now move the shortcut icon to the desktop.
You can make any of your photo or picture as the desktop background. To do this, use an alternative method - open the photo you need by double-clicking on it with the left mouse button, then right-click on the photo field and select "Set as desktop background" in the menu that opens.
By default, the Windows operating system does not display the My Computer icon on the Desktop. For many users, this setting of the operating system is inconvenient for comfortable work.
Since the days of the Windows XP operating system, users have been accustomed to calling this icon "My Computer", although in Windows 7 the icon changed the name to "Computer", and in Windows 8.1 and Windows 10 to "This PC".
Using the My Computer icon (Computer, This Computer), you can open Explorer and quickly get into the management of the Windows operating system by right-clicking on the icon and selecting the appropriate item from the context menu.
In this article, we will analyze how to return the My Computer icon to the Desktop in Windows 7, Windows 8.1 and Windows 10 operating systems.
How to return the Computer icon to the desktop in Windows 7
1 way. In order to return the Computer icon to the Desktop in Windows 7, go to the "Start" menu, find "Computer" in the menu, right-click on it.
In the context menu, check the box next to "Display on desktop".
After that, you will see the "Computer" icon on the Desktop.
2 way. This method is universal for all versions of the Windows operating system.
Right-click on an empty space on the desktop of your computer. In the context menu that opens, select "Personalization".

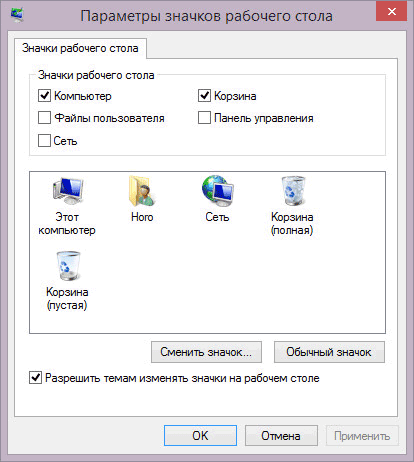
In the Personalization window, click on Change Desktop Icons.

In the "Desktop Icon Options" window, check the box next to "Computer", and then click on the "OK" button.

After that, the Computer icon will appear on the desktop.
3 way. If you drag "Computer" from the "Start" menu to the Desktop with the mouse, then in this case you will return the My Computer (Computer) shortcut to the Desktop, and not the system icon.
How to return the This PC icon to the desktop in Windows 8.1
Use personalization settings to return the "This PC" icon to the desktop in the Windows 8.1 operating system.
After right-clicking on an empty space on the monitor screen, select "Personalize" from the context menu.
In the "Personalization" window, select "Change Desktop Icons" (similar to Windows 7).
Check the box next to "Computer" in the "Desktop Icon Settings" window. Save your changes.
How to get my computer icon back in windows 10
In the Windows 10 operating system, you can return the This PC icon to the desktop through personalization options.
On the free space of the screen, click on the right mouse button, in the context menu, click on the "Personalization" item.
In the "Options" window, go to the "Themes" tab, in the "Related Options" section, select "Desktop Icon Options".

In the "Desktop Icon Settings" window, check the "Computer" item, click on the "OK" button.

The This Computer (My Computer) icon will appear on the Desktop.
Article Conclusions
In the Windows operating system, at default settings, the My Computer icon is not displayed on the Desktop. After changing the settings, the user can return the My Computer icon (This PC, Computer) to the Desktop in Windows 10, Windows 8.1, Windows 7.
One of the most important elements when working with EOM is the computer desktop. How is it structured and what changes can be made to it? What is the desktop for? It also has many properties that most people do not even know about, although they could make their lives much easier.
What is a computer desktop?
It is a working area displayed using a monitor that displays all the necessary information. It contains file icons that allow you to quickly access all the programs that you need to get it. You can change the extension that the Windows 7 desktop has, increase the number of shortcuts located on the desktop. For aesthetic pleasure, you can change the background image, and in case of prolonged inactivity, the splash screen. Also, thanks to the additional software increase, you can increase the usefulness of the desktop for yourself. Such a benefit can manifest itself in the form of installing extensions that will display the desired information such as weather, exchange rates and much more - there is a good choice.
Often you can hear a question like "How to install a desktop?". The fact is that by default on computers that are sold, it is already installed. And this issue is understood as changing the design or installing a visually distinct file manager. Now you have a general idea of the possibilities that the Windows 7 desktop provides to the person working behind it. Let's look at everything in more detail.
Quick access to necessary files
The desktop makes it possible to get quick access to all the necessary folders, files and programs. If we talk about the first, then you can either create (transfer from another place), or leading to an existing one. Also, if desired, the files themselves can be transferred to the desktop, since there is enough space on it for such an operation. But still there are some limitations (as a rule, up to 1 Gigabyte of memory).
Regarding files and programs, we can say that the features of their movement directly depend on their subsequent use. So, simply moving a working document to the table will cause an error to constantly pop up either that the necessary files were not found, or about something else. But the end result will be the same - the required document will not start and there will be no way to see what is inside it. The only exception to this is when a file is transferred, which does not need anything extra. An example of such an option is documents from a work office installed in the operating system, which allow you to edit text documents, presentations and programs of similar content.

Changing desktop settings
If you are not satisfied with the visible screen, then you can change it. Moreover, make adjustments not with the help of a different background, splash screen, extension, or something similar, but precisely by changing the display mode. To do this, follow a short instruction:
- Right-click on an empty spot on the desktop. From the menu that appears, select the screen extension.
- In the window that opens, you can select many options. The first is the monitor with which the computer works. Then screen expansion. Here you should stop and report that when the screen resolution changes, the usable area increases / decreases. And along with this, the number of icons that can be placed on the screen is growing. Or decrease. The fact is that as the screen size increases, the icon becomes smaller, and more can be placed.
- You can also choose the screen orientation: landscape or portrait.
- If you want to make only the icons smaller / larger, without changing the screen extension, you can use a special link for such operations.
- And if you really want to personally get to all the possible settings, then click on "Advanced Options". Here you can edit the refresh rate, colorization level and perform screen diagnostics.

Ability to access the desktop
Few people know, but you can work remotely with a computer desktop. This requires access to the local / World Wide Web (depending on where the entry will be from) and special programs. Moreover, it is possible to interact with the help of both paid and free software. The desktop is in this case a remote terminal, the possibilities of working with which directly depend on the programs used.

Change the background and splash screens
Right-click on a free part of the computer desktop. From the menu that opens, select "Personalization". A window will open in which you can select the background, window color, sounds and screensaver. The basic variety is not too great, so if you wish, you can load your own design elements yourself. The desktop is such a part of the system to which any image can be assigned.

Desktop Extensions
Now about the rather important and very useful extensions. If you want to track the position of several things, then this is for you. The desktop is a real testing ground. Right-click on an empty space on the desktop and select "Gadgets" from the menu that opens. A window will appear in which you can select all the desired extensions. By default, there are such additions:
- Music player.
- Information board about the exchange rate.
- A puzzle that can be fun to distract yourself with.
- News headlines taken from the RSS feed.
- Calendar.
- Weather.
- Clock.
- Slideshow.
- The scoreboard about the loads on the central processor and the physical memory of the computer, which is made in the style of car speedometers and is very attractive in appearance.
These extensions mentioned in the article are not all possible. If there is an interest in what is not represented, then in the global network you can find add-ons that you think are necessary for you. You can search using the tools installed in the gadget window. But if there was nothing satisfying there, there is another option. Search on your own, using a browser and then installing manually.

Additional software
You can also change the computer desktop using special programs. We can say that using them, you literally set your external design, which in the end can be radically different from what it was at the beginning. The variety of their use is great, so it is better to get by with a brief description of the functionality:
- Programs that add additional icons to the toolbar (recycle bin, folders and whatever your heart desires).
- Software that allows you to do all the above operations to change the desktop without leaving it.
- Programs that allow you to create a three-dimensional effect of the arrangement of documents on the desktop and itself.
- A provision that affects the appearance of system elements. You don't like how dull the watch looks? Nothing, it can be fixed! Or maybe dissatisfied with the appearance of the volume control? Well, in this case, there is quite a variety of choices.
- There are also programs that can change the display of folder items, system items. Don't like the width of the edges of the folder? It can be fixed. Do you want to make them or the Start menu transparent? And this is possible.
- File managers.
Conclusion
Summing up, we can say that the desktop is an important component of the computer. With it, you can perform many actions, change the design of your computer and do many other useful things.
Good day! When starting to study a computer, first of all, you need to understand what is desktop. Once you master it, you will be able to perform many tasks with ease. Also, in the process of learning, you will have a good experience to work with more complex processes and tasks.
Desktop is what you see after turning on the computer and loading the . It includes 2 parts:
- task bar;
- label area.
How to work with the label area
The shortcuts area contains program shortcuts, that is, icons that are direct links to programs and allow you to quickly launch them right from the desktop. It is important to understand that these are just shortcuts, the programs themselves are stored elsewhere. So don't be discouraged if you accidentally delete any of the shortcuts. The program itself will continue to work normally. You just need to find it and re-create the shortcut.

Another important point. Many beginners think that in order to burn a program to a USB flash drive or disk, it is enough to copy its shortcut. This is not at all the case, because the shortcut is only the door through which you enter the program.
By the way, try not to place a lot of shortcuts on the desktop. Firstly, it will be difficult for you to find the right one among them, and secondly, it will increase the boot time of your computer. Leave shortcuts on the desktop only for those programs that you use most often.
Also, do not store desktop important documents, because if the system crashes, you risk losing them forever. Instead, save them on My Computer, specifically on the D or E drive.
Taskbar Features
At the bottom of the desktop is Task bar and it looks like a horizontal strip on which the Start button, Language bar and Notification area are located. When you click on the Minimize button in the program header, its working window is reduced to a button on the Taskbar.

The main menu allows you to see all the programs installed on your computer and documents saved on disks. To open Main menu, click on the button Start.
Language bar needed to switch the mode of entering words from the keyboard: one mode involves entering English characters, the other - Russian.
On the right side of the taskbar is notification area. It shows the system clock, as well as the icons of some programs running at that moment.

Quick launch bar displayed in the Taskbar automatically. It may include shortcuts to installed programs. Clicking on a shortcut opens the corresponding application.


