Hidden folders and files
In the Windows operating system, folders and files can be hidden. That is, in the properties of a folder or file there is an attribute "hidden" and it will not work to see or enter this folder, for example, through "My Computer".
Often, critical system folders are made hidden folders so that the user cannot delete or change important files... But viruses can also hide in hidden folders.
The folder in which Windows XP and Windows 7 stores temporary files, that is, garbage is also hidden.
How to open access to hidden and system folders and files
There are times when you need to open access to hidden and system Windows folders 7 or XP. For example, to find and delete manually hidden files viruses or clean up the temporary folder. The following is step-by-step instruction how to open access to hidden folders and files in Windows XP and Windows 7
Accessing hidden folders in Windows XP
1. Open My computer... On the menu bar, select Tools - Folder Options.
2. In the window that opens, go to the tab View and uncheck the item. In point Hidden files and folders make the item active Show hidden files and folders.

Otherwise, the extensions of the files with which are associated installed programs are not shown. That is, if you have Word installed, the extension is not displayed for .doc files. This is often adjusted to virus files... After all, the extension.exe (executable file) is not shown either. Usually viruses with the .exe extension have an icon for an MS Word document, video file, or other common program. Assuming you are opening a video file or document, you run the file with the extension .exe, which is executable file- that is, a virus program.
To avoid such misunderstandings, it is just useful to see the true extension of the executable file. To do this, uncheck the specified item in the list.
Now click the OK button. The window will close, and all folders, including hidden ones, will be displayed in Explorer.
Accessing hidden folders in Windows 7
1. Go to the menu Start - Control Panel

2. Select an item Appearance and personalization

3. Select a menu item Folders settings

4. Go to the tab View... Uncheck the box Hide protected system files (recommended)... Include item Show hidden files, folders and drives.

Click OK. Now all file folders will be displayed, including hidden and system ones.
Like
Like
Tweet
When opening, deleting or otherwise manipulating files and folders, you may encounter a file access error. I will talk about how to deal with this and why it happens.
How to get full access to files and folders
First, an instruction on how to get full access to folders and files. In the next chapter, there will be an explanation for the curious.
Open the folder where it is located problem file or folder. To get full access to their content, you need to configure access to files:
1. Push right click mouse over a locked file (or folder) without access - Properties - select the tab Security:
2. Push the button Additionally - select the tab Owner:

3. Push the button Change and select your username (in my case it is Dima, you will have something else), also put a daw on Replace owner of subcontainers and objects:

4. If a window appears with the text “You do not have permission to read the contents of the folder. Do you want to replace the permissions for this folder so that you have the rights full access? ", We answer Yes:

5. After changing the owner of the folder, a window will appear with the text “You have just become the owner of this object. You must close and reopen the properties window for this object to see or change the permissions. " Push OK, then press again OK(in the window Additional security options).
6. In the window Properties - Security press again Additionally, only now we are looking at the first tab of the window that opens - Permissions. Gotta push a button Change permissions:

7. Click the button Add:
(If you are working with properties folders, not a file, check the box next to Replace all child object permissions with inherited permissions from this object.)

8. In the "Select: users or groups" window that opens, you will need to enter the name of your user (you can see it in the "Start" menu - the name will be the most top line), press the button Check names, then OK:

If you need a folder (or file) to open without restrictions by absolutely all users, i.e. not only yours, then press again Add and enter the name " Everything"Without quotes (" All "in English Windows versions), then press Check names and OK.
9. In the tab Permissions in turn, double-click on the lines with usernames and check the box "Full access":

This will automatically check the boxes below.
10. Then press OK, in the next window, answer the warning Yes, again OK to close all windows.
Ready! Full access to files and folders received! You can safely open them, change and perform other actions with them.
Conclusion: you need to take two steps: become the "owner" of the file or folder (item 3), then assign yourself access rights (item 6). Many instructions on how to get full access to files and folders only mention the first step and forget about the second. This is not entirely correct, because the security settings of the file / folder may be different, you need to bring them to normal view, and not just become the "owner".
Why do you need permissions to files and folders
The mechanism of delimiting access to files and folders is necessary for many reasons. For instance:
1. Restriction of access to information by different users.
If on one computer or in common network several (more than one) users work, it is logical to restrict access to information - some users have access to all information (most often they are administrators), others - only theirs own files and folders (regular users).
For example, at home, you can restrict the rights of one user in such a way as to protect important files and folders from deletion (so that the child cannot unknowingly delete important documents), while from the other (parent profile) you could do whatever you wanted.
In the first chapter, I showed how allow access to certain users. The same can be done limit access - the steps are the same, only in paragraph 9 it is necessary to put other checkboxes.
2. Security of the operating system.
In Windows XP, everything is arranged quite primitively - users with administrator rights can change (and delete) any folders and files on the hard disk, including system ones, i.e. owned by Windows. In fact, any program running in the admin user profile could do with content of hard disk anything... For example, delete the boot.ini file, which will cause Windows to stop loading.
Under the rights limited user, where, thanks to the security settings, it was impossible to delete important system files, few people sat, preferring the administrator account... Thus, an account with administrator rights in Windows XP creates the most favorable conditions for viruses.
V Windows Vista, in Windows 7 and Windows 8 "User Account Control" (UAC for short) works: when working in an administrator account, programs launched by the user work with limited rights. That is, delete or change the system files of the program can not... Programs are able to gain more complete access by requesting it from the user using the UAC window, which I already mentioned:

If the file permissions are configured correctly and UAC is enabled, viruses running in the Vista / 7/8 administrator account cannot seriously harm the system without the permission of the person sitting at the computer.
UAC useless in cases:
1. If a user is sitting at the computer, thoughtlessly pressing the "Yes" and "OK" buttons
2. If you run programs "as administrator" (right-click on the program's shortcut - Run as administrator).
3. UAC is disabled.
4. For system files and folders on the hard drive are allowed full access to all users.

Programs running in a restricted account Windows user Vista / 7/8 (type "Normal access"), cannot bring up the UAC window and work with administrator rights, which is quite logical.
I repeat once again: when there is no way to elevate your rights to administrator rights, you cannot harm the operating system files protected by restricting access rights.
Reasons and solutions for file access problems
The problem is that you are trying to access files and folders created under a different account. There are two solutions: either allow to all users access, or allow only those who need it by listing them. Both solutions are easy to implement according to the instructions above. The only difference is that you will enter in paragraph 8 - the word "All" or listing users.
By the way, you can allow access to everyone, but deny access to one (several) users, while the deny setting will be a priority for the listed users.
There are many reasons for file access problems. Most often they appear if you have several accounts, several operating systems or computers - all accounts are different, when creating files and folders, the rights are also assigned differently.
What can not be done with the rights of files and folders
Under no circumstances assign full access to files and folders on the entire hard disk with the installed operating system!
There is a myth that the operating system restricts user access to his files, so you need to assign access rights to all files on the disk. This is not true and you cannot change the rights of all files! In a system that was not "poked", access rights were not assigned manually, everything was assigned correctly!
Use my instructions only in case of real problems, not to prevent contrived ones.
Let me explain: by allowing access to system files, Windows will still work, but any virus or incorrectly working program can do very bad things. You hardly need problems.
The folders “C: \ Windows”, “C: \ Program files”, “C: \ Program files (x86)”, “C: \ Users”, “C: \ System Volume Information”, “C: \ ProgramData "," C: \ Recovery "and many others. They cannot be changed, except in cases when it is necessary to perform any manipulations with the files (for example, to change Windows theme), and you need to return the settings back.
Do not change the security settings "just like that", making the system defenseless against viruses and crashes! After installation Windows rights access to system folders are configured correctly, no need to change them!
Advice: if the program works correctly only if it is run "as administrator", if normal startup giving errors - try assigning full rights to change the folder with it in "C: \ Program files" or "C: \ Program files (x86)" (not the most the Program folder files, and the folder with the right program inside it!).
Very often it helps to run old games on Windows Vista / 7/8/10 that store settings files, save files inside their folder. Running without permission to modify their own files, such games in best case cannot save game progress, at worst - they close or do not start at all. It's the same with old programs.
conclusions
1. Assigning access rights is relatively easy.
2. Access rights cannot be changed without a justified purpose.
3. Changed the permissions of system files - change them back. To change the rights systemic folders and files to the old ones, you can use this instruction (the method for Windows Vista should also work for Windows 7, Windows 8, 10).
4. Changing security settings is a delicate matter and the author of the article is not responsible for your actions. Like
Sometimes, when you try to open a folder, you may receive an error message. Let's see what can be done if there is no access to the folder.
The reasons why a folder cannot be opened are very different, but I will try to tell you about each of them and instruct you on what to do in each case if access to the folder is denied. To begin with, I must say that everything the following actions must be performed using an administrator account.
You are not the owner of the folder
After reinstallation or windows updates you may no longer be on the list of folder owners, so the system quite rightly prevents you from reading files that do not belong to you.
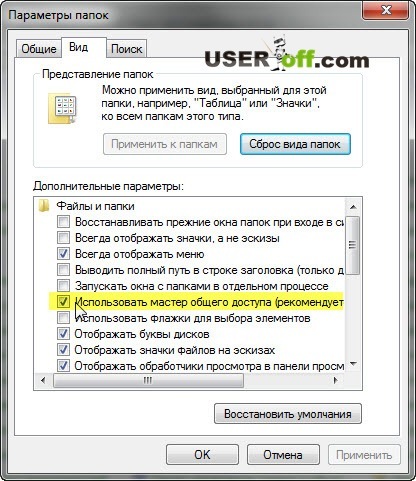
Now I will tell you how to access the folder in this case. First, go to the "Control Panel" menu item and select "Folder Options" or "Folder Options" there, depending on the system.
In the "View" tab, we find the item "Use the wizard general access(recommended) ", if you have Windows 7 or XP, if Windows 8 -" Use simple shared access to folders (recommended) ", uncheck the box, click" OK ".
Now right key mouse click on the folder and select "Properties" in the drop-down menu. In the "Security" tab, click on "Advanced" and in a new window click on the "Owner" tab at the top of the window. At the bottom left, click "Change".


It is possible that you will not have such a tab. Then you need to go to safe mode and then follow the steps described below.
In the window that opens, select the name of the user whom you want to allow access and click "OK". To get access not only to the folder, but also to all files and folders inside, we selected the item "Replace owner of subcontainers and objects" and then click "OK".

As you can see, there is nothing difficult. The very bottom line is that the owner of the folder has changed and in order to fix this, you need to indicate yourself as the owner. It's different when you encrypted the data and after per Windows installations decided to open this folder. Then the head may just explode, and your problem is solvable and you shouldn't worry! Hopefully, after following my instructions, you are no longer denied access to the folder you need.
By the way, if such an error appears when you open a flash drive or disk, then be sure to check your computer for viruses.
Here's another option, from the person who posted the video:
In this article, we will set up a local network between two or more computers with installed Windows 7 (Windows 8) that are connected via a Wi-Fi router. In fact, setting local network Windows 7, Windows 8, and Windows 10 are pretty much the same. Windows XP only has its own nuances, there are always some problems when setting up a network between the seven and XP. But, about this in a separate article, and it’s time to move from Windows XP, it is outdated.
It is clear that in order to set up a local network and share files, computers need to somehow be connected among themselves. This can be done with a network cable, I have a direct connection between two computers. But, it is much more interesting to connect all computers through a router, which is now installed in almost every home and office. When connecting via a router, you can already set up a local network not only between two computers. All computers can be connected to a local network, and even mobile devices that are connected to one router
For example, desktop computers can be connected to a router using network cable, and laptops - on Wi-Fi networks... This is how it is more convenient for you, and how you do it. It doesn't matter if the computer is connected to the router via Wi-Fi or a cable, the local network will work. And it doesn't matter what operating system you have installed, but I'll show you on Windows example 7.
And I will configure and show the network through a router to which my laptop is connected via Wi-Fi, and stationary computer... Both work on Windows 7. We will now set up a local network between these two computers. And also, let's open shared access to folders and files. What is a local network between computers for? Mostly for file sharing. If you often need to transfer some files from one computer to another, then in order not to run with a flash drive, this can be done over the network. Well, you can play games over the network.
If your network still has a TV with Smart TV, then you can set up access to movies on your computer from the TV. Read more in the article.
Instructions for setting up a local network in Windows 7
Let me remind you that the computers that you want to network must be connected to the same router, or directly connected with a cable. Also, all the actions that I will show in this section must be performed on both computers.
An important point! If you want to set up a network via a Wi-Fi router, to which some third-party devices (for example, your neighbor) are connected, then after setting up, he will be able to access those folders on your computer that you set up public access to. Install a good one to protect your network. If you still need to connect to your router third party devices, but you want to set up a home network, then you can create " guest network"as we did on Zyxel's router.
One more point. If you are setting up a network when connecting computers directly, without a router, then you will also need to set static IP addresses, in the properties of the local area connection. If you have a connection via a router, then you do not need to do anything else, continue to follow the instructions.
1 First of all, we need to check that all computers work in the same workgroup. This must be checked on all computers that will be connected to the local network.
We do this: press the keyboard shortcut Win + R, and in the window that appears, specify the command sysdm.cpl... Push Ok.
Against Working group is likely to be written WORKGROUP... You can leave her. The main thing is that on the other computers the workgroup should also be WORKGROUP.

If you go to change it, for example on MSHOME, then press the button Change, and indicate new group... Save changes and restart your computer.
2 The second step is to change the sharing settings. We perform these settings in the same way on all computers in the network. Now I'll show you what to enable.
Right-click on the internet connection icon in the notification bar, and open Network and Sharing Center... In the new window select Change Extra options general access.

There will be two profiles. Home or Work, and General. We change the one that is written current profile ... You can make these settings for both profiles.
First of all, put the switch near Turn on network discovery ... Also, turn on File and Printer Sharing, and turn on share folders... See screenshot below.

Scroll through the settings page, find and open the tab All networks, or General, and necessarily disable Sharing with password protection.

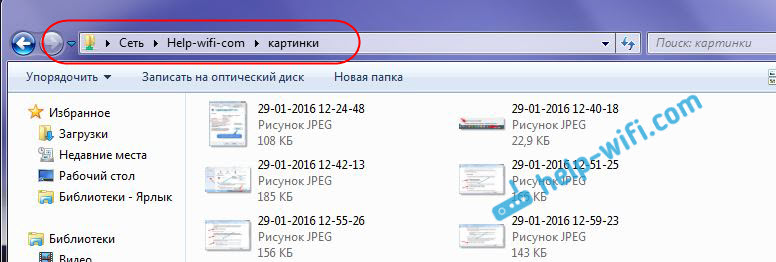
After these steps, it is advisable to restart your computer. This is actually all the settings, the local network should already work. To check, you need to go to the explorer (My Computer) on one of the computers, and open the tab on the left Net... All computers on the network will be displayed there. In the screenshot, you can see my computer, and another one from the network.

We can already log into the computer in our home network, there will be access to shared folders.

If you do not have computers on the network, or you do not have access to a computer, then see the solutions at the end of this article.
Setting up file and folder sharing
As I wrote above, you already have access to shared folders. But, we may need to share some other folder, which is, for example, on local disk D. This can be done without any problem. After we open shared access to the folder, all computers from the local network will be able to view the files located in it, modify them, and add new files to this folder. (however, it depends on what permissions we enable).
For example, I want to share my Pictures folder. To do this, right-click on it and select Properties... Go to the tab Access, and click on the button Advanced customization... We put a tick next to the item Share this folder, and click on the button Permissions.

In the window that opens after clicking on the button Permissions, we need to set the permissions to this folder. So that netizens can only view files, then leave a tick only opposite Reading. Well, for full access to the folder, with the ability to change files, set all three checkboxes.

Click on Apply and Ok... In the window Advanced sharing settings, also press the buttons Apply and Ok.
In the properties of the folder, go to the tab Security, and press the button Change... Another window will open in which we click on the button Add... In the field we write "Everything" and press Ok.

Select the group Everything, and from below we mark the necessary access points for this folder with checkmarks.

All, after these steps, there will be a general access to this folder from all computers on the network. Starts working without rebooting, checked. Open this folder from another computer:
Everything was done in a confusing way, until you figure it out ... It was possible somehow to make these settings more simple and understandable. But, everything works. It turns out that I have access to a folder that is located on another computer. And this is all over the air, since I have both computers connected to the router via Wi-Fi.
By the way, this folder will also be available from smartphones and tablets that are connected to this Wi-Fi router... To view network folders on Android, I advise you to install ES Explorer, or use standard conductor... Everything is working:

Now we will consider possible problems and errors that can very often be encountered during the configuration process.
Possible problems and errors when setting up a home LAN
If during the configuration process any errors or problems appear, then first of all disable antivirus, and other programs that might block the connection. If the problem is in the antivirus, then you will need to add your connection to the exceptions.
- Computers from the local network do not appear on the Network tab. In this case, on all computers we check working group, and sharing settings. Open a tab in the explorer Net, right-click on an empty area, and select Refresh... One more important point, very often antiviruses and firewalls block access to the local network. Try disabling your antivirus for a while. Also, you need to make sure that there is a connection to the router.
- Shared folder cannot be accessed. Another problem, when we seem to have set everything up, shared access, but when we try to open a folder on a computer on the network, a message appears that we do not have access, we have no rights to access this folder, we could not open network folder etc. Or, you are prompted for a username and password.
Be sure to check the sharing settings in the properties of this folder. There are a lot of settings, everything is confusing, maybe you missed something. Well, again, turn off the antivirus, it can block. - A computer connected via Wi-Fi cannot be seen by other computers on the local network. Or vice versa. If you have a network built with computers and laptops that are connected as wireless network, and by cable, then there may be problems with specific connection... For example, laptops that are connected via Wi-Fi may not appear on the local network.
In this case, pay attention to which profile you enabled network discovery (settings at the beginning of the article)... Also, it is advisable to assign the status of a home network to connect to your Wi-Fi network. Well, be sure to try disabling your antivirus.
I think you succeeded. If something could not be configured, then ask in the comments. Also, do not forget to share your tips on this topic.
Users of a single local network often perform tasks related to each other, so there is often a need for sharing certain files / folders. OS Windows 7/10 has all the tools you need to set up permissions and share access to individual users and groups. In this article, we will consider in detail how you can create shared folder and share it over the local network.
Setting up sharing in Control Panel
First of all, we will make required settings For more information, see Network and Sharing Center. Let's go into it through the "Control Panel", and then on the left click on the link "Change advanced sharing options".
Here we will expand the active network profile and enable all options, except for the item "Sharing with password protection".

If you want to set password protection, then make this function active as well.

Now in the "Network" section you will see computers from network environment... You can go to any of them and see the folders for which public access is already enabled. Let's try to share a folder and check its visibility on other computers.
Sharing folders and files
Note that the procedure for sharing in Windows 7 and Windows 10 is practically the same. In our case, the "seven" will be used. For example, let's create in the root of the disk or in any directory new folder named "General". Next, click on the icon with the right mouse button and select the "Properties" item in the menu that opens. Let's go to the "Access" tab.
Now click on the "Share ..." button.

In the "File Sharing" window, open the drop-down list and select the "Everyone" user.

Click on the "Add" button and make sure that the selected user has been added to the list. By default, the list contains the owner of the folder - the Administrators group. She has the right to set permissions for ordinary users... For example, for the Everyone group, you can set the permission level to Read or Read / Write.

By choosing desired option, click the "Share" button and thereby share the folder for computers on the same network. A corresponding message box will appear.

Second way to share
There is another way to share a folder over a local network in Windows 7/10. In the "Properties" window on the "Access" tab, click the "Advanced settings" button.


As we can see, the list already contains the "Everyone" group. We can set up access rights for her, or we can click the "Add ..." button and select another user.

In the field "Enter the names of the selected objects" enter the required user and click "Check names".

If no such user is found, a warning message window will appear.

To select a user from the list of all available users and groups, click the "Advanced" button, and then "Search".


For example, let's select the “Guest” account, confirm the selection with the “OK” button, and then “OK” again. The corresponding entry will appear in the list. Let's set the necessary permissions and apply the changes. The fact that the folder has become public will be hinted at by the appearance of a network path next to the "Share ..." button.

In Windows Explorer, you can define shared folders without going to Properties. Just select the directory of interest and check if there is a corresponding inscription on the bottom panel.

How to quickly share folders in Windows 7/10
In Windows 7, you can open shared access in just a couple of clicks. Mark the desired folder and click on the top horizontal menu by the corresponding button.

Let's select users and give them permissions according to the already familiar scheme.

Opening public folders on network computers
In order to get into the shared directory from another PC, you need to select the target computer in the "Network" section of Windows Explorer.

If you plan to use the folder all the time, you can. To do this, right-click on the icon and select "Map network drive ..."


The created drive appears in the Explorer directory tree and in the Network Locations area.

 Home groups
Into the functional Windows systems 7/10 included the ability to create so-called, with which you can also share files and folders. To create a group, go to .

Press the button "Create a home group", then check the boxes for the items that we want to share, and at the end set a password for connecting to the group of PCs located in the local network.


Now let's try to join the created group. To do this, on another computer, go to the same section Control Panel - Home group ... Here we will find information about the already created group. We press the button "Join", and then "Next".


We set the sharing settings and enter the password in the next window.


We complete the procedure by clicking the "Finish" button.

Now, in the Explorer tree, select the "Home group" branch and click on the group name (it will be assigned a username).

The folders "Videos", "Pictures" and "Music" are displayed on the right. The composition and number of folders will depend on the settings specified when creating the group.
Now you can easily add folders to a group. In Windows 7, after selecting desired folder click on the "Share" button on top and set "Homegroup (read)" or "Homegroup (read and write)".


We produce necessary actions, and then we go from another PC and make sure that the folder has been shared.

That's all. We hope you find this information useful.


