The ability to independently configure the MS Word program and display the necessary commands in the form of buttons on the toolbar greatly facilitates the user’s work with documents. For example, to quickly format a font, you can use the commands to increase or decrease the size of characters by one point. This is usually done using a dropdown menu Size on the toolbar Formatting, where only selective sizes are presented: 8, 9, 10, 11, 12 and then there is an increase only after 2 or 4 points. This is just one example of a command that you can “pull” onto the toolbar and use constantly in your work. Next, it’s up to you to choose which function is most often encountered in your work. So, the setup principle itself is as follows: Run the command Service/Settings and a dialog box will open (see Fig.). Drawing. Settings Dialog Box
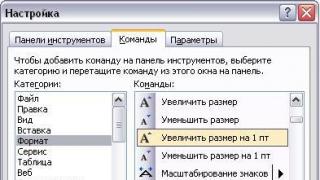
Toolbars Bookmark Toolbars allows you to enable or disable (by checking the box) almost all available commands on the toolbars (see Fig.) Naturally, the user cannot cover such a volume of information and learns everything gradually, and not all commands are needed to work in the Word program, but everyone has their own use of programs and therefore there is the following tab Teams in the dialog box (see Fig.).  Drawing. Settings/Commands In this option, it is possible to “move” only those buttons to the toolbar that you use most often. To do this, select Category on the left side Bookmarks, For example, Format, on the right side Bookmarks are Teams. Next, left-click on the command Increase size by 1 pt and, holding the left mouse button, drag the command onto the toolbar Formatting. Do the same actions with other button commands (see Fig.).
  Drawing. Setting up button commands on the toolbar When you close the document, the button command settings are saved. If you do not need these commands, you can easily remove them from the toolbars in the reverse way, i.e. open dialog box Settings/Commands and “pull” unnecessary buttons from the toolbar. Third tab Options in the dialog box Settings is quite accessible for the user to study independently and allows you to install additional features when working with Menu And icons(see Fig.).
  Drawing. Setup/Options Button Keyboard on all tabs allows you to assign hot keys,
Templates in MS Word: letters, resumes, calendars, etc.
Templates Word are files containing styles, structure, page settings, etc., based on which you can create new documents.
Templates MS Word is already included in the program by default and among them there are, for example, notes, reports, letters and faxes, publications. Moreover, each section also includes design options (exquisite letter, modern fax, etc., or in other words, document formatting. 

Wrapping text around an image; cropping unnecessary edges of an image in MS Word. Changing brightness, contrast, converting a color image to an image with shades of gray.
When you select a picture, a toolbar appears on the screen Image Settings , which you can use to crop an image, add borders, and adjust brightness and contrast. Color formats
Tool Image allows you to set the graphic format for the selected picture
There are four options to choose from:
Auto - automatically selects the image format, leaving the original colors of the picture;
Shades gray - converts the drawing to black and white and replaces each color with a specific shade of gray;
Black and white - converts the selected picture into a pure black and white image; this mode is often used to highlight lines;
Substrate - converts the drawing into a light, low-contrast image that can be used as a background for text and shapes.
Wrapping text around a picture
There are several options for the relative position of text and graphic object. They can be selected either through the menu command Format / Pattern (AutoShape) / Position , or directly in the panel Image Settings where there is a team Text wrapping , which has the following subparagraphs:
Around framework - text flowing around the selected object along the border enclosing the square frame object;
By contour - wrapping text around the selected object around the perimeter;
Behind text - the selected object is placed under the text;
Before text - the selected object is placed on top of the text;
Above And from below - wrapping text around the selected object from above and below, but not from the left and right;
Through - wrapping text around the selected object around the perimeter, as well as from the inside.
In the panel Image Settings there is also a special team Change Wraparound , which lets you change the path that text follows around the picture.
Construction in MS Word: tables, graphs or diagrams.
Insert chart (table or graph) A window will open in front of us, where we will need to select parameters, and then build a chart.
Insert-table-insert. At the top of this window you need to print how many columns and rows there should be in our table. And in the modern version of Word (2007-2010), you should also click on the “Insert” tab at the top, and then click on the “Table” inscription. From the list, select “Draw table”.
In addition to regular tables, you can insert an Excel table in Word. This is a type of table in which you can not only enter the required values, but also “calculate” (add, multiply, calculate percentage, etc.). In modern versions of Microsoft Word (2007-2010), in order to insert an Excel table, you need – again – to click on the “Insert” tab, then on the “Table” inscription. From the list, select “Excel table. In modern versions of Microsoft Excel (2007-2010), there is another type of table - “Express Tables”. This is a set of ready-made tables with a design that can be inserted into a document and edited - change numbers and values, add or delete rows and columns. Also in Word 2007-2010 it is possible to quickly insert a table. To do this, you need to go to “Insert”, click on the inscription “Table” and use the upper part of the window that appears.
Changing styles, applying paragraph and character styles in a MS Word document.
Style is a set of formatting options that you apply to document text to quickly change its appearance. Styles allow you to simultaneously apply an entire group of formatting attributes to document text. There are three types of styles: character style, paragraph style, table style. So, after the document is automatically formatted, you can use the style library and assign the required style to the document and its paragraphs. You can perform the following operations on paragraph and character styles:
apply other styles (style overlay - one style is superimposed on another and replaces it) to paragraphs or characters;
change (make changes to an existing style) styles;
create new styles;
copy styles into the template.
The Microsoft Word text editor is very functional. In addition to typing and designing text, here you can create various figures, graphs and tables, and perform several simple actions with drawings. Where are all the tools necessary for this? That's right, on the Toolbar.
It is located at the top of the page of an open document, and with Word 2007 on it you see not only tabs, but also the main buttons that are used for work. In this article, we will figure out what to do if the toolbar in Word has disappeared, and instead of the usual view, only the main names at the top are visible. I’ll also tell you about the quick access panel and how to add all the necessary buttons to it.
If the Word document you opened looks like the screenshot below, then to restore the toolbar, just click on the small arrow pointing down in the upper right corner of the window.
After this, all the usual groups and commands will be visible again. And if you need to leave only a sheet on the page, then you can hide the top ribbon by clicking on the same arrow, only now it points up. This can be used if you need nothing to distract you while working with a document.

If you have Word 2013 or 2016 installed, then to display the toolbar you need to click on the button "Ribbon Display Options", which is located to the right of the file name, next to the minimize, full screen and close buttons.

After clicking, a small menu will open. The first item automatically hides the ribbon - the window expands to full screen and it hides; when you hover the cursor at the very top, it appears. When you click on the second item, only the menu items “Home”, “Insert”, “Design” and others will remain. If you choose the last option, then you will be able to secure not only the names of the items, but also the commands - this is actually what we need.

Now let's figure out what to do if it is not the control panel itself that has disappeared, but some tabs on it. Go to “File” at the top and select “Options” from the left list.

A window like this will open. Go to the tab "Customize the Ribbon".

For example, I didn’t have a tab on the toolbar. So I put a tick in front of it. To save the changes, click "OK".

After this, the item we need will appear, and you can use all the commands that are in it.

In Word, in addition to the toolbar, there is also a quick access panel. You can add icons to it for the commands you use most often. It is displayed either below or above the ribbon. By default, it has three buttons: save, cancel or return.
To customize it, click on the little black arrow pointing down and select from the list "Other teams".


Look for the desired command in the list, select it by clicking the mouse, and then click “Add”.

Everything that is in the area on the right will appear in the Quick Access Toolbar.

If necessary, all items can be arranged in the order that suits you. To do this, select one and change its position using the up/down arrows on the right. To ensure that changes made in Word are saved for all other files, select in the top field "For all documents". When finished, save by clicking on "OK".


Removal follows a similar principle. Open a familiar window, select an unnecessary command and click “Delete”. Save by clicking on “OK”.

That's all. Now you know not only how to get the hidden toolbar back, but also how to customize it and the quick access panel in Word.
Rate this article:Almost all users who have at least once opened the Word editor remember the program’s workspace: at the top there is a control panel with various sections and functions. After analyzing the sequence of user actions, the developers grouped the commands into separate blocks, thereby making it easier to find the required option. In this article we will tell you how to pin the toolbar in Word if it is “hidden” under a document.
The hidden tape mode is especially convenient to use on netbooks and laptops with a small screen. It allows you to increase the view of the page and not be distracted by unnecessary details.
Proven methods:
id="a1">- Method number 1: you can pin the toolbar in Word by double-clicking on the panel, and you can display it again in the same way.
- Method number 2: near the quick access panel, which is responsible for saving the document and canceling actions, you will see an arrow, clicking on which will open the context list. By checking the box next to the “Collapse Ribbon” command, you will hide the panel, and by removing it, you will display it again.
- Method number 3: right-clicking on any empty field will bring up a short list of commands, including “Collapse Ribbon”.
The state of the ribbon remains after closing the document, regardless of which of the listed methods you used. In the collapsed position, the menu will open commands when you hover the mouse over the required tab, and then “hide” the commands again.
Has the toolbar disappeared in Microsoft Word? What to do and how to get access to all those tools without which working with documents is simply impossible? The main thing is not to panic, just as it disappeared, it will return, especially since finding this loss is quite easy.
As they say, everything that isn't done is for the best, so thanks to the mysterious disappearance of the Quick Access Toolbar, you can learn not only how to get it back, but also how to customize the elements that appear on it. So let's get started.
If you are using Word 2012 or higher, you just need to click one button to return the toolbar. It is located in the upper right part of the program window and looks like an upward arrow located in a rectangle.

You press this button once, the disappeared toolbar returns, press it again - it disappears again. By the way, sometimes you really need to hide it, for example, when you need to concentrate entirely on the content of the document, and so that nothing unnecessary distracts.

This button has three display modes; you can select the appropriate one just by clicking on it:
- Automatically hide the feed;
- Show tabs only;
- Show tabs and commands.

The name of each of these display modes speaks for itself. Choose the one that will be most convenient for you while working.
If you are using MS Word 2003 - 2010, to enable the toolbar you must perform the following manipulations.
1. Open the tab menu "View" and select "Toolbars".
2. Check the boxes next to the items that you need to work.
3. Now they will all appear on the Quick Access Toolbar as separate tabs and/or tool groups.
Enable individual toolbar items
It also happens that not the entire toolbar “disappears” (is hidden, as we have already figured out), but its individual elements. Or, for example, the user simply cannot find some tool, or even an entire tab. In this case, you need to enable (configure) the display of these very tabs on the quick access panel. You can do this in the section "Options".
1. Open a tab "File" on the quick access panel and go to the section "Options".

Note: In earlier versions of Word, instead of a button "File" there is a button "MS Office".
2. In the window that appears, go to the section "Customize the feed".

3. In the “Main Tabs” window, check the boxes next to the tabs that you need.

- Advice: By clicking on the plus sign next to the tab name, you will see lists of groups of tools that these tabs contain. By expanding the “pluses” of these items, you will see a list of tools presented in the groups.
4. Now go to the section "Quick Access Toolbar".

5. In section "Select commands from" select item "All teams".

6. Go through the list below, when you find the required tool there, click on it and press the button "Add" located between the windows.

7. Repeat the same step for all other tools that you want to add to the Quick Access Toolbar.
Note: You can also remove unnecessary tools by clicking the button "Delete", and sort their order using the arrows located to the right of the second window.
- Advice: In chapter "Customize the Quick Access Toolbar" located above the second window, you can choose whether the changes you make will be applied to all documents or only to the current one.

8. To close a window "Options" and save your changes, click the button "OK".
Now the quick access panel (toolbar) will display only the tabs you need, groups of tools and, in fact, the tools themselves. By properly setting up this panel, you can significantly optimize your working time, thereby increasing your productivity.
Many complex programs. It allows you to quickly activate the commands the user needs without having to look for them in classic drop-down menus. But sometimes this part of the program may disappear as a result of a software or hardware failure. This article will try to answer the question of what to do if the toolbar has disappeared in Word and how to get it back.
Return of the toolbar in version 2003
This part of the interface disappears for two reasons: accidental disabling of an element and corruption of the settings file. In the first case, there are 2 ways to return the toolbar in Word. The first and simpler one is as follows:
- In any free space next to the menu bar, you need to right-click (right mouse button).
- In the long list that opens, select the disappeared combination of instruments.
The second method is a little more complicated. To use it to return the toolbar to its place, you need to:
- In the “Service” drop-down menu, select “Settings”.
- In the window that opens, go to the “Toolbars” tab.
- In the list on the left side of the window, check the boxes next to the required elements.
- Click "Close".

In the same window, you can create your own empty toolbar using the “Create” button. If the settings file is damaged, you will have to recreate everything again.
How to get the toolbar back in Word 2007
In all Microsoft Office programs from 2007 and later, the toolbar refers to the toolbar. She cannot fall into the abyss, as happens in the 2003 version. The reason is that it combines a standard menu bar and a toolbar. But the ribbon can be minimized if you left-click on any free space in the editor window. To get rid of this property, you need to:
- Right-click on the line where the tab names are placed.
- In the drop-down menu that appears, click on the “Collapse Ribbon” item.

The second way to return the toolbar in Word is as follows:
- On the Quick Access Toolbar (located near the Office button), click on the “Customize Quick Access Toolbar” button.
- In the menu that opens, select “Collapse Ribbon”.

There is also a hotkey associated with this function in Word 2007: Ctrl + F1.
The return of the toolbar in version 2010

In this version of Word, the toolbar disappears only at the user's discretion. Compared to the 2007 version, there are only 2 ways to hide the ribbon: a hotkey and a special button located on the right side of the window next to the help symbol.
Return of the toolbar in versions 2013 and 2016
The interface of these versions of the text editor is very similar to 2007 and 2010, but the functionality and customization options are very different. It provides the user with 3 feed display modes:
- Complete hiding (similar to Expert Mode in 3ds Max 8).
- Only the name of the tabs. Clicking on them expands the tool ribbon completely, and clicking on an empty space collapses it again.
- Tabs and all commands.
To select the most appropriate display mode, you need to click on the button with a rectangle with an upward arrow on it on the right side of the window (next to the window control buttons). It will bring up a small menu where you can select one of three modes.

In addition to controlling the display of the ribbon, in versions 2013 and 2016 there is the ability to customize it. Customization allows you to remove unnecessary tabs and create your own. This innovation leads to the problem of missing tabs. The method of how to return the toolbar in Word comes down to the following algorithm:
- Click the “File” button (replacing the round “Office” button).
- In the window that opens, select the “Options” sub-item.
- In the new window, go to the “Customize Ribbon” subsection.
- On the right side of the window, check the boxes next to the names of the missing tabs.
- Click OK to save the settings.
UbitMenu and ClassicMenu programs
Many users who have become acquainted with and mastered versions of the Microsoft Office 2003 and earlier software package do not like the interface of 2007 and subsequent editions of the programs. To eliminate this problem, third-party developers created the UbitMenu and ClassicMenu programs.
These apps add another tab to the ribbon interface called Menu. It completely reproduces the interface of the editor of version 2003 and older, namely: a menu bar and 2 control panels (standard and text formatting).
The main difference between these apps is that ClassicMenu simplifies the tool ribbon to 1 tab with a classic menu.

And UbitMenu adds a similar one between the existing ones.

It is also a free product and only supports Word, Excel and PowerPoint 2007 and 2010. The program itself is very small - it takes up less than 1 megabyte on your hard drive.
Classic Menu is a commercial development that supports several languages and later versions of the editor.
Most often, a toolbar or toolbar disappears due to the user's fault, and sometimes due to a software glitch. The ways to return the toolbar in Word are simple enough to quickly return the tools required for working with text back into view without bothering the system administrator.