Formatting a Windows Hard Drive
Let's consider such an interesting and not everyone understandable question - hard disk formatting. What is it for and how to do it?
So what is formatting? Someone may answer that this is the removal of all files from the hard disk (hard drive). Roughly speaking, this is true, but it is not only the removal of all information.
In general, formatting is a fundamental technical process of preparing a hard disk for operation. Moreover, the very initial can be done only with the help of special equipment.
There are 2 main types of hard disk formatting:
- Physical
- Boolean
Physical formatting of the hard disk (low level) is the process of breaking down a new hard drive into tracks, sectors and other important technical features for its subsequent delivery for sale.
This initial preparation of the hard drive is carried out exclusively at the manufacturer's factory, using special equipment. It cannot be done independently or at home, because this requires special factory equipment.
At home, you can only do software formatting of the hard drive. Although many who have come across this issue have seen programs on the Internet that allegedly offer to perform it - this is not true, it is impossible to do this at home, as mentioned above.
Boolean (high level)- this is already quite feasible formatting at home.
In its process, boot records, sectors, the structure of the file system are created, that is, everything that is necessary for the normal operation of a hard drive in a computer.

It often happens that you need to format a new hard drive, let's describe what path it goes through in order to start full operation:
- Low-level formatting - carried out at the factory. Next up for sale.
- Division into sections. After the hard drive falls into our hands, it is necessary to create partitions on it. This is necessary for the correct operation of the operating system and the subsequent safety of personal data. Usually 3 partitions are created - local disks C, D, E. You can read more about this issue in the article how to partition a hard disk into partitions.
- High level formatting. And now the final stage before installing the operating system (OS), this stage is performed. We all usually do it when we need to format either a hard drive, or a local disk before installing the OS, or a flash drive.
It is of two types:
- Rapid
- Complete
If we choose fast, then we get only a superficial one, that is, a quick update of the file tables takes place. Moreover, all files are still stored in place, although they are invisible. They are not visible due to the updated file table.
In this case, it is easiest to recover data and with almost 100% probability. It is only extremely important to remember, if you plan to restore this information - you should not write anything here.
Because the new information will simply overwrite the old files. If we perform full formatting, then a whole range of measures for cleaning and updating the hard drive takes place here.
What is also very important at this moment is the diagnostics of all cells of the formatted partition for operability. If faulty ones are detected, they are marked as unusable and are not used by the operating system during subsequent work.
Now let's see how you can format a hard drive or one of its partitions. In general, it can be produced:
- In the OS itself
Let's look at the second, easiest way
First, go to "My Computer". There we see local drives C, D, E usually, although there may be fewer and more of them.
Select the drive you want to format and right-click on it. A menu for working with this section will appear. We find there "format" and click on it:

Next, the settings menu will appear, we leave everything in it, as it is, it only remains to decide whether we do a quick or full format. What is their difference can be seen above. Once you've made your choice, click "Start".
A window will appear about the warning of data loss, if you are sure of your actions, then we agree and the process will start. If you need to completely format the hard drive, then this can only be done if you connect it to another computer or when installing / reinstalling the OS.
In general, that's all, additional information on this topic can be found in the article how to format a USB flash drive. We have considered the issue - formatting the hard drive. What is this process. What types is it divided into and how to produce it.
List of popular free programs for various types of formatting hard drives (HDD, SSD, RAID) and removable media (USB, Firewire, SD). In this article, you will learn how to properly format a hard drive, learn about various types of HDD formatting - including low-level. We will also choose a good program for partitioning a hard drive.
HDD formatting methods - from simple to complex
Formatting is a simple operation that can be performed by inexperienced users. Next, I will tell you how to format the HDD yourself - from simple to complex, depending on your skills and PC proficiency.
Using standard Windows tools for formatting
The Windows XP-10 operating system has built-in tools to perform this operation. Formatting a hard drive is done like this:
- Open "Explorer" (or another file manager),
- Go to the "My Computer" section
- Click on the desired disk
- Select "Format"
- Next, click on the “Start” button
This is the easiest way to format your computer without additional tools. For all its simplicity, however, all steps must be performed consciously, clearly understanding why you are doing this. Before giving your consent to formatting, carefully check whether the correct disk is selected.
Perhaps the video tutorial shows more clearly how to format the disk.
Alternative formatting method in Windows 7 / 8 / 10
- Different systems have different paths to Disk Management - the easiest way is to open the search for programs and enter "management". When the system gives you a search result, find "Computer Management" and open it
- In the menu on the left, go to "Disk Management"
- Right-click on the desired partition and select Format. Since the process takes place inside a running OS, the "Format" menu item will be inactive on the system partition
- Next, select a label for the new partition, the type of the future file system and the required cluster size (if you don’t know what size you need, leave “default”)
- For high-level formatting, you can leave the "Quick Format" checkbox active. If deep cleaning of the contents of the section is required, then uncheck this box.
- After pressing the "OK" button, the system will ask for confirmation - click "OK" again
Formatting a hard drive through the Windows command line
To start formatting, open a command prompt (console) on your computer. To do this, use the key combination WIN + R, in the Run window that appears, enter the CMD command, press ENTER.
Note. To format a drive through the command line, you will need administrator rights. Start - CMD - open the context menu by clicking on the application icon "Command Prompt" - Run as administrator. If you try to format the drive without administrator rights, you will fail: access will be denied. In general, watch the video where I show how to format as an administrator.
For formatting through the console, use the following commands:
Format drive letter
Press Enter. We carefully read what is written in the console, perform further actions with the hard disk according to the situation.
Full HDD Format via HDD Low Level Format Tool
Low-level formatting will optimize the HDD structure. This is useful in preparation for reinstalling the operating system. At the same time, you can solve problems with bad sectors of the hard drive.
HDD Low Level Format Tool is suitable for low-level formatting. The utility will help you format your computer hard drive, external HDD, tablet SD card and other storage devices.
In addition to the basic functions, HDD Low Level Format Tool can be used to read SMART scores, check for read errors, disk usage time, and more.
How fully format hard drive:
- After installation, run the program HDD Low Level Format
- In the Drive selection window, select the hard drive (if several HDDs are connected to the PC). The easiest way to distinguish one hard drive from another is by volume. Click Continue
- Go to the LOW-LEVEL Format tab
- For quick formatting (deleting partitions and MBR records), select the Perform quick wipe option.
- To completely format the hard drive, the above option must be ignored.
- Before completely formatting a hard drive, check that the correct drive is selected. Only after that press the Format this device button.
AOMEI Partition Assistant
The program offers a number of useful features, including low-level formatting of hard drives and most types of removable media. The interface resembles standard Windows tools, so it will not be difficult to figure it out:
- The main window automatically displays the disk with the installed OS. If you need to format another device, select it by clicking the "Disk" item in the top menu
- In the lower block of the left menu, select "Erase Hard Drive"
- When you click this button, you will be prompted for the number of passes of the operation. If in the future it is planned to restore destroyed data, then select a value from 1 to 7. If you specify a parameter of 8 or more, it will be almost impossible to restore information from the device
- Confirm your choice by clicking "Yes"
- It will require a system reboot to start formatting - there is no turning back after clicking the Reboot Now button, so make sure you select the correct drive and the desired operation settings
After restarting the computer, the program will perform all the specified actions and you will have a clean hard drive at your disposal.
DiskWipe
DiskWipe is a great solution for situations where the data on the media needs to be destroyed beyond recovery. The program uses several proven algorithms (Dod 5220-22.M, US Army, Peter Guttman), and advanced settings allow you to choose the depth of formatting. According to the developers, the program does not contain hidden viruses, etc., and does not transfer user data.
Formatting the desired device using DiskWipe is extremely simple:
- Run the program. In the block on the left you will see all devices available for formatting
- Select the desired device and click "Wipe Disk" in the top menu
- The advanced settings will open with predefined default values. For full and irreversible formatting, you can check all available fields with checkmarks, and in the right block, specify "Highest"
- After selecting the settings and clicking "OK", the formatting of the selected device will start
Paragon Partition Manager
A test period of 30 days allows you to evaluate the capabilities of the program and format the necessary devices in various modes. Since Paragon Partition Manager has several options for working with partitions (partitioning, restoring, and others), it is distributed shareware.
The formatting process is intuitive:
- In the main window, click "Partition Manager" in the menu on the left, then select "Launch Partition Manager"
- From the proposed list of devices, select the one you need, open the context menu with the right mouse button, and click "Format Partition"
- Specify the type of future file system and volume name, then click "Format"
- The procedure will be queued - to apply the changes, you must click on the green checkmark in the top menu
- After confirming the operation (the “Yes” button), it will no longer be possible to stop its execution
Separately, it is worth noting the fact that Paragon Partition Manager not only formats the device, but also creates a new partition with the specified file system, so after the system boots, the disk can be used without additional steps.
reference Information
What is formatting?
Formatting a disk is the process of marking a storage device such as a hard disk drive (HDD), memory card, CD/DVD, or other storage medium. The formatting operation is equally useful for new and worn-out HDDs.
A disk that has no partitioning is absolutely useless. In addition to the fact that you apply markup to the disk, when formatting, all data is deleted almost irretrievably (although there is). Therefore, you need to be careful and prepare in advance for formatting the hard drive.
Over the years of operation of the operating system (Windows, Mac OS, Linux), the hard drive turns into a "garbage dump", since many programs leave their files on the disk, and after uninstallation, their "roots" still remain on the HDD. As a result, the system is slow and unstable. There are various freezes, slowdowns, noise - it behaves inappropriately. After reformatting, the hard drive is optimized and starts working better. Many devices last a long time without this procedure. I advise you to insure and format your hard drive at least once a year.
Sooner or later formatting the drive is inevitable. However, before doing this, it is very important to update or reinstall the operating system on the computer. Along with the removal of unnecessary files, you get a completely clean environment without defects, harmful viruses, unused programs, data that lead to conflicts. Thus, before reformatting the hard drive, we reinstall the OS.
Before formatting, back up any important data to another drive. As already mentioned, during the execution of this procedure, various service information, labels are written to the disk, which allow further information to be written to the HDD without hindrance.
Steps to Format a Hard Drive
low level– at this stage, the base markup is applied to the disk at a low level. Typically, this is done by the hardware developer. In this case, special tracks, service data, are applied to the disk. This information remains on the hard drive almost forever - it can only be overwritten using proprietary utilities. These programs can only replace service data. By the way, if you perform a low-level formatting of the hard drive, then you will not be able to recover data later, unfortunately or fortunately. Therefore, if you aim to destroy information, then you can use this format.
Section breakdown. It is clear that storing data on a disk without partitions is quite inconvenient. For some logical organization, the HDD is divided into special zones, disks - drive C:, drive D: and so on. For these purposes, both utility utilities built into the OS and external programs for formatting a hard drive, which I have written about more than once, can be used.
high level. In the process of this type of reformatting, boot sectors, file tables are created.
Types of disk formatting
You may know that the standard system tools provide 2 methods by which you can format a hard drive - external or internal:
quick format: takes less time, allows you to carry out the procedure as is. The bottom line is that with this type of computer formatting, the files in the file table are overwritten with zeros, while the data is stored as if nothing had happened, you can later restore it. Also, with this method, you do not optimize the file structure, and if there were defects on the hard disk, you will not fix them with the fast method.
regular formatting: Longer and deeper hard disk formatting. Data on an internal or external drive is completely destroyed, the file system is checked for possible errors, damage. bad sectors, bad blocks. Thus, with the usual way of reformatting, you kill two birds with one stone, although you lose a little more time.
Windows users have two options for formatting - quick and full. Each formatting option is applied in its own case and has significant differences.
All versions of Windows allow you to format your hard drive or flash drives. Formatting is the process of removing all data from a disk. In some cases, this process is the only solution. An inexperienced user will have questions when he first encounters formatting. And the most common question is what is the difference between quick and full formatting and which formatting to choose. You can choose any type, but you need to know for which cases quick formatting is better, and for which full formatting is better. But first of all, let's figure out what formatting methods exist.
How to format a disk or flash drive
All modern versions of Windows allow you to format a disk or flash drive. Users have several options on how to do this:
- Format with Explorer;
- Format the drive using Disk Management
- Formatting via command line;
- Format the disk when installing the OS;
- Use special programs;
There are also two ways how to format. Quick format and full format. Quick formatting, as you might guess, is much faster to process. In this case, the files are not actually deleted from the disk. An empty table is written to the disk or flash drive, and a note is made to the disk itself in the system that it is “empty”. In fact, the disk is still with old data and is very easy to recover.

Full formatting means deleting data from the disk. That is, a complete disk cleanup. When fully formatted, the system also checks the hard drive for bad sectors and clusters. This process takes longer. The difference in time between quick and full formatting, sometimes reaches 100-200 times.
What type of formatting to choose
Quick and full format are two full options. You should choose a quick format if you want to save time, you don't have any problems with the disk, and you don't worry that deleted files can be easily recovered. Quick Format is the most popular choice. Moreover, this formatting type is the default formatting type. And in order to perform a full format, you need to take additional steps. And to be precise, uncheck the box next to the “Quick Format” item.

Full formatting is a much more reliable option, but also not 100% secure in terms of data safety. If you are selling a computer and you are worried that someone will be able to use the data from your hard drive, then you need to perform a full format. Experts recommend that after formatting, it is advisable to write new files to the disk and format it again. In this case, it will be extremely difficult to restore the original files that you wanted to delete.
File system - FAT32, NTFS, ExFAT, does not affect the choice of formatting type. You can choose quick format or full format in any file system. Full formatting is one of the tools like "cure disk". During formatting, the system performs a full disk check. And if there are damaged clusters, then it marks them. Therefore, we recommend using this formatting method if you are formatting a disk to install an operating system.
Full formatting is bad for SSD drives. Windows 10 won't do a full format if you're using an SSD drive. But if you have earlier versions of the OS, then remember that this type of formatting cannot be applied. This is due to the fact that the full format method involves removing zeros, not ones, and such partial deletion is harmful to the structure of the SSD disk.
And if your drive refuses to be formatted and Windows throws an error, then we recommend reading.
Greetings to all readers of my blog, Denis Trishkin is with you.
Using the computer for a long time, sooner or later it becomes necessary to reinstall Windows. This can be done in several ways. The correct one is the one before which you need to format the hard disk. In the article I will tell you exactly how this happens, and also introduce you to the main concepts.
So what is formatting? Even at school, this process was presented as a division into sectors and tracks, with the loss of all information previously recorded on the storage medium. In the realities of today's technological world, formatting is the process of marking up an electronic data carrier, regardless of its shape and structure, whether it be an optical or hard disk, memory card, flash drive.
Simply put, the process is the erasing of all existing files in the specified area. At the same time, when new ones appear, they are already placed on top in an integral way. Because of this, in the future, access to them will be easier, and, consequently, the speed of processing requests will decrease. The OS and individual programs will run faster.
File system types( ^)
Before proceeding directly to familiarize yourself with the process itself, it is important to introduce you to such a concept as file system and its types. So, it is a table that indicates the order of storage, recording and naming of information on media. In other words, she is responsible for all processes related to transferring and reading data.
There are some of the most famous and used types:

Formatting process( ^)
Immediately you need to clarify that we are talking about formatting before installing Windows. Therefore, we will focus on working with hard drives, and not with other data storage devices.
Formatting methods before installing a new system( ^)
There are only a few ways to format before installing a new Windows:
using built-in features;
command line (the same tool is used);
third-party software (most often Acronis Disk Manager);
use another computer.
Step-by-step instructions for formatting with built-in features( ^)
It should be noted right away that I will be talking about Windows 7, 8, 10, because previous versions are no longer supported by Microsoft. So, when during the installation of a new operating system you reached the disk selection point, you need to:

The built-in tool allows you to format the disk only in a quick way.
However, it does not provide additional functions. That is why many specialists use special formatting programs that work even without an operating system installed. The most convenient is the above Acronis Disk Manager. This application is paid, although there is a possibility of temporary use.
Formatting with Acronis Disk Director( ^)
To work with the application you need:
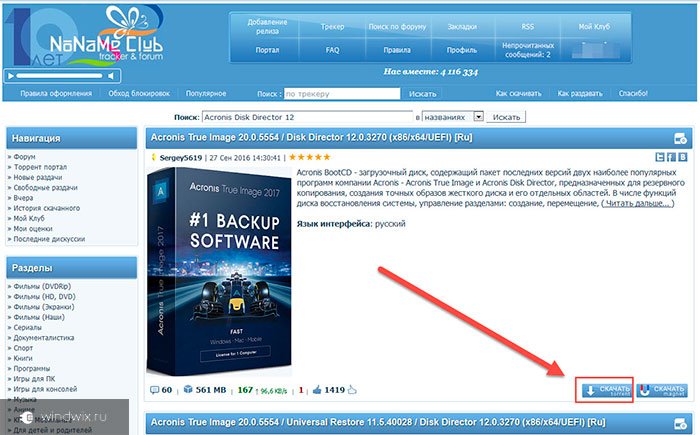
1 Download the program image file using a torrent tracker.
increase
2 Write the downloaded image to a USB flash drive

increase
3 Through BIOS (BIOS) check that the system boots first from a USB flash drive, press the F10 button, agree.
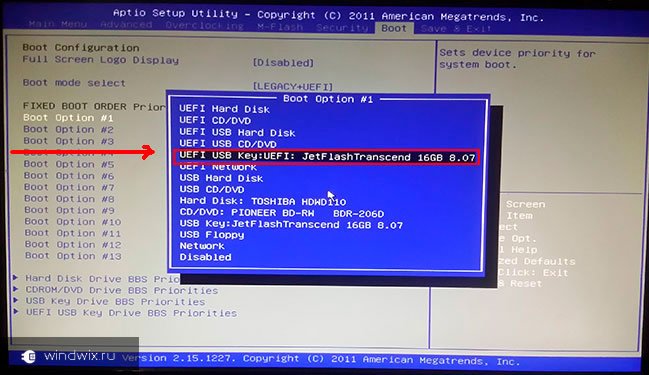
increase

increase
4 After the reboot, confirm the work from the flash drive.
5 A black screen appears where you need to select the full version Acronis Disk Manager.

increase
6 On the pop-up window, mark the "manual" mode.
7 After that, select the section and click on the item in the left menu.
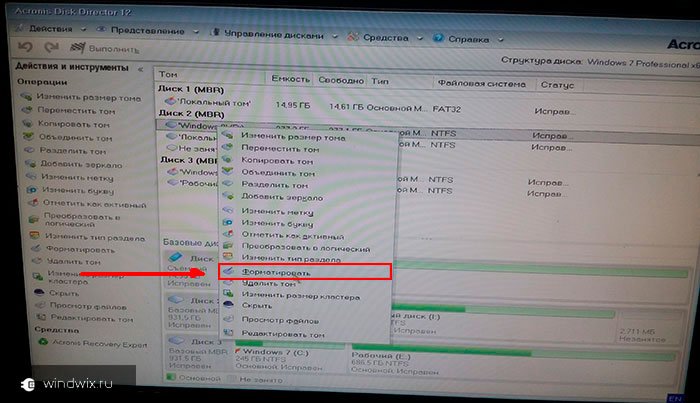
increase
increase
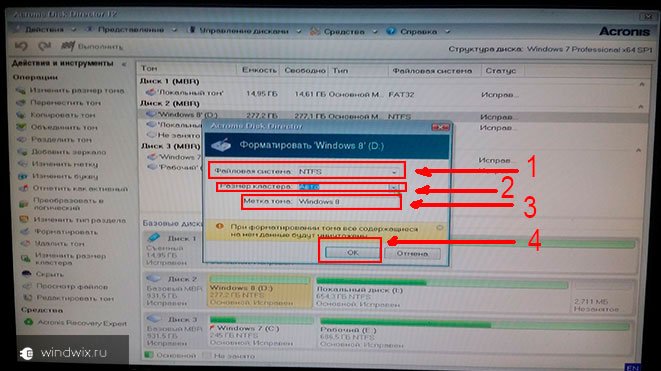
9 After that, the program sends us to the initial section selection window. This is necessary to make additional changes. But since we are only doing the formatting of the disk on which Windows will be installed later, we click on the checkbox.
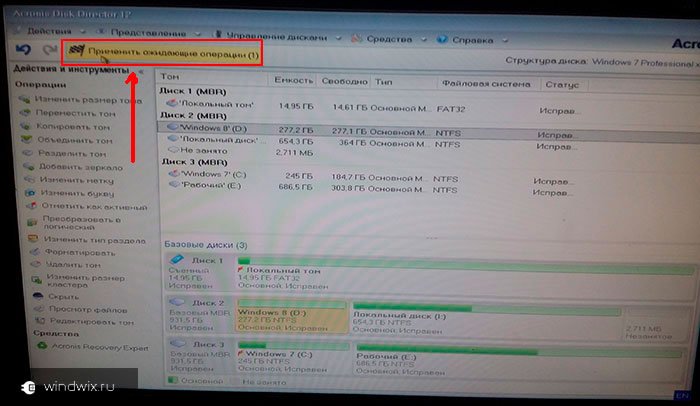
increase

increase
10 We are waiting for the end of the process. After that, you can exit the program and continue installing the OS. At the same time, there is no need to format the disk with the built-in program.

increase
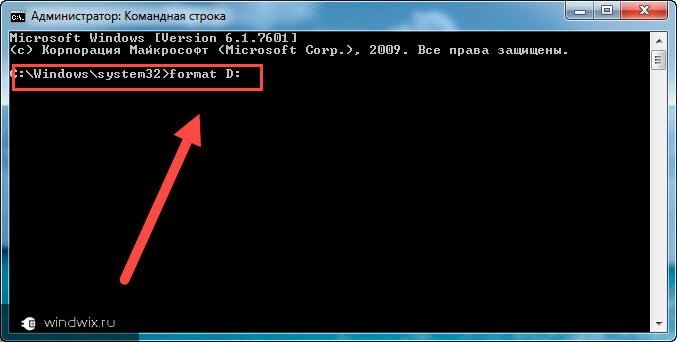
Formatting via command line( ^)
Almost no one uses this method, since most of the above methods are enough. But sometimes there are still situations when he remains the only one.
To call the command line, before copying the new version of Windows to your computer, you must, when the first installation window appears, press the key combination " Shift+F10". After that, a black window will appear. It contains the command " format” along with the letter of the partition to be formatted (it can be C, D, E, etc.). After that, you need to confirm the action: " Yes". Or write " no» if you made a mistake with the partition letter or just changed your mind.
The situation can be solved with the help of a third-party computer. An infected hard drive is connected to it and cleaned in the standard system. To do this, after loading the system in the section " My computer"You need to select the damaged partition, right-click on it, and then select the appropriate menu. The file system, cluster size, and volume label are specified.

increase
After formatting the hard drive, it is installed on the original computer and Windows is installed. Sometimes during this, the system requires you to re-divide the partition into sectors and tracks. Don't worry - this is normal.
Formatting your hard drive before installing Windows is an important step. If it is not done, the new version will work with errors and most likely not for long.
I hope this article will clarify for you the main issues that are related to the formatting procedure. Subscribe, recommend me to friends and become computer literate along with sleep.
Formatting a hard disk is the process of creating a logical markup of a data storage area located on a magnetic medium and necessary for further filling with information and working with it. Usually, formatting is carried out before working with the HDD, to completely destroy information or to eliminate damage caused by a virus.
Types of formatting hard drives
Low-level formatting is the layout of the HDD at the physical level, which usually remains unchanged during the entire existence of the media. Performed at the factory and cannot be performed at home. Programs that claim to allow low-level formatting are usually only able to overwrite control information at best.
Partitioning is necessary to create partitioning on logical drives, which will allow you to store information in a more organized way. For example, a laptop's only hard drive can be divided into two drives, one of which can be used for the operating system, the other for storing files. This will allow you to reinstall the OS without erasing the information stored on the non-system partition. Partitioning of non-system drives can be done from under Windows.
High-level formatting is divided into full and quick. Fast involves only clearing the file system tables, which are a kind of file location directories. Full formatting (verification), in addition to destroying the information in the tables, includes the search for broken blocks and their replacement with working ones. There are several formatting methods.
Format HDD During Windows Setup
In order to start installing the operating system, you should set the settings in the BIOS so that the first device from which the computer starts to boot is the installation disk. To enter the BIOS, you must restart the operating system and press the Delete key several times after the computer starts up again.
In the window that appears, go to the Boot section and specify there as the device from which the computer will boot first of all, the drive where you insert the installation disk.
After setting the required boot options, insert the installation disc into the drive, save the changes in the BIOS, and restart the computer. Usually, the F10 key is used for this. If you did everything correctly, you will see a window for installing and restoring the operating system.

Press the Enter key to proceed with the installation, click Windows. After that, you will see the text of the license agreement, press F8 to continue further work.

After that, you will need to delete all the partitions into which the hard disk has been divided in order to create a single unallocated partition on the HDD. To do this, select each of the available sections in turn and press the L key.

After you delete all partitions of the hard disk, only the single inscription "Unallocated area" will remain in the list.

Press Enter and you will be presented with options for file systems that you can format your hard drive with. Select Format partition as NTFS.

After a few minutes, the formatting of the hard disk will be completed. This method is good, first of all, because it allows you to format the system disk, while programs running under Windows do not allow you to do this. If you are going to format the HDD, where there is not a working operating system, but some files, then it will be much more convenient to use another method.
Formatting a hard drive using the built-in Windows program
Open "My Computer" and by right-clicking on the required disk, select "Format" from the pop-up menu.

In the window that appears, you can specify the necessary formatting options. Quick formatting takes much less time than full formatting, but occurs without complete erasure of information, which allows, if necessary, to restore part of the information with special programs.

After you set the required parameters and click Start, you will see a window warning you that all data on the disk will be destroyed. Click on the OK button and wait for the message about formatting completion.

Using Command Line to Format HDD
One of the simplest ways to format a hard drive is to use a special command on the command line. Click Start –> Run or press the Win+R keyboard shortcut. a small window will appear in front of you, where you should enter the name of the cmd program and press Enter.
In the black window that appears, type format followed by a drive letter followed by a colon, such as format d:, and press Enter. A question will appear with a warning "Attention, all data on fixed drive d: will be destroyed!" and the question “Start formatting?” Press Y and Enter to continue. Formatting will start.
Formatting with the built-in Disk Management program
The Windows operating system has a special built-in program that allows you to perform various operations with disks and their partitions. The program is located at Control Panel -> Administrative Tools -> Computer Management -> Disk Management.

Right-click on the desired drive and select Format. In the window that appears, you can specify the formatting method (quick or full) and the file system type.
Using the Partition magic utility to format the HDD
One of the most convenient and functional programs for working with disks and logical partitions is the Partition magic utility. The program can be used even if the built-in Windows software failed.

In order to format a disk using Partition magic, you need to create a bootable disk, insert it into the drive, and after restarting the computer, working in the program itself, perform all the necessary operations - formatting, as well as deleting or creating a new partition.


