Have you already burned a bootable USB flash drive, but do not know how to boot from a flash drive? There is nothing complicated here. Booting Windows from a flash drive is very simple, and for this you just need to go into the BIOS and change one setting.
If you have not yet recorded a licensed digital copy of Windows, I recommend reading -?
How to set up boot from a flash drive?
If you simply connect a USB flash drive to a PC or laptop and reboot it, Windows installation will not start. After all, for this you need to enable boot from a USB flash drive in BIOS.
This is done easily. But there is one nuance here. The fact is that loading Windows from a USB flash drive on PCs and laptops is carried out in different ways. First, it depends on the BIOS manufacturers. And, secondly, from the brand of the laptop (Asus, Acer, Samsung, Lenovo, HP, etc.).
Yes, the BIOS menu will always be different, and this can cause difficulties. But below we will look at a few examples so that you understand and can navigate the BIOS menu on your own (in case you have another option).
So, let's begin. To enter the BIOS, you must immediately press a certain button on the keyboard when you turn on your computer or laptop. Which one? This can be found out when loading on the screen.
You can find out that you have entered the BIOS by seeing the corresponding menu in front of you. Usually there are the following options:


If loading the BIOS failed, then wait until the PC or laptop turns on, reboot it and try again by pressing another key.

In this case, the item "Boot" was selected, and then "Boot Device Priority" (i.e., the priority of starting devices). As a result, a menu like this will open:


As you can see, they are different, but in each case there are lines we need - First (1st), Second (2nd) and Third (3rd) Boot Device. It indicates which device boots first, which one second and third in turn. As a rule, the hard disk drive (HDD) always comes first, followed by the disk drive (CR-ROM).
When you connect the USB flash drive, the USB-HDD item will also appear. It is necessary in the First Boot Device item to select the option - USB-HDD. Example:

Next, be sure to save the changes, otherwise you will have to repeat everything from the beginning. Which save button? This information is written at the bottom of the screen. For example, in the screenshot above: F10 - "Save", ESC - "Exit". Save the changes and exit the BIOS. Congratulations, the BIOS setup for booting from a USB flash drive is complete.
The computer (or laptop) will automatically reboot, after which the following line will appear:

Press any button - and the installation of Windows will begin.
If you have a UEFI BIOS then everything is as easy as shelling pears
Go into BIOS and you will see something like this menu:

To configure booting a flash drive in UEFI, we are interested in the “Boot Priority” item. Drag the USB device icon to the top of the list (so that it is the first one) and exit (exit button in the upper right corner). When you exit, the system will ask you if you want to save the changes. You agree, after which the PC or laptop will reboot.
By the way: it doesn’t matter at all what kind of image you have on a USB flash drive - Windows 7, 8, 10 or XP. It doesn't affect anything. Booting the OS from the flash drive will start anyway (of course, provided that it is written correctly).
And finally, one more very important point. When the unpacking of the Windows files is completed, the computer will restart.

After that, you need to go back into the BIOS and return the previous device startup priority. That is, put the hard disk (HDD) in the first place, and the USB flash drive in the last place. There shouldn't be any problems with this.
Basically, you don't have to. In this case, when a black screen appears, NOTHING don't press.
Otherwise, the Windows installation will boot again and you will be installing the operating system again.
But when Windows is installed, you still need to go into the BIOS and return the previous device startup priority. Otherwise, the computer (or laptop) will always load data from a USB flash drive first (provided that it is connected).
Surely you have noticed that now in many articles on fixing various errors in Windows or restoring it, it is almost always recommended to use a bootable USB flash drive with operating system installation files or from a LiveCD. And only then they remember the use of the installation CD.
In principle, this is not surprising, since DVD drives have already faded into the background, and CD / DVD discs naturally followed them. For example, when assembling a new computer, few people additionally buy and install a DVD drive, by the way, in many PCs that are sold already assembled, the drive is also not installed. Well, I generally keep quiet about modern laptops or netbooks, in most models the drive has disappeared for a long time.
Just in this instruction, several examples of how to set the boot from a USB flash drive in different BIOS versions will be considered. In this article, you can find examples for both the earliest BIOS versions and some modern UEFI versions from various manufacturers.
The procedure for installing boot from a USB flash drive in BIOS
Installing a boot from a USB flash drive in different BIOS versions may differ slightly, but in principle the algorithm itself is the same for everyone.
- We write down or with;
- We connect the prepared usb-drive to the computer. If you are going to install Windows, I recommend connecting the drive to USB 2.0, that is, to the ports that are colored black (blue is USB3.0). So, sometimes the system may refuse to start the installation due to the lack of drivers for the USB3.0 to which the device was connected;
- We turn on or restart the computer and enter the BIOS using the keys " Del" or " F2". If not one of these keys does not work, you can find options that can help you here;
- In BIOS, open the “Boot” section, where in the list of boot devices we move the USB flash drive to the first place;
- By pressing the "F10" key and saving the changed parameters, we try to boot from the device we connected;
In general terms, it looks something like this. Well, now let's specifically go through each BIOS version.
Booting from USB to Pheonix AwardBIOS
AwardBIOS is a rather old version of BIOS, and today it is very rare to come across, but it still happens sometimes.
So, having entered the BIOS, we need to go to the "" tab.


Initially, the hard drive will be in the first positions, or if you have several of them, then all hard drives will be displayed first and only then the connected usb device. Here you need to use the key " + » move the flash drive to the very first line.

Then we return to the previous menu by using the " Esc” and in the parameter “ Firs Boot Device» choose value « USB-HDD". (By the way, some versions of this BIOS may not have such a line, so you can try to select either USB-FDD or USB-CDROM).

Well, in the parameter " SecondBootdevice » expose « hard disk».
By pressing F10, save the settings and restart the computer.
Booting from a flash drive in another version of Pheonix AwardBIOS
Also, there are several more versions of Pheonix AwardBIOS, in which the principle of installing a boot from a USB flash drive is similar, but the menu itself is slightly different.
We'll start by checking if the USB controller itself is enabled:

Installing boot from usb flash drive:

By the way, I want to draw your attention to the fact that in this BIOS version there may be several more options for installing boot from a USB flash drive, for example:
- In some cases, it is enough just in the “Boot” section to select “USB-HDD” as the first device from which the computer will boot.
- Sometimes a flash drive can be found not in the hard drive settings, but in the "Removable Drives" subsection;
How to set boot from usb drive in AMI BIOS
AMIBIOS is another BIOS version that is often found on not the most recent mats. boards. In general, if once in the BIOS, its appearance will be the same as in the screenshot below, then to install the USB flash drive as a boot device, you need to follow these steps:

In this BIOS version, also, a flash drive can be found not only in " Removable Drives", but also in "", so be careful.
We set the boot from a USB flash drive in the UEFI BIOS Gigabyte
Now, let's move on to more modern types of BIOS, which can be found on later models of motherboards from various manufacturers.
Well, right now we will start with the UEFI BIOS on the Gigabyte motherboard.
So, going into the BIOS using all the same keys " Delete", " F2" or " Esc", Go to the tab" BIOS Features". Here you can see that booting from a flash drive will initially be available only in UEFI mode.
Well, since this option is not suitable for most, because the usual Legacy mode is more priority, we need to change the ego. To do this, go to the line " Hard Drive BBS Priorities.

AT " Boot Option #1"We set instead of a hard disk, a bootable USB flash drive, respectively, in" Boot Option #2”, the HDD must be installed.

After that, in the previous menu you can select a USB flash drive as a boot device, but without the UEFI prefix.
There is another boot option, which, it seems to me, is much easier to use, but its trick is that it serves as a one-time boot from a usb drive, that is, the next time you reboot, you will again have to choose to boot from it in the same way.
In order to use it, you need to move to the tab " Save & Exit" and in " Boot Override»Select the required device to boot the computer.

The beauty of this option is that it does not require any additional changes in the BIOS settings, and later you simply do not have to bother with resetting the boot settings to their original position. By the way, this option is very similar to the same Boot menu, although in this case we will have to go directly into the BIOS.
Booting from a flash drive on ASUS motherboards
In BIOS on ASUS motherboards, there are also several options for starting a computer from a bootable USB flash drive with Windows.

On more modern motherboards, the principle is the same. Below I will show an example on the same ASUS.
After entering the BIOS, on the initial screen, we again need to use the mouse to move the priority device to the very top. Up because this menu moved to the right side and became vertical.

You can also use the boot menu, as I showed in the previous example.
Going into " AdvancedMode( F7)' and going to the tab ' Boot", you can change the download priority manually in the " Boot Option Priorities ».

Or just select the desired device to start downloading from it in the " Boot Override", which is still in the same "Boot" tab.

Booting from a flash drive in BIOS on an MSI motherboard
With regards to the motherboard in MSI, here we can set the boot from a USB flash drive in two ways.

In general, I hope that you will find an option that suits you, and that you will be able to set boot from a USB flash drive in your BIOS without any problems.
How to set boot from a flash drive in old and modern versions of BIOS
Friends, in this article we will find this most boot menu for laptops Acer, Sony, Samsung, MSI, Toshiba, HP, ASUS, Packard Bell and load the above devices from my Corsair Voyager flash drive, which contains the Windows 7 operating system. Do not forget, if you want to install Windows 7 or Windows XP on a new laptop, then connect the flash drive to the USB 2.0 port (black) if you connect the USB flash drive to USB 3.0 port (blue), the system installation will fail because the Windows 7 installer does not have USB 3.0 drivers.

We will also analyze the BIOS of these devices in detail. Consider how to change the boot priority on these laptops, in case you and I cannot enter the boot menu. There is no need to be afraid of the BIOS, if you configure something in it incorrectly, you can always reset the settings to default.
Very important note: This note is useful to you if you have a new laptop from any manufacturer (2013, 2014 with UEFI BIOS). If you have such a laptop, and you are reading these lines, then you want. To do this, naturally, the laptop needs to be loaded from .
Almost all laptops sold now have a UEFI BIOS, such a laptop just cannot be loaded from a USB flash drive, since there is a special protection in the UEFI BIOS - the Secure Boot protocol based on special certified keys (available only for Windows 8). The Secure Boot protocol will not allow you to boot your laptop from any boot disk or flash drive other than the Windows 8 installation disk. .
Let's get back to this article. I think the information will be useful to many owners of laptops and netbooks. This article will also help if you want to boot from disk and don't know how to do it.
Let's start with the Acer laptop, first of all we connect our Corsair Voyager flash drive to the laptop, then press F12 at boot,

Then you need to select our flash drive in the boot menu that appears and click
If you are unable to enter the Acer laptop boot menu using the F12 key at boot, then the Boot Menu option is disabled in the BIOS and you need to enable it.
Press when loading F2, the initial tab Information, go to the tab Main, see the parameter F12 Boot Menu, set it to Enabled,

Next, press F10 to save the settings, reboot, press F12 when loading and our boot menu appears, select our USB flash drive in it and press Enter, the USB flash drive is loaded.
If the boot menu of the Acer laptop still does not appear, then we go to the BIOS again (when booting F2), the Boot tab. We select our flash drive and put it in the first position using the F6 key, then press F10 to save the settings, reboot and boot from the flash drive.


We press F12 when loading the laptop and get into the boot menu, select our USB flash drive here, if you connected a USB flash drive to the laptop, its name will be here. Press Enter and if your flash drive is bootable, it will boot from the flash drive.

If for some reason you cannot boot a laptop from a USB flash drive using the boot menu, then you can enter BIOS and change the priority of the boot device there. We often press F2 when booting a Toshiba laptop and get into the BIOS of this laptop. The initial tab Main, go to the Boot tab (responsible for loading the laptop) and see our Corsair Voyager flash drive in sixth position. We select it using the keyboard and press F6, thus moving our flash drive to the first position, then press F10 to save the settings we have changed, the reboot occurs and the laptop is loaded from the flash drive.
Friends, if you have a new Samsung laptop, for example, 2012-2013, then we read this article "", this instruction is also suitable for all others.
We press when loading Esc or F10, we get into the boot menu and select our flash drive. If the boot menu does not appear, then we go to the BIOS, press F2 or DEL when loading. In the BIOS tab Boot, select the first parameter Boot Device Priority

And we enter it, here we select our flash drive and use the F6 key to put it in the first position. Next, press F10 to save the settings and reboot, reboot, then boot from our flash drive.


and get into the boot menu. The drive is now selected as the first device, if your flash drive is connected to a laptop, then its name will also be present here, select our flash drive here and press Enter or F10, it reboots and further downloads from the flash drive.

If you cannot enter the HP laptop boot menu, then go to the BIOS, press ESC when loading, then F-10, get into the BIOS,

Go to tab System Configuration, then Boot Options, press Enter


As you can see, the laptop's hard drive is set to be the first device. Notebook Hard drive. If your flash drive is connected to a laptop, then its name will be here, select our flash drive and use the F6 key to move it to the first position. Next, we save the settings we have changed, press F10 to save the settings, the reboot occurs and the laptop boots from the USB flash drive.


If the boot menu is not available, press the DEL key at boot and enter the BIOS, then go to the Boot tab, select our flash drive and, without releasing Shift, press + , thereby moving our flash drive to the first position. Press F10 to save the settings, the settings are saved and the laptop is loaded from the USB flash drive.


Then we go to the Boot tab, and set the Fast Boot option (fast boot) to Disabled (disabled),


Once again we enter the BIOS and go to the Boot tab, set the Launch CSM (advanced boot) option to Enabled,

We go down to the Boot Option Priorities and Boot Option # 1 options and enter it by pressing Enter, in the menu that appears, using the arrows on the keyboard, select the name of our flash drive and press Enter. Here we also put our Corsair Voyager flash drive in first place.


We press F10 to save the settings, reboot and our Asus laptop boots from the USB flash drive.
Also you can use boot menu Asus laptop, for this, in the initial phase of loading the laptop, often press the key Esc, you will get to the boot menu, use the arrows on the keyboard to select your bootable USB flash drive in it and press Enter.

How to boot a Packard Bell laptop from a flash drive

Press key while loading F12 and get into the boot menu of the laptop, there we simply select our USB flash drive and boot the laptop from the USB flash drive.
If F12 does not work when loading press F2, less often F6 and get into the UEFI BIOS of the laptop,

go to tab here Boot.
If before turning on the laptop you connected a USB flash drive to it, then it may not decide directly in this menu.
Set the Boot Mode option to Legacy BIOS.
And the option secure boot put in position Disabled.
Now the flash drive should be determined. Put the flash drive in the first position, save the settings and reboot. If the bootable flash drive is made according to our articles, then the download will be successful.
Now I will show you how you can configure the BIOS of the Acer Aspire V3-551 laptop to boot from a USB flash drive or CD / DVD drive. Ahead of a lot of pictures, that is, photos.
By the way, do not confuse it with the Acer Aspire 551G, because. they have different BIOS.
In this laptop, the UEFI BIOS and setup are usually more difficult than on regular AWARD / AMI BIOSes.
And so you will see how the bios autorun is configured on a laptop and how to enable the ability to select a boot.
Well, let's get started.
First we need to enter the BIOS.
To do this, press the power button and immediately "click" on the key " F2". Why right away? So as not to miss the moment of entering the BIOS.
And so we see the following. Here we can look through the brief characteristics of the Acer aspire V3-551 laptop.
In this tab, enable the ability to call the boot menu using the " F12".
As shown in the photo, we do this, that is, we switch from " Disabled" on the " Enabled":

We see:

After switching, a message will fly out, approximately as follows: "For the settings to take effect, you will need to restart the laptop."

Click on " Enter", And so we need to restart the laptop while saving the settings, press the " F10" and " Enter".

And we go back to the BIOS. Go to tab " Boot" and see the following:

Hooray! We see all connected devices to the laptop, which can be assigned boot priority.
For example, I will put a USB flash drive in the first boot, that is, I will boot from a USB flash drive in order to install Windows in the future or boot from a LiveCD, it doesn’t matter at all.

As we see, " USB HDD"this is our flash drive, but" ATAPI CDROM:" - drive unit.
P.S.: The distribution of the boot priority is set with the keys "F5" - to lower and "F6" - to raise.
There is a little left.
What do you choose to download from? Exposed? And now we save the settings, as usual through the " F10" and " Enter".
And lastly, remember in the paragraph where we enabled the Boot Menu function using the " F12"?
Now you can choose the boot priority without entering the BIOS. When you turn on, do not press the "F2" key, but the "F12" key.
And you will see this window:

Here we select the device from which you will boot.
That's basically the whole setting of the boot priority from the acer aspire v3-551 BIOS flash drive.
Almost all laptop models produced today do not come with a built-in CD/DVD drive. Lenovo laptops are no exception. A bootable USB drive in this case is a useful tool for diagnosing and repairing the operating system or for installing a new OS.
There are several ways to boot Lenovo laptops from a bootable USB drive.
Booting from a USB drive (flash drive) via priority change is the best option when you need to unlock your PC using the Windows password recovery tool or fix a boot problem such as blue screen, OS not starting, etc.
To download you need:

BIOS Boot
- When the BIOS menu appears, go to the "Boot" section with the left and right arrows on the keyboard.

- Use the up and down buttons to select the "USB HDD" drive and install it using the "F6" and "F5" buttons in the "Legacy" list above the "SATA HDD".

- In addition to "Legacy" booting, the BIOS may support "EFI" booting. If the MBR table is located on the HDD, you need to select "Boot Priority" with the arrows, press "Enter" and instead of "UEFI First" set the arrows to "Legacy First" by pressing "Enter".

Reference! If there is an MBR partition table on the hard disk (an old version of HDD layout that works with partitions of no more than 2 TB), then set to “Boot Priority” - “UEFI First” can lead to an error installing Widnows.
- Press the "Esc" button to exit the BIOS main menu, and press the "F10" button to save the BIOS exit options. After restarting the laptop, it will start booting from the USB drive.


Phoenix Award BIOS
If Phoenix - Award BIOS is installed on the laptop, after a standard BIOS entry, you must:

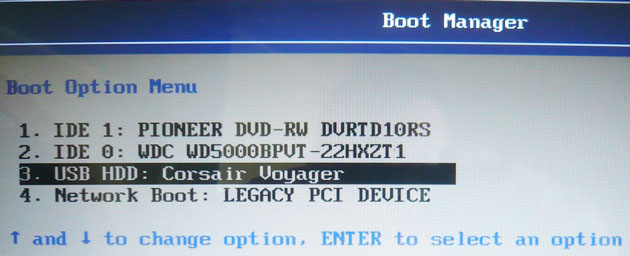
You don't have to do it through BIOS Setup to boot Lenovo from a USB drive. Lenovo laptops have a special boot menu called “Boot Menu” for this.
To enter the boot menu, you must:

If you can’t enter the Boot Manager boot menu with the F12 key, for this case, Lenovo laptops have a special arrow button next to the power button or on their side panel. This button is present on many Lenovo laptops and is called "Novo Button".
To activate the download using the "Novo Button" button, you need:

Sometimes the laptop boots up so quickly that the BIOS cannot be entered by pressing the F1, F2 + Fn, or F12 buttons. If the laptop does not have the Novo Button, but it can normally boot the operating system from the hard drive, then you can enter the UEFI BIOS boot menu directly from Windows 8/8.1/10.
How to enter the UEFI menu
For Windows 8/8.1
- Move the mouse pointer to the upper or lower right corner of the display, and move the mouse up or down. The Charm panel will appear, where you need to click on Options (gear icon).

- In place of the Charm panel, the Settings panel will appear, at the bottom of which you need to select Change PC settings.

- In the PC Settings window that appears, select Update and Recovery.

- In the next window, select "Recovery" - "Restart now".

For Windows 10

The last steps are the same for Windows 8/8.1 and 10:

As you can see, there are a lot of options for booting a Lenovo laptop from a USB drive, and each option offers its own solution that is most suitable for the user in a particular case.
Read more detailed information with instructions in our new article -
Notebook Lenovo IdeaPad Z580: home machine at the right price
If you're looking for a laptop that combines style and entertainment at an affordable price, the Lenovo IdeaPad Z580 is a great choice. Attractive appearance, good ergonomics, durable case, excellent performance - all these qualities have a laptop from Lenovo.
The build quality of the Z580 is also good, and despite the somewhat pliable plastic panels (the laptop comes in both aluminum and plastic cases), the chassis is quite solid. The laptop offers bold, glossy lines and is one of the most striking budget laptops on the market.

Under the attractive appearance of the IdeaPad Z580 hide:
- processor: Intel Core i3/i5/i7, 2200-2900 MHz;
- core: Ivy Bridge/Sandy Bridge;
- RAM: 2-8 GB RAM;
- HDD: 320-1000 Gb;
- video HD Graphics 4000 plus GeForce GT 630M–645M.
The glossy display from Lenovo is also impressive. With a screen diagonal of 15.6″, the resolution of the matrix is standard and is 1366 × 768 pixels. The brightness of the monitor is also average, but the contrast reaches an impressive 260:1, which, along with good color reproduction, provides vibrant colors and makes it one of the best displays in its price category.
The laptop, not light, is 33mm thick and weighs about 2.5kg. Battery life - 5 hours.
Important! According to the results of tests in real games, this is one of the fastest budget laptops. If the customer is looking for a fast laptop for everyday tasks without spending too much money, the Lenovo IdeaPad Z580 will not disappoint.
Smartphone Lenovo S920, characteristics of fast IdeaPhone
Another interesting solution from Lenovo is the Lenovo IdeaPhone S920 smartphone.

Phone Specifications:
- screen: IPS 5.3 ″, 16 million colors, 1280 × 720, touch, capacitive, multi-touch;
- Processor: 4-core MTK 6589, 1.2GHz, PowerVR Series5XT video;
- memory: 1 GB RAM, 4 GB built-in + 32 GB microSDHC, microSD;
- phone type: monoblock, 159 g, 154 × 77.7 × 7.9 mm;
- phone charging connector: micro-USB;
- connection type: GSM 900/1800/1900, 3G;
- navigation: GPS, A-GPS;
- interfaces: Wi-Fi, Bluetooth, USB;
- platform: Android 4.2 with ideaDesktop proprietary shell;
- battery: Li-Pol 2250 mAh, 25 h (GSM), 12 h temp. (WCDMA);
- camera: front 2 megapixel, rear 8 megapixel, flash, face and smile detector.
The IdeaPhone S920 boasts two SIM cards, but it is equipped with one radio module, which, for example, does not allow it to download a file on the Internet during a telephone conversation.

The image quality of the S920 is very good, but the ideaDesktop doesn't shine with its design. The battery allows the smartphone to work intensively for a day on a single charge, which is a very good indicator. The speaker of the phone is of high quality and loud.
The Lenovo IdeaPhone S920 isn't an absolute bestseller, but it's a solid choice for an all-in-one purchase, highlighted by its good camera, long battery life, and dual-SIM capability.
Video - How to boot from a USB flash drive or from a disk on a Lenovo laptop


