Every sysadmin needs to know how boot computer from USB stick... Most often, this skill is required when installing an operating system. After all, the Windows distribution does not have to be located on a CD-ROM. And, for example, you won't even be able to install Windows on a netbook in a different way. it usually does not have a floppy drive.
Today I will tell you how to set the boot from a flash drive to the BIOS of various manufacturers. Regardless of which version you have, the procedure will be as follows:
1. We insert our bootable USB flash drive into the usb connector of the computer. It is advisable to insert it into a port located directly on the motherboard, i.e. from the back of the system unit.
2. Turn on the computer and press the key Delete(or F2) to get into the BIOS. Depending on the manufacturer and BIOS version, other keys (Esc, F1, Tab) can also be used, so you need to carefully look at the prompts on the screen.
In BIOS, we can navigate through tabs and lines only using the keyboard.
Next, I will describe this process in detail using the example of different BIOS versions.
Setting up Award Bios to boot from a USB flash drive
Award Bios: First, let's check if the USB controller is turned on. Go to “Integrated Peripherals”. We go down with the arrow on the keyboard to the item “USB Controller”. Press the “Enter” key and select “Enable” in the window that appears (also using “Enter”). Opposite “USB Controller 2.0” should also be “Enable”.
  We leave this tab by pressing "Esc".
Then go to “Advanced BIOS Features” - “Hard Disk Boot Priority”. Now, in my example, the hard drive is in the first place, and the flash drive should be.  We stand on the line with the name of our flash drive (Patriot Memory) and raise it to the very top using the “+” key on the keyboard.
  We leave from here by pressing "Esc".
Now on the line “First Boot Device” press “Enter”. We selected “CD-ROM”, but it is necessary to set “USB-HDD” (if suddenly booting from a flash drive does not work, return here and try to set “USB-FDD”). Let the second device be “Hard Disk”.  Exit this tab by pressing Esc.
Now we exit the BIOS, saving the changes. To do this, press “Save & Exit Setup” - press the key “Y” - “Enter”. 
Configuring AMI Bios to boot from a USB flash drive
If, after entering BIOS, you see such a screen, then you have AMI Bios: First, let's check if the USB controller is turned on. Go to the “Advanced” - “USB Configuration” tab.
  Opposite the items “USB Function” and “USB 2.0 Controller” should be “Enabled”.
  If this is not the case, we stand on this line and press the “Enter” key. From the list that appears, select “Enabled” (also using “Enter”).
Then we exit this tab by pressing “Esc”.
Go to the "Boot" tab - "Hard Disk Drives". 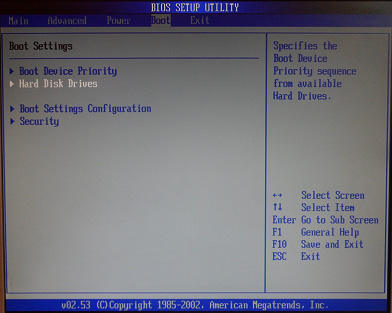 Now my hard drive is in the first place, but I need to put a USB flash drive here. We stand on the first line, press “Enter” and in the window that appears, select our Patriot Memory flash drive.
  It should be like this:
  We leave from here through "Esc".
We select “Boot Device Priority”. Here, the first boot device must be a USB flash drive.  Press Esc.
Then we exit Bios, saving all the settings made. To do this, go to “Exit” - “Exit & Save Changes” - “OK”. 
Configuring Phoenix-Award Bios to Boot from a USB Flash Drive
If, after entering BIOS, you see such a screen, then you have Phoenix-Award BIOS: First, let's check if the USB controller is turned on. We go to the “Peripherals” tab - opposite the “USB Controller” and “USB 2.0 Controller” items there should be “Enabled”.
  Then go to the “Advanced” tab and set “USB-HDD” opposite the “First Boot Device”.
  After that, we exit Bios, saving the changes. To do this, go to “Exit” - “Save & Exit Setup” - press the “Y” key - “Enter”
  This is practically everything you need to know in order to boot from a USB flash drive. In my article, I described the process of configuring BIOS for the most popular versions: Award and AMI... The third example presents Phoenix-Award Bios, which is much less common.
This procedure may differ slightly in different BIOS versions. But the main thing is that you understand the very principle of setting.
By the way, I would also like to add: in order to choose which device your computer will boot from, it is not necessary to change the settings in the BIOS. You can immediately call up a special menu after turning on the computer to select boot devices (this can be done with the F8, F10, F11, F12 or Esc key). In order not to guess with the keys, we look closely at the monitor immediately after switching on. We need to have time to see an inscription like this: “Press Esc to selest boot device”. In my case, it was necessary to press "Esc". 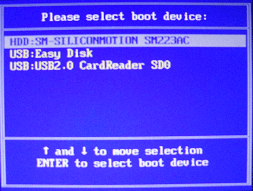 If your computer BIOS UEFI, and you need to boot from a USB flash drive - you can familiarize yourself with.
If you need reset forgotten user password using a bootable flash drive - how to do it.
Hello dear readers and colleagues in computer science!
Why could this happen?
Let's figure out the reasons with you. Imagine that you decided to install an operating system and found an old USB flash drive. On a laptop, it was determined, you formatted it and rolled up the system on it for installation. And so you rebooted, and the PC just did not see the flash. The most common case, you simply did not translate BIOS into the settings for downloading from a mobile hard drive.
This is how it is done. What would be in these very settings, you need to restart the laptop and when you see such a screen -

Pay attention to which button is written in the line that I underlined. In the figure, I also indicated which keys can also be called BIOS (it all depends on the model of the program itself). If you did everything correctly, you will see a screen like this.

Here you need to configure the boot parameters . Go to the section First Boot Device and in this line select USB-HDD.


Now the computer should see the flash.
The second reason is a problem with the drivers. They either got confused and give out bugs, or were not initially installed. The USB ports are on the motherboard. If they do not work, then the medium will not be visible, or it will be detected every other time.
You need to download the software from the manufacturer's website and install it. It is also advisable to scan the laptop for the presence of firewood from other devices. You can do it with this software.
Install, scan and reboot. In general, this procedure should be done after each demolition of the operating system and also after its restoration. The program is free, works quickly, completely in Russian.
How to identify the problem?

If you inserted a flash drive, and the computer freezes at the same time, then the problem lies in the medium itself. You need to do the formatting at a low level. This is a complete rebuild of sectors with their cleanup.

Also, system brakes can be caused by a conflict with the hard disk. In this case, you need to check the hard drive itself with the standard program built into the OS. Due to untimely defragmentation of the media, such problems appear.
If you have Windows 7 maximum, then it is quite possible that you downloaded a self-made build. In such cases, only reinstalling the licensed software from the image can help. Of course, there will be no additional chips, but the stability of work in this case is guaranteed. You will have to format the disk, so be prepared to transfer your data to an external hard drive or online storage.

If you get an error that says that there is no connection to a portable device, this means that the device itself has failed. Again, it is unlikely that you will be able to save the data, so just format it. Also check the entire computer for viruses, it is quite possible that a malicious script is blocking OS operations that are responsible for connecting via USB ports. It is advisable to do this with a powerful antivirus with updated databases, and not free counterparts that rarely find anything at all.
One-stop solution

If you do not know what to do and how to fix the problem, then simply demolish the Windows, format the hard drive and the USB flash drive itself. It is better to perform a major reinstallation of the OS, rather than half-measures. In my case, only this helped. In addition, buy a new media, most likely the problem is in it. From a blow, he could be damaged, or the board inside the case shorted out.
Conclusion
This is where I will end the article. I hope you will not encounter bugs when working on your laptops. Share the article on social networks and subscribe to the blog to keep abreast of new materials! All the best to you and good luck, my dear readers!
You decided to install Windows: wrote a digital copy to a USB flash drive, set up BIOS, restart your computer or laptop, and for some reason the installation does not start. What the heck? Why does the BIOS not see the bootable USB flash drive? It seems that everything was done correctly….
There are 2 most likely reasons here. First, the BIOS does not display the USB flash drive, because it is not bootable. Second, you have not configured the BIOS quite correctly.
Although there is one more nuance - your BIOS is too old. It does not support USB drives, and therefore does not see them. In this case, you can install Windows from disk.
As for the first two reasons, we will consider them in more detail.
Did you write the bootable USB drive correctly?
The point is that it is not enough just to copy files to her. In this case, it will not be considered bootable. That is why the BIOS does not see your flash drive. It is necessary to record it only with the help of special programs. There are plenty of them, but I personally use UltraISO. Why? Because she:
- Free (with a trial period of 30 days).
- Records both Windows 7 and Windows 8.
- Easily writes images to a 4 GB flash drive (some programs only support USB drives with a volume of 8 GB and above).
And most importantly: creating a bootable USB flash drive in UltraISO is as easy as shelling pears. First, you need to install the program (link to the developer's website) and connect the USB flash drive to your laptop or computer. And after that, there are only a few steps left to complete:

During recording, all information from the USB stick will be deleted. The program will also warn you about this. Therefore, if it contains important data, copy it to another location.
Correct BIOS setup
If you did everything according to the instructions, then you can be sure that the USB flash drive is recorded correctly. And now it is really bootable. Try it - you might be able to start the Windows installation.
Therefore, restart your laptop or computer and enter the BIOS. To do this, you need to press a certain button several times. Most often it is Del or F2, although it may be different (depending on the model of the motherboard and the brand of the laptop).
Next, you need to go to the tab, the name of which contains the word "Boot". It is here that the boot priority of devices is configured when the PC or laptop is turned on. By default, the hard disk is loaded first (First Boot Device), followed by the floppy drive. In this case, you need to put a USB flash drive (USB-HDD) in the first place, and temporarily lower the hard disk (Hard Disk) to the second.

When exiting BIOS, be sure to save the new settings! To press the button, which is responsible for the item "Save and Exit".

That's all. Now, if the USB stick is connected to the computer or laptop, and the BIOS is configured correctly, the Windows installation will begin.
P.S. If this is all too difficult for you, then you can go to the Boot Menu. This is one of the BIOS options, which is designed just to quickly configure booting from a USB flash drive.
P.S. If the BIOS stubbornly refuses to recognize the USB stick, then it might be corrupted. But before you throw it away, read it. Perhaps everything will work out, and it will last a couple of years.
Laptop and computer manufacturers are increasingly ditching bulky CD drives. This is understandable, because it saves a lot of space and makes the device much more compact.
As a result of this new trend, users need to install an operating system not from a CD, but from a USB stick, and, as usual, this entails certain problems. So, for example, sometimes the BIOS does not see the USB flash drive, which means that further work with it becomes impossible. You can read below how to fix this.
USB stick malfunction
The first thing to check is the performance of the USB drive. It is possible that the BIOS does not see the bootable USB flash drive due to its malfunction. In this case, the device can safely work as a storage for files, but it will cease to function if you use it as a Boot device.
It is best to check the operability of the flash drive on another computer or laptop. To do this, just try to use it as a boot device, and if everything goes well, then your USB drive is not damaged.
In the absence of a second computer, you can use alternative methods to check the operability of the flash drive. For example, you can simply connect it to a different port, or even write the operating system image to another drive and try to boot from it.
Faulty USB port
If the BIOS does not see a USB flash drive, which you are completely sure of is working properly, you should check the functionality of the USB port. It is much easier to do this than in the case of a USB drive, because you do not need another computer or laptop for this operation.
So, you just need to alternately connect the USB flash drive to different ports and try to boot from it. Yes, this operation is time-consuming, but thanks to it, you completely eliminate one of the possible causes of BIOS errors.

Separately, it is worth highlighting the USB ports located on the front wall of the system unit, on the keyboard, all kinds of extension cords, and so on. It often happens that they begin to function only after the operating system is fully loaded. Simply put, when the computer starts up, they do not work, respectively, the BIOS does not see the USB flash drive. What to do in such a situation? Use the ports located on the back of the system unit.
USB 3.0
Modern computers, as well as laptops, are equipped with new devices for working with flash drives - USB 3.0. They provide a much higher speed of the drive, but at the same time they can cause certain problems. In particular, sometimes the BIOS does not see a bootable USB flash drive if it is connected to a version 3.0 port.
It should be said here that the malfunction does not arise due to the inability of older versions of Windows to work with USB 3.0 during installation. For example, you will not be able to install Windows 7 from a USB flash drive connected to 3.0, but already in the "eight" and "ten" this problem is absent.
Fortunately, the manufacturers have taken into account possible compatibility issues. They supply computers with both version 2.0 and USB 3.0 ports. The latter, by the way, are painted blue / light blue. So, if your flash drive does not work in the 3.0 slot, you can try removing it and plugging it into USB 2.0.
"Broken" image
Another reason that the BIOS does not see the USB flash drive may be the "broken" image of the operating system written to it. Damage to OS installation files can occur both during their download from the Internet, and in the process of writing to a USB drive.

The problem is that you won't be able to fix the "broken" image. The only thing that can be done is to re-download the installation files, and then reinstall them on the USB flash drive. In addition, by following the advice of computer specialists, you can check the USB drive with the image recorded on it for errors and bad sectors.
Also worth mentioning are the unlicensed versions of Windows. Pirates, creating them, do not bother too much, so very often when trying to make a bootable USB flash drive from such files, problems arise. In other words, you should try to download the distribution kit from another team, or even better - use only licensed software.
Image is not recorded correctly
Very often, the BIOS does not see the USB flash drive due to the fact that the operating system image was written to it incorrectly. Some users just copy the installation files to a USB stick and then try to boot from it. Yes, this option may work in some cases, but it is by no means correct.
In fact, you only need to create a bootable USB flash drive using special programs. Such applications are provided by both the creators of the operating system and third-party developers. For example, UltraISO, Rufus, WintoFlash and so on are very popular programs. Each of them fully copes with its functions, so it is difficult to single out a favorite here.
Recording with Rufus
Since the most common reason for the "invisibility" of a flash drive is an incorrectly recorded image, you should definitely figure out how to do it correctly. As an example, we will take the Rufus program, which is easy to learn. So, to create a bootable USB drive, follow this algorithm:
- Connect USB stick to PC and launch Rufus program.
- In the main menu of the application, find the line "Device" and select your USB flash drive in it.
- Now click on the CD-ROM icon located opposite the "Create bootable disk" option. Using the explorer window, specify the path to the operating system image.
- If necessary, you can enable the function of checking the device for bad blocks by ticking the option of the same name. But keep in mind that this operation will increase the image creation time by two, or even three times.

Now you just have to press the "Start" button, confirm your decision and wait for the end of the operation. Remember that removing the USB flash drive while the program is running is strongly discouraged.
Incorrect BIOS setup
To start the PC from a USB stick and not from a hard drive, you need to set the boot priority correctly. In Award BIOS, for example, this is done like this:
- Enter BIOS by pressing the corresponding key while the computer boots. Most often it is F2 or Del, but sometimes there are other options.
- Open the Integrated Peripherals section and check if the USB Controller option is in the Enabled state. It is usually enabled by default, but it's worth making sure of it.
- Now go back to the main menu (ESC key) and go to Advanced BIOS Features. Next, open the Hard Disk Boot Priority subsection.
- Find the HDD-USB parameter and move it to the first line using the Plus key.
- After that, return to the previous menu, open First Boot Device and put HDD-USB in the first place in it.

- Press the F10 key to save your changes and then exit the settings.
Keep in mind that in other BIOS versions, the boot priority setting procedure may differ slightly from the Award BIOS. You can find details about it in the manual on the official website of the motherboard manufacturer.
Secure boot
On computers and laptops manufactured after 2013, the Secure Boot function is quite common. Its purpose is to prevent malware from being installed before the operating system starts. However, this service can block the operation of the bootable USB flash drive, so you need to disable it. You can do it like this:
- Go to BIOS and open the Boot section (sometimes the name Advanced is found).
- Find the Boot List Option and change it to Legacy.

- Set the Fast Boot option to Disabled.
Now you just have to set the boot priority and start installing the operating system. Most importantly, do not forget to turn Secure Boot back on after you no longer need to use a bootable USB flash drive.
Older BIOS versions
If you are a “lucky” owner of an outdated computer, there is a high probability that he does not know how to work with USB drives at all before the operating system boots. More precisely, this old BIOS does not see the USB flash drive, because earlier, in the era of CDs and floppy disks, there was simply no such need.
This problem can be corrected by updating the BIOS to the current version. The files and programs required for this procedure can usually be found on the website of your PC or laptop manufacturer.
Keep in mind that the process of updating (flashing) the BIOS is associated with great risks, and without the proper skill, it is better not to start it. If you do something wrong, you can harm your computer, which only specialists can fix.
Alternative options
So, you have tried all the methods outlined above, but the BIOS still completely refuses to work with a USB flash drive. In this case, you have two alternative options.
The first is to install the OS from disk. If your computer has a CD-ROM, feel free to create a bootable CD and install the operating system from it. In addition, you can temporarily borrow a CD drive from friends and connect it to your PC.

The second option is to use the Plop Boot Manager utility. It is installed on the hard drive and allows you to select the boot priority without having to enter the BIOS.
Advances in technology have made it possible to significantly increase the volume of flash drives. During this time, CDs completely disappeared from our lives, even Microsoft began to distribute Windows 10 on flash drives. But what if the BIOS does not see the bootable USB flash drive that has the software you installed.
Causes and ways to eliminate them
There are not so many reasons, they are almost all related to the BIOS setting.
Important! First, you need to make sure that the flash drive is working properly. Having connected to another computer or laptop, check if it is displayed.
Incorrect image recording
The installation flash drive is created using special programs, it is not enough just to upload the file to the drive, it must be written correctly.
If you want to capture an image of Windows 7, then use a proprietary Microsoft utility.
For other versions of Windows and other programs, it is better to use UltraISO.

BIOS settings
What if the USB flash drive is recorded correctly, but it does not boot from it? Most likely, the problem is in the BIOS settings.
Device startup order
Advice! Connect the storage device to the USB port before performing the following steps. This will make it easier to detect.

Boot Mode
The second reason may be that the flash drive is not visible in the Boot Menu due to a mismatch in the boot mode. Most devices support two boot modes: Legacy and EFI. If the BIOS is set to Legacy mode, and the flash drive is written for EFI (or vice versa), then the system will not be able to recognize it.
The only thing that needs to be done in this case is to specify the desired mode through the Basic Input / Output System.

USB port support
Sometimes there are situations when the PC does not see the USB flash drive through the USB 3.0 port when trying to install the system from it. This is most likely due to the BIOS configuration. To solve the problem, simply move the flash drive to USB 2.0.