HTC HD2 is quite an interesting communicator that, in addition to the installed software, supports default windows mobile 6.5, also windows installation phone 7 and android. If windows phone 7 can only be installed for the sake of curiosity, because third party programs for this operating system very little. But android is not only possible, but also necessary, since this operating system is much nicer windows mobile 6.5.
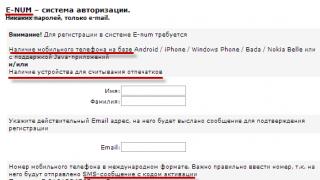
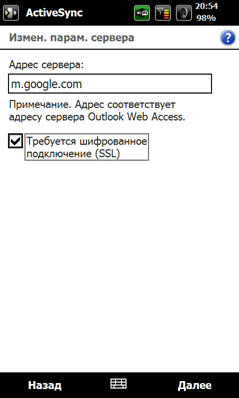
In order to install Android, it is worth doing a few preparatory actions. For example, import contacts and calendar events into their respective google services. This is done simply. First you need to create a google account. Just follow the link and register. Then we launch activesync on the communicator and select the item in the menu:
A window appears in which you need to enter the username of your google account and add @gmail.com at the end

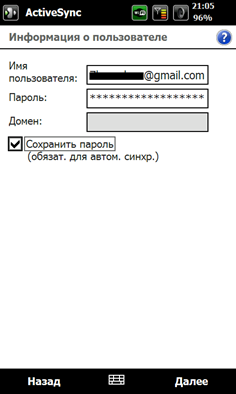

Click done and wait for the contacts to sync.
Now you can go directly to the firmware.
Firmware selection
Android firmware are essentially of two types: based on htc sense, familiar from windows mobile and pure android without sense. For starters, it’s better to take a firmware based on sense, this shell is already familiar and it will be easier to get used to. There are also a huge bunch of firmware based on sense from different authors, so I will not consider the issue of choosing a firmware in this article. I like the rafdroid firmware and will describe the installation process based on it. If you want to install another firmware, then see how it's done. Installing other firmware is not much different, but there are always different nuances.
Firmware
V general case The firmware process consists of several steps:
- Preparing the sd card for firmware
- hspl firmware
- Radio module update
- Clearing internal memory
- magldr firmware
- Firmware recoverymod
- android J firmware firmware
1. Preparing the sd card for firmware
The data from the sd card will be lost, so be sure to make a backup before completing this step.
2. hspl firmware. If hspl version 2.08 was flashed earlier, then you can skip this item.
In order to be able to install Android on the communicator, you need to flash a specially modified bootloader - hspl. The bootloader can be downloaded from here http://narod.yandex.ru/disk/7780301001/HSPL4.zip
We connect the phone to the computer and synchronize via active sync(windows xp) or through the center mobile devices (windows vista, windows 7). Unpack the contents of the downloaded archive and run HSPL4.exe (on vista or seven with administrator rights).
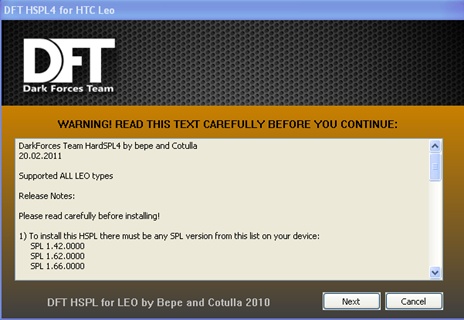
Click next, a window appears and wait, sometimes for a long time.
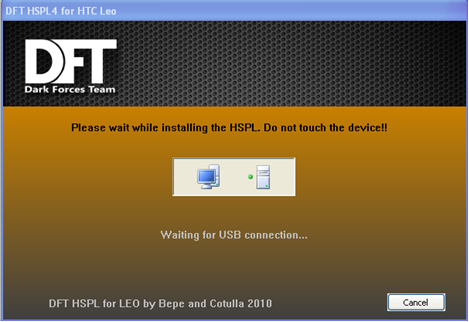
and in the next window, be sure to select 2.08.HSPL ( this is the meaning!)

Click next and wait for the end of the firmware. Do not disconnect the cable and running programs.
3. Update the radio module
Download the radio module from here http://narod.yandex.ru/disk/7783665001/Radio_2.15.50.14.rar or from the topic on 4pda http://4pda.ru/forum/index.php?showtopic=195550&st=0#entry5482569
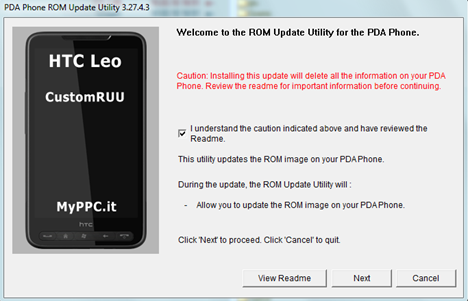
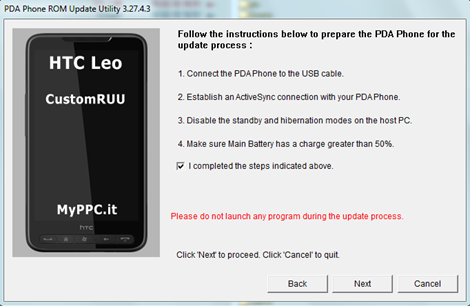
Unpack the archive and run CustomRUU.exe (in windows vista or windows 7 with administrator rights).
In the windows that appear, check the boxes and click "next".
In this window, click "update"


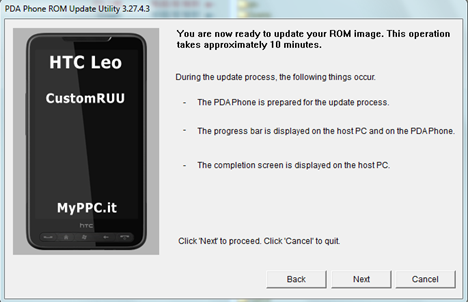
At the end, this window appears. We are waiting for completion, we do not pull out the cables, we do not close the windows.

4. Clearing the internal memory
In the process of firmware inner memory gets clogged. It needs to be cleaned up. To do this, download the archive from here, or take it from the topic on w3bsit3-dns.com, unpack and run task29.exe (on windows vista or windows 7 with administrator rights).
Clearing the memory looks the same as the firmware of the radio module. We also place the checkboxes and click next, in the last window we click “update”.
After cleaning windows memory mobile will no longer load, but a white window will appear with a green "HTC" inscription. You need to distort the battery and turn on the phone with the volume rocker pressed down. A striped multi-colored screen appears - bootloader. In common people it is called a mattress.
We connect the communicator to the computer, “Serial” from the bottom should change to “USB”.
5. magldr firmware
Magldr bootloader is special android bootloader. It can be downloaded from here or taken in the topic on w3bsit3-dns.com.
Run ROMUpdateUtility.exe and see the same windows as when flashing the radio module. After completion, the communicator will reboot itself and the magldr menu will appear. You can navigate through it with the volume buttons, the choice is made with the call acceptance button (green tube). Select the menu item "USB Flasher" and connect the communicator to usb.
6. Firmware recoverymod
Before executing this step, make sure that you have selected the "USB Flasher" item in the magldr menu .
Some firmware require recoverymod, in particular rafdroid ( android firmware, which we will use) is flashed through it. You can download it from here or from this topic. We need a 400MB version.
Unpack the archive and run DAF.exe and click "next" several times.


As always, we are waiting...

7. And finally, the firmware of Android itself.
We download the firmware. Now current version 4.0.2, you can take it. However, the firmware is updated frequently, find the most new version you can on xda.
Firmware in the form zip file Without unpacking, put in the root of the memory card. We reboot the communicator and go to the magldr menu and select the "AD Recovery" item, then the "Install zip from sd card" item and at the end "Choose zip from sd card". In the list, select the zip with the name of the firmware. We are waiting for a long time ... until the firmware is completed.
Then press the back button on the keyboard and select the item " Reboot system now".
And again we wait, we wait a very long time for the first android downloads. Sometimes the first boot takes 10-20 minutes. The author of the firmware recommends waiting 5-10 minutes after the lock screen appears and not touching the phone. After that, produce initial settings and restart your phone. After the reboot, put the config.txt file with the following content in the root of the sd card:
gps_zone=ru
sd_boost=0
old_light_driver=0
auto_btn_backlight=0
Just in case, I put this file here
And reboot again.
Now you can enjoy all the delights of android
Update: who wants to try, besides rafdroid, another firmware - described how to do it
Do it carefully!
You are solely responsible for all actions!
The battery holds a full day with the included WiFi, 3G.
The first unofficial firmware that just surprised me with the quality.
Official firmware
Update Recovery:
2. Key sound down + Power
3. Bootloader will load
4. The system will detect the file and suggest an update. We agree
5. At the end of Power to reboot
Install Kernel with S-OFF:
2. Key sound down + Power3. Bootloader will load
5.Install from sdcard
1. Download firmware HTC_Europe_3.33.401.153(HBOOT 1.29.0000)
2. Copy it to the sd card. Rename to PG58IMG.zip
3. Key sound down + Power
5. Upon completion, reboot
Unofficial firmware firmware
Update Recovery:1. Download 4EXT Recovery PG58IMG.zip
2. Key sound down + Power
3. Bootloader will load
4. The system will detect the file and suggest an update. We agree
5. At the end of Power to restart
Install Kernel with S-OFF:
(for without S-OFF )
1. Download the kernel. Can
2. Key sound down + Power
3. Bootloader will load
4. Choose Recovery. The new 4EXT Recovery Touch will boot
5.Install from sdcard
6. Select the Kernel file on the map
Installing the official firmware:
1. Download unofficial firmware
2. Copy it to the sd card
3. Key sound down + Power
4. In Recovery, select the installation from the sd card
5. Find the file on the map and install
From experience - I have not seen one more reliable than the official firmware.
HTC, like many other Taiwanese companies, started its business as an ODM (original design manufacturers) manufacturer. HTC developed base platform for PDAs, smartphones and communicators and produced devices for such well-known manufacturers like Hewlett-Packard (HP), Dell, Palm, Fujitsu Semens.
HTC developed and produced almost the same devices at its factory, they just stuck different "labels" (labels). Devices based on the same platform differed in a slightly modified design and software stuffing.
HTC's most important customers were operators cellular communication. For example, T-Mobile, O2, Orange, Vodafone. In addition to well-known manufacturers and telecom operators, distributors also used the company's services. The most famous of them is i-mate. For its own retail sales, HTC marketed two brands: Qtek for Europe and Dopod for Asia.
But in June 2006, HTC revised its policy. As a result, she began to invest all her efforts in two directions: retail sales and sales to mobile operators, while refusing to cooperate with competing distributors (i-mate) and manufacturers.
Now devices for the "abandoned" are produced by Chi Mei Communication Systems (CMCS - a branch of Foxconn International Holdings), Quanta Computer, Asustek Computer, Arima Communications, Gigabyte Communications.
HTC also abandoned the Qtek brand. Now all smartphones and communicators are produced under a single brand - HTC Smart Mobility.
We can say that HTC is looking more towards the flagship and expensive smartphones. Budget, if I may say so, models from the company appear quite rarely. Today I have just such an option on the review. HTC Desire C.

Technical characteristics of the device.
Manufacturer: HTC
Model: Desire C
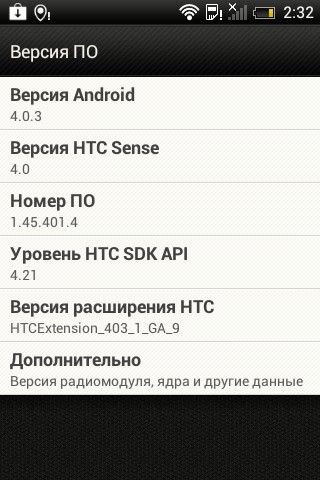
Release year: 2012
Oper. system: Android 4.0.3
Battery capacity: 1230mAh
Dimensions: (width, height, thickness) 60.6 x 107.2 x 11.95mm
Weight: 98g
Processor type: Qualcomm MSM7225A
Clock frequency: 600MHz
RAM: 512MB
Built-in memory: 4GB
Communications: GSM 1800, GSM 1900, GSM 850, GSM 900, UMTS 2100, UMTS 900
Bluetooth: 4.0
WiFi: 802.11b,g,n
Other: EDGE, GPRS, GPS, HSDPA, HSUPA, UMTS/WCDMA
Screen Size: 3.5inch
Screen resolution (px): 320 x 480
Video accelerator: Adreno 200
Rear Camera: 5MP
Speaker: mono
Headphone output: 3.5
Other: FM Radio, G-Sensor, Light Sensor, Proximity Sensor, Digital Compass
Touch screen: capacitive
Buttons: touch buttons
Memory cards: microSD, microSDHC, microSDXC
Connectors: microUSB
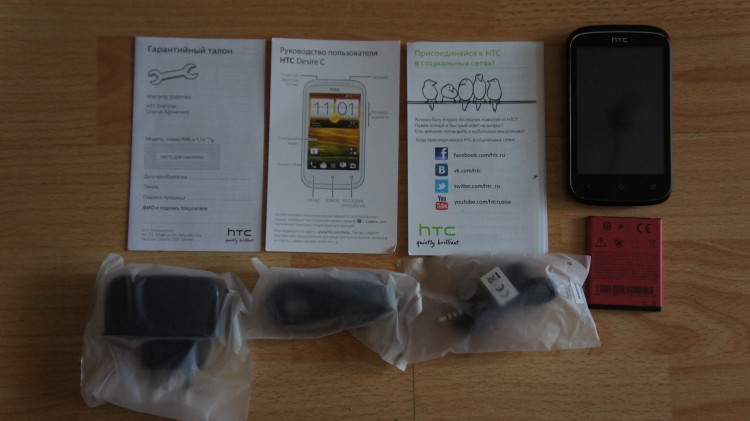
Packing, equipment.
V recent times I like the way HTC packs their products. This is a rounded cardboard box. already in hand this package aesthetically pleasing. There is no information on the package itself, it is present on the paper ring that encircles the package.


Equipment.
Let me remind you that the smartphone is budget and you should not expect surprises. The box contains the following items:
1. The smartphone itself.
2. Headphones.
3. Charging block.
4. USB cable.
5. Battery.
6. Warranty card.
7. Quick Guide user.
8. Advertising information.
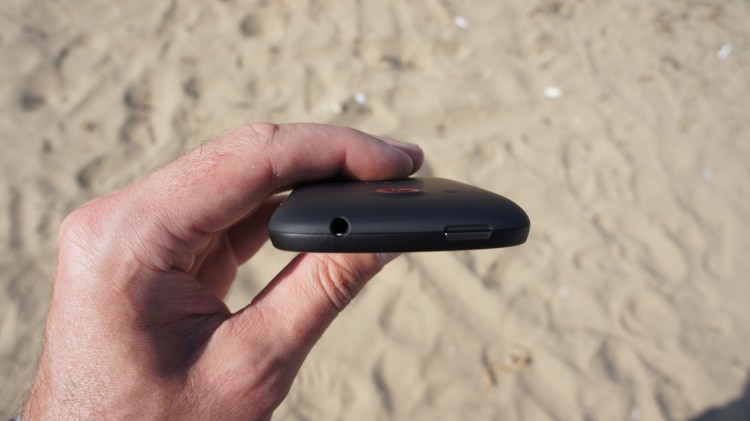
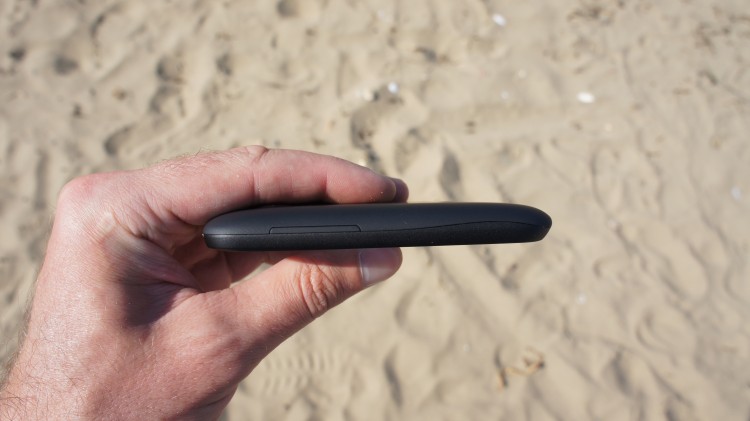
Appearance, design.
To be honest, I really liked the appearance and design of the smartphone. The smartphone is small and quite heavy, it lies just fine in the hand, it does not slip out as the back cover is made of rubberized plastic. The lid itself is wavy around the edges. On the front part along the entire perimeter there is a thin silver strip that separates the screen and the edges of the smartphone, it looks original. If you remove the back cover of the smartphone, the insides and the battery are painted red. By appearance we can say that the HTC smartphone was a success, it looks equally good in a female, male and children's hand. We can say a smartphone for all categories of citizens.
Naturally, everything is made of plastic, but this is not the top level.
V in general terms the build quality is good, there are no gaps or backlash, but as they say in a barrel of honey there can always be a fly in the ointment. Back cover creaks when pressed.
The power button is located on the top of the smartphone. silver color and a 3.5 headphone jack. On the right side is the volume rocker. On the bottom of the microphone hole. On the left side there is a connector for Charger. I never liked the presence of a charging connector on the side, because when charging, the cord sticks out to the side and if you hold the phone in your hands, it’s not very convenient. On the front part at the top there is a speaker in a small strip of holes, below the inscription "htc" under the display touch keys management. They are painted in White color and do not have backlight. On the back there is a camera eye with a red metal border, a second speaker, a hole for a lanyard at the bottom, the inscription "beatsaudio" and the inscription "htc" in black.


functional elements.
The smartphone is running OS Android 4.0.3, the interface is HTC Sense 4.0. As we see a weak processor, and a weak graphics accelerator did not interfere with installing on a smartphone 4 android version. So, you can safely not trust the manufacturers when they say that you cannot install on their smartphone latest version operating system from Google due to technical limitations smartphone. The interface looks like in the top HTC smartphones, but the functionality has been cut down.
Sound. Availability of the function in the phone Beat Audio and turning it on or off somehow drastically does not affect the sound quality in the headphones. It can be said quite quality sound, but no more than that. Speaker volume is average. However, smartphones from HTC were once not famous for this indicator.
Screen. Desire C has touch TFT screen capacitive type with a diagonal of 3.5 inches and a resolution of 320x480 pixels. The margin of brightness is large, the viewing angles are large, the screen behaves well in the sun, the information is readable.

There is automatic adjustment brightness. Multi-touch for 4 touches.

The graininess of the screen is certainly visible, but the low resolution and budget of the smartphone hint at this. protective coating the screen does not.


The smartphone has a 5MP camera. No autofocus good shots can only be done in good weather in other conditions in the photographs there are many extraneous noise. Maximum Resolution video 640x480 pixels.
Photo examples:


Smartphone can work in WiFi quality router, the application for work is already installed. There is also the possibility of end-to-end connection to the Internet via USB via PC.

In work, testing.
The smartphone is built on the Qualcomm MSM7225A platform and has a processor frequency of 600 MHz. When opening various programs the smartphone slows down a little and you should be prepared for delays when working with the screen, the response to touch is delayed. Of course, with such a processor, you can simply forget about new 3D games and some do not start. You can play the simplest 2D games.
The smartphone plays unconverted video out of the box, just do not set the resolution of the video more resolution screen, playback problems immediately occur.
I was very pleased with the possibility of using microSDXC memory cards, my 64GB card worked immediately, I didn’t even need to format it. But is this amount of memory needed for this smartphone?
GPS. The smartphone uses a GPS-One chip based on the Qualcomm platform. The search for satellites is quite fast, about 20 seconds. There are no problems with navigation.
There are no connection problems. Clear sound v conversational dynamics. good welcome cellular network, compared with Galaxy S3 about 15% better network catches in bad places.
Liked fast charging, up to 100% charged in about 1 hour.
It is worth warning that you do all the manipulations with your device yourself, carefully and on your own initiative, the author of this post is not responsible for everything that can happen to your device in the process.
Also, data will be erased during the flashing process. Contact log, SMS, etc. Phone book recovering from account. It is impossible to restore the SMS archive as it could be done in "Sense". You need to take care of this before manipulating the phone. The data on the SD card will not be affected.
What do we need from software in the process of flashing:
1) HTC Sync drivers to work with the phone
2) Elements of the Android SDK - drivers for working with the phone
3) Recovery - a program that allows you to work with your phone, with a memory card, firmware, etc., without an operating system on the phone itself
4) Firmware CM10.1 from Andromadus
5) GAPPS set - a set of services from
6) just in case, I apply Recovery, the one that is by default on the phone. Useful if you need to roll back to official firmware. To roll back, you also need to lock the bootloader back (see point 3 - Unlocking the bootloader).
3) Unlocking the bootloader. Required for replacement standard Recovery and installation of custom assemblies. See how to unlock the bootloader. We do not pay attention that our model is not in the list, we select - "All Other Supported Models". Step 5 and 6 instructions for unlocking the bootloader - we skip it, because. we already have necessary files in the folder c:\android\.
4) Installing a Third Party Recovery. Necessary for working with firmware files, installing firmware directly, creating backups and formatting system memory and caches.
To enter bootloader phone, you need to remove the battery for a couple of seconds, insert it back. Pressing the rocker button of the phone volume down press the power button. After a couple of seconds, a blue-red-green menu will appear bootloader"a.
We connect the phone to the PC, select the line with the volume rocker - fastboot(by default it is selected) and press the power button.
The archive from point 3 of the software for flashing - Recovery.zip is unpacked into c:\android\.
We open command line. If XP: Start - run - cmd. If more later versions: Start - in the "Find programs and files" field, write cmd, and then run the found program.
Using the command line, go to the folder with our files c:\android\. To do this, type on the command line:
cd c:\android\
Enter the following code on the command line:
fastboot flash recovery recovery.img and press enter. After a couple of seconds, Recovery is installed.
5) Formatting the phone's system memory. To do this, we need to go to the new, installed Recovery. How to enter bootloader was considered in previous paragraph. On the menu bootloader"and use the volume rocker to select the green line - Recovery and press the power button of the phone. To be able to restore data and past firmware, it is recommended to make a backup in the corresponding menu item Recovery.
V Recovery(touch control) select a line wipe | format and choose further - wipe data/factory reset. After a few seconds system memory phone will be cleared.
6) Firmware installation.. We copy the files from points 4 and 5 of the software for flashing to the memory card in the phone. For this, basically recovery menu select item - toggle usb storage . After a couple of seconds, the memory card will be detected in the PC and it will be possible to copy the firmware file and GAPPS to it.
After copying is completed, press - Disconnect in Recovery and get back to the main menu. Choose install from sdcard, find the copied firmware archive flinnycm101_saga_22 and install. After installing the firmware, install GAPPS in the same way. After the installation is complete, return to bootloader, for this now it is not necessary to do manipulations with the battery. In Recovery, select the bottom line - power menu and in her reboot into bootloader
Ready? left just a little bit.
7) Kernel Firmware. To do this, open the archive on the PC flinnycm101_saga_22 from point 4 of the software and copy the file boot.img v c:\android\.
Back to command Windows line and enter:
fastboot flash boot boot.img press enter. Ready. Now let's go to point fastboot menu bootloader"and choose - reboot
The phone will boot from new firmware. Will need to be done initial setup language, Google account etc. A few screenshots:


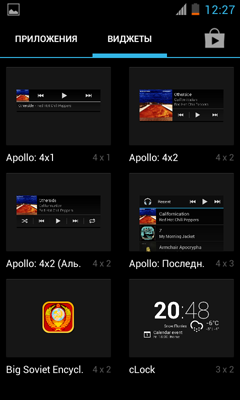
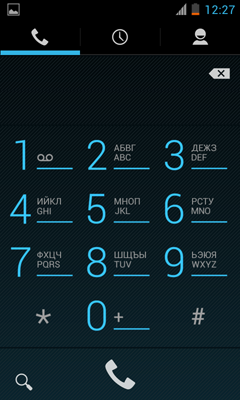

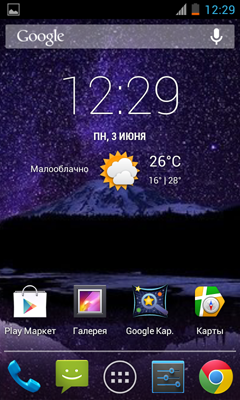

There are many in the system interesting settings, for example - setting the vibration response time of the touch keyboard.
Thank you.
I completely forgot, I learned it myself