BIOS setup to boot from CD/DVD/USB
The BIOS is a program that runs on the computer when it is turned on. Basically, BIOSes are divided into two groups depending on the appearance of the menu and the manufacturer. This article will cover both. If you yourself cannot figure out your BIOS, try looking for a solution on probios.ru.
So, you need to make changes to the BIOS settings in order to change the boot order and determine the device from which the computer will boot, for example CD-ROM or USB Flash disk. To begin with, try not to change anything - perhaps everything is already configured. Insert boot CD or USB Flash into the computer and restart it. If the computer starts booting from external drives, then you don’t need to configure anything further. If not, keep reading.
In the first seconds after turning on the computer, the BIOS performs a test of the system components and displays the results. This process lasts only a few seconds, after which boot control is transferred to the operating system. Therefore, you need to act quickly and decisively. The data displayed by the BIOS "ohm on the screen indicates a key combination that allows you to get into the BIOS settings ( BIOS Setup). If you do not have time to see this combination during the download, pause the download with the key Pause. Typically, the keyboard shortcut for entering the BIOS is indicated in the lower left corner of the screen. After you find the desired combination, press it and get into the BIOS settings.
There is one "but": instead of inscriptions on the black screen, you can see a graphic splash screen (manufacturer's logo). Try to remove it by clicking Esc or any other button - BIOS messages are located "under" this screensaver. If nothing helps and the logo does not disappear, and information about the key combination is not visible, you can try the most common combinations to enter the settings, which are given just below under the spoiler.
![]()
Spoiler: BIOS Setup Utility - access keys
BIOS Setup Utility - access keys for major BIOS manufacturers
The motherboard of each computer contains a manufacturer-specific BIOS, to access the settings of which you must enter the appropriate command from the keyboard.
You can quickly identify the BIOS manufacturer by the manufacturer's logo, usually located in the upper corner, or the inscription at the very bottom of the monitor that appears when you turn on the computer on one of the first boot screens.
After establishing the BIOS manufacturer on your system, review the following list and use the appropriate keyboard command to access the BIOS Setup Utility.
AMI (American Megatrends) - AMIBIOS, AMIBIOS
- Press key Del
- In some older motherboards that use AMIBIOS, it is possible to use the keys F1 or F2.
- Press key Del,
- Some older motherboards that use AwardBIOS may use a keyboard shortcut Ctrl + Alt + Esc.
- Press key Esc immediately after turning on the computer.
- Press key F1 immediately after turning on the computer.
- Press key Del immediately after turning on the computer.
- Some older motherboards that use the Phoenix BIOS may use keyboard shortcuts Ctrl + Alt + Esc, Ctrl+Alt+Ins or Ctrl+Alt+S.
- Ctrl+Alt+F3
- Ctrl+Alt+Del
- Ctrl+Alt+Shift+Del
- Ctrl+Insert
- Ctrl + Shift + Esc
- fn+ [any " F" Function key] ( on some laptops)
BIOS Setup Utility - access keys for popular computer systems
Acer - Aspire, Power, Veriton, Extensa, Ferrari, TravelMate, Altos
- Press key Del or F2 immediately after turning on the computer.
- To access the BIOS on Acer Altos 600 use keyboard shortcut Ctrl + Alt + Esc and key F1 to call additional options.
- On older Acer computers, you can also use the keys to access the BIOS. F1 or Ctrl + Alt + Esc.
- Press the F10 key when the cursor is blinking in the upper right corner of the screen.
- On older Compaq computers, you may also use the keys to access the BIOS. F1, F2, F10, Del.
- Press key F2 when the logo appears Dell. Keep pressing the key for a few seconds until the message appears Entering Setup.
- On older Dell PCs and laptops, you may also use the keys to access the BIOS. Ctrl+Alt+Enter or Del.
- Can be used on older Dell laptops Fn + Esc or fn+f1.
- Press key Tab or Del when the logo appears eMachine.
- On older eMachines, the BIOS key may also be used to access the BIOS. F2.
- Press key F2 when the Fujitsu logo appears.
- Press key F1 several times immediately after turning on or restarting the computer.
- On older Gateway computers, you can also use the key to access the BIOS. F2.
- Press key F1, F10, or F11 immediately after turning on or restarting the computer.
- Keys can be used on HP Tablet PCs F10 or F12.
- On older HP computers and laptops, you may also use the keys to access the BIOS. F2 or Esc.
- Click F1 immediately after turning on the computer.
- On older IBM computers and laptops, you can also use the key to access the BIOS. F2.
- Click F1 or F2 immediately after turning on the computer.
- On older Lenovo computers, you may also use the keys to access the BIOS. Ctrl+Alt+F3, Ctrl+Alt+Ins, or fn+f1.
- Press key F1, F2 or Del immediately after turning on the computer.
- Click F2 immediately after turning on the computer.
- Press key F1, F2 or Del.
- Click F2 immediately after turning on the computer.
- Some very old Sharp computers require a diagnostics installation disc to access the BIOS.
- Click F2 or Del at startup.
Press key F1, F2 or F3 immediately after turning on the computer.
Toshiba - Portégé, Satellite, Tecra, Equium
- Click F1 or Esc immediately after turning on the computer.
- Press key F12 on Toshiba Equium.
ARI/ALR/AST (Advantage)- Use keys Ctrl + Alt + Esc or Ctrl+Alt+Del.
CyberMax- Press key Esc.
Tandon- Use keys Ctrl + Shift + Esc.
BIOS Setup Utility - access keys for popular motherboards
Abit - AB9, AN7, an8, AV8, AW9D, BE6, BH6, IC7, IN9, IP35, KN8, KN9 etc.
- Press key Del, while the text is displayed on the screen PRESS DEL TO ENTER SETUP.
- Click F2 immediately after turning on the computer.
- Click Del On some ASUS motherboards, use the key Ins.
- Click Del, at the moment of displaying the inscription ...enter setup at the bottom of the screen when you turn on your computer.
- Press key Del during the display of the full-screen logo immediately after starting the computer.
- Press key Del Press DEL to enter setup, immediately after the memory test.
- Press key Del or F1 immediately after starting the computer.
- Press key Del immediately after starting the computer.
- Press key Del immediately after starting the computer.
- Press key Del immediately after starting the computer.
- Click F2 during the initial boot process immediately after starting the computer.
- Press key Del immediately after starting the computer.
- Press key Del immediately after starting the computer.
- Press key Del while the message is being displayed Press DEL to enter setup immediately after turning on the computer.
- Press key Del or F1 immediately after starting the computer.
- Press key Del immediately after starting the computer.
- Click Del, or Ctrl + Alt + Esc while the message is being displayed Press DEL to enter setup immediately after turning on the computer.
- Press key Del immediately after starting the computer.
- After starting the system, press the key Del or key F4 to launch the BIOS setup utility.
- Press key Del immediately after starting the computer.
Most likely you will succeed. Often, other useful hotkeys are indicated next to the BIOS entry keys. For instance, boot menu(key F11 or F12). Sometimes the Boot menu can be useful - let's say you constantly boot from the hard disk, but one time you needed to boot from the CD. By pressing this button, you will be taken to a simple menu - a list of devices from which you can boot. Choose what you want and click Enter.
Spoiler: Why is it impossible to enter the BIOS settings
- Hardware problems, are solved with the help of a phased replacement of computer components or in a service center.
- Problems with keyboard definition, are solved by replacing the keyboard with a new one of a different type of connection ( USB => PS/2 and vice versa).
- Problems with bugs in BIOS setup- are solved by resetting the CMOS settings by removing the CMOS battery, closing a certain jumper, depending on the model of the motherboard.
- Problems related to the fact that the BIOS settings password protected- are solved using the same CMOS reset, service passwords or selection of a service password by hash using various utilities.
- Reset BIOS
- Methods for resetting a password on laptops
- BIOS Password Backdoors in Laptops
Let's move from theory to practice. Here's what it looks like:
AMI BIOS

AWARD (Phoenix) BIOS

When you enter the BIOS, you will see one of the two images presented, depending on the manufacturer. Then carefully look at the screenshots and follow the instructions. If you have AMI BIOS:
Move right through the menu to the item boot.
On the page boot select item Boot Device Priority.
Description of Phoenix Award BIOS Parameter Settings
Description of Phoenix Award BIOS parameter settings.
The BIOS setup screens and their descriptions are for reference only and may not match what you see on your computer screen and are based on a 2005 Intel i915PL chipset-based motherboard for Intel (Socket 775) processors.
Main Menu - Main menu.
The BIOS ROM contains a built-in BIOS Setup program to allow the user to change the basic system and hardware settings. The information is stored in a battery-backed CMOS memory, and thus is retained when the main power is turned off. In general, the information stored in CMOS RAM will not change until something changes in the system, such as replacing a hard drive or adding a new device.
In some cases, the CMOS battery may fail, causing all CMOS information to be reset. If this happens, you will need to replace the CMOS battery and reconfigure the BIOS.
To enter the setup programs (SEtupPProgram):
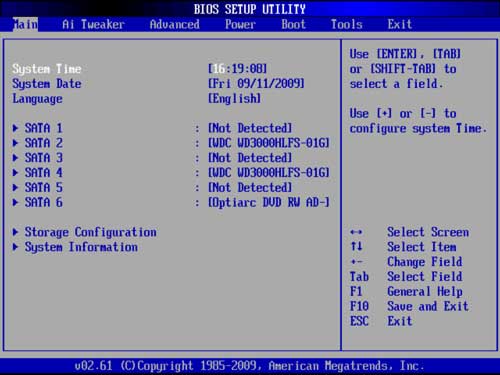
After turning on the power of the computer, hold down the during self-test (POST). The BIOS CMOS SETUP UTILITY utility will open (Figure 1).
Figure 1. CMOS setup utility.
The main menu contains all the main settings sections. Select the section of settings you want to configure. The selection is made by moving the cursor (using the cursor arrows) and then pressing the key
1. Standard CMOS Setup - Standard CMOS settings
Select "STANDARD CMOS FEATURES" from the main menu (Figure 2). This section allows the user to configure basic system settings such as current time and date, installed hard disk type, floppy drive type, and video adapter type. The amount of RAM is automatically determined by the BIOS and displayed on the screen for information. When an item is highlighted (using the cursor arrows), the contents of the item can be changed by pressing the keys Figure 2. Standard CMOS settings. Selecting this section allows the user to change the settings for the options listed in this section. It shows the default settings set by the manufacturer. Keystroke Figure 3. Advanced BIOS settings. This option is only available for Pentium processors with the Prescott core. Here the sequence of enumeration of hard drives from which the system will be booted is set. CPU L1 & L2 Cache (Internal and external processor cache memory (L1 and L2)). CPU L3 Cache (Cache memory of the processor of the 3rd level). Hyper Threading Technology. First /Second/Third/Other Boot Device ( P Yervoe/ V Toroe/ T Retier/ D other device to boot). When this option is enabled, the system tries to boot the operating system from other devices that are not specified as the first / second / third devices for booting. Boot Up Floppy SeekSearch for floppy drive during boot). Boot Up NumLock Status ( WITH NumLock state during boot). Security Option (Access restriction). APIC Mode - R APIC mode. HDD S.M.A. R.T. Capability ( P Support for S.M.A. R.T.). Full Screen LOGO Show - Display the logo in full screen. When this section is selected, the following menu will be displayed (Figure 4). Figure 4. Advanced chipset settings. DRAM Timing Selectable - V Selecting the timing of DRAM memory. CAS# Latency Time - W supportSignalCAS. DRAM RAS# to CAS# delay — W Delay between RAS and CAS signals DRAM RAS# Precharge - precharge time by row select signal. Precharge Delay (tRAS) - M The minimum duration of the RAS signal. SystemBIOSCacheable-
TO AshingBIOS'a. Video BIOS Cacheable- TO Video BIOS escaping. Figure 5. Embedded Peripherals. Realtek Lan BOOT ROM. Move the cursor to the PCI Express Function section and press the key Move the cursor to the IDE Function Setup section and press the key Delay For HDD (Secs). IDE HDD Block Mode. IDE DMA transfer access. Chipset Primary (Secondary) PCI IDE. IDE Primary/Secondary Master/Slave PIO. IDE Primary/Secondary Master/Slave UDMA. *** On-Chip Serial ATA Setting *** Chipset Serial ATA. PATA IDE Mode. Move the cursor to the Onboard Device section and press the key USB controller. USB 2.0 controller. USB Keyboard Support. USB Mouse Support. Realtek Lan Device. Move the cursor to the Legacy Devices section and press the key Onboard FDC Controller- AND Integrated floppy drive controller. Onboard Serial Port 1 - AND Integrated P Serial port 1. Onboard IrDA Port- AND Integrated infrared port. Onboard Parallel Port— AND Integrated parallel port. Parallel Port Mode- R Parallel port mode. EPP Mode Select - V ChoicemodeEPP. ECP Mode USE DMA - AND Using DMA in ECP mode. Select "Power Management Setup" from the main menu (Figure 6). In this section, the user can change the power management settings and IRQ signals. In general, these parameters should not be changed unless absolutely necessary. Figure 6. Power management settings. POWER ON Function. PwrOn After Pwr-Fail - V Switching after a power failure. off: The system remains off. Power management- At Nutrition management. Max. S Aving: Maximum energy saving. The period of inactivity for all modes is 1 minute. Min. S Aving: Minimum energy saving. The period of inactivity for all modes is 1 hour. DPMSSupport: Select this option if your monitor supports the DPMS VESA (Monitor Power Management Signaling) standard. Use the software that came with your video devices to configure power management settings. HDD Power Down - Turn off hard drives. Soft Off by PBTN- P Programmed shutdown by the power button. Wake Up by PCI Card - P Wake on signal from PCI. Resume by Alarm- P Timer wakeup. This section allows you to modify the PCI IRQ signals when installing various PCI expansion cards. Figure 7. PNP/PCI configuration. Init Display First - Determination of the main video adapter. Resources Controlled By - TO ControlResources.
***
P Items related to PCI Express *** When using PCI cards in shared IRQ slots, make sure their drivers support "Shared IRQ" mode or that these cards do not need to be assigned an IRQ. IRQ conflicts between two PCI groups will result in system instability or inoperability of these cards. Figure 8. Setting up hardware monitoring. Show PC Health in POST - P Provide a summary during download. Current System/CPU Temperature. Current Power/CPU/System FAN Speed. VDIMM VChip VCore Vbatt(V) +12V, VCC, 5VSB(V) ACPI Shutdown Temperature - T System shutdown temperature. Move the cursor to the SmartFan Function section and press the key Smart CPU FAN Function. Current CPU Temperature/Fan Speed. Only the parameters marked in gray in the figure need to be set. The system will automatically calculate the intermediate Temp LM and Temp MH temperatures and the corresponding duty cycle Duty LM and Duty MH. This section allows you to adjust various system overclocking options to achieve better performance. Attention: Figure 9 Frequency/Voltage Setting. Auto Detect PCI Clk - A Automatic detection of PCI bus frequency. Spread Spectrum Modulated - M Odulated spread spectrum. watchdogfunction- Control function. CPU CLOCK/SPEED - H Frequency/speed of the processor. Clock frequency x TO Multiplication factor = R Operating frequency of the processor. Figure 9-1. The FSB frequency is 800 MHz. Figure 9-2. The FSB frequency is 533 MHz. Enter the processor frequency value in decimal format. PCI Express Freq Control - At Governing bodyFrequencyTiresPCI Express. PCI Express Freq - H Adjusting the frequency of the PCI Express bus. Figure 9-3. Enter the PCI Express frequency value in decimal format. PCI FreqSel- Setting the frequency of the PCI bus. System Memory Frequency - H Adjusting the frequency of the system memory. CPU Clock Ratio - H Setting the processor frequency multiplier. Voltage Adjust Menu - AND Changing voltage levels. In the following paragraphs, "DefaultVoltage" means the manufacturer's settings, and "NewVoltage" means the voltage set by the user. CPU Vcore Chipset Voltage VDIMM Voltage Bios Features Setup Chipset Features Setup PnP/PCI Configuration Setup Power Management Setup fan monitor Thermal Monitor Voltage Monitor This material describes almost all the parameters set in the Setup BIOS program from AWARD Software International Inc. In a particular motherboard, some of the described parameters may not be. The same parameters may be named differently depending on the manufacturer of the motherboard, so here in some cases there are several options. BIOS FEATURES Setup Enabling this setting prevents any write to the boot sector of the hard drive without the user's permission. It was introduced to protect against so-called boot viruses that infect the boot sector. It is recommended to always enable this setting, but keep in mind that, for example, Windows 95 hangs during installation if Virus Warning is set to Enable (a black square appears on the screen). Can take values: Enabled - allowed Disabled - prohibited Boot Virus Detection (Detection of a virus in the boot sector) The meaning of this parameter is very different from Virus Warning. The idea is as follows - if this option is disabled, then before the operating system is loaded, the BIOS rewrites the boot sector to flash memory and stores it there. After setting the parameter to Enabled, the BIOS will not boot the system from the hard drive if the content of the boot sector differs from that stored in memory. Further, at the discretion of the user, it is possible to either boot the system from a hard disk or from a floppy disk. Can take values: Enabled - allowed Disabled - prohibited CPU Internal Cache/External Cache Enable/disable internal or external processor cache. Any type of cache memory should be disabled only if it is necessary to artificially slow down the computer, for example, when installing some old expansion card. Can take values: Enabled - allowed Disabled - prohibited CPU Level 1 Cache/CPU Level_2 Cache Enable/Disable L1 cache and L2 processor cache for Pentium Pro architecture processors (Pentium II, Deshutes, etc.). Cache memory should be disabled only if it is necessary to artificially slow down the computer, for example, when installing some old expansion card. Can take values: Enabled - allowed Disabled - prohibited CPU Level 2 Cache ECC Check (Enable ECC for processor level 2 cache) This parameter can be present only for boards with Pentium II architecture processors. It only makes sense to enable it if the installed Pentium II class processor has a L2 cache with ECC control capability. Can take values: Enabled - allowed Disabled - prohibited BIOS Update Enabling this option allows you to update the BIOS microcode. In this case, new menu items may appear, with the help of which it is possible to fine-tune the system for individual cases (for example, cases of incompatibility). Can take values: Enabled - allowed Disabled - prohibited CPU Fast String Enabling this parameter allows using some specific features of the Pentium Pro family architecture (Pentium II, Deshutes, etc.), in particular, the ability to cache operations with strings. It is only necessary to understand that the conditions for enabling this mechanism must be met in the program itself. These conditions are specified in the documentation for any processor of this family. It is recommended to leave the parameter in the "Enabled" state. Can take values: Enabled - allowed Disabled - prohibited Deturbo Mode When this parameter is enabled, the FLUSH# signal becomes active and no data is then cached by the processor into its internal cache (first-level cache) by Pentium Pro architecture processors (Pentium II, Deshutes, etc.). Enabling this setting should only be used when you need to deliberately slow down your computer. Can take values: Enabled - allowed Disabled - prohibited Quick Power On Self Test Enabling this parameter leads to a significant reduction in the time for the initial testing of the BIOS computer, especially with significant amounts of RAM. It should only be taken into account that the memory, for example, is not tested in this case, but only its size is checked. Can take values: Enabled - allowed Disabled - prohibited Boot Sequence The parameter sets the sequence of polling devices from which the operating system can be loaded. These devices are identified either by letters for physical hard drives and conventional drives, or by the name of the device - CD-ROM for CD-ROM drives, LS for 120 Mb a:drive drives, or ZIP for 100 Mb ZIP IDE drives. For modern versions, possible values might look like this: Swap Floppy Drive If enabled, drives A and B are sort of swapped. It makes sense only if there are 2 drives in the computer. Can take values: Enabled - allowed Disabled - prohibited Boot Up Floppy Seek (Search for a bootable drive after turning on the computer) If this option is enabled, then the BIOS asks each drive to recognize its format (it supports 40_or 80 tracks). Since 40-track drives have not been released since 1993, this option should not be enabled, as the BIOS will spend several seconds each time figuring out the format of the drive. Can take values: Enabled - allowed Disabled - prohibited Boot Up NumLock Status Enabling this setting turns on the NumLock indicator and the numeric keypad generates digit and character codes, otherwise it generates arrow codes, Ins, Del, etc. Can take values: Enabled - allowed Disabled - prohibited Typematic Rate Setting Enables or disables setting the rate at which the keyboard repeats characters when a key is pressed. Can take values: Enabled - allowed Disabled - prohibited Typematic Rate (Chars/Sec) The parameter has an effect only if the Typematic Rate Setting is enabled. The repetition frequency has a number of fixed values, which this parameter can take: Typematic Delay (Msec) Sets the delay value from the moment a key is pressed until the keyboard starts repeating a character. Only has effect if the Typematic Rate Setting is enabled. The value can be selected from the range: PS/2 Mouse Function Control Enabling this parameter only gives IRQ12 for the PS/2 mouse port. Otherwise, if there is no PS/2 mouse connected to the computer, IRQ12 is free for other devices. It is recommended to set the value to Auto. Can take values: Enabled - enabled and IRQ12 is busy Auto - BIOS detects the presence or absence of a PS/2 mouse OS/2 Onboard Memory > 64MB Requires permission when two conditions are met - the computer has more than 64 Mb of memory installed and OS / 2 is used as the operating system. Can take values: Enabled - allowed Disabled - prohibited PCI/VGA Palette Snoop The parameter should be enabled only if the colors are not displayed correctly on the screen. As a rule, this effect can occur when using such non-standard devices as MPEG cards, 3D accelerators and other similar devices. Can take values: Enabled - allowed Like Like tweet Let's say you have a boot disk with Windows in your hands. Or the anti-virus disk Dr.Web LiveCD. Or maybe you want to install Linux. You insert the disc into the computer, but suddenly the question arises: “What to do next?” If you are an inexperienced (yet) computer user, then this question will be one of the first. Advanced users also sometimes need to know the boot order in different BIOS versions. So my guide is for everyone. So, we are faced with the task: we need to tell the computer which disk to boot from first. To do this, you need to get into the BIOS settings. How to do this - read on. Which button to press? The very first question that arises from an unprepared user. How to boot from a boot disk or flash drive? Option 1 is simple, but not all BIOSes support such a menu. In any case, it's worth trying. Typically, the boot menu appears when you press F11 or F12 right after turning on the computer. Less often - Esc, F8 or other buttons. Sometimes it is supported but disabled. In this case, read the instructions for the motherboard of your computer. Option 2 always works - there are boot settings in almost every BIOS. About the setting and will be told by me. We need to get into the BIOS settings. BIOS (or its improved analogue UEFI) is a special system that boots immediately after turning on the computer. The BIOS is independent of Windows or anything else because it resides on a memory chip soldered into the motherboard. You can read more about terminology. Another example: Instead of a black screen with diagnostic text, the logo of the laptop or motherboard manufacturer may be displayed, then the prompt will look like this: By the way, in the last two screenshots there are hints for the boot menu button (which simpler) - on the first one it's Esc, on the second it's F12. Let me remind you that this option is preferable, but not always present. On the boot screens of some laptops there is no inscription, then look at the keymap After pressing the desired button and the BIOS screen appears, an ambush awaits us - there are many BIOS versions, their settings look different. There is also good news - they all most often have the same points, so you can figure out what's what. There are two BIOS versions that are very different from each other, we will consider them below. Please note that similar tips are also in the instructions for a laptop or desktop computer motherboard. If you do not have instructions in paper form, you can always download it from the model page on the official website of the manufacturer. After reading this article, looking at the explanatory illustrations, you can set up booting from the Windows installation disk on any computer. Popular BIOS version. It is, in particular, on many Acer laptops: We need to get into the Boot section. Press the right arrow three times: Before us is a list of devices from which you can boot. On each computer, the names of the lines are different, but the first two words always say what kind of device it is: To set the first drive (line starting with IDE CD), i.e. change the boot priority, use the up/down arrows to highlight this item, then press F5/F6(on some versions of this BIOS you need to press - or), put it first in the list. It will be something like this: To save settings, click right arrow to get to the menu exit(Exit), select menu item Exit Saving Changes(Exit and save changes) and press Enter twice in a row. Note: The Exit Discarding Changes menu item allows you to exit the BIOS without saving your settings. The computer will restart and instead of loading Windows, it should start loading from the selected drive. That is, for example, the installation of Windows will begin. Mission Complete! The main menu of this BIOS looks like this: Press Enter, return to the previous settings page, go to Second boot device(Second boot device) and there we set hard drive- this will allow your computer to boot normally with the DVD disc or flash drive pulled out. Press Y on the keyboard, then Enter - the settings will be saved, the computer will restart. Ready! Now, when a boot disk is inserted, the computer will boot first of all from it, and not from the hard disk. If the disc is not inserted, it will boot from the next device in the list. I have seen this only on older computers before 2003. The main menu looks like this: To configure the boot order, you need to go to the BIOS FEATURES SETUP menu: Similar to the aforementioned AWARD BIOS. It most often contains the inscription BIOS Setup Utility without any explanatory names. On the Boot page, go to Boot Device Priority: There are points here 1st Drive, 2nd Drive- "First boot device", "Second boot device". You need to open 1st Drive and specify CDROM (for a floppy drive) or USB (for booting from a USB flash drive), specify SATA or IDE in 2nd Drive, depending on what hard drive you have and what item will be available in the menu. Everything is clear here, look at the picture: buttons and –
you can cycle through the menu items by pressing the button F10 will call the save settings item. V: I can't get into BIOS settings. What to do? O: Make sure you're doing everything right. 99% of problems are due to inattentive reading of the instructions. Everything is solved if you correctly ask the question to the almighty Google: "motherboard / laptop model boot setup." V: I configured it as it should, but the error “NTLDR is missing” occurs or the cursor blinks at the top left of the screen. O: You have burned your boot disk or flash drive incorrectly. V: How to boot from a flash drive (or portable hard drive) and not from a DVD? O1: You must specify USB-HDD, USB-ZIP or Removable in the boot setting. Item name may vary. In case of problems, read the instructions for the motherboard. O2: If the BIOS does not support booting from USB devices, you can make a bootable DVD with Plop Boot Manager and, when booting from it, select the “USB” item in the menu that appears. The advantage of this method is that even on older computers, where USB works in slow USB 1.1 mode when booting, the speed will be fast - USB 2.0 mode will turn on. Minus - again, not always supported by some motherboards. More about Plop written V:How to make a bootable flash drive? O: If you need a flash drive with the installation of Windows 7 or 8, then you are in the section V:The article does not contain instructions for setting up my BIOS. Please write!!111 O: With the advent of motherboards, where UEFI is used instead of BIOS, a large number of different externally, but essentially identical screens with settings have arisen. Since the settings need to be done the same everywhere, either read the article above carefully and find similar items in your BIOS, or read the instructions for your motherboard / laptop. V: I set up the BIOS, now nothing is loaded at all. Help! O: In 10 cases out of 10, the problem is inattention or an incorrectly made bootable flash drive / disk. Reset the BIOS settings either by removing the battery for half an hour from turned off computer, or the menu item Load Default Settings. Then do it all again, carefully reading all the instructions. V: When booting from a flash drive, a blue screen appears. O: You made a mistake somewhere when creating a bootable USB flash drive. Read the instructions more carefully or look for another one - there are many ways to create bootable flash drives. V: I made a boot disk / USB flash drive, configured the BIOS, but it still boots from the hard disk. O: Either the boot disk / USB flash drive was not prepared correctly, or the boot was configured incorrectly. If you can't read the instructions carefully, consider: are you doing everything else right? Maybe it's better to turn to experienced people (to the service center)? Using the information in this article, you will be able to run bootable disks on any computer or laptop - any LiveCD, Windows or Linux installation disk, any bootable USB flash drive (if the BIOS supports booting from USB devices). On modern computers, there are BIOS (or UEFI) versions with mouse support, beautiful menus, and more, more. Despite the different appearance, everything is configured according to the same principle that I gave above. Do not forget after installation (or why else do you configure the BIOS) to return the boot settings back so that the computer boots normally from the hard drive! It is not uncommon for PC users to have to dig into BIOS settings. There are many questions and problems here, since on various motherboards there are sewn different types of BIOS. Menu items differ in name and location, but in general they perform similar functions. The own type of BIOS is integrated by the motherboard developers themselves or by third-party companies that have concluded an agreement with the manufacturers. The market is dominated by third-party companies. Three main types of BIOS should be distinguished: Let's dwell on these types and consider in more detail the interface and distinctive features. It is a leader in this field. Back in 1998, Award Software was bought by Phoenix, but BIOS is still labeled as Award. Traditionally, the base system shell has a blue (grey) background with English menu items. The interface is different in different versions. For example, in version 4.51 PG, navigation is visually divided into two vertical compartments. At the very bottom are the control keys. If we consider version 6.0, then surprisingly the appearance already looks different. The gray color scheme prevails. The menu items have different names. The main sections are arranged horizontally. In the column on the right, there is a brief background information. Takes an honorable second place. It is the property of American Megatrends Incorporated, hence the abbreviation AMI. In all respects, the similarity with the AWARD BIOS is noticeable. The names and location of the main sections coincide, but not always. The presence or absence of BIOS options primarily depends on the manufacturer of the motherboard and its functions. Therefore, it is impossible to single out specific features of AMI unambiguously. Also, different versions have different interfaces. The appearance of BIOS versions 2.5x (2.6x) And this is what BIOS 3.31 looks like The third type of BIOS is a truly modern technology. It has a graphical interface, something even resembles an operating system. The menu is made in the form of pictures with inscriptions. Without knowing English, you can intuitively guess what this or that section is responsible for. It has a big advantage over the old types. As you know, the traditional BIOS, due to its functional limitations, is able to see no more than 2 TB. UEFI breaks the limits, as there are practically no volume limits. The new software boasts a rich set of system utilities. It is possible to backup data or optimize the operation of RAM. The following features should be highlighted: Of course there are many more benefits. Large manufacturers have already begun the transition to a new type of BIOS. UEFI technology has proven itself only from the best side, it is not for nothing that such giants as Intel and Microsoft are interested in it. I bring to your attention a video. There are cases when you need to find out the current BIOS version. This can be done in the operating system Windows 7, XP. To do this, click "Start" - "All Programs" - "Accessories" - "Utilities" - "System Information". In the window that opens, find and read the item “BIOS version”. At its core, there is no big difference between AMI and AWARD. They perform the same function, the distinctive differences were discussed above. Particular attention should be paid to UEFI, since this type of BIOS is a new technology with high functionality.If the Primary Master/Slave and Secondary Master/Slave hard drives are set to Auto, the size and model of the hard drive are detected automatically. The "Halt On:" parameter determines at what errors the BIOS will stop the system boot process.
2. Advanced BIOS Features - Advanced BIOS settings.
Hard Disk Boot Priority (Priority of loading from hard drives).
This setting controls the state of the processor's internal and external caches.
This setting controls the state of the processor's Level 3 cache.
Options: Enabled, Disabled.
Note:
It is recommended to enable Hyper-Threading technology for systems running Windows XP and Linux 2.4, and disable it for earlier operating systems.
Enables the processor's Hyper-Threading technology.
Options: Enabled, Disabled.
The BIOS attempts to boot the operating system from devices in the sequence defined in this paragraph.
Options: Floppy, LS120, Hard Disk, CDROM, ZIP100, USB-FDD, USB-CDROM, LAN, Disabled (device not used for booting).
Options: Enabled, Disabled.
When this option is enabled, the capacity of floppy drives is detected at system boot. This feature may be useful if you are using an older 360Kb floppy drive.
Options: Enabled, Disabled.
Specifies the state of NumLock when the system boots.
Options:
On: The numeric keypad works in numeric mode.
off: The numeric keypad works in cursor control mode.
This item allows you to restrict access to the system and the BIOS setup program, or only to the BIOS setup program.
System: The system will not boot and access to the BIOS setup utility will be denied until the correct password is entered.
setup: The system will boot, but access to the BIOS setup utility will be denied until the correct password is entered.
This item allows you to enable the APIC (Advanced Programmable Interrupt Controller) functionality. APIC is an Intel chip that implements symmetric multiprocessing (SMP) on Pentium systems.
Options: Enabled, Disabled.
S.M.A. R.T. (Self-Monitoring, Analysis, and Alert Technology) is a diagnostic technology that monitors and predicts device performance. The software to support this technology is located both on the drive and on the computer itself. If a device failure is predicted, then the software installed on the computer using the Client WORKS S. M.A. R.T. alerts the user to an upcoming condition and suggests actions to save the information.
Options: Enabled, Disabled.
Display a full screen image of the logo during loading.
Options: Enabled, Disabled.3. Advanced Chipset Features - Advanced chipset settings.
If "By SPD" is selected, memory timing will be set according to the Intel Serial Presence Detection specification.
Options: Manual (Manual), By SPD (using SPD).
This parameter allows you to set the number of clock cycles required after the CAS (Column Access Strobe) signal before starting a data read operation.
Options: 2.0, 2.5, 3.0, Auto.
This parameter defines system memory timing parameters such as CAS (Column Address Strobe) and RAS (Row Address Strobe).
Options: 2, 3, 4, 5, Auto.
This parameter determines the number of cycles required to return the data to its previous position to close the memory bank, or the number of cycles required for a memory page before the instruction to activate the next memory bank is executed.
Options: 2, 3, 4, 5, Auto.
This parameter determines the number of clock cycles required after the memory bank wake-up signal before recharging (sets the minimum width of the RAS signal).
Options: Auto, 4
This option allows the BIOS to be cached in RAM for fast execution of commands.
Options: Enabled, Disabled.
This setting allows the video BIOS to be cached in RAM for fast command execution.
Options: Enabled, Disabled.4. Integrated Peripherals - Built-in peripherals.
Enables/disables the Boot ROM of the Realtek integrated network card for booting from the local network.Chipset IDE Devices - Integrated IDE devices.
This item allows you to set a longer delay before scanning the hard disk during system boot. Some hard drives may require longer latency in order to be correctly identified.
Options: 0
The IDE HDD Block Mode allows the controller to access blocks of sectors rather than one sector at a time.
Options: Enabled, Disabled.
Automatic data transfer between system memory and IDE device with minimal CPU usage. Allows you to increase bandwidth and free up the processor for other tasks.
Options: Enabled, Disabled.
The motherboard supports two channels of the conventional IDE interface and one channel of the Serial ATA interface. Select "Enabled" to configure each channel.
If you are not using the built-in IDE connector, set the Onboard Primary (Secondary) PCI IDE settings to Disabled.
The four IDE PIO (Programmable Input/Output) fields allow you to set the PIO mode (0-4) for each of the four IDE devices supported by the integrated IDE controller. Modes 0 to 4 provide sequentially increasing performance. In Auto mode, the system automatically determines the best mode for each device.
Options: Auto, Mode 0
Select the operating mode of the IDE device. Using Ultra DMA-33/66/100 technology is possible only if your IDE hard drive supports it and the DMA driver is installed in the operating system. If both the hard drive and operating system support Ultra DMA-33/66/100, set this option to "Auto" to enable UDMA mode in the BIOS.
Options: Auto, Disabled.
Configuring the integrated Serial ATA interface.
This item sets the operation mode of the SATA interface. In Combined mode, the SATA port will replace one of the traditional IDE Primary or Secondary ports. Enhanced mode allows SATA to work simultaneously with Parallel-ATA ports.
Options: Disabled, Auto, Combined Mode, Enhanced Mode, SATA Only.
This item is available only when the integrated SATA controller is in Combined mode. The "Primary" value will make the PATA IDE port the Primary port and the rest of the SATA ports become Secondary. Likewise, a value of "Secondary" will make the PATA IDE port a Secondary port, and the SATA ports a Primary port.
Options: Primary, Secondary.Onboard Device Setup - Set up built-in devices.
Includes USB controller.
Includes EHCI controller (USB 2.0).
Options: Disabled, Enabled.
Enabling/disabling USB keyboard support when working in the DOS operating system.
Enabling/disabling USB mouse support when working in the DOS operating system.
Options: Enabled, Disabled.
AC97Audio.
This option allows you to disable the integrated audio controller.
Options: Auto, Disabled.
Includes an integrated LAN network interface.
Options: Enabled, Disabled.Legacy Devices - Customization of legacy devices.
Select "Enabled" if you are going to use the integrated floppy drive controller. If you want to install an external controller or the system does not have a floppy drive, select the "Disabled" value.
Options: Enabled, Disabled.
Select base address and interrupt number for integrated serial port #1.
Select the base address and interrupt number for the integrated infrared port.
Options: 3F8/IRQ4, 2E8/IRQ3, 3E8/IRQ4, 2F8/IRQ3, Disabled, Auto.
Integrated Parallel LPT Configuration
Options: 378/IRQ7, 278/IRQ5, 3BC/IRQ7, Disabled.
Allows you to select the operating mode of the parallel port.
Options: SPP, EPP, ECP, ECP+EPP.
Allows you to select the EPP mode of the parallel port.
Options: EPP1.9, EPP1.7.
Allows you to select DMA1 or DMA3 for use in ECP mode.
Options: 1, 3.5. Power Management Setup - Power management settings .
Allows you to turn on the power of the computer by a signal from the keyboard, mouse, or by pressing a specified key combination.
Options: Disabled, Any Key (Any key), Mouse (mouse), Both (Any Key + Mouse) (Both options - Any key + mouse).
This option allows you to define the behavior of the system when a power failure is restored.
Former- S Ts: The system returns to the state it was in when the power was turned off.
This option allows you to select the power management mode. The default value is User Mode.
User Define: Allows you to manually set the time periods for power saving modes.
Video Off Method WITH How to turn off the screen.
This item allows you to select how the screen turns off in power-saving modes. The default value is "V/H Sync+Blank".
V/H Sync+Blank: The system disables the vertical and horizontal scanning circuits and writes a blank frame to the video buffer.
blank: The system only writes an empty frame to the video buffer.
Suspend Mode- R Suspend mode.
The system automatically turns off all devices except the processor after the specified time of system inactivity.
Options: Disabled, 1, 2, 4, 6, 8, 10, 20, 30, 40 minutes and 1 hour.
Turns off power to hard drives after a specified period of system inactivity.
Options: Disabled, 1
Select the operating mode of the power button. The default value is "Instant Off"
instant O FF: Turns off the system immediately.
Delay 4 S econd: Turns off the system after a 4 second press delay. By short pressing the power button, the system will enter the Suspend mode. Press the power button again to return the system to the working state.
Specifies whether the system can be returned from S3/S4 mode by a signal from a USB device.
Options: Enabled, Disabled.
Allows you to set the day of the month and the time (hh:mm:ss) when the system will be powered off when the system is turned off.
Options: Enabled, Disabled.6.
PNP/
PCIConfiguration- ConfigurationPNP/
PCI.
V Nimanie: TO IRQ collisions can prevent the system from discovering some devices.
Allows you to select the order in which video adapters are initialized at system boot.
Options: PCI Slot, PCIEx.
Specifies how PNP/PCI resources are controlled. The default value is Auto (ESCD)
manual: PNP card resources are controlled manually. The "IRQ Resources" field becomes available and you can select which IRQ-X and DMA-X values are assigned to integrated devices and PCI devices.
Auto: The BIOS automatically assigns interrupt resources.
PCI/VGA Palette Snoop - TO Correction of the VGA palette for PCI video cards.
The item is intended to solve problems with some non-standard VGA cards.
Options: Enabled, Disabled.
Maximum Payload Size.
Sets the maximum packet size (in bytes) for PCI Express devices.
Options: 128, 256, 512, 1024, 2048, 4096.
Interrupt requests are used according to the table:7. PC Health Status - Setting up hardware monitoring.
When this function is enabled, hardware monitoring system information is displayed on the screen during boot.
Options: Enabled, Disabled.
Shows the current chipset/processor temperature.
Shows the current PSU/CPU/chassis fan speed in RPM.
DIMM memory voltage level.
Chipset voltage level.
CPU core voltage level (Vcore).
Battery voltage level.
Switching power supply voltage levels.
The temperature at which the computer will be shut down to prevent damage from overheating (requires ACPI mode to be enabled in the Power Management section, and ACPI mode to be supported by the operating system). Default value: Disabled.
Options: 60°C/140°F to 75°C/167°F in 5°C increments.SmartFan Function- AND Intelligent fan control.
This item allows you to set the fan speed control method. The "Full Speed" method sets the fan duty cycle to 100%. By selecting the "By Duty Cycle" method, you can directly set the duty cycle of the fan. The "By Temperature" method allows you to calculate the fan speed depending on the temperature range.
Below is an example using the "By Tempeature" method.
Displays the current CPU temperature/fan speed.
. The performance of the Smart CPU FAN function depends on the design of the fan. Most fans have built-in thermistors and can independently regulate the rotation speed. Some fans allow you to control the duty cycle only in a very limited range of values.
. For best results, use the USDM fan tuning utility.8. Power BIOS Features - System overclocking settings.
Overclocking a system requires deep understanding and can damage system components. We recommend that you do not change the values of these parameters for stable system operation.
When enabled, automatically disables clocking on unused (empty) PCI slots, thereby reducing EMI.
Options: Enabled, Disabled.
Enabling this option can significantly reduce the electromagnetic interference generated by the system.
Options: Enabled, Disabled.
When this function is enabled and the system overclocking fails before POST code 26h, the system parameters will be automatically set to default values.
Options: Enabled, Disabled.
Allows you to increase the processor clock frequency in 1 MHz increments. Together with the CPU Clock Ratio, this parameter determines the operating frequency of the processor.
For example, if the processor is running at 2.4 GHz and the clock frequency is 200 MHz, then 200 MHz x 12 = 2.4 GHz.
Options: from 200 to 400 in steps of 1 MHz.
The result of unsuccessful overclocking will be the absence of an image on the monitor screen. To solve this problem, turn the system power off and then on again. While rebooting the system, hold down the "Insert" key. This will reset the BIOS settings to their default values.
Allows you to control the operating frequency of the PCI Express bus.
The "Enabled" value allows you to change its frequency in 1 MHz steps using the following item. Selecting "Disabled" will fix the PCI-E bus speed at 100MHz. A value of "Auto" will set the frequency according to the FSB.
Options: Auto, Enabled, Disabled.
Allows you to set the operating frequency of the PCIE bus in steps of 1 MHz.
Allows you to select the frequency of the PCI bus.
Options: 33.3MHz, 33.80MHz, 34.28MHz, 34.78MHz, 35.29MHz, 35.82MHz, 36.36MHz, 36.92MHz, 37.50MHz.
Allows you to set the DDR SDRAM clock multiplier to match the installed DIMMs. It is recommended to leave the default value. The available options depend on the FSB frequency.
Allows you to set the processor frequency multiplier. See CPU CLOCK/SPEED. If your processor frequency multiplier is locked, this item is not available.
Move the cursor to the Voltage Adjust Menu section and press the key
This item allows you to change the processor core voltage Vcore.
This item allows you to change the chipset voltage.
It is recommended to leave the default value.
This item allows you to change the voltage of DIMMs.
It is recommended to leave the default value.Virus Warning
Two solutions:
Usually, to enter the BIOS settings, you need to press the Delete, F2 or Esc button 1-3 seconds after turning on the computer. How to find out which button to press: after turning on the PC, look for the line Press Del to enter Setup on the screen (where instead of Del there may be F2 or another key). This will be the inscription about which button to press. Example:

We press the desired button and get into the BIOS. If you pressed the wrong button, nothing bad will happen, because. the computer will simply ignore your actions or show some other BIOS add-on, where it will not be what you need. Then you need to press Reset (the reset button on the system unit) or Ctrl Alt Del to restart the computer.


 To change the boot order to AWARD BIOS, go to the menu Advanced BIOS Features:
 Selecting a menu item First boot device(First boot device), click Enter and point opposite CDROM (Removable, if you need to boot from a USB flash drive or portable hard drive):

Old version of AWARD BIOS

 Paragraph Boot Sequence responsible for the load order. buttons PageUp and PageDown(or Enter and arrows - unfortunately, I don’t have the opportunity to check) you need to set the first CDROM, the second C (this is a hard drive), the third is not important - set any.
Use the right arrow key on your keyboard to move to the tab Boot:

Another AMI BIOS

Questions and answers
Conclusion


UEFI BIOS:

How to find out the type and version of BIOS