Everyone knows that the Android operating system is developed by Google for smartphones and tablets. At the moment, this is the most popular platform for these devices. The official version of Android can only run on supported ARM devices. But since Android is an open source project, the community has created a port of Android for x86 computers that will work on almost any modern computer.
The official version of Android 6.0 from Google came out quite a long time ago, but only a few days ago the developers released a stable version of the Android x86 port for version 6.0. In this article, we will consider installing Android x86 6.0 on a computer or laptop. The platform may not be stable enough yet, but it can already be used and you will see for yourself.
System Requirements Android x86 6.0
Android x86 is quite demanding on the hardware. Ideally, it should work on any x86 computer. But in reality, not everything is so simple. The developers have tested the system on several devices, for example, laptops from ASUS, EeePC and Dell, for a complete list of supported devices and their level of support, you can find on the official website.
With regard to equipment and characteristics, the following parameters are recommended:
- CPU: Intel;
- RAM: 2048 MB;
- Free disk space: 10 GB;
- USB flash drive- to record the installer.
Preparing for installation
As with other operating systems, we first need to download the installation media. You can download the latest version of the system from the repository at SourceFoge or the official website. Images are available for both 32 and 64 bit architecture:
It takes up a little image, only 400+ megabytes, so it loads quickly.
Step 2. Burn to media
To install Android, you need to use either a USB flash drive or a rewritable disk. But still a USB stick is better. I do not recommend using various utilities to capture the image, do it with the following command:
dd if = ~ / android-x86-6.0.iso of = / dev / sdc bs = 5M
Here ~ / android-x86-6.0.iso is the image you just downloaded and / dev / sdc is your flash drive.
Step 3. BIOS setup
Everything is standard here. Restart your computer and during the BIOS splash screen press F2, F8, Shift + F2 or Del to enter the BIOS setup, then go to the Boot tab and select in 1st Boot Device your USB stick.

It remains to go to the tab Exit and press Exit & Save Changes.
Installing Android 6.0
Step 1. Beginning the installation
Immediately after restarting your computer, you will see such a bootloader window. Here you can either boot into the Live system, or go to its installation. We will be interested in the last point, installation:

The installer will start very quickly:
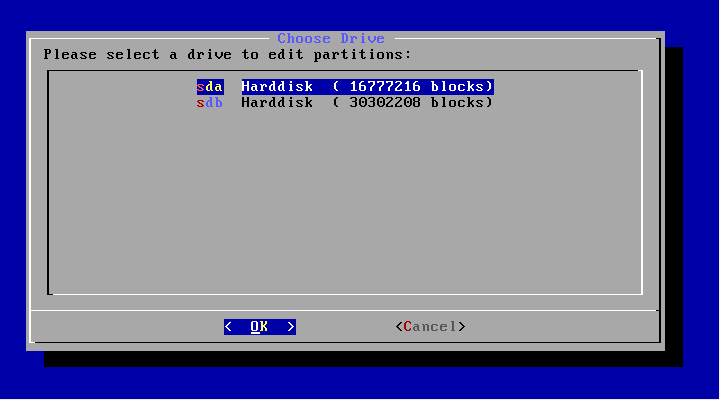
Step 3. Selecting a disk
At the first step, you have to select the drive on which you will perform the installation:
Step 4. Partition table
Further, if this disk has not yet been partitioned, you must select the partition table. You can use GPT, but I do not recommend doing this as it is more likely that the installation will simply hang. Therefore, at this step, select No. In this case, MBR will be used:

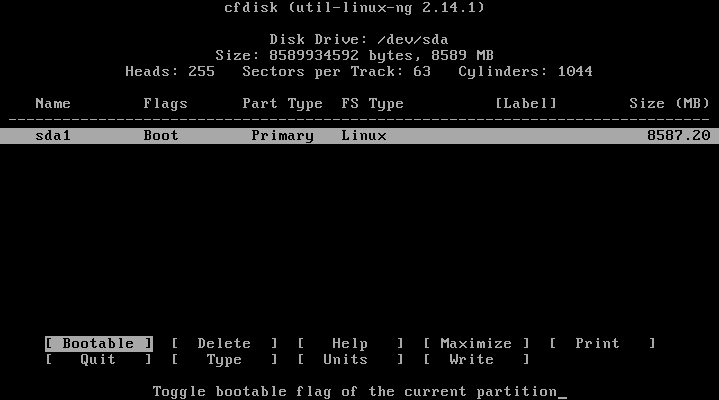
Step 5. Create a partition
Installing Android x86 6.0 is done on one partition only. And at this step we have to create it. The cfdisk utility will be used for this. First click New to create a new section. You can navigate through the buttons with the left / right arrows, and press with Enter:

Select type primary, primary:


Find the Bootable button and press Enter to make this partition bootable:
Find and click the Write button to write the changes to disk. Type yes to confirm:

It remains to press the quit button to exit the program:

Step 6. Selecting a section
After completing the markup, you need to select the section you just created:

Step 7. File system
Choose a filesystem like ext4

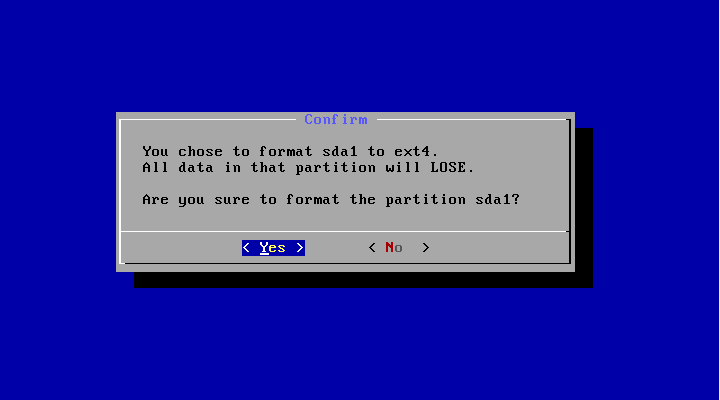
Step 8. Formatting
Since we want a clean section, we agree that it will be formatted:
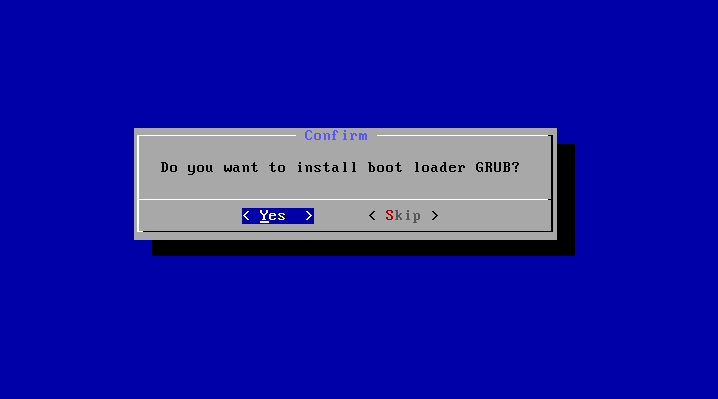
Step 9. Bootloader
We'll need a bootloader, so select Yes:
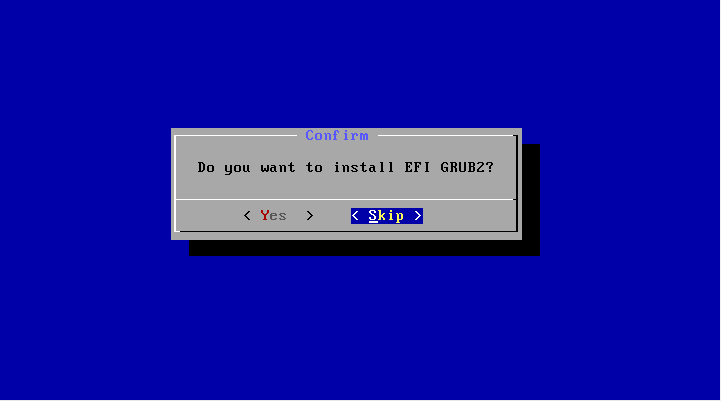
Step 10. EFI Boot Loader
But we do not need an EFI bootloader, given that we used MBR. Please select Skip:
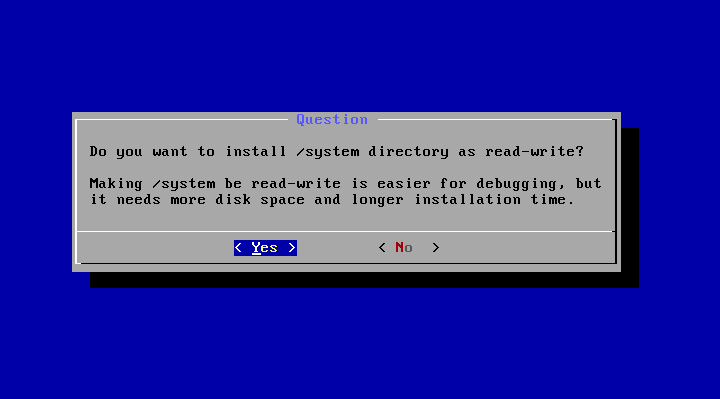
Step 11. Access mode
In this window, you need to choose whether you want to mount the system partition / system in read and write mode. This will be useful for installing new programs, so select Yes:
Step 12. Completing the installation
Wait until all files are unpacked:

When the installation of Android on your computer is complete, select Reboot to restart your computer and enter the new system:

Step 14. Bootloader
Select the first bootloader item:

Step 15. Starting the system
Wait for the system to boot up.
Step 16. Finish
That's it, the installation of Android x86 on your computer is complete. You can now use Android right on your computer. You can install and run Android applications, play games:

conclusions
As you can see, installing android x86 on a pc is not that different from other operating systems. If you are lucky and the system will fully support your hardware, then you can very easily get a full Android system on your computer. If you have any questions, write in the comments!
To complete the video with the Android installation process from the American video blogger:
We continue to acquaint the reader with installing the Android mobile operating system on computers and laptops running Windows and OS X. In the first part of the tutorial, we showed how to install through the BlueStacks emulator. This material provides for a more complex installation of Android on a computer as a separate operating system without using virtual machines.
By installing Android as a second operating system, we can achieve a significant increase in the performance of the mobile OS without loading RAM and processor with third-party applications or emulators.
Training
To install, we need a USB drive of at least 1 GB and a separate disk partition at least 8 GB in size. A disk partition for installing Android can be created using standard operating system tools (context menu of the Start button - Disk Management for Windows), but to save time, you can use a second USB drive, on which the operating system will be installed.
Installation
Before starting the installation, download the ported Android operating system image from the Android-x86 site. In the Downloads section, find the OS version you are interested in (it is recommended to install the latest up-to-date version "android-x86-5.1-rc1.iso" or "android-x86_64-5.1-rc1.img", depending on the bitness).

2. To write the downloaded Android image to a USB flash drive, you will need the UltraISO utility. The trial version of the program can be downloaded from here. Install UltraISO and wait for the Android installation image to finish downloading.
3. Connect the USB storage device to your computer. Attention: during the installation process, all data on the USB flash drive will be deleted!
4. Start UltraISO. Click "File" - "Open" and select the image you just downloaded in * .img or * .iso format.

5. The image will open in the UltraISO application. Go to the menu: "Boot" - "Burn hard disk image".

6. Make sure that the installed flash drive is selected as the target disk for recording (the Disk Drive item), and the downloaded .iso / .img file with Android system is selected as the "Image File".

7. Click on the "Burn" item. The utility will warn you about the destruction of all data on the flash drive and will start recording the installation image.
Wait for copying to finish.
8. Restart your computer.
In the BIOS / UEFI settings, make sure that USB is selected in the Boot Device Priority - First Boot Device item (depending on the motherboard model, the boot drives priority items may have different names).
If you have an Apple computer:
When rebooting, at the moment the white screen appears, hold down the "Alt" key and hold it until the menu for selecting bootable disks appears. Select the drive you created.
9. After loading, the Live CD menu will appear on the screen, with which you can immediately start the Android OS without preliminary installation, go to one of the debug modes, or perform a full installation.

Select Installation and press Enter.
10. In the menu that appears, select the partition on your hard drive created for installing Android. Be careful - installing on top of Windows or OS X will completely wipe your system.

Note: In some cases, especially when trying to install Android on a laptop, a USB keyboard may need to be connected. The built-in keyboard may become unresponsive until the installation is complete.

The installer window will warn you about the loss of all data located on the selected partition. Click Yes.
12. Agree to install the GRUB bootloader and the EFI GRUB2 subkey.


13. To be able to overwrite data on the Android system and work with files, in the Do you want to install / system directory as read-write? select Yes.

14. Android OS installation starts.


At the end of the process, the installer will offer to create a custom partition within the system. By default, 512 MB is allocated for data. Click Yes and set the recommended size to 2000 MB.
15. This completes the installation of the Android operating system. In the window that appears, select Run Android-x86 - "Start Android".

Further configuration of the system completely repeats the first inclusion of a new smartphone running Android, and consists of the following steps: choosing the system language, connecting to a wireless Wi-Fi network, authorizing using a Google account and, directly, downloading applications and games from the Google store Play, or installing APK files.
Possible problems
When formatting a hard disk partition (point 11), it is preferable to choose FAT32 and NTFS systems. This is due to the optimal compatibility of the flash drives used with the installation APK files copied using the Windows OS (the difference between the file systems of the drive and the partition can lead to a conflict - the system simply will not see the flash drive). If there is no need for this method of installing games and applications, you can choose any type of formatting.
Where the launch through the emulator was described. But did you know that Android 4.4 and 5.1 can be easily installed on a computer as a full-fledged operating system?
So, let's start with the most important thing, where can I download?
1. You can download it from the official website of the portal: http://www.android-x86.org/download/
At the moment, Android 4.4 and 5.1 are available from the latest versions. Personally, I've installed both versions, both work fine.
2. After you have downloaded the image, you need to write it to a USB flash drive or disk. I installed from a USB flash drive, I used the WinSetupFromUSB program to create a bootable USB flash drive. I will not describe the process of creating a flash drive, since there are a lot of articles on this topic.
Let's get down to installation.
I installed on a virtual machine using VMware Workstation 12. The installation requires a hard disk of at least 1 GB. The installation process on a normal PC is no different.
So, after booting from a USB flash drive, you will see an installation selection menu. If you select the very first line, as in the screenshot, Android will boot immediately without installation. After rebooting, you will lose all settings.
I chose the option to install to a hard drive, as this is a true full-fledged installation that allows you to install programs and save everything after a reboot. But without a hundred grams of tips, it's not so easy to figure it out.
1. Select the last menu item Install Android-x86 to harddisk
.
2. Selecting a partition to install.

3. Working with cfdisk.

4. We give the partition at least 1GB and select the item Write.
5. After that, select the item Bootable and Quit.
6. The section is created, then we will be offered options for choosing the file system.
Most instructions recommend FAT32 or NTFS. I have personally formatted EXT4.
7. After that we will be asked: do we want to install the Grub bootloader?

8. To be able to overwrite data in the Android system and work with files, in the dialog box Do you want to install / system directory as read-write?

9. Android installation will start.

10. Installation on a virtual machine takes less than a minute. It's better to reboot after installation.
An Android emulator on a PC is a program that is designed to create an Android device on your personal computer with any other operating system. The principle of its operation is to read the structural features of devices and translate game codes for smartphones into codes for computers. The list of codes includes both audio and graphic formats. The emulation process itself extends to memory, processor, and input and output devices. Please note that the same type of processors does not play any role in the operation of the emulator.
Top 10: Android Emulators on PC
Bluestacks
Bluestacks emulatorSo, the first emulator in our rating will be the Android Bluestacks emulator. This program is absolutely free, while it has high performance in work. An emulator is a program that allows you to synchronize your smartphone with a computer, as a result of which you can play mobile games on your PC. In addition, you will be able to make calls and send messages from certain applications that have this function. That is, the computer reads the data from your phone, and will also use your mobile number.
The system requirements of the Bluestacks emulator are basic, works on all versions of Windows and MacOSX. In the program settings, you can configure the language, including Russian. You can also download games and applications, while running them in full screen mode. The latter is ideal for those who have always wanted to play games and applications on Android on their personal computer with a different operating system. In general, if you decide to download an emulator, and do not know which one to choose, then Bluestacks is the best option for you, it is free and quite easy to use.
Droid4X
Droid4X emulatorThis emulator will display a full-fledged Android device for you, which will allow you to run games and applications on your personal computer. This idea is ideal for people who are running out of memory on their smartphones, or they simply do not support a new desired game. Here you can download as many applications as you want, and you will be sure that the emulator can easily read them. In case you have a PC or laptop with a touch screen, this will greatly facilitate your task. Otherwise, in the settings of each game, you have to select the control buttons.
The Droid4X Android emulator is based on the Android 4.2.2 version, thanks to which you will be able to download any games and applications to your PC, even the newest and required high performance. With this emulator you will get an Android device with 16GB of internal memory and 32GB of external (SD) memory. Also this app is great for app developers. It has an application testing system and an excellent base for ordinary users. The technical characteristics that the application requires for full operation and high performance are not high indicators that any standard computer can satisfy.
Andy
One of the newest emulators that can emulate on your personal computer a full-fledged device with the Android operating system, version 4.2 Jelly Bean. Since the Andy emulator came out quite recently, it is intended for use on Windows 7 or Windows 8, and this is also its disadvantage. But the developers promise to soon launch the version on Mac OS. Among other things, the creators of the application are actively releasing regular updates and are working to constantly improve their service.
For those who plan to use the emulator both on a computer and on a smartphone, the application has a useful function with which you can control all processes from your mobile device. This feature is often needed by games and applications that require the use of a touchscreen or accelerometer. You can download the emulator application to your smartphone for free. The characteristics of Andy's emulator allow you to install it on any standard computer and synchronize with another device.
Genymotion
An emulator that is considered one of the highest quality and fastest in its field. This application has increasingly focused on application testing, and it is perfect for game and application developers. By and large, the Genymotion emulator is a continuation of the AndroidVM project. Despite the fact that testing has become the main focus of the emulator, it is also perfect for playing Android mobile applications on a personal computer with a different operating system. Genymotion download emulator can be easily installed on operating systems such as Windows, Linux and Mac OS. To prevent errors, the developers suggest installing VirtualBox before downloading the emulator itself.
Unlike other emulators, Genymotion can be downloaded in both paid and free versions. Of course, the first will have more extensive functionality than the second. One of the attractive features of the paid version has become - Multi-touch, but it is increasingly aimed at using large companies that are engaged in serious development. The free version has all the necessary features to fully use the emulator on your PC for basic needs. Please note that if you first create an Android image, then the download will occur many times faster.
LeapDroid
Leapdroid emulator on PCAn Android emulator, which has become one of the most recent developments in its field. A novelty, which, however, like other emulators, works on the basis of VirtualBox. That is, without installing the last mentioned program on your PC, you will not be able to use the emulator normally. After all the manipulations done, you will receive a full-fledged Android version 4.4.4. on your PC. One of the main features of the application is its high performance, which is good for the speed of work and downloads. Also, the LeapDroid emulator actively supports OpenGL and adb, you can use it at any time.
In this emulator, there is a function to synchronize folders with your computer. Run multiple instances at the same time without worrying about losing speed. Copy and paste text using your favorite combinations. Work with your microphone while recording videos of your screen. Also, the LeapDroid emulator has a high level of compatibility, which allows you to download almost any Android games and applications. The minimum requirements that the program requests are available on every ordinary computer, so you can rest assured of the quality of its work.
Nox APP Player

A completely new product from Chinese programmers that deserves high marks. Today the program works with the Android 4.4.2 version, which allows you to download and use all new games and applications from Google Play. Emulator Nox APP Player can be safely called one of the most stable and high-performance of all that exist today. It is so powerful that it can support any processor, even AMD. Another indisputable advantage of this application is that it is completely free and available for download for all users.
Having visited the official website of the developer, we found a comparison table, which shows that the Nox APP Player emulator wins in many respects, in relation to other emulators. Its only drawback was the lack of a version for Mac OS, but it's only a matter of time, soon the developers will fix this error. In terms of appearance, you can find similarities with the Genymotion emulator, as evidenced by the right sidebar with a number of tools, and the control keyboard setting is similar to the keyboard in the Droid4X emulator, but besides that, you will also find gyroscope settings here. Generally. The developers have collected all the best from other emulators, improved a little, added new functions and released the Nox APP Player.
AMIDuOS

One of the few emulators developed by American Megatrends. The hypervisor feature is what sets AMIDuOS apart from other emulators. With the help of this emulator, you will install a device on your Android computer that will work without conflicts with the Windows OS. Unfortunately, so far the program is available for download only on Windows 7/8 / 8.1. Thanks to the full screen mode, you can run downloadable games and applications in full screen. This emulator reads all codes so well that you will not see any differences in the gameplay between a PC and a smartphone.
The Android emulator AMIDuOS defines shared folders for various files (documents, video, audio, etc.). In addition to the fact that the program does an excellent job with its direct responsibilities, it will help you to perform other additional settings. These include obtaining and configuring root rights (administrator rights), setting the screen resolution, sharing the RAM allocated for work, and installing Google applications on the computer.
Youwave

A simple emulator of version Android 4.0 ICS. The product is quite effective and works in its field as standard. YouWave differs in that it copies your Android device as accurately as possible, from the interface to the touch keyboard. In addition to its main task, it performs other functions, for example, emulates SD cards on which it saves games and applications or multiplayer modules. The menu is displayed here in a rather classic way, in the form of standard icons.
But this emulator also has a feature that distinguishes it from other emulators, it supports active rotation of the device. This feature makes the gameplay more convenient. You can download games and applications both from Google Play and from archive files. The latter option is more practical, easy to use and convenient to run. If you still chose the first download option, the application will ask for your personal Google ID. And only after that you will be able to use the YouWave emulator for its intended purpose.
Windroy

Not a bad achievement for Chinese developers. An emulator that performs all basic tasks and is perfect for those who do not require a wide range of functions. This program will imitate the Android OS, version 4.4.2, with high quality and as accurately as possible. The technical specifications will allow you to use your PC like a real smartphone. With it you can play all kinds of Google products. If you want to bypass the Play Market side, you can always install programs from archive files, it will be faster and better.
The application has a fairly high performance and speed, and also supports all versions of Windows without conflicts. If you own a touch screen of a computer, laptop or tablet, then this program is a real find for you. It will transfer all codes with high quality, so you won't even notice the difference.
MEmu App Player
Quite recently, a new and very cute Android MEmu emulator has appeared. And its first advantage was the free installation for all users. This product was created by Chinese developers who promise high performance and speed when downloading Android games and applications to PC. The 4.2.2 version of the OS is used, and in the program you automatically enter into administrator rights (root). This emulator will provide you with a stylish desktop and a range of settings that you can play with for several hours.
To make you feel more comfortable during the gameplay, the developers have provided keyboard and joystick mapping. Quickly install archive files using APK drag and drop. Here, in a matter of seconds, you can create, delete or copy any Android system or run several at once. MEmu App Player is a great choice, making it a quality emulator that does its job perfectly.
We launched all ten emulators and this is what happened
So, you want to use mobile applications on your desktop or laptop. But here's the catch: you can't just take and run the .apk file from under Windows. There is no other option but to install Android on your computer.
The good news is, it's possible. Even better news: you can even choose whether to install only Android on your PC or run it from under another system (below we will consider both options, with their pros and cons) Absolutely great news: everything you need is available for free (for the applications themselves, this, however, it does not apply - they can be commercial).
Android emulators for PC
If your real goal is to run mobile applications or games on a desktop or laptop, then there is no need to make Android the main system. You can simply install an emulator that runs as a Windows program and acts as an environment for executing applications.
This way of working has a whole host of advantages:
- You can emulate various devices that you do not have in reality (more precisely, their parameters - power, screen resolution, etc.)
- Different versions of Android can be selected
- Easier to establish interaction between Windows and Android (for example, to take screenshots or broadcast videos)
BlueStacks
Probably the most famous emulator today (although not the only one). This is the one recommended to all novice enthusiasts who want to fully work on a computer, say, with Instagram or Musical.ly.
Among its advantages are easy installation and use, support for many languages, various versions of Android. Do not be afraid that the site is in English: during installation, the program will recognize your system one and, if it is Russian, will go to it.
BlueStacks Download Page
2. Run the downloaded file
Run the downloaded file
3. Click "Install Now"
4. Wait until the end of unpacking files
Final stage of installation
5. Click Finish. If you need to run the program immediately after installation, leave the appropriate checkbox in the box.
At the first start, the virtualization engine will start for a relatively long time - a few minutes. In the future, the shell will start many times faster.
Then the program will behave like a smartphone or tablet, which you launch for the first time, and ask for permission to determine geolocation, as well as offer you to sign in to your Google account.
You now have a full working version of Android on your PC
There are several tricks you can use to install applications:
- Standard installation via Play Market
- Dragging and dropping the .apk file into the running BlueStacks window
- Copying .apk file to shared folder in Windows and launching it through android explorer

If the application is designed for vertical orientation of the device, the emulator will automatically select the required dimensions of the virtual screen
With Knife Hit, which requires a very fast response, we also tested the responsiveness of the system to user actions. And we found that on a test PC (Intel i5-6600K, 16 GB of RAM, MSI Radeon RX 580 8GB) the Samsung Galaxy S8 + smartphone emulates almost perfectly.
Apps (despite being double-padded with Windows and BlueStacks) responded without lag.
MEmu
The principle of operation of MEmu is the same as that of other emulators. You install it simply as a Windows program. We recommend downloading the distribution kit from the official website of the project.
The file is just under 300 MB and contains the most current version of the emulator
1. Download the file from the site using the Download button (in the upper right corner)
Run the downloaded file
2. Run the downloaded file. If Windows asks whether to allow the program to make changes to the system, answer yes.
3. If you want to change the installation folder or manually select the language, click the Custom button in the installation window.
Installation process
4. After selecting the parameters, click on "Install"
5. When the installation is complete, click Start.
MEmu initializes faster than BlueStacks. The desktop looks pretty much the same - it is an imitation of Android in tablet orientation. Likewise, you need to sign in to your Google account to install applications from the Play Market.
Pay attention to the menu to the right of the virtual desktop. In it, you can configure the parameters of the emulated device, and work with a physical keyboard, and full-screen mode, and much more.
Settings section
- MEmu is an emulator designed primarily for games. This can be seen in the special section for manipulators, which can be very finely tuned.
Manipulators section
- Among similar products are Nox Player, Windroy, Genymotion and others.
- In operation, they meet standard criteria: control is emulated using a mouse and a physical keyboard, there is access to shared folders, Android has access to real or virtual hardware, etc.
- The principle of their installation and operation is the same as in the reviewed BlueStacks and MEmu.
Android as the main OS
However, there are reasons why you might want Android to be the primary system on your device. For example, you are using a virtual machine on Windows and Intel x86 platform and you are not happy with its performance.
Indeed, the same components may be sufficient for the full-fledged operation of Android and barely pull the system from Microsoft.
Android desktop
Of course, it is highly desirable that the device be equipped with a touch screen. However, as can be seen from the emulators described above, they can be controlled in the traditional way - with a keyboard and a mouse. In some cases (text editors, browsers) it is even more convenient.
Android-x86 Project
For 2018, the most interesting project is "Android-x86", whose task is to develop versions of Android, which can be the main OS for a computer.
Android-x86 Project Site
There are a number of assemblies based on both the canonical version of the OS and alternative ones (for example, CyanogenMod)
Consider installing Android on a bootable removable media using the example assembly x86-7.1-r2.x86_64.
We need:
- distribution kit that can be downloaded from the link. Iso file required - disk image
- Rufus application required to create a bootable USB stick
- a free flash drive with a volume of at least 2 GB (preferably more, of course). We did not have a free flash drive less than 16 GB in our editorial office: 2018, however.
Make sure that there is no valuable data on the flash drive: during the installation process, it will be formatted first.
The installation procedure looks like this:
1. Download the Android distribution and the Rufus program - preferably in the Portable version to avoid another installation procedure
Rufus website
2. Start Rufus. Allow the program to make changes to the hard drive when Windows asks for it.
3. Click on the SELECT button.
Utility for writing an Android iso image to a USB flash drive
4.Using Explorer, select the downloaded file android-x86-7.1-r2.x86_64.iso (or another version you downloaded)
Open the downloaded is0 image
5. Check that the parameters are as follows:
- Partition Scheme - MBR
- File system - FAT32
- Cluster size and disk label - at your discretion (it is better to leave the default)
Setting recording parameters
6. Press "START" to start unpacking the image
Start recording
7. If the system asks you about the recording mode, select ISO.
Click OK
8. Wait until the end of unpacking
After the end, less than 1 GB is occupied on the flash drive. That's a good thing: there is more room for apps and media.
- Now restart your computer and go to BIOS or UEFI using the Del or F2 key to select the boot disk. You are about to boot from the newly created USB drive.
- Or using the F12 button for quick access to the Boot menu (booting from a specific HDD, SDD or USB media)
- Select USB media: this is the flash drive onto which the disk image has just been unpacked. Boot from it. An image similar to the following will appear on your screen:
Select the USB flash drive on which we recorded the iso-image
If you have come across the Linux Live CD practice, then you know that you do not need to install it to become familiar with the operating system.
Since Android and Linux are in many ways similar as close relatives, here you can try to start the system without installation (the first menu item).
Selecting Live mode (option without installation)
After booting the system, your desktop will look something like this
This is a full-fledged Android that your computer is now running on.
Let's note a few important nuances in terms of management:
- To simulate a long press, not a right click with the mouse is used, but a long press with the left.
- Gestures must be done with the left mouse button held down, which corresponds to touching the screen.
- You won't be able to use multitouch unless you have a real touchscreen installed.
- The Windows key on a physical keyboard corresponds to the Home button on Android.
It is also important to note that no one guarantees the full work of the assembly specifically on your computer or laptop. While the Android_x86 project is the best in its class today, it is still experimental in nature. Therefore, a wide variety of crashes and bugs are possible.
The most common problems with video are: the image on the screen can "float" or get littered due to incomplete compatibility with the video card. This is especially common during the boot phase of the system.
Remix OS
The task of this project is, in general, the same as that of the previous one. Remix OS is a system that adapts Android to mouse and key control for a regular laptop. The developers declare compatibility with ARM and x86 systems (including x64).
Download Remix OS
Since November 2016, Remix OS has been discontinued, but it is still available through third-party sources such as Sourceforge. The size of the distribution is approximately 1 GB.
As a rule, Remix OS was installed on transformers of Chinese origin, in parallel with Windows. The user experience was quite comparable: the creators of Remix did a good job of adapting it. Note that this was not a community of enthusiasts, as in the previous case, but a completely commercial company Jide.
One of the advantages of Remix OS is portability. An 8 GB flash drive is enough to carry it with you and store installed applications and personal files there. The disadvantage is that the project has stopped in development on Android 6.0 Marshmallow and will not be updated to more recent versions.
How to install Remix OS
The archive, which is proposed to download, contains not only the system image, but also instructions in English, as well as a tool for installation. First of all, unpack the archive.
Run Remix_OS_for_PC_Installation_Tool-B2016080802.exe
In the window that opens, click the Browse button and select the .ISO file located in the same folder. In the "Type" line, select "USB Device". In the "Media" section - the flash drive on which you want to install Remix OS.
Recording setup
Click "OK" to start the installation. Be sure to save everything of value that was on the flash drive: it will be formatted in the process.
At the end of the installation, the system will reboot into the freshly installed Remix OS, however you must confirm the reboot manually.
After rebooting (similar to the section with Android_x86), the version of Android adapted for the computer will be loaded on your computer.
The pitfalls are the same as everywhere else: the OS is not compatible with all hardware. There are modified versions with a modified bootloader, but they are not a panacea either.
Outcomes
As you can see, Android can be made as a primary operating system on a computer, or a secondary one using a virtual machine. In the former case, the chances of a successful installation are less, but the performance gains are well worth the effort. All major programs and services available for Windows are also available for Android.


