Recovery - what kind of program is it? Translated from in English into russian "recovery"- it "recovery"... Recovery is a program preinstalled by the manufacturer on the hard drive of a laptop or internal memory smartphone, which allows you to roll back the device (laptop, phone, tablet) to its factory state. In smartphones, this program is launched from the off state by simultaneously pressing and holding the power button and the volume control button for a few seconds (usually "up", but sometimes "down" or both at once). For laptops, this monotony is not provided.
How to start recovery on laptops
After turning on the laptop, we begin to feverishly press the keys:
F3- MSI recovery;
F4- Samsung. Under the OS you can through Samsung Recovery Solution;
F8- Fujitsu Siemens. In general, it often allows you to get on other laptops (through troubleshooting) in proprietary utility for Recovery.
F8- Toshiba recovery;
F9- ASUS recovery;
F10 - Sony VAIO... Under the OS it is possible through VAIO Recovery Utility;
F10- Packard Bell;
F11- HP recovery;
F11- LG recovery;
F11- Lenovo recovery.
Alt + F10- Acer recovery. Before that, select Disk-to-Disk (D2D recovery) in the BIOS;
Ctrl + F11- Dell Inspiron;
F8 or F9- Dell XPS.
Pinch- Rover
After a long hiatus, we are again returning to the topic of restoring laptops to factory state. Today we will talk about system recovery on Dell laptops.
Traditionally, I remind you that before proceeding with the recovery procedure, you will need to make all the necessary preparations, which I wrote about earlier in the article. Be sure to read it, as this material has been written with the understanding that the reader is familiar with the introductory article.
Well, it should also be said that the system for restoring Dell laptops to factory settings from the recovery section is equipped with the function Reserve copy... Nevertheless, I prefer to do such things, and therefore I will not consider this option within the framework of this article. Moreover, we are talking about restoring exactly to the factory state, when there are no extraneous data on the computer yet.
Launching the recovery environment on Dell laptops is exactly the same as on laptops,. Immediately after turning on the laptop, you need to make short quick presses of the F8 button to bring up a menu of operating system boot options.
By the way, I have come across mentions that the recovery environment on Dell laptops can be launched by pressing the Ctrl + F11 key combination when the Dell logo appears on the display, but this number did not work on the experimental model. But if anything, keep in mind that it seems to work somewhere.
In the menu of boot options that appears, select "Troubleshoot computer problems."
After that, we will be prompted to select the keyboard language. We select the option we need and click "Next".

Next, you will need to select the user on whose behalf the system will be logged in and enter the password, if it is set.

The menu appears on the display. available funds recovery. In this menu, select the Dell DataSafe Restore and Emergency Backup application.

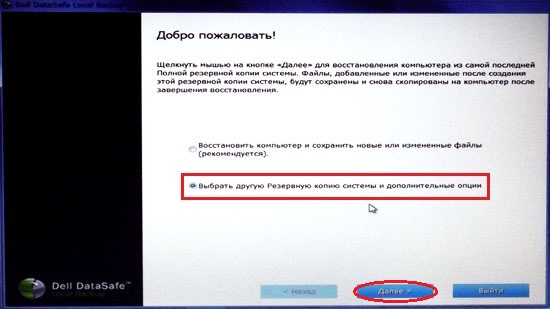
Here we will be prompted to select the option to restore to factory settings. As I said, we will be looking at a way to return your Dell laptop to the state it was purchased in the store. Therefore, we select the item "Choose another backup systems and additional options"And click" Next ".
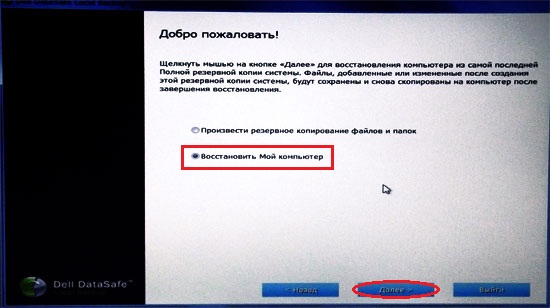
On the next page mark the item "Restore my computer" and again click "Next".
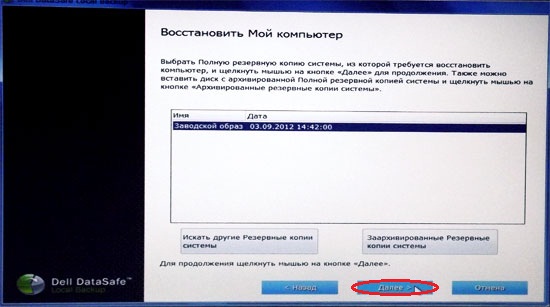
A list of available restore points will appear on the screen. In my case, there is only one image created when the system is first started. But if you've used the backup feature before, there are several options.
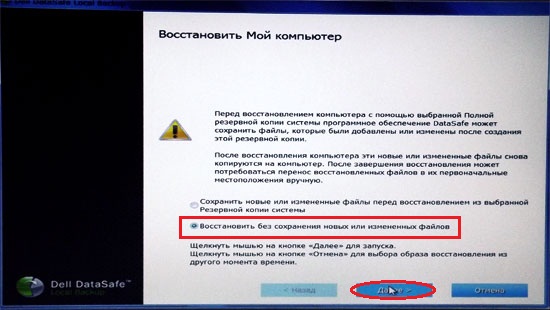
The system will once again clarify whether we have decided to restore it to the factory state, or well, nafig it?

We answer that "Yes, continue", after which the procedure for restoring the Dell laptop from the recovery partition will finally begin.
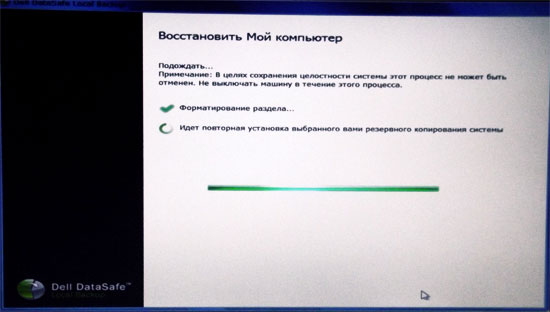
The recovery process takes about twenty minutes, so you can do other things for now. When we are informed that the restoration is complete, we press the "Restart" button.
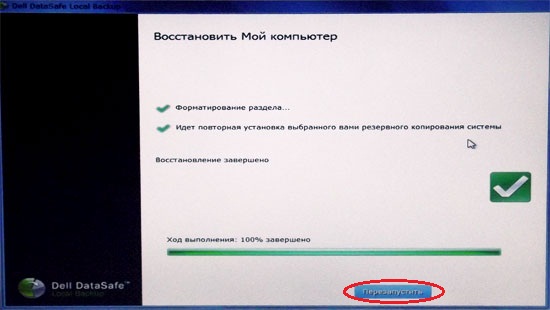
After the reboot, preparations will begin for the first start of the operating system.

And in a couple of minutes we will be asked to select the language of the operating system.

That's all. Now you are as good at restoring as I am Dell laptops to factory settings. Good luck with this incredibly fun activity 🙂
If my article turned out to be useful for you, please recommend it to your friends using the buttons social networks or simply by sharing the link.
You can send your questions for the heading « Free help" by the address: [email protected] site. Write "Free Help" in the subject line.
Good day everyone!
Why memorize what you don't need every day? It is enough to open and read the information when you need it - the main thing is to be able to use it! I usually do this myself, and these hotkey labels are no exception ...
This article is a reference, it contains buttons to enter the BIOS, to call the boot menu (also called the Boot Menu). Often they are simply "vital" necessary for reinstalling Windows, when restoring the computer, configuring the BIOS, etc. I hope the information will be relevant and you will find the coveted key to call the desired menu.
Note:
- The information on the page will be updated and expanded from time to time;
- You can see the buttons for entering the BIOS in this article (as well as how to enter the BIOS at all :)):
- At the end of the article there are examples and explanations of abbreviations in the table, and a description of functions.
LAPTOP
| Manufacturer | BIOS (model) | Hotkey | Function |
| Acer | Phoenix | F2 | Enter Setup |
| F12 | Boot Menu (Change Boot Device, Multi Boot Selection Menu) |
||
| Alt + F10 | D2D Recovery (disk-to-disk system recovery) |
||
| Asus | AMI | F2 | Enter Setup |
| ESC | Popup Menu | ||
| F4 | Easy Flash | ||
| Phoenix-Award | DEL | BIOS Setup | |
| F8 | Boot Menu | ||
| F9 | D2D Recovery | ||
| Benq | Phoenix | F2 | BIOS Setup |
| Dell | Phoenix, Aptio | F2 | Setup |
| F12 | Boot Menu | ||
| Ctrl + F11 | D2D Recovery | ||
|
eMachines (Acer) |
Phoenix | F12 | Boot Menu |
|
Fujitsu Siemens |
AMI | F2 | BIOS Setup |
| F12 | Boot Menu | ||
|
Gateway (Acer) |
Phoenix | Click mouse or Enter | Menu |
| F2 | BIOS Settings | ||
| F10 | Boot Menu | ||
| F12 | PXE Boot | ||
|
HP (Hewlett-Packard) / Compaq |
Insyde | ESC | Startup Menu |
| F1 | System Information | ||
| F2 | System Diagnostics | ||
| F9 | Boot Device Options | ||
| F10 | BIOS Setup | ||
| F11 | System Recovery | ||
| Enter | Continue Startup | ||
|
Lenovo (IBM) |
Phoenix SecureCore Tiano | F2 | Setup |
| F12 | MultiBoot Menu | ||
|
MSI (Micro Star) |
* | DEL | Setup |
| F11 | Boot Menu | ||
| TAB | Show POST screen | ||
| F3 | Recovery | ||
|
Packard Bell (Acer) |
Phoenix | F2 | Setup |
| F12 | Boot Menu | ||
| Samsung | * | ESC | Boot Menu |
| Toshiba | Phoenix | Esc, F1, F2 | Enter Setup |
|
Toshiba Satellite A300 |
F12 | Bios |
PERSONAL COMPUTERS
| Motherboard | BIOS | Hotkey | Function |
| Acer | Del | Enter Setup | |
| F12 | Boot Menu | ||
| ASRock | AMI | F2 or DEL | Run Setup |
| F6 | Instant Flash | ||
| F11 | Boot Menu | ||
| TAB | Switch screen | ||
| Asus | Phoenix-Award | DEL | BIOS Setup |
| TAB | Display BIOS POST Message | ||
| F8 | Boot Menu | ||
| Alt + F2 | Asus EZ Flash 2 | ||
| F4 | Asus Core Unlocker | ||
| BioStar | Phoenix-Award | F8 | Enable System Configuration |
| F9 | Select Booting Device after POST | ||
| DEL | Enter SETUP | ||
| ChainTech | Award | DEL | Enter SETUP |
| ALT + F2 | Enter AWDFLASH | ||
| ECS (EliteGrour) |
AMI | DEL | Enter SETUP |
| F11 | BBS POPUP | ||
| FoxConn (WinFast) |
TAB | POST Screen | |
| DEL | SETUP | ||
| ESC | Boot Menu | ||
| GigaByte | Award | ESC | Skip memory test |
| DEL | Enter SETUP / Q-Flash | ||
| F9 | Xpress Recovery Xpress Recovery 2 |
||
| F12 | Boot Menu | ||
| Intel | AMI | F2 | Enter SETUP |
| MSI (MicroStar) |
Enter SETUP |
REFERENCE (according to the above tables)
BIOS Setup (also Enter Setup, BIOS Settings, or just BIOS)- this is the button to enter BIOS settings... You need to press it after turning on the computer (laptop), moreover, it is better several times until the screen appears. Depending on the manufacturer of the equipment, the name may vary slightly.

Boot Menu (also Change Boot Device, Popup Menu)- a very useful menu that allows you to select the device from which the device will boot. Moreover, to select a device, you do not need to enter the BIOS and change the boot queue. That is, for example, you need to install Windows OS - pressed the Boot Menu entry button, chose installation flash drive, and after rebooting - the computer will automatically boot from hard disk(and no unnecessary settings BIOS).
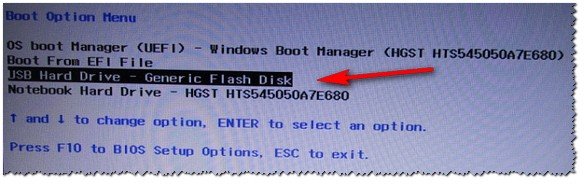
An example of a Boot Menu is an HP laptop (Boot Option Menu).
D2D Recovery (also Recovery)- Windows recovery function on laptops. Allows you to quickly restore the device's performance from hidden section hard drive. To be honest, I personally do not like to use this function, because recovery in laptops, often, "crooked", works clumsy and there is not always a choice detailed settings"how and what" ... I prefer installation and Windows recovery from a bootable USB flash drive.

Easy Flash - used for BIOS updates(not recommended for beginners ...).
System Information - system information about the laptop and its components (for example, this option available on HP notebooks).
PS
For additions on the topic of the article - thanks in advance. Your information (for example, the buttons to enter the BIOS on your laptop model) will be added to the article. All the best!


